[Blender] Quickly Creating a Base Mesh For Sculpting/Modelling

Вставка
- Опубліковано 30 вер 2024
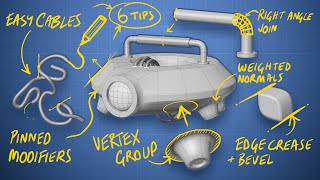
- Using a method similar to ZSpheres from ZBrush, you can create base meshes for creatures or various objects in Blender, which will probably save you some time.
Another absolutely random tutorial :)


Compiling some of the suggestions by others (thanks!):
- When creating the plane at first, you can simply merge the vertices into one instead with M
- For symmetry, you can alternatively use a mirror modifier of course. I used symmetrize because I thought it would be good to show as not everyone is aware of it and it can be pretty useful, and it doesn't necessarily mirror the entire model
-Instead of booleans you can simply have the meshes joined together and then use Remesh (Shift+R + Ctrl+R) over at the Sculpting workspace. Note this could take some time to process and the results might vary. You can then apply dyntopo.
OH! I didn't know M merged points! I've had the utter irritation of not knowing how to merge vertices into the structure making modifying really annoying after breaking a face or something
This was a ridiculously easy-to-follow process. As a newbie into the digital sculpting scene, thank you very much. This has just saved me hours of headaches.
Instead of doing booleans simply join the meshes with ctrl+j, go into sculpt mode hit shift+r to set the remesh resolution and then hit ctrl+r to apply the voxel remesh.
Ohhh… I did CTRL+J (I couldn’t find the Booleans so I looked it up) but didn’t know why it didn’t work after… this makes more sense LOL
i watch this stuff over and over and still dont get the extrude bs.
A small note but removes a few steps. When adding that plane at the beginning, go into edit mode, make sure its four vertices are selected, hit "M" for the merge menu. From the drop-down hit "By distance." This will merge the four starting vertices at the center into one. Save a few extra clicks.
Saves even more steps. Replace the cube with a vertex then save as startup file
You actually need to merge at center and not by distance, but good tip
@@brianbuckman6908 Good point though in the case of a default plane both actions lead to the same result.
@@gwentarinokripperinolkjdsf683 That is a next level move. +1
Guys, why do you turn a plane or a cube into a vertex at all? You can also add a single vertex right away. Just enable the built-in addon Add Mesh: Extra Objects.
I hope this information could be useful to someone.
To align vertices to a specific axis (x, y ,z) with 3 key presses:
1. In edit mode, selected the target vertices.
2. press 's' to scale then press either 'x', 'y', 'z' and finally press '0'
*press esc to cancel
To slide the vertices along the line, press g double time
Thank you, this was a very easy to understand tutorial. Appreciate it much. Happy new year to you.
Do you think you could do a speed-sculpt showing us how you might transform this into a final piece?
I have a model that I want to add details like scales to it, but my PC is very weak, does anyone have any suggestions on how to do this on my model without my computer crashing?
Just throw a Remesh modifier on top of that whole stack to have much more sculpt-friendly mesh to start with :)
Great Tutorial, but for newer blender users such as myself, its quite hard to comprehend just what your clicking to do what your doing right now. even the most trivial of things such as your top down view I simply dont know how to do.
Blender can be super overwhelming at first, I suggest watching a separate tutorial meant for beginners and taking more time to familiarize yourself with the layout. I've been using it for years and I'm still discovering things.
Never have I watched a more audibly captivating and useful tutorial in my life. Now I have after watching this. Thank you dude! This tutorial is superb!
When I use the symmetrize, the body disappears while the legs are duplicated. Anyone else have this problem? (and yes, it's on the +X to -X) Even attempting the mirror modifier I can't just mirror the legs, can anyone help?
Nothing I have watched till now had made blender less intimidating, this makes me want to start learning tonight!
I love spending hours doing something one way only to find a video where somebody throws it together in seconds. Thanks for this video this is awesome.
Hey thanks for the tutorial. I have a question however. Whenever I join the limbs to the body, either the body or the limbs disappear. Why? I have tried deleting the connections from the body, and making whole new limbs, out of a new vertex. Same problem, what am I doing wrong
Why do I get a huge block when I add the skin modifier instead of the sort of small manageable pipe you get when you add yours?
Im struggeling do you personal pojects
Can you please create a Knucker Dragon Lowploy model in Blender so aspiring animators could use it on July 5, 2022 ?
Bro I can't escape this video, it's been suggested to me like 10 times in the past week
Blender 4 still doesn't have zspheres, it's really sad.
This was really helpful, I always have trouble creating a base shape, this solves everything. I highly recommend this and might even show this video in class if I ever get permission to teach my peers.
"no I can't go to your mother's birthday I have things to trace"
Just like the good old days of playing Spore ahah
this is very cool and useful!
Hey can i pay you to make a dragon for me please its for a video ?
Great explanation and good tips 👍
I already knew about the skin modifier, but didn't know about the bool tool and the sculpting fix for the mesh.
Thank u very much! New sub 😅
In engineering, having a structured mesh is a pain in the ass. I wonder if there’d be any good to learn this software to mesh complex structures. Looks fairly easy to do it in here. That would be cool if it lets you export a mesh.
Of course you can export?
As for learning it there are thousands of tutorials or there
Im confused on the vertices part
i wish you was used display keystroke think to display which keys you were pressed
9/10
How do I see the vertices on my plane?
Exactly what I was looking for, much appreciated!
Wow, thanks! This is really helpful; my models will look way better with this method
Wow, this method looks cool :D
"I really like this."
Bro made me felt like a pro in an hour 💀
How do you turn on X-ray mode
to activate x-ray is alt + z
It is a really good video for newbies like me, so thank you, it's really nice and awesome how you explain it, but when I'm turning on the Dyntopo, all the modifiers disappear and I only have the Vertex' left. I tried to handle it somehow, but I still don't know how. Can someone please say me how can I fix it?
i have the same problem
wow thank you
cute character 😘
Thankyou ❤️
ty
nice!
This video proves that i REALLY need to explore modifiers more!
I had no idea about the "Skin" Modifier! and have been manually adding bones for years :(
A problem I have is that this method, when going into the body, creates a bunch of squares???? I'm not sure why it's happening but it's just messy and buggy and unfortunately I don't see it happen here.
Any ideas of what could be happening???
TYSM!!
All the time I would not have(or feels like I wouldn't have) wasted on bones if I had only learned the create armature before now. T.T And the part where you can extrude multiple times from one vertex and still get more than one mesh might help me on my hydra (maybe??) but i can't wait to try it!
Man.. Thank you UA-cam gods for showing me this in my recommendation feed, and thank you! For the awesome simple video. Consider making more, I subscribed simply to show you my gratitude for this intuitive approach. If you are interested, I'll happily show you the model I was able to finish based on this technique!
In edit mode, Merge Vertices to Center can merge all vertices into a single vertex
u sir instantly cured me of my headache
Amazing tutorial! Subed. Thank you
Holy shit that was great. Literal magic. Awesome thanks for sharing your workflow.
W
I'm finding this now because someone posted it to twitter and my god, this is so cool for a beginner like myself
Like what your doing and keep up the great work on the channel
I’m in the same boat, idk what I’m going to do exactly with my channel
Great tutorial! How did you select the leg by itself at 4:55?
In edit mode you can push L to select all connected verts in a mesh.
@@tylerdavis4970 Thanks! That’s gonna gonna save a lot of time.
Wonderful bro 👍 God bless you. Am following you kindly continue to animate it thanks
Thanks for great tutorial. I learned a lot through this video which is easy to understand.
this is the best blender trick ive learned yet. i tip my hat to you sir. thank you
Manera fácil de esculpir gracias lo vio intentar
An amazingly good tutorial. I never would have thought to separate the legs. That fixes my main problem with the skin modifier!
Hi There! Found this from your Twitter. You should definitely create some more blender tutorials, you're very easy to follow, and I've never thought to start creating a base mesh like this! You've convinced me to jump back into blender ^^
Oh my god. I wish I had found this sooner. I did an entire model and now I have a way to actually remake it without the headache.
this was super helpful!
I just got blender and I’m super new to 3d modeling and animation, I have done 2d and it was ok-ish
but this tutorial was so helpful to help me with a base!
Finally a tutorial I understand ty so much
Lots of good info, and well put together.
This is exactly what I needed! Thanks for making this
Thank you sooo much I've been looking for a specific tutorial like this for ages 😭 and then your video just popped up on my recommendation. Thanks a lot, you deserve my sub 🙂👍
I had no idea about mark root, legend
thank you so much you are the best
Thanks you so much is useful !
This is so handy! Good stuff.
Brillliant! Thank you for the tutorial.
Thanks for the nice video!
this must be the single best blender tutorial on youtube
Nice and simple tut. Thanks.
nicely done; subbed
wow, dude thanks
useful and short. nice!
that was great, man!
I appreciate it.😇
Sick tutorial!
very nice
This is a seriously great tutorial!
Dem, dat EZ
Fuck!! Wow!!
Why not use a mirror modifier for the symmetry? you can use an empty for the mirror plane
most likely because if your going to use it for any form of animation one legs movement would change the other leg aswell.
@@the_silverking You can apply the modifier at any time, if you mirror it first and add the skin second you should get no issues
this is fantastic. thank you. i think, after converting to mesh it would be easier and more elegant to got right to sculp mode and remesh it with "ctrl + r". so no need for boolian and dyntopo.
and in the beginning you can create a single vert (without creating a plane first). maybe you need to activate the mesh extra objects addon first.