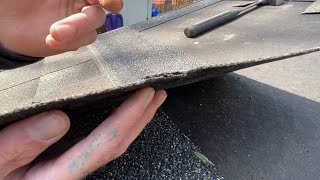
How to Install Starter Shingles

Вставка
- Опубліковано 17 кві 2020
- On today’s video of how to shingle a roof, we will be going over the installation of starter shingles along eaves and rakes.
If you have any request for future tutorials, please comment down below!
For business inquires email us at youraverageroofer@gmail.com
Please like and subscribe for more content!


First time shingling...this series extremely helpful. You explained how to and why without talking down to us, thank you!
Glad it was helpful!
@YourAverageRoofer hey dylon,I was wondering for places where high wind is a factor. Is there any other addition steps you have to do so the first layer of shingles don't blow off..or is a starter strip good enough..?
You cover all the basics. Glad to see you know your stuff.
I just noticed he gave us the bird at 2:15. I'm just starting this part on my shed. Very good video.
Full Tar Adhesion sounds like a metal band.
Great video!👍🏼
Great video series! I couldn’t have reroofed my old shed by myself without this awesome video series with so many detailed tips.
You really nailed this tutorial! I do a couple of small roof repairs a year. Laying the tar strips together makes total sense, something I wouldn't have thought of. Thanks! 👍🏻
Nice video! I have roofed my share of farm buildings but it's infrequent and I tend to forget how to roof in the in-between times. This was a great refresher! Thanks for putting this out there!
Same. It's only every decade or so I actually roof lol
great video. thank you for taking the time to help the common person to try to do it yourself.
Thanks for the video. I have to put a roof on my shed tomorrow and this helps a lot. Little nervous about getting on the roof though.
Thanks again Dylan. This video and your "How to properly start shingle courses" helped me today with our new garden shed
i like how you point out some of the common mistakes like joints lining up and the leaks that can cause along with nail spacing. a screwed up my first room simply because i didn't know nails should be 4-5" from a joint and really no less than 3. water creeps towards the nails when they are right next to joint lines and 5 years later you have the drips and nails that look like they were submerged in salt water
Thank you Dylan you're a great roofing instructor for the DYI!
Dylan,
Thank you for making these videos. Extremely helpful for a novice like me.
Wow, what a fantastic tutorial on how to install starter shingles! 🏠👏 I've been wanting to tackle this project myself, and your video made it look so easy and straightforward. Your step-by-step instructions were clear and concise, and the visual demonstration really helped me understand the process better.
Very helpful! Starting a small roof soon and this was much needed! Thanks!
You are very professional with your attention to detail.
Needed a refresher since i haven't done roofing since AIT very informative and easy enough for a soldier to get
Thanks for this series I'm using your videos to do shingles on my shed for the first time ever
Thank for the detail information, great video explaining the methods used and why.
Very easy to follow your instructions. Great job.
@youraverageroofer great video very helpful, the only tip i have for improvement is on your starter strips on the corners put the bottom starter then gable one over the top so just flipped from how you did it. Water runs downhill. Really great video though!
You have the best videos! You tell and show without all the extra talk some youtubers do. Thanks
Good vid. Very well explained. And you explained why you DONT do things. Such as not lining up the shingle and starter lines.
Andrew Bortolini I always try to explain why not to do certain things and the consequences of doing so, just helps with understanding from a students point of view.
Of course you always start your starter with a half so it wont fall even with the finish shingle
@@Average_Roofer can i spread turbo polyseal over the nails to stop leaks
I'm 60 years old and looking to re-shingle my farm house to save on labout costs. Never don it before. This video was awesome! I don't think there's anything 'average' about your quality of work. Well done!
I'm in the same boat as you. Too bad we don't live close by so we can help each other. Mine came in a 32K to remove a layer of cedar and asphalt on a 1700 sq ft home that is 4/12 pitch with a long ranch roof with no alcoves or anything. I just turned 70!
I’m not a professional roofer by any means but I’ve never put my starter upside down. This is an awesome video
You guys are lucky , in central FL we need to nail dripedge every 4 inches and put tar on it all around , difference is we don't put starter going up, it's way faster that way
I'm not in to hand nailing, but it's very satisfying watching and hearing this guy do it.
Extremely useful video and strait to the point . Thanks !
Hey just wanted to take a moment and thank you for the instructional videos you make because they have been a big help to me, you are my go to. Thanks again.
Jim P
You are an excellent teacher.
Amazing tutorial man! Keep up the good work!
Good job man, I watched your shingle video too, very good as well I will be doing this tomorrow morning so I really appreciate this clear video.
This was nicely done. Good production values. Clear, unhurried audio.
STRAIGHT TO THE POINT AWESOME!
These are some really great points!
Thanks for your videos man. There are helping me… A LOT!!
This guy seems like the best roofer
Great video, very informative!
Thank you for your experience and knowledge
Thanks for this bud, I’m helping a friend roof a small shed tomorrow and I couldn’t remember if you put the nails in tar strip or not.
I staple them in with my hammer tacker saves nails. Quicker application and the nails from the shingles fasten them down. No dragging the air hose around. Thanx 4 your video.
Your vids are so much more professional than the bdr
I found your video to be on point and precise. You will laugh, but I watched your videos prior to roofing a dog house. If I am going to do something, I like to do it right, even on a dog house.
You are an above average roofer. You have your own UA-cam channel!!
Don't sell yourself short.
I’m trying to roof my little tiny chicken coop with remnant shingles from friends. Tried to start today after doing tar paper and the drip edge. Its not pretty but... I’m learning. I tried starting the shingles today and realized I just be missing something and it was the starting shingles. Lol. Your videos are super helpful. Thanks. You also just taught me how important the tar strips are. I’ll send a photo if it works out. Thanks again.
claymonsterpottery send your finished photos via email to YourAverageRoofer@gmail.com 👍🏼
Thanks for the videos! Great help.
Very, very helpful. Thx for posting this.
Now I know what my roofer did wrong.
Yes ! Simple and practical
That was a great video!
Look at all the great comments this is getting! Keep it up. I am looking for all the things I can do wrong now. I know there are tricks and tips that people get from experience. Looking under rocks for them.
Yes very helpful thank you. Can you or have you made a episode with shingling in valleys? Thanks again time to smash the like button
nice video, very well explained and why!
Just what I needed today.
Great teacher !
Getting ready to do roofing on my shed and your video was very helpful! I Hulk smashed that like button!
Thien Nguyen Thank you! If you need any help or advice feel free to DM me on Instagram @youraverageroofer
@@Average_Roofer Dylan, how long should the nail be and how long should it protrude through the roof?
Great video. Thank you!
Thank you, very helpful!
Thnx man great vid.
THANKS ,BUDDY ....GOOD INFORMATION !!!!!
thanks so much for video. branch just fell through my roof. so i have lots of work ahead of me. now to learn how to do the sheathing.
There is is a video on my channel for that. I’ll tag a link to you.
ua-cam.com/video/wnPsUNeENFA/v-deo.html
Thanks a mill bro great video I did it on my kids playhouse
This is really helpful man, thanks!
Glad it helped!
Very very good. Thank you. I will do as I see.
For a novice homeowner learning, this was is what I needed. I didn't like the cutting of shingles on the roof. In regards to the starter strips in the corners, how about cutting them at a 45 so you get less of a bump on the ends? Thanks for the video, no BS, well done.
If you prefer to cut the 45, do it. It won't be noticeable if you don't tho
Awesome vid
Great Videos Thank you so much now am like a pro
Good vid man
Gracias from Texas
Any time
Keep up the great work
Thank you!!
You have some great videos! I have a question on the starters I noticed you ran the gable starter first then overlapped at the bottom wouldn’t you run the eve first then run up the gable just so water would shed properly? Thanks
Would it be better to put the rake edge shingle on top but cut out a sliver at its bottom to expose the other shingles tar? I know a great deal of consideration goes into overlapping the roof materials correctly so just wondering if there's a way to have these overlap that way too
Last time I shingled a roof,we just rotated the shingle 180°, presto! There's your starter strip! Of course you offset the first row so the seams doesn't line up.
Never heard of a actual "starter strip" before!😁👍🇨🇦
Doing it your way the tar strip is not on the edge of the roof.
Bottom course would not seal and could potentially blow off.
@@contractorjay5062 . Double nail,and we are in a little clearing in a forest, but far enough so a tree can't hit the house.
Don't get half the wind that's at the road beyond our little sheltered spot...
Only lose shingles when I shovel the roof,don't know when to quit and leave some snow on top of the roof!🙄
Biggest problem is we suffer sun damage on the back,front roof wears fine...🤔
The best way to start the starter shingles along the corners at the rake and eave is to 45 degree cut both starter strips. Then they both are flush with each other. There both flat on the roof and the tar strip will contact itself to both shingles firmly.
thanks for knowledge good videos
Great video! What do I do when I get to the ridge?
Very good video I'm a framer and I want to learn how to roof👍👍👍👍
Anthony Z I will be doing 2 videos every week on how to install roofing systems starting with shingles and moviegoing up to metal and flat roofs.
On the Gable end the starter strip should probably be on Top of the lower one because of the path of water
Interesting..hmm..as it flows it should go..well I guess 905 is Ontario, Canada! it's probably a base that is covered which doesn't matter..I take the 3 tab shingles en just cut umm! but who says ya can't get out a caulk gun with a roofing tar tube in it! (shouldn't HAVE to I guess!)..and did he build that roof to MovieSet this Presentation!
I don’t think that matters as much as the paper and flashing underneath it. I believe you’re just as like;y to have wind-driven water moving in at this location. If water happens to drain down under the shingle above the starter strip AND under the starter strip (you probably have other issues to deal with), the paper and flashing are still going to drain water off the roof.
Good job Dilly
💪💪💪💪💪💪💪💪💪💪💪💪💪💪
Thanks for advice. Finished product.
Came out great. I tried to add a photo . Didn’t work. Thanks
I’m building a chicken coop with a lean to frame roof. I’m assuming I just need to run the drip edge all the way around but should I start my starter strips on one side like you did? Is there anything special I need to do at the top of a lean to?
Great video
My question do I have to put starter shingles up the gable
What is the reason to put starters up gable lm replacing the sheeting and shingles
Thank you!
Would suggest using a self adherring waterproofing membrane on the eaves and gables. They should extend the the starting edge of the drip edge in case you are in snow country and have gutters. The underlayment should lap the drip edge in either case to prevent water from running back and soaking your deck.
gary24752 use ice and water shield along all eaves, gables and valleys making sure they cover 18” inside any heat bearing walls. Under the drip edge along eaves. And over the rake edge metal.
@@Average_Roofer In your earlier video "How To Install Drip Edge on a Roof", I think you said the opposite ... in that video, I think you said the drip edge goes under the underlayment (or ice & water shield) along eaves and on top of the underlayment at rake edges. Please clarify because I want to make sure I understand correctly. Thanks.
Thank you so much! I purchased the started shingles and thank to you I feel confident that I can shingle my gazebo. Any additional advice for an octagonal shape roof? 🙂
You are so welcome!
I did I roof on a garage on my summer cabin, and I failed to put down a starter strip, dumb mistake I know but never done a roof before, any adhesive you would recommend that I go back to adhere that first course?
Thanks brother
I have a 20 ft outbuilding shed. I bought the gaf at 39 3/8 inches. They say full first run. Then less 6, 11, and 17. The first starter row is 3-1/4 inches short. It hardly makes sense to spice in every 5 th row with a 3-1/4 inch piece does it. You have good videos. Watched several of them. Please advise.
We just had our roof reshingled on Saturday. On the quote, it said that there will be 2 bundles of starter shingles. But when I saw the actual job being done (I took pictures), I noticed that they installed architectural shingles flipped the other way (rotated 180 degrees) on both the gable and eave ends. They are Certainteed Landmark. Does not using proper starter shingles void the warranty in any way?
Food stuff thank you!
Thanks mate
Would it be wrong to miter the rake and eave starter strips at the corner so that the tar strip is consistent all the way around?
Thanks !
So many videos show the starter strip as a shingle rotated 180 degrees. This puts the adhesive tab five inches away from the bottom of the first row, increasing the chance of wind lift. Cut the tabs off if using a regular shingle as a starter and install with the adhesive at the roof edge. This video clearly shows the correct way a starter strip has the adhesive at bottom of the first row.
I got to redo an old front porch roof. It's in constant shade. Does the adhesive still melt, work ?
@@LiftingwithGrandpaCharlie Most asphalt shingle manufactures require that a specialized adhesive is manually applied to each shingle if temperatures are below 40 degrees Fahrenheit. If shingles are applied below 40 degrees without the specialized adhesive, the manufacturer will void any warranty. Above 40, no problem.
@@brianw612 Thanks !
I've never roofed anything but shouldn't you run your razor blade somewhere besides on top of the felt paper ? ? ?
Great video what do you do at the ridge? Just butt the two gable starter strips at the ridge? Or should one starter strip go over the ridge
- Gundy to be 100% honest. You can do it either way. As hip/ridge shingles are going to cover it regardless.
What about the tar on the shingle? Will that not adhere to the upside architectural shingle?
Great video. Only thing I would do different is I would put the eave starter on first then overlap the rake starter. Backward laps erk me lol. Outside of that your procedure is legit. I know it's the same either way, as long as you do like you said and make sure to have the starter glue meet on the rake and eave.
Very well explained. Subscribed!
Would it not be better to have the gable starter strips go over top of the eve starter strips? That way if water gets on that gable strip it has a way out instead of going under the eve strip?
I like watching your videos but on the starter strips what do I do when I get to the peak of the roof do I just wrap it around the top and continue down the other side
wondering the same thing. did you find out abd if so can you share the awnser with me