I've been a woodworker for just over 60 years now. I owned a custom woodworking shop for years and now have a beautiful home shop with all the fixings where I get to spend many stree-free hours with no dead lines. If today's technology to share knowledge had been available back when I started out I can only imagine where I'd be today as a woodworker. To be sure, there were masters of the craft that we could seek out and study under but we seldom had access to them and usually at a hefty price. So today I teach free of charge (except for supplies) those who are or want to be workworkers and are willing to put up with the old guy in the shop who thinks he owns the place. It's my way of giving back and passing it on. I really hope people today appreciate what you and some other excellent instructors are sharing free of charge online. I know that our craft will continue and grow because of your efforts and others like you. I can only imagine where woodworking will be in 30 years with great teachers who are knowledgeable , entertaining and inspiring. I wont be around at that time to see how it all turns out but I'm sure you and a few others will be able to look back on the evolution with great pride. This was my long winded way of saying thank you to you Marc and others who are also doing an amazing job. Just a Chip Off the Old Block But what A Great Block it Was Cheers
Wow, that’s really incredible Ro-J. I can only imagine where I’ll be in 60+ years of woodworking!😱 I really appreciate your comment and your thank you to Marc, I too owe him a huge thank you. Marc wasn’t the one that got me started I did that on my owe learning from my mentor named Scott Robeson and he was great to learn from, very wise and extremely knowledgeable when it came to woodworking. Surprisingly enough he sought me out because of my work ethic at a local grocery store, I was a meat cutter for 15 years and it paid pretty well, however when I started working for Scott I got hooked like crazy! I started working for him part time after I managed the meat department at the grocery store back in 2017, so that was when I started it all. I’ve been woodworking for 5 going on 6 years now, I do t work for Scott anymore. I started saving all my extra money that I could get my hands on and started buying equipment and watching Marc sometime around 2018, Marc had already moved to Denver by this time, but I watched all of his older videos and I learned so much from Marc and I have a shop of my own now, not all the equipment but most everything any woodworker could start out and I have started my own business and so far so good. I finally left meat cutting for good this last spring in May but I still don’t make enough to do it alone so I started working at my own town’s water treatment plant and I just past my level 1 water operator test and I’m on my way to helping my town. I love woodworking and I watch all Marc’s new content when I have time, he’s so knowledgeable and I respect what and who he is. I read your response Ro-J and it reminded me of my journey and I just wanted one the most respected people I know to know my story and you as well Ro-J. Thanks guys, much respect and thank you for your time😊👍
In a time when every other woodworker channel seems to be a sham wow commercial for the 5 tools under $20, you are still putting out great content on builds. Thanks man, and that turned out beautiful, and great instruction also.
Yeah seems like there's only a handful that do build videos anymore. Tww, stumpy nubs, Tamar, and a few more. I honestly like to learn about tools but I prefer to learn about them in use in a build video.
Good lord. How many box videos have I watched? Way too many, given that I rarely learn much new. But that little moosh of a bad edge really ties the room together. Thank you.
I guess with an urn you don't often open it up to check on the inhabitant, but I kept waiting to see what you did for a handle. Very nice! I will use the 4-corner-match trick.
I've seen a lot of hard wax finishes in UA-cam land recently. In fact, I think this is the first tung oil finish I've seen for a while: I'm glad the classic is still relevant!
Three things to note here: 1. I received a copy of the world-renowned Essential Joinery for Christmas, and it's awesome. 2. You are the only other person I know who owns a Craftsman Guide Master™ push shoe. 3. Beautiful project!
Marc has a masterful eye, which I think is what sets him apart. Yes, he has the skills, but he makes beautiful pieces of furniture, because he has an uncanny eye for making the grain work within his pieces.
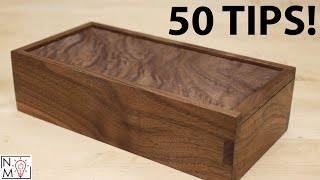
That's a beauty, Marc~! I had a friend ask me about making an urn. I was a bit intimidated by the request until I learned that it was for a pet. Thanks for the inspiration~!
When I first started making boxes, I was measuring 16ths and 32nds trying to get everything just right. Now I only measure my box lengths and sides as a starting point and then I reference everything off those. Has cut down on construction time tremendously and people tell me my boxes are not only gift worthy but could also be sold. Also amazing what you can do with an Oshlun box blade set for cutting grooves, inlays and such. Sometimes I'll just use one of them to make a 5mm groove for my bottoms. I only have a DeWalt Table saw and planer but I get by. Would love to have a 6" table top jointer. Nice video. Well produced.
I remember you posting a short version of this to Instagram and at the time I was a bit confused. This video cleared up my confusion and I think this is quite possibly the most satisfying trick one can use for making a fancy box. Thanks, Marc!
Nice job. Well presented. Love it. If you leave the board a bit wider then if the grain does shift after smoothing the saw marks then often just moving boards up/down a bit can catch it again then recut to final width. Board selection helps for grain wrap. Nice to see a shoulder plane in action - router plane works too.
After you posted this on Instagram I tried it on both a small tool box (box jointed) and a tissue box holder (mitered) . My biggest issue was what you warned about; I took too much material out in my resaw because my bandsaw was drifting and it required some extensive jointing to get it flat, so the grain is not perfect but it still flows pretty nicely. I’m going to make sure my bandsaw is all Snodgrassed up next time.
Excellent video and instruction. These type of details are what sets woodworkers apart. Timing couldn't be better because this is my next task going forward.
Never would think to cut the bevels on a Miter Saw vs the Table saw. Interesting. I have a non sliding Dewalt DW715 and happy with its accuracy (I know you had it for a short time =-), just never would think of doing it this way. Thanks for opening up another option for a future application.
I’ve been trying to do the same thing, I did a birch waterfall cabinet for my uncle and it looks wonderful, the very last corner of course didn’t look as cool as the other three, however it’s underneath the cabinet so you’ll never see it.😊👍 Thank you for actually showing me this for first time and now when I do it I try to do the exact same thing you’re describing right now. Thanks so much Marc, you’re the best😊👍🤘😝
Thank you. An excellent video covering off the skill and detail necessary to produce a beautiful box. Woodworking is joints and grain, and this basic project reinforced the principles which can then be reapplied to other projects.
That's a great video! I use something similar when making my frames. It's not as continuous since the visible part of the frame is mitred, but yields better results than cutting it from a straight board.
I just made a box like this between the holidays. I also hate bevel joints, so I rough cut on my miter saw and clean them up with an Infinity Tools Mega Chamfer router bit.
This is a really cool method, I just started experimenting in making smaller boxes, I will be able to get a full wrap on a 7" x 5" box from a 24” long board which is never 24”, only have a table saw, think it will still work with a 2.6 mm kerf
My friend, I bought one of those expensive wall ornaments my first week of owning a saw stop! Haha! Now I never run reclaimed wood without bypass mode.
Thanks for the great video! Did you glue the bottom all the way around? Is there any worry about the bottom expanding? Im pretty new to woodworking ,.that's why I ask. Thanks again!
Yes I would be worried about this box in humid conditions. I never make a box with a drop in lid like that. It's asking for trouble in my opinion. In fact I'm surprised Marc did it that way. Wood movement is so often ignored these days. I always do my lids to allow for movement. Wood never stops moving no matter how dry or old it is or how much finish is applied.
It you cross-cut the pieces on the table saw, with the blade at 45 and just high enough to score the top, you can avoid that 3mm gap between the faces altogether.
If you lack a band clamp, try connecting cable ties/zip ties together. Not reusable but provides lots of clamping power. I've made a lot of splined boxes just like this, except never with the 4-side continuity. My kingdom for a bandsaw.
I'm building a end table now not a box but I resawed my legs and my top ( table saw saving for bandsaw ) using walnut so expensive trying to save yet make look good as much as I can. This is a great video and explanation of how to figure and match grain like I'm trying to do now ( on every project understand it's a box but ya know ) still apply to a lot of projects. Thanks now I'm show the wife how bandsaw saved material lol thinner kerf lol hey worth a shot. Great video and learned a lot.
Great build and love that the grain is gorgeous all around. I also see that you added a sacrificial fence to the Woodhaven 4448 Ultra Track you attached to the SawStop fence.. Nice touch
I made a recipe box similar to this for my sister for Christmas and the wrapping grain is just 👌 I referenced the Jonathan Katz Moses video but this would've been even better to know about
I've been working on a humidor for a retired colleague... Your video makes me want to start over, but Spanish cedar is too expensive now. But definitely excellent info for future projects! Thanks!
Awesome box! Cant believe i hadnt seen this video. Being off for the holidays hurt my pay situation a good bit maybe in a couple weeks i can het a heater for thr shop and go make some stuff. Spring will be here soon now and ill be building me an above ground shop. I think ill go with 16x16.
I've been making and selling boxes like this for years now on my Etsy store. I always re-saw and grain match all four corners when possible. Quarter-sawn grain works pretty good as well if the grain is all very straight lines anyway...like Sapele of Padauk. I think it's an amazing bit of detail HOWEVER, I've never had a Customer mention that specific detail in any of the CX reviews I've gotten...disappointing really but it is what it is I suppose...it's worth it to me though knowing it's masterfully done.
Thanks Marc! I picked up a number of good techniques from your excellent video(s). I'm embarking (pun intended) on some box making soon and will use some of your tips.
that is a great technique for box making. can i just point out my gaffer when i trained would have had apoplexy if he saw you putting all the timber through the thicknesser in one place. spread it out across the whole bed so that you are using all the knife so that it will last longer before you need to pull them for sharpening.
To minimize the grain difference when cross cutting to length, could you use a 90 degree router bit on the side of the wood facing the inside of the box? That'll let you miter the corners, and if you sneak up on the thickness of the wood, you won't lose as much grain to the kerf width.
Nice! I've seen a bunch of these box videos lately, which is great because I've been accumulating hardwood offcuts and plan to make some boxes, but the missing video is taking a box like this to the next level and adding trays and compartments for storing and organizing things. Something smaller than a toolbox with a hinged lid and some kind of locking hardware would be great... and maybe some Kumiko... get Mr. Farrington on the horn! Don't forget flocking! 😄
Chisel across index finger knuckle. Cut through all the tendons into the joint capsule. 2 surgeries and 6 months of rehabs later and I’m at 75 percent function.
I really enjoyed the video and picked p some valuable tips, so thank you. I did however notice that the lid was not secured with any type of fastener. Perhaps it isn't needed but if an urn has remains in it and for some reason the lid came off, that would be a bad bad day. The Likelihood of that happening I know is very low but I tend to look at things from what it would be like in a worse case scenario. Any suggestions on what us anal types could do to fasten the lid using the method you used?
My father passed recently, and I've been tasked with making an urn. I've made boxes, but never an urn. I know the urn typically has a removable bottom instead of a top. I would love it if you could give me some pointers on making the urn. Thanks.
Lane, I am in a similar circumstance, my father in law, asked me when he passes, so I am searching for information. Want to make a few test runs. Marc any info, plans etc would be great. Is 3/8” thick enough? Appreciate all comments? And Titebond or west system epoxy for glue up?
Lane, sorry for your loss. I've made a box or two, so what I'd recommend is to do everything Marc did, to include the lid, EXCEPT for the bottom, which you'd put another rabbet (like the lid). When you're ready to place the bag of cremains inside, I'd use just two small brass screws to hold the bottom in. You'd want to start with thicker stock, obviously, and aim for 3/4" thick walls in the end. Rough board would be 6/4 before doing anything. The final work would have the lid secured permanently. Hope this makes sense and helps.
I want to build my husband a watch box using this method. Unfortunately i don't have a band saw or a jointer. I'm hesitant, I'm not sure how resawing with turn out using a table saw
First off, this is freaking stunning. Fantastic job on it, and I'm so glad you taught that technique, genius! I was wondering though, a bit off topic, sorry, did you get rid of the brand new split top rubo you built? The knock down one? I've been seeing a lot of your old workbench, but not much of the new one
Very informative video but I have one question. I'm fairly new to fine wood working, but I've made a number of small boxes. I understood that if you're using something other than plywood for the box bottom you shouldn't glue the bottom in place to reduce the chances of joint damage due to wood expansion. Can you explain why you glued your box bottom in place when it looked like the wood was not plywood.
@davesteffens2309 I had the same question after seeing this and I would like to know if there is a rule of thumb to follow on this. For small boxes I always glue the bottom in if they are made out of a wood species with a dense grain like walnut. Correct me if I am wrong but I do believe that the amount of expansion and contraction is less with walnut or maple then say a species like pine. Wider grain wood species like pine I tend to place them without glue. Can this be explained in a future video? Thanks for the great video Marc


Relevant Links:
+ Essential Joinery Book - thewoodwhisperer.com/product/essential-joinery-book/
+ Merle Band Clamps - amzn.to/3Cz4W8d
+ Blue Shop Towels - amzn.to/3vQXemc
+ Bumblechutes Wood Finish (Save 10% with TWW10)- www.bumblechutes.com/product-page/furniture-finish?ref=tww
I've been a woodworker for just over 60 years now. I owned a custom woodworking shop for years and now have a beautiful home shop with all the fixings where I get to spend many stree-free hours with no dead lines. If today's technology to share knowledge had been available back when I started out I can only imagine where I'd be today as a woodworker. To be sure, there were masters of the craft that we could seek out and study under but we seldom had access to them and usually at a hefty price. So today I teach free of charge (except for supplies) those who are or want to be workworkers and are willing to put up with the old guy in the shop who thinks he owns the place. It's my way of giving back and passing it on.
I really hope people today appreciate what you and some other excellent instructors are sharing free of charge online. I know that our craft will continue and grow because of your efforts and others like you. I can only imagine where woodworking will be in 30 years with great teachers who are knowledgeable , entertaining and inspiring. I wont be around at that time to see how it all turns out but I'm sure you and a few others will be able to look back on the evolution with great pride. This was my long winded way of saying thank you to you Marc and others who are also doing an amazing job.
Just a Chip Off the Old Block
But what A Great Block it Was
Cheers
Great Video Marc, wondering where you got the green sanding block from? Lee Valley has a similar red one but maybe slightly larger
Wow, that’s really incredible Ro-J. I can only imagine where I’ll be in 60+ years of woodworking!😱 I really appreciate your comment and your thank you to Marc, I too owe him a huge thank you. Marc wasn’t the one that got me started I did that on my owe learning from my mentor named Scott Robeson and he was great to learn from, very wise and extremely knowledgeable when it came to woodworking. Surprisingly enough he sought me out because of my work ethic at a local grocery store, I was a meat cutter for 15 years and it paid pretty well, however when I started working for Scott I got hooked like crazy! I started working for him part time after I managed the meat department at the grocery store back in 2017, so that was when I started it all. I’ve been woodworking for 5 going on 6 years now, I do t work for Scott anymore. I started saving all my extra money that I could get my hands on and started buying equipment and watching Marc sometime around 2018, Marc had already moved to Denver by this time, but I watched all of his older videos and I learned so much from Marc and I have a shop of my own now, not all the equipment but most everything any woodworker could start out and I have started my own business and so far so good. I finally left meat cutting for good this last spring in May but I still don’t make enough to do it alone so I started working at my own town’s water treatment plant and I just past my level 1 water operator test and I’m on my way to helping my town. I love woodworking and I watch all Marc’s new content when I have time, he’s so knowledgeable and I respect what and who he is. I read your response Ro-J and it reminded me of my journey and I just wanted one the most respected people I know to know my story and you as well Ro-J. Thanks guys, much respect and thank you for your time😊👍
In a time when every other woodworker channel seems to be a sham wow commercial for the 5 tools under $20, you are still putting out great content on builds. Thanks man, and that turned out beautiful, and great instruction also.
Right? Woodworking UA-cam isn't what it used to be just a year ago. I'd blame TikTok, but there isn't long form video content there. What's going on?
Yeah seems like there's only a handful that do build videos anymore. Tww, stumpy nubs, Tamar, and a few more. I honestly like to learn about tools but I prefer to learn about them in use in a build video.
... or installing mega machines and losing touch with the viewers... yeah, I'm lookin at you Malecki !! 🙄😂
@@DaveYoakum Greed
Everyone can make this box, all you need is a full professional workshop fitted with the best equipment money can buy
Good lord. How many box videos have I watched? Way too many, given that I rarely learn much new. But that little moosh of a bad edge really ties the room together. Thank you.
This explains it so well and now have a much much better understanding of how to do it.
Thanks for the share dude, appreciate it.
I've been doing them that way for years but it's good to see it explained so well.
The quickest I have ever been in viewing one of these
I guess with an urn you don't often open it up to check on the inhabitant, but I kept waiting to see what you did for a handle. Very nice! I will use the 4-corner-match trick.
I've seen a lot of hard wax finishes in UA-cam land recently. In fact, I think this is the first tung oil finish I've seen for a while: I'm glad the classic is still relevant!
Three things to note here:
1. I received a copy of the world-renowned Essential Joinery for Christmas, and it's awesome.
2. You are the only other person I know who owns a Craftsman Guide Master™ push shoe.
3. Beautiful project!
I discovered this push stick in a box of hand-me-downs. I like it. Mine is Orange.
Good video, nice box, some good tips, but I have to say its all a lot easier with about two hundred thousand dollars of woodworking machines
Marc has a masterful eye, which I think is what sets him apart. Yes, he has the skills, but he makes beautiful pieces of furniture, because he has an uncanny eye for making the grain work within his pieces.
Well, that and he has all those fancy tools. I could make that too if I just had all his fancy tools !
That's a beauty, Marc~! I had a friend ask me about making an urn. I was a bit intimidated by the request until I learned that it was for a pet. Thanks for the inspiration~!
When I first started making boxes, I was measuring 16ths and 32nds trying to get everything just right. Now I only measure my box lengths and sides as a starting point and then I reference everything off those. Has cut down on construction time tremendously and people tell me my boxes are not only gift worthy but could also be sold. Also amazing what you can do with an Oshlun box blade set for cutting grooves, inlays and such. Sometimes I'll just use one of them to make a 5mm groove for my bottoms. I only have a DeWalt Table saw and planer but I get by. Would love to have a 6" table top jointer. Nice video. Well produced.
I remember you posting a short version of this to Instagram and at the time I was a bit confused. This video cleared up my confusion and I think this is quite possibly the most satisfying trick one can use for making a fancy box. Thanks, Marc!
Nice job. Well presented. Love it.
If you leave the board a bit wider then if the grain does shift after smoothing the saw marks then often just moving boards up/down a bit can catch it again then recut to final width. Board selection helps for grain wrap.
Nice to see a shoulder plane in action - router plane works too.
After you posted this on Instagram I tried it on both a small tool box (box jointed) and a tissue box holder (mitered) . My biggest issue was what you warned about; I took too much material out in my resaw because my bandsaw was drifting and it required some extensive jointing to get it flat, so the grain is not perfect but it still flows pretty nicely. I’m going to make sure my bandsaw is all Snodgrassed up next time.
I came here to see the tricks and appreciated the fact you were using a graphgear 1000 while marking boards. Nice work.
Don't know why this never occurred to me, but it's brilliant. I really need to improve my resaw capability... Thanks for sharing!
Finally tried this process, work like a charm, thanks for the great video.
I use splines all the time for small boxes, made of contrasting wood. They are very strong. Good job!
I’d never seen this before Marc. Thank you.
Perfect timing for this video, I just picked up two offcuts of walnut from my local candy store to try making my first box!
Ordered your book today. Very nice video. THANKS!
Awesome! Thank you!
You are quite the craftsman. Good luck in your new shop.
Nice to see a carpenter with 10 fingers still!
One additional technique is to start with a board wide enough to get the top and front to grain wrap. I call it the 5 corner match.
Thought it was just another box video, but love the tips on resawing, and the tonge oil. Nice work
Nice video. I learned that you should flip the board so that the outside is on the inside. Thank you
Excellent video and instruction. These type of details are what sets woodworkers apart. Timing couldn't be better because this is my next task going forward.
That planer is sweeet!
Never would think to cut the bevels on a Miter Saw vs the Table saw. Interesting. I have a non sliding Dewalt DW715 and happy with its accuracy (I know you had it for a short time =-), just never would think of doing it this way. Thanks for opening up another option for a future application.
Great video, you are so much more relaxed than you were a few years ago and it makes for a better viewing
Wow, that was so easy. Beautiful box.
Excellent talk through and demo, thank you.
Good Looking box. Ill have to save this video to remember how to lay out the cuts!
I’ve been trying to do the same thing, I did a birch waterfall cabinet for my uncle and it looks wonderful, the very last corner of course didn’t look as cool as the other three, however it’s underneath the cabinet so you’ll never see it.😊👍 Thank you for actually showing me this for first time and now when I do it I try to do the exact same thing you’re describing right now. Thanks so much Marc, you’re the best😊👍🤘😝
You can do it!
Thank you. An excellent video covering off the skill and detail necessary to produce a beautiful box. Woodworking is joints and grain, and this basic project reinforced the principles which can then be reapplied to other projects.
That's a great video! I use something similar when making my frames. It's not as continuous since the visible part of the frame is mitred, but yields better results than cutting it from a straight board.
45.5 Degree miters are a huge help when assembling miterfolds!
literally started building a box today - good timing, and thanks!
This man makes a simple box into a piece of art.
I was confused at first then...suddenly...it clicked. Thank you!
my grandmother asked me Saturday to make her urn so the timing is impeccable.
Thanks Marc! I love making boxes and I really appreciate when your videos help improve my skills.
I just made a box like this between the holidays. I also hate bevel joints, so I rough cut on my miter saw and clean them up with an Infinity Tools Mega Chamfer router bit.
Detalhes fazem a diferença. Ficou muito bonita! Comprei o livro pela Amazon pois estou no Brasil! :) obrigado pelo vídeo, foi muito didático!
The screwdriver on the corner trick got me all excited!
Thank you man. I still believe it’s magic how you get it to work and I’m really digging the new shop.
That looks amazing
This is a really cool method, I just started experimenting in making smaller boxes, I will be able to get a full wrap on a 7" x 5" box from a 24” long board which is never 24”, only have a table saw, think it will still work with a 2.6 mm kerf
Thank you Marc. I really appreciate your approach and focus on detail.
Glad it was helpful!
My friend, I bought one of those expensive wall ornaments my first week of owning a saw stop! Haha!
Now I never run reclaimed wood without bypass mode.
Thanks for the great video! Did you glue the bottom all the way around? Is there any worry about the bottom expanding? Im pretty new to woodworking ,.that's why I ask. Thanks again!
Yes I would be worried about this box in humid conditions. I never make a box with a drop in lid like that. It's asking for trouble in my opinion. In fact I'm surprised Marc did it that way. Wood movement is so often ignored these days. I always do my lids to allow for movement. Wood never stops moving no matter how dry or old it is or how much finish is applied.
Smooth shaft ,,I get it😅....great video .Thank you for sharing
Very nice! I love the look of that finish. I’ll give it a try 😀
It you cross-cut the pieces on the table saw, with the blade at 45 and just high enough to score the top, you can avoid that 3mm gap between the faces altogether.
You’re a dang beast dude!!!! 💥
On a small box like that do you not glue the bottom for wood movement and if that's the case do you undersize it just a little bit
This is great! My boxes always end up with that one corner that doesn't flow. Now I need to get a bandsaw💸
If you lack a band clamp, try connecting cable ties/zip ties together. Not reusable but provides lots of clamping power. I've made a lot of splined boxes just like this, except never with the 4-side continuity. My kingdom for a bandsaw.
I'm building a end table now not a box but I resawed my legs and my top ( table saw saving for bandsaw ) using walnut so expensive trying to save yet make look good as much as I can. This is a great video and explanation of how to figure and match grain like I'm trying to do now ( on every project understand it's a box but ya know ) still apply to a lot of projects. Thanks now I'm show the wife how bandsaw saved material lol thinner kerf lol hey worth a shot. Great video and learned a lot.
Thanks Marc!
Great build and love that the grain is gorgeous all around. I also see that you added a sacrificial fence to the Woodhaven 4448 Ultra Track you attached to the SawStop fence.. Nice touch
Such a helpful video!! Thank you for sharing your knowledge.
I made a recipe box similar to this for my sister for Christmas and the wrapping grain is just 👌 I referenced the Jonathan Katz Moses video but this would've been even better to know about
Beautiful box
I was so surprised when I figured this grain wrap trick myself without seeing it from anywhere back when I made the dice towers.
Clear, accurate build video, and beautiful box.
I've been working on a humidor for a retired colleague... Your video makes me want to start over, but Spanish cedar is too expensive now. But definitely excellent info for future projects! Thanks!
Good video Marc
Awesome box! Cant believe i hadnt seen this video. Being off for the holidays hurt my pay situation a good bit maybe in a couple weeks i can het a heater for thr shop and go make some stuff. Spring will be here soon now and ill be building me an above ground shop. I think ill go with 16x16.
Looks amazing glad to see you making stuff again
Great technique! Adding it to my collection.
I've been making and selling boxes like this for years now on my Etsy store. I always re-saw and grain match all four corners when possible. Quarter-sawn grain works pretty good as well if the grain is all very straight lines anyway...like Sapele of Padauk. I think it's an amazing bit of detail HOWEVER, I've never had a Customer mention that specific detail in any of the CX reviews I've gotten...disappointing really but it is what it is I suppose...it's worth it to me though knowing it's masterfully done.
Thanks Marc! I picked up a number of good techniques from your excellent video(s). I'm embarking (pun intended) on some box making soon and will use some of your tips.
Nice work Mark!
Super clean video, nice editing! Love that nice little planer...
that is a great technique for box making. can i just point out my gaffer when i trained would have had apoplexy if he saw you putting all the timber through the thicknesser in one place. spread it out across the whole bed so that you are using all the knife so that it will last longer before you need to pull them for sharpening.
To minimize the grain difference when cross cutting to length, could you use a 90 degree router bit on the side of the wood facing the inside of the box? That'll let you miter the corners, and if you sneak up on the thickness of the wood, you won't lose as much grain to the kerf width.
Gorgeous
Belíssimo trabalho. Parabéns! (Beautiful work. Congratulations!)
The two splines are beautiful, but I wonder if a third one wouldn't make it even better looking.
If you are putting a tray in the box, you can cut the splines deeper so that they show inside... (I know you already know this Mr. Whisperer)
😎👍☘️🍺
I'd like to see a video on how that spline jig was made. It looks simple enough, but I can screw up anything.
Very informative and really nice build! Can you share what band saw blade you use? Thanks again!
Smooth shaft. Fnar!
Great video fantastic skills thanks for sharing!!!
Nice! I've seen a bunch of these box videos lately, which is great because I've been accumulating hardwood offcuts and plan to make some boxes, but the missing video is taking a box like this to the next level and adding trays and compartments for storing and organizing things. Something smaller than a toolbox with a hinged lid and some kind of locking hardware would be great... and maybe some Kumiko... get Mr. Farrington on the horn! Don't forget flocking! 😄
Any concern about wood movement by gluing up the bottom?
As always, great instructional content!!
Chisel across index finger knuckle. Cut through all the tendons into the joint capsule. 2 surgeries and 6 months of rehabs later and I’m at 75 percent function.
I really enjoyed the video and picked p some valuable tips, so thank you. I did however notice that the lid was not secured with any type of fastener. Perhaps it isn't needed but if an urn has remains in it and for some reason the lid came off, that would be a bad bad day. The Likelihood of that happening I know is very low but I tend to look at things from what it would be like in a worse case scenario. Any suggestions on what us anal types could do to fasten the lid using the method you used?
Great video, thanks for sharing. I just purchased your book on Amazon.
My father passed recently, and I've been tasked with making an urn. I've made boxes, but never an urn. I know the urn typically has a removable bottom instead of a top. I would love it if you could give me some pointers on making the urn. Thanks.
Lane, I am in a similar circumstance, my father in law, asked me when he passes, so I am searching for information. Want to make a few test runs. Marc any info, plans etc would be great. Is 3/8” thick enough? Appreciate all comments? And Titebond or west system epoxy for glue up?
Lane, sorry for your loss. I've made a box or two, so what I'd recommend is to do everything Marc did, to include the lid, EXCEPT for the bottom, which you'd put another rabbet (like the lid). When you're ready to place the bag of cremains inside, I'd use just two small brass screws to hold the bottom in. You'd want to start with thicker stock, obviously, and aim for 3/4" thick walls in the end. Rough board would be 6/4 before doing anything. The final work would have the lid secured permanently. Hope this makes sense and helps.
I have to come clean and let you know I kept this video in my wood working folder.
I want to build my husband a watch box using this method. Unfortunately i don't have a band saw or a jointer. I'm hesitant, I'm not sure how resawing with turn out using a table saw
First off, this is freaking stunning. Fantastic job on it, and I'm so glad you taught that technique, genius! I was wondering though, a bit off topic, sorry, did you get rid of the brand new split top rubo you built? The knock down one? I've been seeing a lot of your old workbench, but not much of the new one
Very informative video but I have one question. I'm fairly new to fine wood working, but I've made a number of small boxes. I understood that if you're using something other than plywood for the box bottom you shouldn't glue the bottom in place to reduce the chances of joint damage due to wood expansion. Can you explain why you glued your box bottom in place when it looked like the wood was not plywood.
@davesteffens2309 I had the same question after seeing this and I would like to know if there is a rule of thumb to follow on this. For small boxes I always glue the bottom in if they are made out of a wood species with a dense grain like walnut. Correct me if I am wrong but I do believe that the amount of expansion and contraction is less with walnut or maple then say a species like pine. Wider grain wood species like pine I tend to place them without glue.
Can this be explained in a future video?
Thanks for the great video Marc
Very nice work 🤘🤘👍