I feel like I'm in the middle of a rainforest for some of this, those birds are going nuts in the background! I've never been a big fan of Fuchs style wheels, but yours came out really classy-looking. Nice work.
Fuchs wheels always look good. I am learning a lot from your videos. I like the way you show problems and how you fixed them. Letting paint have plenty of time to set is always a good idea. Looking forward to your engine video.
did my wheels VERY easy. put the wheel in a LEVEL plastic trash can, fill the can with water, carefully add water till the black is covered, spray paint the wheel,let dry , use Your finger to remove the overspray on the water, lift it out ! works like a champ
I am not a big fan of that method as the when you spray you risk splashing the water and even just rippling it near the edges. The better method, which is closer to the original, is to make a bath of black paint with some vibration to break the surface tension and lower in the wheel (or fill up the paint to the level).
Love how the wheels turned out Jeff and equally so that you went for 17s. You've probably come across it before, but there's a method for painting Fuchs where you put the wheels in a perfectly level bath of water (with some dish soap to reduce surface tension) and fill it slowly, giving you a perfectly flat masking line around the petals. I'm not sure if you then mark along the waters edge for masking tape or if it would be possible to float liquid latex along the surface, either way I thought it's an interesting method.
I haven't seen that one, but I have seen the method where you paint it all silver. then block up the holes and very carefully fill it with black paint. Once you get to the height you puncture the holes and let the excess drain away. I am not sure how well that would work though.
Home Built By Jeff hey Jeff ! love the car. we have a 85 3.2 and I was going to do my fuchs. saw that a guy did his and I am going to try his idea . childs wading pool, the shallow plastic one. put the wheels in , level ! add water to proper line for paint,gently fog on the silver , when covered, lift it out ! 😄I'm hoping!
easiest way to do wheels like this jeff is to paint them silver, put 1 coat of clear over them and leave to dry overnight. light scuff with grey scotchbrite the next morning then mask off then do the black, pull the the masking and clear the lot. This method gives a perfect finish 100% of the time
Yep. I agree, that is how I should have done it, or even used an intercoat clear (HOK one I used to use was good) I was being lazy and I paid the price for it ;)
So tempted to rush things when close to the end but please take your time and give love to each part. Set your mindset like this: When it's done, you'll have nothing to do anymore. So make every single step longer and do it properly.
***** You have no idea. I've been fiddling with the brakes for few days and got to the point of needing to bleed the brakes and i did so much stupid mistakes.. You know what happens when you push the brakes when the drum is off... Yup. Pistons all over the floor. But i was kinda drunk at the same time so...
looking great, still think purple centres would have looked better!!!, bet you're glad the painting done with!, just more flatting to do,prior to polishing!, looking forward to seeing what engine you're going to build!
Home Built By Jeff you need to use soapy water. It’s a trick that was suggested by the chief designer at Bugatti, who used it on his personal project. ua-cam.com/video/eAY5fRglsb4/v-deo.html
Hi Jeff, just further congrats mate. The build is looking great. I really get the Singer style you a re going for with the build. Matching the wheel centres to the purple in the stripes and decals (and the roll cage) would have been a bold step, but if anyone could make it work it would be you!
+Home Built By Jeff As others have said, you can always change your mind about it later. Wheels are easy to remove and repaint. I was a bit sceptical about the purple in the decals etc when you first did it but now seeing the result, I dips me lid to ya sir. It looks really good mate, well done. Can't wait to see your ideas for the interior and the mechanicals!
The factory dipped the wheels when they were originally painted. I imagine it takes a lot of paint but if you get it set up right and everything is level, you'll end up with a perfectly painted wheel.
Home Built By Jeff yes it would take a lot of paint. I saw one guy online who had a good idea and taped off all the holes from the back and then just poured the paint into the center and then poked holes in the tape to drain the paint. That still uses a lot of paint but not as much as dipping them like the factory. Yours turned out great though. Taping them can have great results as long as you do a good tape job.
Ryan Lange I did see that. I thought about trying it, but i still thought it would be difficult to get it right. What if you need a second coat? In in the end it was just easier to mask it 😉
Awesome job you did with the wheels. With these conversions, would be there rubbing issues when turning if you run such wide wheels? I read that some people run turbo suspension to get the geometry right
A lot of people run Turbo tie rods which don't have a rubber connection so they get more direct steering feel. From what I know the turbo's came out with spacers from the factory. That said, I do have issues with the fronts touching, and I had to remove the 25mm spacers I have in there. I think that is also due to the size of the tyres I am running and also the front bar and front guards are fibreglass, so they are not necessarily all the right size anyway.
Nicely done! although i think you should definitely have gone for 15s. Deep 15s with the fat tyres under a widebody 911 are one of the best looks in the history of cars. The 17s do work (like on Singer and Jack Olsen who you might heard of) but in another, more modern way. Thats not what RSR's are about i think. And not what your colour scheme is about? anyway! great going and nice to follow this.
I agree that the 15's look great on these old things, but I am not doing an RSR replica as much as my own take on a Singer type build. Also I suppose beggars can't be choosers, and these were what was available to me at a reasonable price. New wide 15's are really expensive, and so is the rubber :(
Makes a lot of sense to me! I'm sure they'll work great for the look you're going for. Also, they are just wheels, easy to change might you wish so in the future. I applaud your keep-the-project-moving mentality. Im always stuck on details i can just as well fuss about when im done.
Wasn't sure about polished lips and painted petals but looks good! Did you consider the method of sealing the holes and pouring the paint in to do the black detailing which simulates the original dip method?
Yes, I had seen that method, and I was tempted to try it, but I was worried that it probably wouldn't work that well and it would also waste a lot of paint.
Yep, that's the same trouble I have with building a car and making videos of it all at the same time. But for me, the car and its quality come first. Hence why some of my videos can take weeks to make. Never skimp on quality work just to rush a video out.
That is why even though I do weekly videos, I show if something works or if something doesn't and if it is not finished, it will just be done in next weeks vid.
Actually the original 73 RSR's had 15x9's at the front an 15x11's on the rear. I actually have to get spacers for the rear so they fill out the arches as the wheels I have were made for a 930. I have already bolted them on the car and with the wide body arches there is heaps of room.


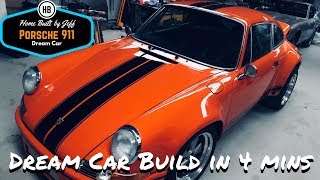


Fuchs are the penultimate wheels, and you did a very nice job painting them up. Hope you share the entire project when it's finished.
Haha. Look at my channel ;)
I feel like I'm in the middle of a rainforest for some of this, those birds are going nuts in the background! I've never been a big fan of Fuchs style wheels, but yours came out really classy-looking. Nice work.
Lol, yep there are a bunch of trees around my garage. I would try to get rid of them, but I don't think I would have much luck ;)
Fuchs wheels always look good. I am learning a lot from your videos. I like the way you show problems and how you fixed them. Letting paint have plenty of time to set is always a good idea. Looking forward to your engine video.
Thanks mate. I could easily just gloss over the problems and make it look like everything always works perfectly for me, but that is not reality.
More Porschey goodness! My favourite look for 911 wheels. Be interested to see what you have in mind for the engine. Keep up the great work! 👍
Sweet works your doing! Cheers
Love your show Jeff
did my wheels VERY easy. put the wheel in a LEVEL plastic trash can, fill the can with water, carefully add water till the black is covered, spray paint the wheel,let dry , use Your finger to remove the overspray on the water, lift it out ! works like a champ
I am not a big fan of that method as the when you spray you risk splashing the water and even just rippling it near the edges. The better method, which is closer to the original, is to make a bath of black paint with some vibration to break the surface tension and lower in the wheel (or fill up the paint to the level).
In love with the build!! You came into Autobarn Gregory Hills and spoke to me, cant wait to see this up and running!!
Thanks mate. Glad you gave it a look.
very interested in what you have in mind for the suspension and drivetrain. looking good!
Love how the wheels turned out Jeff and equally so that you went for 17s.
You've probably come across it before, but there's a method for painting Fuchs where you put the wheels in a perfectly level bath of water (with some dish soap to reduce surface tension) and fill it slowly, giving you a perfectly flat masking line around the petals. I'm not sure if you then mark along the waters edge for masking tape or if it would be possible to float liquid latex along the surface, either way I thought it's an interesting method.
I haven't seen that one, but I have seen the method where you paint it all silver. then block up the holes and very carefully fill it with black paint. Once you get to the height you puncture the holes and let the excess drain away. I am not sure how well that would work though.
Awesome man, been following along the build and the car is going to be so BADASS!! :O
Thanks mate. I am dying to actually drive it ;)
Home Built By Jeff hey Jeff ! love the car. we have a 85 3.2 and I was going to do my fuchs. saw that a guy did his and I am going to try his idea . childs wading pool, the shallow plastic one. put the wheels in , level ! add water to proper line for paint,gently fog on the silver , when covered, lift it out ! 😄I'm hoping!
easiest way to do wheels like this jeff is to paint them silver, put 1 coat of clear over them and leave to dry overnight. light scuff with grey scotchbrite the next morning then mask off then do the black, pull the the masking and clear the lot. This method gives a perfect finish 100% of the time
Yep. I agree, that is how I should have done it, or even used an intercoat clear (HOK one I used to use was good) I was being lazy and I paid the price for it ;)
Congrats on the build so far Jeff. For a shed build car the result you have attained is impressive. Best of luck with the rest of the build :)
Thanks mate.
Who is the manufacturer of your fuchs wheels? I like the look of them and would be interested in getting a set for 88 3.2
So tempted to rush things when close to the end but please take your time and give love to each part.
Set your mindset like this: When it's done, you'll have nothing to do anymore. So make every single step longer and do it properly.
That is a good motto to go by, but is often easier to say than to stick to (in my case anyway ;) ).
***** You have no idea. I've been fiddling with the brakes for few days and got to the point of needing to bleed the brakes and i did so much stupid mistakes..
You know what happens when you push the brakes when the drum is off... Yup. Pistons all over the floor. But i was kinda drunk at the same time so...
V4 Garage haha, that will do it.
looking great, still think purple centres would have looked better!!!, bet you're glad the painting done with!, just more flatting to do,prior to polishing!, looking forward to seeing what engine you're going to build!
I did consider painting the background (the black part) purple with the silver petals, but I like the traditional look.
What paint codes did you use? I’m particularly interested in the silver! Thanks
Instead of masking with tape you can put the wheels in a water bucket/tub to get a perfect mask ;)
Have you ever tried to use a spray gun near water ;)
Home Built By Jeff you need to use soapy water. It’s a trick that was suggested by the chief designer at Bugatti, who used it on his personal project. ua-cam.com/video/eAY5fRglsb4/v-deo.html
Hi Jeff, just further congrats mate. The build is looking great. I really get the Singer style you a re going for with the build. Matching the wheel centres to the purple in the stripes and decals (and the roll cage) would have been a bold step, but if anyone could make it work it would be you!
Haha. I did consider doing the background colour on the wheels in purple instead of black, but I chickened out ;)
+Home Built By Jeff As others have said, you can always change your mind about it later. Wheels are easy to remove and repaint. I was a bit sceptical about the purple in the decals etc when you first did it but now seeing the result, I dips me lid to ya sir. It looks really good mate, well done. Can't wait to see your ideas for the interior and the mechanicals!
Thanks, I had a few raised eyebrows when I mentioned the purple, but since I have done it everyone has been positive.
The factory dipped the wheels when they were originally painted. I imagine it takes a lot of paint but if you get it set up right and everything is level, you'll end up with a perfectly painted wheel.
Ryan Lange Yes that is true. But you are talking about a lot of paint which would get everywhere and would not be that practical at home.
Home Built By Jeff yes it would take a lot of paint. I saw one guy online who had a good idea and taped off all the holes from the back and then just poured the paint into the center and then poked holes in the tape to drain the paint. That still uses a lot of paint but not as much as dipping them like the factory. Yours turned out great though. Taping them can have great results as long as you do a good tape job.
Ryan Lange I did see that. I thought about trying it, but i still thought it would be difficult to get it right. What if you need a second coat? In in the end it was just easier to mask it 😉
Awesome job you did with the wheels. With these conversions, would be there rubbing issues when turning if you run such wide wheels? I read that some people run turbo suspension to get the geometry right
A lot of people run Turbo tie rods which don't have a rubber connection so they get more direct steering feel. From what I know the turbo's came out with spacers from the factory. That said, I do have issues with the fronts touching, and I had to remove the 25mm spacers I have in there. I think that is also due to the size of the tyres I am running and also the front bar and front guards are fibreglass, so they are not necessarily all the right size anyway.
Nicely done! although i think you should definitely have gone for 15s. Deep 15s with the fat tyres under a widebody 911 are one of the best looks in the history of cars. The 17s do work (like on Singer and Jack Olsen who you might heard of) but in another, more modern way. Thats not what RSR's are about i think. And not what your colour scheme is about? anyway! great going and nice to follow this.
I agree that the 15's look great on these old things, but I am not doing an RSR replica as much as my own take on a Singer type build. Also I suppose beggars can't be choosers, and these were what was available to me at a reasonable price. New wide 15's are really expensive, and so is the rubber :(
Makes a lot of sense to me! I'm sure they'll work great for the look you're going for. Also, they are just wheels, easy to change might you wish so in the future. I applaud your keep-the-project-moving mentality. Im always stuck on details i can just as well fuss about when im done.
Wasn't sure about polished lips and painted petals but looks good! Did you consider the method of sealing the holes and pouring the paint in to do the black detailing which simulates the original dip method?
Yes, I had seen that method, and I was tempted to try it, but I was worried that it probably wouldn't work that well and it would also waste a lot of paint.
Yep, that's the same trouble I have with building a car and making videos of it all at the same time. But for me, the car and its quality come first. Hence why some of my videos can take weeks to make. Never skimp on quality work just to rush a video out.
That is why even though I do weekly videos, I show if something works or if something doesn't and if it is not finished, it will just be done in next weeks vid.
Hi Jeff, 17x10" they are huge! do they fit inside the arches? what offset are they?
I have a 70 911 with stock arches and it has very little space :(
Actually the original 73 RSR's had 15x9's at the front an 15x11's on the rear. I actually have to get spacers for the rear so they fill out the arches as the wheels I have were made for a 930. I have already bolted them on the car and with the wide body arches there is heaps of room.