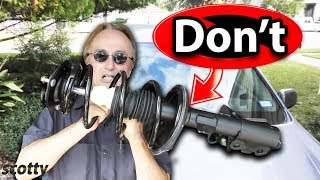
A detailed tutorial for replacing front struts on a 2015 Chrysler 200C. Includes useful tips to avoid extra work you don’t need to do. Large Prybar: amzn.to/3IBtopR
Great video! These darts and 200c's seem to be the most difficult struts I've had to replace but this saved me a lot of time messing with the subframe. Thank you!
Quite the tip with the prying motion. I couldn’t go back in the same way so I took the lower ball joint loose. Thanks man. Time and money in my pocket.
Great stuff my friend. I'm probably not the first to mention this, but I didn't feel like reading all of your comments, but either some grease or a little anti seize on the bottom of the strut would have been a good ides.
Thank you. I hope it’s helpful for a lot of people. I really didn’t want to accept that a normal wear part like a strut couldn’t be taken out “easily”. Thanks for your feedback!
There are some other videos, but they tell you to drop the subframe which I refused to accept. It took me a couple hours to find the trick to this project.
You know if you raise both side then you don’t have to mess with sway bar. It comes off without issue. When you only raise one side it loads up the sway bar.
Hi Joe.I just got through doing this job on a customers car. I watched your video, and read the manual. Your are really adding a whole lot more steps to this then you need to. The manual has you remove the steering knuckle, that was far faster and easier to do. Yes, I had the car on a lift in my shop with air tools, but really it was no big deal.
I just tried your method today and my ball joint was impossible to remove. I ended up using a pickle fork to pry the ball joint out partially. I still couldnt get the ball joint out of the knuckle completely. This ended up destroying the ball joint boot so now the next job will be a new control arm. I guess I’ll stick to my method for strut removal on this car.
@@JoesCarSmartsNY Really, I had soaked the ball joint stud before lunch with JB80, after lunch I removed the one cross bolt in the knuckle and it slid apart very easily.
Hi there thanks for the awesome video! have a quick question if you don't mind me asking, you're doing the left side (driver) side and the strut has to be at 7oclock but since i'm doing the right side (passenger) what position i have to put the strut? 7oclock too or 5oclock on this one?
We’re talking about the rotation of the top bearing I think right? There is a small tab and hole in the top of the bearing. That hole lines up with a hole in the metal frame strut tower above it. That should get you in the right orientation.
Do you have any experience on replacing a chrome strip above a window on chrysler 200 ? 2016 limited being specific! It is giving me quite the time. Appreciate viewing your work here
Hi Joe, great video! I have been searching for fully assembled struts for my 2015 Chrysler 200 2.4V Engine Car. All I keep coming across is the Front Right Strut Assembly. I cannot find the Front Left Assembly anywhere. Can you tell me, is the Front Right Strut Assembly the same for as the Front Left Assembly? I checked Rock Auto too and a majority of the Struts for my car are sold out. Any help you can provide is GREATLY appreciated. Thank you!!!
I was unable to find fully assembled units. I had to transfer the coil spring over to the new strut. I don’t know of any supplier that offers a fully assembled unit right now.
In case anyone else is looking I was able to find MasterPro brand strut assemblies for my 2015 200 from O’Rielly Auto parts. That was the only place I could find them through.
Hello Joe, I have a question for you i have a very little leak over this stud for over a year now i thought first it was grease however i saw the same leak while changing rotor. Do I need to replace these?
Are you saying that your strut is leaking? If so, the strut should be replaced. You are probably feeling more shaking when you hit a bump if your strut is leaking.
I determine that based on mileage and condition. If the coil spring is broken or if the surface is badly rusted and at risk of breakage you should get new springs. Also, this is just a number I use myself, it’s a good idea to change the springs at 100k miles if you can. I don’t think I could easily find new ones when I did this job. If you keep old but not broken/rusted springs you could find that the car sags and sits a little lower because the springs are worn. Shouldn’t be any other symptom.
how did you get hub assembly down that far? there's still a good 2-3 inches inside the knuckle and it won't budge. is the lower control arm disconnected at all?
Only one side came off like in the video but on the other I had to remove the subframe piece but don't remove the rear a arm bolt out, it'll only make it harder to put in. Just remove the front a arm bolt and pry just like he did in the video and it will come right out
Thereal Hubster I was able to use the same technique on both sides when I did it. This video is the second side I did. It’s definitely a challenging job, but both sides can be done this way.
@@jakehamilton8544 If you’re talking about the clip at the top, I found that is the easiest way. The clips will help hold the strut while you work on the rest of reassembly. Also, it could be tough to clip them later. Although, once it’s all down and the car back on the ground I would check those clips again to make sure they’re secure.
I tried to hit the 19mm nut that goes on top of the strut and I couldn't get it to fasten all the way down. I'm gonna leave it as far as it went (I'm thinking the nylon made it all spin) you think it'll have any problems in the future?
Did you use the new nut that came with the new strut? Often times the OEM nut is not the same as the new nut. It is not advisable to leave the nut anywhere but fully tightened. Maybe try again when it’s in the car and the weight of the car is helping to hold the strut still. That’s my best recommendations.
@@JoesCarSmartsNY Yes I did use the new nut that came with the strut. I tried to tighten it but the entire thing kept spinning. No way I can get a open ended wrench on there with another wrench to hold down the rod. Let alone a socket instead of a wrench. I'll see how it goes, but thanks for the video
@@FromThe3PointLine GEARDRIVE Offset Box Wrench Set, Metric, 9-Piece, 6-23mm, 75-Degree, Chrome Vanadium Steel Construction with Rolling Pouch www.amazon.com/dp/B07T6DMYC6/ref=cm_sw_r_cp_api_glt_fabc_JXW4B5ZRRRHZVJCXF3Y3?_encoding=UTF8&psc=1 You need offset wrenches.
Is the 2015 doge dart loaded strut compatible to Chrysler 200 strut assembly they look exactly the same the part even pops up when I search 2014 Chrysler 200
Good morning sir i have two questions if you don't mind why you open 36 nut of drive axle and what do you men by down and backwards the strut or spindle or bar? sorry if I bother you with many questions
I removed the 36MM so that I can get more movement of the steering knuckle. Down and backwards means, use a large pry bar to push the knuckle towards the ground and and then also push it straight towards the back of the car.
www.rockauto.com/en/catalog/chrysler,2015,200,2.4l+l4,3310286,suspension I found recommendations online that you should replace that clip. My old clip LOOKED like it could be reused but it is only plastic. Also, the clips are available on Rockauto now and they weren’t before I don’t think. They’re not too expensive.
I’ve been satisfied using Monroe struts for replacement. The only other option I’ve found is Mopar Original parts. I think these cars are still new enough that not many people have needed to replace the struts quite yet. As the vehicles age the aftermarket makers will have more replacements available I’m sure.
I removed the axle nut. That gave the knuckle more flexibility. It’s def. a tricky job but doable. I’ve had the struts out again since this video because my brand new top mounts failed prematurely. Replaced those with Chrysler OEM strut mounts after that.
Someone else commented here that the notch I used for leverage is not there on the V6. Other than, if you get leverage somehow, should be the same. I recommend you take a look and compare to this video to make sure.
@@YOUNGFEAST91 I would have a pro garage diagnose it. I’m not sure if it would be a motor on the steering rack or maybe the whole rack needs to be replaced?
Rattling from the wheel area when hitting bumps can mean the struts have lost pressure. Also on this car it can mean that the strut mount at the top has failed.
@@JoesCarSmartsNY I know they used the same platform and everything in your video matches up exactly with the dart. Only difference being that we can’t get it out. Gave up and called up a family friend who’s a mechanic to come do it lmao.
FOUND A LOADED STRUT ASSEMBLY FOR MY 2015 CHRYSLER 200 RIGHT SIDE BUT NOBODY HAS THE LEFT SIDE LISTED I WAS TOLD THAT THE PART WILL FIT FIT RIGHT SIDE ALSO IS THIS TRUE.
I see that FCS has a product now, but looks like rockauto.com is out of stock. The right and left are not the same part. It’s because of the way the brake hose and ABS wire attach to the strut body I believe.
For someone like me, once the visual progression was broken, I'm lost. I have to see all the steps, or I can't follow it. How do you put the foam in right? What order? What do you mean you couldn't buy the whole kit? It doesn't come with everything? These are things you should go over. If I knew what all this was, I wouldn't have to watch the video.
If you are at that level, this is probably a job best left for the shop. This video is for someone who's already done struts, but not necessarily of the Fiat style. When he refers to the whole kit, he is talking about a loaded strut. This would not require the swapping of the spring, boot, and mounting assemblies for reuse. Monroe calls these quick struts.
They’re not Chrysler OEM, but they’re built to the same specs and mounting. My only recommendation here is do NOT use an aftermarket strut mount on the top. The MOOG strut mounts failed quickly and I had to go back and replace with Chrysler OEM mounts.
@@JoesCarSmartsNY yeah. I have to get my struts replaced again because I used KYB strut mounts. This time I got the Mopar strut mounts and the Monroe struts
Cost mainly. Also, this car was being beat to hell driving for Door Dash during the COVID pandemic. The aftermarket struts worked perfectly. However the rubber mounts at the top were trash. I had to replace those with OEM not long after this video was made.


Great video! These darts and 200c's seem to be the most difficult struts I've had to replace but this saved me a lot of time messing with the subframe. Thank you!
You’re welcome! Thanks for your feedback.
Quite the tip with the prying motion. I couldn’t go back in the same way so I took the lower ball joint loose. Thanks man. Time and money in my pocket.
Took me FOREVER to figure that out. It’s definitely tricky, but worth it.
Very good explanation of how to remove strut. I aslo noticed that notch when I replaced the control arms lower. Thank you for the video.
One of the best car repair videos I've ever seen. Keep up the good work!
Yea except he skipped the whole disassembly and reassembly of the strut😮
@@nunesjoann2161 I covered that starting at 8:50. What are you missing?
I've seen all your videos on the 200 , and you've saved me hundreds of dollars
Awesome!
Dude thank you!!!!! Way faster than removing subframe and a arm
Man you are a time saver. I had to take out the sub frame 😂 thanks man
Nice video this helps allot of diy guys out thanks for sharing
Nice video. Very informative.
Great video! Well done!
Good job your video was straight to the point
Thanks for your feedback. I’m glad this helped you.
Best replacement video for this SHIT FIAT strut design on youtube. Good shit mate! Keep killin it!
You are amazing. 200 DIY are here.
very helpful! thank you
Great Job!
Thanks very helpful
Great stuff my friend. I'm probably not the first to mention this, but I didn't feel like reading all of your comments, but either some grease or a little anti seize on the bottom of the strut would have been a good ides.
You are really creative
Thank you. I hope it’s helpful for a lot of people. I really didn’t want to accept that a normal wear part like a strut couldn’t be taken out “easily”. Thanks for your feedback!
Thank you! Haven't been able to find any videos on this anywhere.
There are some other videos, but they tell you to drop the subframe which I refused to accept. It took me a couple hours to find the trick to this project.
You know if you raise both side then you don’t have to mess with sway bar. It comes off without issue. When you only raise one side it loads up the sway bar.
You’re right. Thanks for pointing this out.
Thank you
helped alot good shit
Thanks!
God bless you sir
Thank you. I’m glad this helped you.
Hi Joe.I just got through doing this job on a customers car. I watched your video, and read the manual. Your are really adding a whole lot more steps to this then you need to. The manual has you remove the steering knuckle, that was far faster and easier to do. Yes, I had the car on a lift in my shop with air tools, but really it was no big deal.
I just tried your method today and my ball joint was impossible to remove. I ended up using a pickle fork to pry the ball joint out partially. I still couldnt get the ball joint out of the knuckle completely. This ended up destroying the ball joint boot so now the next job will be a new control arm. I guess I’ll stick to my method for strut removal on this car.
@@JoesCarSmartsNY Really, I had soaked the ball joint stud before lunch with JB80, after lunch I removed the one cross bolt in the knuckle and it slid apart very easily.
@@Jeffy2n I’ll have to pick up some JB80. That’s a new product for me, the PB Blaster wasn’t quite up to the task this time.
Hi there thanks for the awesome video! have a quick question if you don't mind me asking, you're doing the left side (driver) side and the strut has to be at 7oclock but since i'm doing the right side (passenger) what position i have to put the strut? 7oclock too or 5oclock on this one?
We’re talking about the rotation of the top bearing I think right? There is a small tab and hole in the top of the bearing. That hole lines up with a hole in the metal frame strut tower above it. That should get you in the right orientation.
@@JoesCarSmartsNY Ohhhh okay awesome thanks didn't notice haha awesome thank you very much :D
Do you have any experience on replacing a chrome strip above a window on chrysler 200 ? 2016 limited being specific! It is giving me quite the time. Appreciate viewing your work here
Sorry. Never got into that.
Hey joe thanks for the awesome videos as always was wondering where I could purchase the struts
I think I got them from Rockauto, but some commenters here have having a hard time finding them.
Yea it’s in rock auto left side and right side for 100 bucks 💯💯 thank you 🙏🏾 this will stop the squeaking it’s embarrassing driving on it 🤣🤣
Ebay
I hope this works I am doing this soon
Hi Joe, great video! I have been searching for fully assembled struts for my 2015 Chrysler 200 2.4V Engine Car. All I keep coming across is the Front Right Strut Assembly. I cannot find the Front Left Assembly anywhere. Can you tell me, is the Front Right Strut Assembly the same for as the Front Left Assembly? I checked Rock Auto too and a majority of the Struts for my car are sold out. Any help you can provide is GREATLY appreciated. Thank you!!!
I was unable to find fully assembled units. I had to transfer the coil spring over to the new strut.
I don’t know of any supplier that offers a fully assembled unit right now.
In case anyone else is looking I was able to find MasterPro brand strut assemblies for my 2015 200 from O’Rielly Auto parts. That was the only place I could find them through.
Hello Joe,
I have a question for you i have a very little leak over this stud for over a year now i thought first it was grease however i saw the same leak while changing rotor. Do I need to replace these?
Are you saying that your strut is leaking? If so, the strut should be replaced. You are probably feeling more shaking when you hit a bump if your strut is leaking.
Hey quick question how do I kno if I can reuse my coil spring? Major video
I determine that based on mileage and condition. If the coil spring is broken or if the surface is badly rusted and at risk of breakage you should get new springs. Also, this is just a number I use myself, it’s a good idea to change the springs at 100k miles if you can. I don’t think I could easily find new ones when I did this job. If you keep old but not broken/rusted springs you could find that the car sags and sits a little lower because the springs are worn. Shouldn’t be any other symptom.
how did you get hub assembly down that far? there's still a good 2-3 inches inside the knuckle and it won't budge. is the lower control arm disconnected at all?
I disconnected the tie rod and the CV Shaft nut. I did not remove anything from the control arm. I’m also using a 48” pry bar I think.
Only one side came off like in the video but on the other I had to remove the subframe piece but don't remove the rear a arm bolt out, it'll only make it harder to put in. Just remove the front a arm bolt and pry just like he did in the video and it will come right out
Thereal Hubster I was able to use the same technique on both sides when I did it. This video is the second side I did. It’s definitely a challenging job, but both sides can be done this way.
What about the strut shaft? Did you remove the old and place it onto the new strut?
I’m not sure which part you’re calling the strut shaft?
Do you put the clips on as soon as you put the new strut up in there?
@@jakehamilton8544 If you’re talking about the clip at the top, I found that is the easiest way. The clips will help hold the strut while you work on the rest of reassembly. Also, it could be tough to clip them later. Although, once it’s all down and the car back on the ground I would check those clips again to make sure they’re secure.
Great video!!!!!!!! Thank you!!!!!!
I tried to hit the 19mm nut that goes on top of the strut and I couldn't get it to fasten all the way down. I'm gonna leave it as far as it went (I'm thinking the nylon made it all spin) you think it'll have any problems in the future?
Did you use the new nut that came with the new strut? Often times the OEM nut is not the same as the new nut.
It is not advisable to leave the nut anywhere but fully tightened. Maybe try again when it’s in the car and the weight of the car is helping to hold the strut still. That’s my best recommendations.
@@JoesCarSmartsNY Yes I did use the new nut that came with the strut. I tried to tighten it but the entire thing kept spinning. No way I can get a open ended wrench on there with another wrench to hold down the rod. Let alone a socket instead of a wrench. I'll see how it goes, but thanks for the video
@@FromThe3PointLine GEARDRIVE Offset Box Wrench Set, Metric, 9-Piece, 6-23mm, 75-Degree, Chrome Vanadium Steel Construction with Rolling Pouch www.amazon.com/dp/B07T6DMYC6/ref=cm_sw_r_cp_api_glt_fabc_JXW4B5ZRRRHZVJCXF3Y3?_encoding=UTF8&psc=1
You need offset wrenches.
Is it possible to do without pulling out the cv shaft? I don't have a 36mm deep socket
I found it necessary yes. You can rent or borrow a socket from a parts store.
Is the 2015 doge dart loaded strut compatible to Chrysler 200 strut assembly they look exactly the same the part even pops up when I search 2014 Chrysler 200
Not sure. I’d compare exact part numbers. If they’re exact same part numbers they should
be good.
I’ll just take it to a shop.
Good morning sir
i have two questions if you don't mind
why you open 36 nut of drive axle
and what do you men by down and backwards
the strut or spindle or bar?
sorry if I bother you with many questions
I removed the 36MM so that I can get more movement of the steering knuckle.
Down and backwards means, use a large pry bar to push the knuckle towards the ground and and then also push it straight towards the back of the car.
@@JoesCarSmartsNY god bless you sir
god protect you sir
god safe you sir all all time
thanks again
sorry if I bother you by many questions
@UCpwtDG1Ogx2ABqzYEz8Y5vA I’m glad this is helping you. Thank you.
@@JoesCarSmartsNY thanks again sir
Can you post a link of where you got the strut and the bearing !? And can you use the clip from the old strut
www.rockauto.com/en/catalog/chrysler,2015,200,2.4l+l4,3310286,suspension
I found recommendations online that you should replace that clip. My old clip LOOKED like it could be reused but it is only plastic. Also, the clips are available on Rockauto now and they weren’t before I don’t think. They’re not too expensive.
My mechanic said I need whole front strut assembly with spring. Can't find them anywhere .....I only see struts without spring
Hello I'm from Ukraine. bought such a car chrysler 200. I want to change the front strut. good monroe? what else can be applied
I’ve been satisfied using Monroe struts for replacement. The only other option I’ve found is Mopar Original parts. I think these cars are still new enough that not many people have needed to replace the struts quite yet. As the vehicles age the aftermarket makers will have more replacements available I’m sure.
@@JoesCarSmartsNY Thanks you
How did you do it with the axle but still on. Tried and cant
I removed the axle nut. That gave the knuckle more flexibility. It’s def. a tricky job but doable. I’ve had the struts out again since this video because my brand new top mounts failed prematurely. Replaced those with Chrysler OEM strut mounts after that.
Driver side is on back order. Can I use the passenger strut on the driver side they look the same
No. The brake hose and ABS wire brackets are reversed and won’t mint correctly
how much different would this be on a 2015 200 s AWD v6?
Someone else commented here that the notch I used for leverage is not there on the V6. Other than, if you get leverage somehow, should be the same. I recommend you take a look and compare to this video to make sure.
Hey bro nice video by any chance where the power steering reservoir located at
This year has electric power steering. No fluid reservoir.
@@JoesCarSmartsNY ❤️❤️💪🏾💯 thank you joe your freaking awesome so once I get that fixed it should stop whining 😫😫
@@YOUNGFEAST91 Hopefully. I haven’t had a power steering issue yet. If I do I’ll have to make another video.
@@JoesCarSmartsNY thank you so much would have any idea of where to get part from 🤔
@@YOUNGFEAST91 I would have a pro garage diagnose it. I’m not sure if it would be a motor on the steering rack or maybe the whole rack needs to be replaced?
Help here: do I need to drop the subframe to replace the rack n pinion assembly?
Sorry, but I’m not sure on that one. Sometimes you can slide the rack out one side or the other depending on the car.
@@JoesCarSmartsNY same car u working on 2015 chrysler 200
@@r2rowdiaz139 Yeah. But I’ve never pulled the rack on this car.
Do bad struts make a rattling noise?
Rattling from the wheel area when hitting bumps can mean the struts have lost pressure. Also on this car it can mean that the strut mount at the top has failed.
Yikes, what a pain. Thanks
How much it will cost to replace front left strut ? Only
I haven’t shopped for these parts in a while but you should the part price at Rockauto.com.
What size is the axle nut?
Please see 3:47 in the video. Thanks for watching.
Got the strut out now I can’t get the new one in 😂😂
It’s tricky for sure.
Any tips
Brother has a 2016 Dart and I’m trying this method and can’t get that shit to budge. :/ Did everything as you did and still nothing.
I don’t know if it’s the same setup.
@@JoesCarSmartsNY I know they used the same platform and everything in your video matches up exactly with the dart. Only difference being that we can’t get it out. Gave up and called up a family friend who’s a mechanic to come do it lmao.
Pílese help I need replace. The 2. Front struts but. I can’t fFind it 😭
You can’t find the parts?
Noo. I can’t. Mi mechanic say I need to replace all the complete 2 struts
@@michellesanchez3078 I found mine on rockauto.com
This is impossible I can’t seem to get mine to roll back
Use the notch I show you, use a large prybar, pry down and back. It’s definitely challenging, but it’s do-able.
FOUND A LOADED STRUT ASSEMBLY FOR MY 2015 CHRYSLER 200 RIGHT SIDE BUT NOBODY HAS THE LEFT SIDE LISTED I WAS TOLD THAT THE PART WILL FIT FIT RIGHT SIDE ALSO IS THIS TRUE.
I see that FCS has a product now, but looks like rockauto.com is out of stock. The right and left are not the same part. It’s because of the way the brake hose and ABS wire attach to the strut body I believe.
For someone like me, once the visual progression was broken, I'm lost. I have to see all the steps, or I can't follow it. How do you put the foam in right? What order? What do you mean you couldn't buy the whole kit? It doesn't come with everything? These are things you should go over. If I knew what all this was, I wouldn't have to watch the video.
If you are at that level, this is probably a job best left for the shop. This video is for someone who's already done struts, but not necessarily of the Fiat style. When he refers to the whole kit, he is talking about a loaded strut. This would not require the swapping of the spring, boot, and mounting assemblies for reuse. Monroe calls these quick struts.
No notch on the V6
Oh no. I hope there's another pry point that could help achieve the same effect?
Man that new strut looks different compared to the other one.
They’re not Chrysler OEM, but they’re built to the same specs and mounting. My only recommendation here is do NOT use an aftermarket strut mount on the top. The MOOG strut mounts failed quickly and I had to go back and replace with Chrysler OEM mounts.
@@JoesCarSmartsNY yeah. I have to get my struts replaced again because I used KYB strut mounts. This time I got the Mopar strut mounts and the Monroe struts
@@JoesCarSmartsNY what strut mounts did you use?
@@KimarShabbaz I used MOOG first I think, but those were ruined VERY quickly. I recommend Chrysler OEM mounts instead.
@@JoesCarSmartsNY man I'm about ready to get rid of this car 🤦🏻♂️
Why use a AFTER MARKET strut on this beautiful NEW car? Why not go to the dealer and buy a strut from them?
Cost mainly.
Also, this car was being beat to hell driving for Door Dash during the COVID pandemic.
The aftermarket struts worked perfectly. However the rubber mounts at the top were trash. I had to replace those with OEM not long after this video was made.
Thank you