Це відео не доступне.
Перепрошуємо.
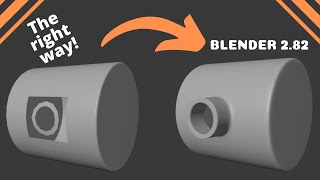
Blender 2.8 Quick Modeling Beginner Tips

Вставка
- Опубліковано 12 сер 2024
- Here is a Blender 2.8 modeling tips tutorial for absolute beginners. We are going to create 3 simple models and I explain the techniques. Although it is a getting started video I use Blender shortcut keys, because I think the sooner you learn them the better.
00:14 Create a quick and simple box, we start with the default cube
01:26 Modeling of a vase mesh, starting with a UV sphere.
04:31 Here we create a simple room and extrude the walls from a plane.
☕️ Buy me a coffee - would be nice: www.buymeacoffee.com/jayanam
See my social profiles here:
Instagram: / jayanamgames
Twitter: / jayanamgames
Facebook: / jayanamgames
Patreon: / jayanam
Merch Store: teespring.com/de/stores/jayan...
Production Music courtesy of Epidemic Sound: www.epidemicsound.com


A UA-cam tip:
Don't make your thumbnail have red bars at the top & bottom. It makes it look like your video & the one above it is already watched on mobile. I almost skipped past your video because it looked like I already watched it.
Treazure idk it made me click it because I was like “ I don’t remember watching this.”
good man
me too
same i was asking myself if i watched this
Yes
Thanks for the tutorial. At 2:50 in my version you need to hold alt when selecting the edge, which selects the entire bottom edge. Took me a minute to figure this out.
Thank you sir!
Thank god for that tip, I was pulling my hair out wondering why I can't select the whole edge!!!
Thank you! Been looking for that answer
Thank you Thank you Thank you. I was wondering where I gone wrong and trying to figure out. Luckily found your answer :).
Kudos!
Good video but while learning the hotkeys is great, you should still mention what each of them is doing and where to find it in the GUI. This helps the user build a better mental map of the possibilities and the overall structure of the program. Saying "press e to extreude, followed by enter, followed by S followed by 0" is not meaningful to newbies.
exactly, the "press E to extrude" I was able to understand, but I was left wondering what S and 0 meant in this context. I know what it ends up doing, but not where else you'd end up using it and why, if that makes sense.
I agree.📌. Awesome tutorial but at beginner level it's better to mention where to find "what" and what it does exactly. Shortcuts and hotkeys are secondary. They are most important when you know exactly what you're doing. Helps you develop speed. However as a newbie, speed should be the least of your worries. Lol.
true and then if you are on a laptop and have changed your settings to emulate numpad then the camera pulls up
This exactly what I need! Learning by practicing is easier and faster to understand instead explaining all the feature and function. Love the shortcut info too. Subscribed.
Thanks! I love this tutorial. Finally somebody who takes time to explain for complete beginners! Thanks. Please keep em coming. I would love to have a step by step tutorial, in your style, for creating a snake, maybe a cobra? and also how to animate it.
Tutorials like these really help beginners to gain confidence. Thanks you!
I just can't thank you enogh. In 7 minutes you managed to make this alien toolbox more familiar and friendly. Thank you once more!
Fantastic video love it, simpel small object but with some good explaning and good tips. keep them coming.
Hey thx, will do
Wonderful, very useful for absolute beginners like myself.
great video thank you very much Jayanam :) please keep it up!
love these!
Brilliant! If you could do a series of these, that would be fantastic!! Thanks, Dave. PS. Liked and Subbed!
Thx! Yeah, I thought about something like creating one model per video, and the model a bit more elaborated in the next ones?
@@JayAnAm Sounds great - you could do 3 small models illustrating different techniques (like today), then alternate with one larger, more complex model in the next video. Thanks for listening! Dave.
Thank you .... You are very creative .
also for the vase, when you add the solidify modifier, switch the offset from -1, to 1. Then you can mess with the thickness. After that apply another modifier called subdivision surface, this will smooth out the jagged outline of your object.
As a Canadian - 2:33 Press S for scale and then ZED :P
Very helpful, thank you!
This video was perfect for what I need thx man
for the box you can also select the top face and press "I" for inset, and then extrude (e) then hit x to move along the x axis, then drag down and left click.
Yes, there are many ways to do this, but if you want to have equal width of the walls the inset and extrude to the inside can be a bit tedious.
Thank you. You helped me out a lot.
Coming from Maya i found this video really helpful, thanks!
Glad to hear!
Thank you
Good stuff!
Great Tutorial
Very nice tutorial, subscribed !!!
Great, thx!
Thanks!
THANK YOU SIR!
Excellent help, thank you.
BNBR-being nice, being respectful-at 2:45, the word "edge" has a voiced "dge" sound, basically the "J" sound. However, if it's pronounced unvoiced, as it is here, it's the word "etch."
I hope you can find this tip as helpful as your video was for me. Warm regards. D.P. Henderson, NV
Good tutorial . . .
2:56 - You can also select the edges and press f for a single face, which results in much better topology
yes
Don't you end up with an ngon then?
Thanks you!
thank you bro it helped so much
Glas you liked it!
So simple and clear with the basics. Just what I was looking for.
Hi Jayanam, at 4:58 you said, somethings wrong. To add a Loop you said, use SHIFT+R instead of CTRL+r :-)
Ok, thx for pointing this out, but one can also see the shortcut key in the lower right hand corner.
@@JayAnAm bro.. u can still tell in in the video ..some way.. it could be useful..coz this entire video was cooool
@@keshav_p I cant add it to the video afterwards:-) In the next one...
@@JayAnAm thanks soo much for replying
Bro.. yupp whatever is easiest for u.. really great. I love these series than any..they are short and to the point.. great for a adhd guy like me😬🙃
@@JayAnAm I sat struggling for 30minuits until I saw this comment
Thanks for the video,
Thx, you're welcome
Brilliant
Very good tutorial!
Glad you think so!
2:45 - after selecting the whole edge loop all you need to do to close that hole is press F and it wil fill the hole with a flat face.
I would argue using all the shortcuts as a beginner is not a good idea, it puts you off and you have to constantly look up shortcuts and if you don’t remember them you are just stuck. It’s much better to learn the GUI, instead of pressing X,Y,Z to lock into a position you can press the middle mouse button and move your mouse in the direction you want (this is also faster than pressing the keyboard since there’s no thinking about which axis is which). Same goes for the views, you can jump between views using the mouse (shift+middle mouse if I remember correctly). There’s a lot of these more intuitive and better commands now :)
Menorizing shortcuts was the old Blender (which did notreally have a GUI, it had a button mashing UI). Shortcuts are good for speeding up your process, they are horrible for learning the software. I’ve been doing 3D models since I was 12, never got into blender because of the horrible GUI until now when they finally fixed it :D
I agree, or at least if you're going to introduce a shortcut you absolutely need to first show where to find it in the GUI and explain what it does. Just saying "Hit e then enter then s then 0" is completely meaningless. People can't learn if they don't know why they are doing what they are doing. Then it's just data entry.
where to find the tool where you said PRESS E THEN PRESS S THEN 0 ?
for the glass,, the place where many vertices were meeting has slightly dented inside.. how do i fix it??
thanks :)
Stuck at 5:00 - Control R, move mouse off the object then mousewheel up once, then click to set it there.
nice
At 3:11 something went wrong for me, I got some greyed out tiles that wouldn't get thick with the solidify option. Don't know how it happened. After I started from the beginning again and it didn't happen again...
I'm having a bit of trouble selecting all the lines with the Vase. I see you click 3 times to select all, but it doesn't work for me. Am I missing something? Great tutorial otherwise!
I was having the same problem, but I just found out you have to press and hold Alt + Click 😉
Standard shortcut is alt+click (PC) or option+click (Mac). Double click to loop select only works only when "Emulate 3 button mouse" is turned on in Preferences (this isuseful for laptop trackpads or even an ancient two button mouse, alt/option is already reserved for navigating the 3D view in this case).
@@hounsker you're the man. Thank you.
@@hounsker BRUH U ARE THE MAN THANKS!!
Thanks for that. Some issues I had (which might be different preferences, mine are the default supposedly) Ctrl R did nothing for me, I had to select the tool each time, and double clicking left mouse didn't increase the number of loops, I had to do it manually in the tool. Scrolling did nothing as well. Also double clicking an edge would not select a loop, it would just unselect it.
It's Shift + R
@@sauravbanerjee5921 Shift + R takes me out of edit mode. He said Shift + R as a mistake when he meant Ctrl + R which doesn't work either.
@@thirdeyenz Ok, it's Ctrl + R and you have to be in edit mode and hover a bit over the surface of the mesh to see the first edge that will be added. When the edge appears scroll the mouse wheel to increase the number of segments.
@@JayAnAm It's working today on a fresh start of Blender. Didn't work at all last night. Very weird. I must have pushed a button that broke something. Thanks.
@@JayAnAm thanks!!!
When I hold shift it doesn't select the entire edge loops, just the individual edge. Did I miss something?
at 3:40 I got stuck on how to apply (current blender version) toggle out of edit, then in the drop down, there is an apply button.
Thank you for this great tutorial. But I wonder if it could be done using Blender with a light user interface theme as I am finding difficult following where things are because of video darkness.
and if you want the bottom of your object (VASE) to be flat, you need to go to edit mode, select that face and inset it twice. slightly making the cirular face smaller TWICE. This will give you a very well defined and perfectly flat bottom
I like
this was extremely helpful, thanks a lot!
Thx, glad you liked it
i like it. i do in 3.0 works as well
Yes
4:15 Not an issue with you Jayanam it is more an issue with the new Blender vs old Blender. That box forget what it is called lower left looks like [ ► Bevel ] it is auto closed. Used to be open. For the sake of studies I wish it was auto opened so we can see things like the number of segments. I know the hints lower right is an addon that has been abandon on and off over the years; it helps a lot. But so did this box that shows additional info segments etc.
I actually cannot see how many bevels you added with your mouse wheel here. As in my eyesight is going bad. I could have used the info box being open to know the number of bevels added. But this is happening with all tutorials not just yours these days. I need that extra info. Cannot afford to pay for glasses USA no health insurance.
I had some trouble understanding 5:00 with the loop cut.
For future viewers you can left click in the middle and at the bottom left corner a window "Loop Cut and Slide" will appear. Inside of there you can change "Number of Cuts"
You can use the mouse wheel to add or remove cuts
weird usualy your short cuts always work for me but at 3:00 e than enter worked but s than 0 nothing happens and i only watched the video to see how you did that lol well i replaced s and 0 with a few Fs and it worked as well
how did you do it what kind of fs ?
When I press S for scaling it scales the whole vase and not the lenght. shift+r/ctrl+r also doens't work in when working on the room.
To scale for one axis press S and then the axis key, for instance Z or X
When i halve the sphere, its solid. not sure what im doing wrong here
hi I have a mac and I'm very confused what he means by "S followed by Set "
whenever I tap S to make the vase taller it gets bigger instead of taller can anyone help
when i double click...its not selecting as loop.. i should have to select each and every edges one by one😕 *how to solve?*
I almost didn't click the video because the thumbnail makes it look like I already watched it, just a heads up.
Yes I see, thx m8
Thanks bro, help me too much!!!! more one subscribe.
Hey, do you know what's the deal with .blend files missing animations when being imported to Unity?
I had multiple actions on my model and only one got imported into Unity with the default name "Scene". The name was impossible to change and all other actions were missing.
Blender 2.8 and Unity 2019.2 are being used.
anyone can help me when i tried to add shapes i cant see it
in 3:00 when press the key " i " and enter, my selection is gone :C
// Ok, i notice that is not I should i press, is "E", it works now.
♥
please more blender videos :D
At 2.50 in Blender 3.2 pressing "e" is redundant. You can just press s and 0 instead and get the same result.
can u make a mesh for me
for it numberpad 5 dont work so if you want to do it just press tag
i dont have an apply
Because you put those red lines on the thumbnail it looks like the video that Ive watched
Yeah, will leave them away next time:-)
5:50, am I the only one that can't delete the face off of the plane? I am able to select the middle, but after I follow Jayanam's procedure, the face is still there.
4:59 you said "and then press Shift and R". but nothing happens
Okay guys I figured it out. it is Ctrl+r not Shift + r and make sure you do it in edit mode
what do you charge for a finished product..?
I like your work.
was wondering if I sent some sketches over, how much you'd charge for it.
I have no time for paid work - you can send me sketches anyway, perhaps I can do a kind of request video
@@JayAnAm
No. that's alright.
thanks tho. means alot.
2:38 i do the exact the same until here. mine become a bowl, not vase
Don't worry, it took me some time too. You need to press S and Z. I find it helpful to look at the bottom of the ruler-thingy, there is explained what happens if you press another key. Hope this will help you :)
@@HerzoginLina aaaaah there they are. X, Y, Z. Thanks a lot for the infos.
@@TheTomiiboy I'm still learning too and it can be so confusing 😅 Glad I could help you
Your video is amazing but you just need to be more careful about what you're saying because you're clicking on the ctrl and you said shift because we still don't have the experience and thanks a lot
idk how to do this 2:56
shirft r makes it bigger
I appreciate the effort but I think this was stupid to see as I did not have any knowledge of the shortcuts which are different for me. At 2:56 you select the complete edge while I only select one particle of the edge. Annoys me blender doesn't seem to be that introducing to new learners on youtube assuming people already know such things.
I think just saying what keys to press without showing the menu options is very confusion. No newbie is going to remember all those key combinations, especially without knowing what the key combinations stand for.
WTF, he didn't delete the default cube. Always thought it wasn't possible.
Try to keep it as often as I can!
2:48 my left click doesn't work
you can go to Preference > Input then, Check Emulate mouse
When u say double click nothing happens
blender is hard.
press a press q press shift left click wtf, this hard for me i just start using blender
you didnt even write the shortcuts on screen so I can follow you easily
The shortcuts can be seen in the lower right-hand corner
@@JayAnAm oh 🤭
@@boringchannel6313 No problem. I know it's hard when you start using Blender but try to get used to the shortcuts, you will see it can be learned quite fast. Everyday a simple model and you will improve quickly.
@@JayAnAm thanks 🙏
the thickness is not even, and i checked even thickness..
Perhaps you scaled in objectmode?
Im ready to give up I've literally spent 4 hours trying to create a box kms
The way you made this was kind of inefficient and most people beginning blender need more simple terms and methods. This tutorial could be done better but you did good 👍
What exactly was inefficient?
Way too rushed and many of your shortcuts don't match mine, so I can't figure out how you got to the next step. Thanks anyway!
This didn't help at all
A UA-cam tip:
Please make pronounciation correctly. Very hard to understand what you are saying.
But thank you for the tutorial
hotkey galore. this isn't a very good tutorial for novices just saying a bunch of hotkeys without even explaining what they are doing exactly or how to do their actions without the hotkeys. i'm not craming for a test, i want to learn the software.