DIY: Fork Seals Made Easy!

Вставка
- Опубліковано 16 сер 2012
- Dr. Dirt's Step-By-Step Fork Seal Swap.
Leaky fork seals are, for lack of a better description, a royal pain in the neck. The most common ailment to plague front suspension, a leaky fork seal can ruin your day by affecting your bike's handling, covering your front brake pads in oil and generally just making a total mess of things. Most of the time a leaky fork seal is the result of dirt inside of the seal, but it can also be caused by a nick or ding in the fork tube from an impact with a rock or stick. But no matter what the cause, a weeping fork seal needs to be fixed, and oftentimes that means tearing into the suspension and changing the seal out. Fortunately, this isn't as difficult as you may think.
Dirt Rider tech guru Scot Gustafson (the man behind the Dr. Dirt tech stories here on www.dirtrider.com) insists that changing afork seal is easy enough for most riders to do in their own garage. To help prove his point, we filmed Scot changing a fork seal in the Dirt Rider tech center and explaining step-by-step how he completes this job. You might want to bookmark this video for reference because someday, no matter if you ride motocross or off-road, you're going to need to address this issue!
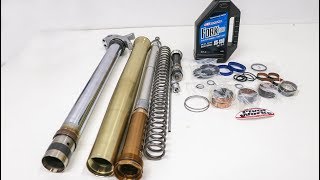
Tools used
Fork Cap Wrench - amzn.to/2Q7tzzm
Motion Pro Fork Seal Bullets - amzn.to/2Eey8mQ
Bel - Ray fork oil - amzn.to/2Wbez92
Motion Pro Fork Oil Level Tool - amzn.to/2YCpWEr
Read more: www.dirtrider.com/features/for... - Авто та транспорт


I was about to pay the dealer almost $250 to do this.. Instead I bought the tools, seals and oil for $60. Thank you!
I just did the same thing😬
Can already tell I'm gonna watch the video like 30+ times when I do this to my yz80
Do it step by step, dont watch it countless times and think you will remember it. Thats a trap. Put your tools in hand and do each step and pause the video till you are ready for the next step. You will learn way faster.
put the video in slow motion g
Just finished doing my fork seals based off this simple instruction video. Definitely helped! Got it done in a few hrs, used tape instead of the bullet, and bought a seal driver from the local parts store, and used a adjustable wrench as the spacer. Ill be doing fork oil changes more often now, saving myself 200-300 dollars having a moto mechanic doing it. Thanks!
This dude is the man....anyone should feel privileged to ride a bike he's worked on.
Best fork seal video on the internet. Even after all of these years. Great job and thank you for making it!!
Adjustable wrench works well in a pinch for the "damper rod holding tool"
Yeah I thought the same for the "fork cap tool" all those unnecessary gimmick tools are just a waste of money
While I do agree, I do find it very nice to have a specific tool for the job.
It looks like a piece of plastic he cut himself.
why didn't i think of that, thank you!
Top tip
Every time i do fork seals i come back and watch this video. So straight forward and easy to understand
Definitely subscribing bud! I’m new to learning all the mechanics. I just recently got my first bike. So Im watching to learn about all the parts and this guy is the first to actually take it apart, name the part, then explain what the part does. Thanks and I’ll be putting a thumbs up on all your videos!
I’ve never seen anyone put their tree on it to hold it. That is very smart and thank you for this tip, that’s really intuitive.
Thanks,
Scotty B
The best instructional video I've ever seen on forks. So many clever little tricks, like using the wheel bolt as a lever for example. So satisfying to watch a real pro!
I guess you have to try it on your own sooner or later, this tutorial will make the job a lot less intimidating for the first try. Great video, I appreciate the effort it took to make it all happen.
The best KYB fork seal/oil change video I've seen so far. Excellent work Dirt Rider Magazine!
Finally I find someone knowledgeable, clean and technical. Excellent !!
I finally understand why the need to use a bullet or a bag with a masking tape.
Thanks Scott !!!
Best is to loosen the fork cap before you take the forks out the triple-clamp. If your space is limited underneath the handlebars, take them off. Much easier. Those caps can be very tight sometimes.
I do it the same way in my shop . I loosen the caps before I pull the forks . Have never had to but you can lover the forks in the the triple clamps then snug the bolts up .
Corrie Theron nice kdx😉
Loosen the pinch bolts first at the top prior to loosening the top cap
Every time I do fork seals I come back to this vid as a refresher.
I refer to this video every time I change fork seals. By far, the best of UA-cam!! Thank you for sharing it.
it’s super easy!
>goes into a mechanical puzzle with dozens of pieces
Hey man, thanks for the video, great job of explaining the process. I have two leaking fork seals and this is what i needed to prepare me for whats to come
You are absolutely amazing . The best video by far I've ever seen regarding a motorcycle repair. If you would have a shop here in Vegas I would not take my bike anywhere else
Thank you .
Really? Have a look at Moonfleet video on Fork seal replacement.
Thanks for the tip of heating the fork leg to make it easier to pop out the oil seal! You the man!
Very fine guide, thank you.
Also you're working so clean, well done.
Hey Scott,
Clear, concise, and VERY helpful, thanks for taking time to help us ordinary riders out! There were several generations of KYB USD fork, and the internals are very different - one thing that might be helpful to know is whether this one you are working on is a 43mm, 46mm or 48mm (I'm quite certain it's not one of the early (and short lived) 41mm). Thank you!
This was an awesome video. Gave me the confidence to change my own fork seals. Also, I love your garage man!
Excellent video! I followed the directions and had no problems changing out the seal. I’m guessing this saved me around $250. One tip, if you get the Tusk cap wrench, the back end can be used as the damper rod holding tool.
Excellent video. Our first build with the new dual chamber type system and your instruction was very helpful. Thank you,
Thanks a mil, reading the manual is one thing but having it shown to you is awesome. Great vid cheers.
Another thing that is even more helpful after seeing this tip. Just unloosen it while it is on your motorcycle. Not bad after suing you use the tree to hold it. That gave me the thought of just loosening it while it is still on the motorcycle to make it even a lot easier to loosen the top one and the bottom one.
I really wanted him to compress it on the ground when he was done lol
Excellent video, many thanks. Nice tidy workshop as well..
Best video iv'e seen on fork seal replacement. Great job!
Nice job, thanks. Wish my shop was that clean and nice.
Excellent video.thank you for the great breakdown and rebuild procedure.
The most useful clip I've viewed on the subject.👍
Thanks for the video, did the fork seals on my 250 sxf yesterday took longer than expected but still easy just keep it clean.
Very thorough ... You made it sound so easy ..I will be doing this....thanks man
Thank you so much, this tutorial gave me the insight and confidence to do this job, on a used DRZ400sm I just bought. 70$ in tools and seal kit, should arrive next week, thanks again
Just did this on my yz250f 08 and followed this video, it was really not that bad, quite fun actually!
Thanks for the video!
Great DIY vid thanks , I now have the confidence to have a go myself
This is a very helpful video, thank you for posting this
This is a great video, and it was really in-depth
I have watched several of your videos, and have found them to be a huge wealth of information. I greatly appreciate your sharing them. Thank you!
Have you done a video on how to check and adjust the valves on a yz450f? Your instructions are very easy to follow, more than some others. I am a bit punchy doing it the first time. I have adjusted MANY valves on various SBC street motors and race motors and understand the process. Thanks again
Awesome video! Very helpful and takes the fear out of doing it yourself.
Thanks buddy you explained it well and got my first seals done myself. Legend
thank you! I've never done it before but just did by following the video.
Great demo many thanks!
Thank you! I have the service manual but your video was much more helpful!
Returning to this video again to do my fork seals, thank you!
Thanks Scott, very useful and helpful video
Excellent vid mate .Thank you
Great instructional video! This will help me a lot.
awesome job I will definitely be doing this myself when its needed
Thank you, I wish you would do one for a sport bike . I have a Honda VFR, would it be similar to what you show here.Great video and a very clean workshop.
Thank you for sharing your knowledge, great video
How could anybody give this a Thumbs Down? he did this Perfectly
Great video just done my 2010 yz450f made the hole job so much easier thanks so much.
Thanks for the helpful video. Super easy to follow!
Thank you for this great video...everything looks very easy when you know how to do it, it's not your's first time :) and if you have a proper tools, just perfect, you can do it on your own...greetings from Serbia
This is an EXCELLENT video, thank you.
Awesome content! Thank you.
Great video! Thank you Scott!
Hi Steve watched your DIY 10X 4 my CRF250R 2017 thanks a bunch!!! Johnny
Wonderful explanation.
Thanks,
I followed this video to a tee and it was simple Great Video!
Excelente Master, bonito taller, nice work.
great helpfull video. i need to learn to keep work area clean like Guss,
thanks for your clear explanations!
Man. Thank you. I have a 2009 YZ450F. Great video
Excellent video!! Thanx4sharing, thanx4caring.
This video was very satisfying to watch for some reason. You have a very clean and organized way of working. I think that helped the job seem easy for most to try. I think I’ll price it out at my local shops first. If they’re too pricey, I’ll definitely be doing them myself.
I have a feeling my friends will be asking me to help them rebuild their shocks soon. 🙄😅
Most shops are 2 hours of labor + overpriced parts. ~$180 + ~$70 is what I've heard.
Make sure to confirm they will replace the bushings, washer, seal, clip and dust cover as well. Some shops are so corrupt they may even charge you for them but reuse anything that "isn't worn". While that is an acceptable procedure sometimes (as in this video), "worn" is a very subjective evaluation. In this video he justifies "worn" objectively by the copper coloring on the bushing, which is correct.
Add to the high shop price... a questionable mechanic who may over-tighten things and it's a potentially tougher and more expensive job the next time.
This is a awesome video
Awesome video!!! Thanks!
What a great video. Greetings from Austria
Very well done!! Thank you!!!
Very nice video bro! Regards from Venezuela!
Great work mate nice vid
Very perfect teaching.
Amazing video! thank you
Excellent, your the man.
Great instructions! Was thinking about trying to replace mine myself, until I saw the tools and material necessary to complete the job. Spend $150 on supplies and 4-6 hours of doing it myself, or spend $200 and drop them off at a shop...all about the convenience!
Since shen was a screwdriver and sockets $150?
You have to buy the seal kit, fork wrench, fork oil etc
Fork seal driver alone is $50.... for a job you'll probably do once. Buy the entire kit and we hit that $150 real quick.
Take the fork off of the bike and the shop only charges you .5 labor and parts (parts youre buying anyhow)
All depends on how often you need new seals
Thank you so much just did mine!👍
Professional jobbb...u r the man...
Very great video, the best on fork
thank you so much for the video
I understand very well.
Thank you very much! 🏁
Great video!
Great video
Bro I have to tell you!!!! Great vid!!!!!!!
Thanks i need to do mine, luckily a guy at work told me he would help me so thats good. Every one told me they suck except for him and now you and they dont look that bad.
you are the best I ever have. well done.
Wow! An expert at work! That is made to look very easy!
Will my WP 48mm Open Chamber Forks be similar?
Very well done instructional video thanks. Do you need to fill the cartidge with oil separately or is that using the main fork tube oil after a while?
I used gas, ended up burning down my brothers house..Thanks for the video!
Why am I even watching this, I don't even own a motor bike.
Well it must be time to get one ha ha
Why did i even watch it? I did my seals 2 months ago
That's the UA-cam way! Look up how to replace fork seals and 8 hours (give or take 16 hours) later you know how to change a diaper. or is it just me
@@skynjaydensdaddy hahahaha....or learn how the Saturn 5 rocket got off the ground....
@@readmore3634 oh you've watched that one also? LOL
The master Yoda of fork rebuilders👏👍👏👍👏👍👏👍
Thanks for your help I have just done my kx250f awesome save me some money 👍
Excellent video - thank you. I would have struggled big time otherwise! One question: YZ250 has cupped backup washer behind seal. Which way up should it go? Lip to the top or bottom?
awesome video
Could you do a video of someone changing fork seals on Cone Valve forks? I can't find a single video on the internet
Nice one, mate.
you're a Genius! Thank you.