Hard Surface Model A Spaceship No Add-Ons Required! Blender Tutorial

Вставка
- Опубліковано 26 сер 2024
- #scifi #blender #blender3d #b3d #tutorial
Amazing Assets & Training Material: gumroad.com/cb...
Join Patreon: / cbaileyfilm
Join UA-cam: www.youtube.co...
Join Discord: / discord
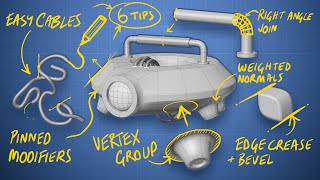
In this exciting tutorial I take you through the basics of how to hard surface model a sci-fi drop-ship. We create the base mesh and then build a few greebles to place across the surface using some cool techniques!
blender 2.8
blender 2.82
blender 2.83
blender 2.90
blender 2.9
blender 2.91
blender guru donut
how to make a gfx


The dark line down the center was caused by there being a face inside the geometry. When you extruded the back it created the face. Whenever you extrude along a mirror you should turn off the mirror to find and delete any interior faces.
Great tip! Thanks Chimpinalls!
@@CBaileyFilm If you turn on clipping on your mirror modifier it won't create interior faces, it also won't let you move the verts in the centre away from the centre.
@@TheMagicalAnimatron i bet he probably normally works with addons, and has just forgotten that in vanilla blender you need to click on so many settings to get something working right hehe.
Really dig this space ship breakdown for hardsurface and greeble bitties. Master of spaceship and time!
Hahah Thanks Glowbox!
YAAAASSSS this is exactly the kind of tutorial I am looking for. I love Hard surface stuff, but I am never sure of myself on what to do or how to fix annoying errors in shading. Watching your workflow is exactly what I needed to figure some stuff out. Super cool ship btw!
Thanks Yusri!
Hey Chris, another cool tutorial 😁👍 I'd only say, each time you make those small gaps like you do at 18:30 (and I've seen it in another tutorial as well) you bevel the edges, then hit E and S to extrude and scale them inwards. But the result will always be a little skewed. The best thing would be to hit Alt+E to Extrude Along Face Normals. This will give much better results. Oh by the way, talking about extruding and scaling: it's a bit confusing to say Inset is the same as extruding and scaling only that it saves a couple of key presses... this may be right for a single face, but just select two connected faces on a simple cube and compare the two methods, that's such a huge difference. And that's something you cannot do with E+S.
I need to start using Alt + E Thanks @gordon! That sounds way better - and I never realised the difference that insetting multiple faces at once has compared to extruding and scaling. So helpful as always! Thanks for helping figure this stuff out! high fives 👋
@@CBaileyFilm You're very welcome 😁 The Alt+E option would also help with the rings on the greeble spheres... you won't have to switch pivot points back and forth.
I've been using Blender for a while now, but there's always something to learn from your videos.
Today I learned about Snapping, and especially "Align rotation to target". To think of all the time I've wasted carefully placing things by hand.
I have to try out these things immediately, and then tell my son (another Blender fan) about it, so that I don't forget them.
I made some awful things in Blender, didn't thought there are some legends that make it better than realistic, I don't know how to appreciate you, buddy, keep up the great work.
VERY good tutorial. I'm glad to see a good tutorial that isn't basically an advertisement for some $60 add-on. I really enjoyed it, and I VERY much appreciate it!
Extrude Along Normals is more effective at keeping your inset extrusions the correct size and shape than just using extrude
if motion blur added then it would be even so real. Really nice
Now there’s something I’ve been looking forward to
Good! I hope you enjoy it :-)
Thank you sir.
I learned a lot from you.
The key things the tips the snapping.
Hundreds and millions of thanks sir.
I have yet to watch the whole video, but all i can say i can only admire people like you who can work everyday with addons and your own blender preferences, and still be able and not get frustrated making vanilla Blender videos/tutorials, i would not be able to do it, i could not get out of my usual workflow just to teach people something. So yeah, keep up the good work.
Like the first 4 min setting up mirrored and bevel with autosmoot/shade smooth/weighted normal, with addons takes like 2sec ( damn i love hardops and boxcutter :D )
One thing i think i can add (i mean you taught me SO much) is the mirror by object modifier.
If you added a mirror modifier to your engines, you can select the ship as the mirror object and you don't have to fiddle with array offsets.
You know you usually watch tutorials for something specific but watching your videos are always so insightful for the little tips and techniques you include in them. Great video!
The default cube was rescued from destruction! Haha
CBaileyFilm I rarely comment on tutorials but yours are very cool, calm and well thought through. As a founding member of Corel and Director of Product Development, your ability to show how a product can be used is one, soothing and two, you make Blender a more interesting product to use. I enjoy your tutorials with relish and mustard. Where the He*l is the Hot Dog? You don't miss a thing, well done CBaileyFilm....
i like the no plugins approach. esp for beginners. great job
Thanks marsmotion!
That's pretty nice! I'm so glad you made a video about greebles and such, because I've always wondered how someone would go about doing this. Nice work! Also, I really enjoyed the timelapse of just placing all the details and such. Really makes me want to get back into making stuff in Blender!
Thanks RSpudieD so glad you enjoyed it!
Man! we need to see the Roughness node tree in the main material. so good! Please show us the whole material setup at the end just for like 5 secs next time. I usually get stuck in the materials part. never knew we can do so much with just 3 greebles :)
You are an awesome Artist and Teacher. Learned so many things watching this. Thank you.
Wow thanks so much Todd!
Thank you so much for this video, I just came across it the other day. Was building a spaceship model to 3d-print for a Starfinder game and was trying to figure out a good way to break up the bland and uniform look of the ship and the greebos really helped me a lot.
Thanks for another awesome tutorial!
You are very welcome Zorro! Thank you for your kind words :-)
personal stamps for learning
4:57 press Z and S at the same time
5:00 double tap A to deselect all
5:03 E to extrude
5:18 loop cut = ctrl R and scale w/ S and Z at the same time (S first then Z)
5:25 face mode
deletes camera and light
6:13 I = inset
6:46 ctrl + b = bevel
7:34 making side jets
7:53 making back engines
11:00 you can extrude along normals with Alt+E
Yes! Gordon Brinkmann pointed that out as well. I never knew that! Such a better workflow! Thanks for sharing James.
1:39 you are a legend, did not know this. I love you.
Thank you so much for the video. I'm in the process of making a few such models in Blender and just needed inspiration for a workflow. I felt a bit stuck on the basic shape and thinking of how to proceed and what can come of it. You did a great job of giving me an outlook of what to do and what to expect.
This is amazing. Thanks mate.
Damn now I have to subscribe and binge watch your vids today! OH and just a note: Would have been nice to include the star creation and engine FX (I know stars are easy but for some reason mine never look that good)! Can you make a vid on that or was that already done?
Thank you very much. You are really really crazy, I was helped by this tutorial. Keep up the good work and enthusiasm 🔥🔥🔥
For the hatches/pipes and such you couod probably make then there own collections to add instances of that collection so changes carry across all of them. Might be better for performance to depending on how many there is
Clipping in the mirror mod!
this tutorial made me realise that adding details is too easy than i what in thing
Amazing project execution! I'm really benefiting from your awesome sci-fi tutorials.
Incredibly WOW! Can you also unfold that in UV editor? Sorry to edit this, but my system crashed.I always bevel with 3 - 5 -7 - 9 etc. With this you can delete every second polygon later if you want to make it game ready without losing the shape!
So glad you found it helpful! I probably won't have time to UV unrwrap this one but I do have some UV unwrapping tutorials on the channel if you want to check them out.
THX
You're welcome!
This is so good was searching for weeks for tutorials like this. Thanks a lot, subscribe and bells on xD. Keep it up!! (very good explained too)
Wow the base model was siccc. I'd probably use procedural textures and skip greebles
Quick tip: recalculate normals is SHIFT + N
@11:00 and @12:00 you should have used shrink/fatten instead of just scale and move. Would have achieved the same result, scale along normals.
Great tip count23! Thank you!
That looks amazing!
Thanks Finn!
really nice tutorial. learned a lot here from your creative process. do you plan to make the render tutorial also ?
fantastic tutorial sir
I love sci fi and i have been trying to do sci fi but for me the base mesh is the easiest it is just that all the small details like the pipes are so frustrating. I love Ian Hubert art style sort of dystopian cyberpunk but i always fail at the details part.
Just try to make one or two small detail bits like I did and then manually place them on your object. You can use that approach for a lot of different objects and it works really well for detail. Good luck!
Please also upload shading tutorial of this thing.
hastag that passion heehhehehe
Solid video my man.
Thanks as always Kwasi!
@@CBaileyFilm welcome! 💪🏾
A sub from me just because this was super amazing!!!!!!!!!!!! :D
Zed brush. Canadian detected!!!
Hahaha, American expat living in Australia actully... but same same.
Awsome tutorial, thx man!
Nice toturial! When you create the cylinder for the engines, how do you create it as a new object? When I create a new cylinder it gets added to Cube with the mirror modifier on, and ends up creating 2 cylinders at a time. Its difficult to edit.
Subscribed ❤️
we don't use "clipping" in Mirror Modifier anymore?
I didn't even think about that... lol
@@CBaileyFilm funny, last night I went to bock some stuff out and yes clipping is still in :D
*block
Thank you 🙏🏻
nice dude
Dang it.. Nice :D
Please please please make a shading tutorial of the spaceship from the clip attached in beginning of video. Or at least link snapshot of the nodes. Some thing please. I want my spaceship too look good. The modelling's gone waste if it ain't looking good. So please make a shading and compositing tutorial for this.
Really cool!
6:40 when trying to scale on y axis it's totally lock i can only work on z and x, if you have any tips i would be grateful
Awesome drop ship I’m running 2.79 struggling with basic cutting and mirror if I could design my own drop ship be nice thanks fellow blender advice please guys
Why is there a blender guru donut in the description XD
Awesome tutorial. I assume once your done modeling you then parent all the greebles to the main ship?
i did my own model follwoing this steps but im stuckwhen i have to snap in the faces of the spaceship. look like the greebles get a little inside not in the face itself :((
UPDATE: the problem was the Origin of the greeble!
Great problem solving Flavio!
thank you:)
how is it possible that i missed so much when i first watched this
could you do a star destroyer with more complicated parts on its surface for a paid course? :)
I really like your content. :D
I'm having some issues with constraint loops. I try to use them on a singular piece of my spaceship, but it sharpens the edges of the whole model.
23:22 press s+x+0 to straighten the loop cuts.
How did you texture it to get look like you had at the end?
did you link everything together as one object at the end?
When I merged by distance it did not fix the problem
Hi
Yo DemonPigg! How are you?
Is the shading, lighting and composition part on Patreon? I modeled the ship, but when it came to the materials and lighting, it looks like a plastic toy, so what I did to hide the lack of shading details, is photobash my render in Photoshop.
Hi @Alfred yes the full video on Patreon or for channel members on youtube goes over the materials and how to create some extra lights on the surface of the ship with geometry nodes. I don't go over any compositing in the video and I also don't create the jet flashes - I did that stuff afterward off stream but there's nothing fancy going on with those parts. All of the heavy lifting is coming from the shader.
@@CBaileyFilm Thanks for letting me know about the additional details provided!
Great tutorial once again. Thank you 👍🏼
What kind of music is playing 24:16?
hi :)
yo :)
I watch these for entertainment. I am a menace, I know.
o
Muchas Gracias!
16:07
19:11
I love how you often forget to turn on clipping with your mirror, then have an issue down the center of the model and adjust all the other modifiers to fix it. I may or may not have been guilty of this as well once or twice.
Its not a tuto
What the heck? Did you just give up? It just ended out of no where….please finish and do a second one with texturing..
I can't find one decent looking tutorial 😑 all the ships are so eew
I won't be supporting you by paying for your full tutoria. I am very disappointed to see you only offering this full tutorial video behind a Patreon paywall and a UA-cam paywall. This is not a tutorial. It's a demo.
Well he did say this version is the abbreviated version. Listen more carefully next time.