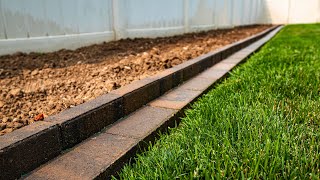
Easy Landscape Edging

Вставка
- Опубліковано 14 жов 2024
- Make your own beautiful edging for your landscape project! It looks way better than that store-bought plastic stuff and it holds up year after year! It's easier than you think and we show you how step-by-step.
- Навчання та стиль


Just stopped back to say Thank You !! I did a couple of my beds exactly like your video and they are beautiful. No more overgrown grass and the mulch stays in place. My wife loves it ❤️. I wish I could post the pics here 👍🏼
Please do. Takes some pics and post a link here. I'm thinking about using this technique as well.
@@perfectbeat .
This is a great idea you came up with.
For anybody else, who really wants to have this done. Cutting the sod perimeter with a shovel is a must first! Then, instead of a flat shovel, you want to use a pick ax. Use the flat side of pickax and pick out more than the depth you need for your selected pavers. To be easy, 4” below paver bottom. Minimum 4”s is important, easier to level out pavers,
Then bring in regular cheap o sand. (washed sand is a little bit easier to work with).
Use the sand as base(gravel much better, sand is easier) using sand, you’ll cut down leveling time. Also soil will compact and sit over time after it’s been disturbed. if next to the grass where you have constant watering, then even more so. The key is to excavate the soil that you’ve disturbed. Replacing that soil with sand or gravel it will drain water better and help the pavers stay level over a longer period time.
Contractors adhesive is great. But applying to much of it will make it impossible to take apart. Incase you need to make repairs(keep tree roots in mind always)!
Tx for reading. Sorry, not trying to be rude, it’s just what I do for living.
kas' n things Hey no problem. I appreciate your input and yes, this project definitely could have been more complicated. That said, I have had this edging on the other side of my yard for almost ten years now with Minnesota winters and have never had any issues with frost heave or movement at all. It looks like the day I installed it, was an easy job that was much more simple and cost effective. I couldn’t have hired this out for even a tenth of what it ended up costing me. Peace.
Very nice!! Fairly simple and very clean and neat looking!! Tks much for sharing!!
I love the way your landscape edging looks. Going to try doing it myself. Thanks for the great tutorial! 😁👍
Love the look of this. I will definitely do this.
Shows the best way to get a good looking edging without spending a ton of money. I like the wide base block with the brick topper idea....great video!
Thank you! Love this!
This is so different than any of my neighbors edging. It's a project I feel I can do myself. Awesome job!
Thats a great idea.
I have laid pavers down on my lawn, but your two layer idea looks great. Who knew there was landscape glue?
Right? It is still going strong too
Your wider base blocks are a very good idea. I've had success with lengths of treated lumber, one board "planted" for the mowing rail and a second board for the mulch "corral". My flagstone effort looked lovely but is difficult to keep clean. Now I am hunting for an edging that will work on free-form curved beds.
I favor shredded wood mulch. To help prevent it traveling, I trench along the inside perimeter of the planting bed. The added depth allows for deeper mulch. The thicker layer of mulch knits together and is less apt to stray. My trench is tapered and not more than several inches deep.
Great Job! I was on the fence deciding stacking blocks, rubber edging, or concrete blocks with the solid 1/2 block cap. You have helped me to decide Joby ;-)
I love how you did your edging I may do it the same way for mine. Thank you
Great tutorial, It's a bit more money but easier to use paver sand or Sakrete concrete mix to level the pavers which you can then mist to activate. The glue and brick is a very standard and very effective method and your Half block method works the best for adding cross pieces for strength.
Great video!
Ahh, Sakrete as a leveling agent. Interesting idea. Sakrete tends to lose some size when wet though. How do you counteract that?
Good job. The shovel is may not be the fastest but it is actually the best way to do this job if you want the result.
I was trying to think of an idea for a nice efficient edging design. I came across your video and it was exactly what I needed. Thanks for the info.
I love the brick on top of paver. Awesome idea.
Fine job and very good instructions. I like the mowerstrip and it shows You are a first! Would it be easy on a slope? Steps are just a way. Forget wood and do it so it will last! I am 80y and like when Young ones come and do it better. Do it once and enjoy it!
Sod cutter would save 8 hours of work. Looks great
What a unique way to lay pavers
Great video. simple and clear instructions, very doable project. finished project looks good. Mahalo
+wahinenuiloa mahalo ia 'oe!
Finally something worth watching. Nice video my bro.
This looks so pretty. Thank you for sharing.
Just curious after four years - how are they holding up? Do you have any rising or settling issues (don't know what part of the world you are in)? Did you consider a compacted rock bed under the pavers? It's looks great and I'm thinking of going this but I'm in Colorado where we have a long freeze thaw cycle so wondering about this stuff. Thank you!
I live in Minnesota so am in an even harsher climate. Still holding up great. Adhesive is still working great and the lines are still sharp, everything is the same as the day I put it in. Yes, you can compact rock underneath, put leveling sand, the works. But, the point of this job was to give a solution that was easier but held up over time.
good stuff! also minimizes the need for edging with a weed wacker!
Good vidoe
Very helpful thanks
I think it's easy enough to follow, I should be able to get the job done, good thing im not doing curves. The only problem I have is, when you split the brick in half did you smooth the rough ends? If so, how did you do it? or did you continue with a rough ends ( which I highly doubt )?
Bubble Blonde the bricks split surprisingly well actually. I didn’t smooth them at all.
@@JayferRattrap thanks, I hope it turns out for me.
Very nice 🙂
Thanks for the video! I’ll be incorporating these ideas into my own future garden! Would you happen to remember the name of the brick paver you used as a foundation before you laid the bricks? I’m having a hard time finding them online 😅
The freight cost will be expensive if you order online. I would simply go to any masonry yard or home cheapo and pick them up yourself. The big blocks are probably a standard 8" X 14."
New subscriber here from the Milwaukee area. That job looks good, thanks for the info! Keep up the good work
I really like this look and function.
Gracias por compartir soy mujer y deseo aprender como hacer estas cosas en mi patio. Bendiciones y saludos...
De nada. Estoy contento de que haya ayudado.
Would you recommend putting a base material under the pavers in Illinois climate? My concern is heaving and throwing the straight lines out of whack.
I live in Minnesota and haven't had any issues at all. Now, if you want to excavate enough to pack a base material before laying it down, it wouldn't hurt but the point of this video was how to do a job that lasts easily and, as I look out at my yard today, I see a paver job that looks as good as the day I installed it. Just make sure you get deep enough to get under the sod like I show you.
Looks good man. Seems like a good idea
You are Amazing! Great Job!
@Joby - can you post the link to those wide base blocks? I love the idea, but can't seem to find those exact ones at home depot?
Also, why wouldn't you use cement instead of adhesive for the bricks? just curious. Thanks much for the wonderful idea though. Off all videos, i love this idea
Shravan Payasam I used a “Riverfront Paver”. They are under $2.00 a piece. The Caulk I used Was actually a “Landscape Block Adhesive” from a company called LocTite. This project is now a few years old surviving Minnesota winters and summers and it still looks great.
I guess the soil does not freeze where you live. Where I live, when the soil freezes, soil forms bumps and anything laid down without crushed rocks become bumpy.
Actually, We live in Minnesota.
Excellent
Great instructive video.. thank you
A very good video on DYI, I have a question, what do you estimate with materials this project cost?
Bridgette Pruitt I think the project cost about $300 in all not including labor of course. Both pavers were pretty cheap and the adhesive ain’t bad either.
@@JayferRattrap thank you, the results really look nice.
@@bridgettepruitt5452 I did this project quite a while ago and, through Minnesota winters, it's still perfect.
@@JayferRattrap thanks for the information. I live in cold winter climate also. I have some beds that have pavers bricks around some beds but I really love the idea of the mowing strip. I have seen some videos that are similar on UA-cam, but your video is exactly what I am looking for. I worried about winter heaving. It seems your technique solves that problem. Thank you for sharing.
Do you need to concrete the blocks in?
Nope
Beautiful! Well done!
Eye balling it…use a leveler …so much better…I have eyeballed my blocks but it’s always just a little off…somewhere in the project…
I got my first job next week and I will install this type of edging. Would you recommend putting sand down below the base or concrete?
+LawnsByJordan sand would be best. If you really wanted to build it bulletproof (where it will withstand heaving, moisture, and temperatures over the years), I would lay a class five first, then sand, then edging.
Just wondering how many adhesive that you gonna need nice work though
Zymbolin I’m usually pretty liberal with it but you really need to make sure you seat it with a rubber mallet so it doesn’t move on you. The adhesive is great though as it’s gone through some pretty severe winters and the edging still looks great.
Do you have a link to the base pavers and the bricks? are they available at home depot or Lowes?Thanks
+T Fries I went to another big box store but I would think you could find both block types at either one of those stores.
Beautiful indeed
In Florida we have grass that would carry those pieces of plastic into the wee of night, and laugh about it under your window.
Jim M funny! There is nothing that’s plastic though. The bottom paver is concrete and the top is brick.
In Texas, we treat bahia as a weed and eradicate it as much as we can.
We just had over Memorial Day 5 inches of rain. My lawnmower left a note saying that it was going to a safe house.
Good job !!!
I like it but unfortunately it is a very expensive option where I live.
It is here too. That’s why I wanted to find a way to do it cheaper by coming up with a way to do it myself easily.
Great job thinks for the info.
Thank you sir. Really helps.
Super nice!
How would you do a slight curve?
armando martinez 90 degree turns work the easiest obviously but you can do slight turn if you have enough length.
What is the size of the pavers?
armando martinez the base pavers are 7.5 x 15
Why don't you use a level?
Well, for a few reasons. First and most important is that the property slants downhill at about a 5 degree angle from East to West. Second, this is not a retaining wall or any kind of structure that has any significant height to it. It is simply one paver on top of on edger. This is meant to follow the flow of the property. If I wanted it level, then 8 would use a series of levels on strings but, as I just explained, that is not the case here. Thanks for watching.
How do you address settling over time?
+Joseph Lloyd haven't had an issue. Hardpan clay here keeps everything pretty stable.
Joby did a great job. If needed, dry or wet mortar mix bed on top of the landscape fabric. You may want to salt the ground with Preem weed preventer before the fabric. www.preen.com
How do you bid papers though? That's my question
+Body By Ellis i'm not sure what you are referring to. If you could be more specific, I would love to help answer your question.
How do you bid a job like this to come up with a price.? I had a typo in my last comment. Pavers not papers?
+Body By Ellis i go $7 per foot plus supplies.
Joby F. Randrup ok thanks
What about curves?
theradiantchild Yes? I have those. Of course, they have to be gradual.
That's what i did. Having 90 degree turns adds areas you have to use a weedeater and i used larger blocks and stood them up behind the flat ones. No adhesive necessary..
Ah, close to an airport like me. It’s pretty annoying.
what kind of pavers are those?
+brandon rodgers which ones?
So no sand or concrete to level it??
Nope. Just careful excavation of the sod. Help to have clay obviously.
Joby F. Randrup good to know, thanks a bunch, will
Be trying this method early next spring by me.
great job u wear hat with cam for motorcycles lol
Easy? Lol, removing the sod with a flat shovel is not easy. Otherwise, looks nice
2nd that. Using a table top grinder to keep a sharp edge as you work really helps.
Agree with your statement, however, after all the efford, hard work and planning, and as with anything else, the sweat, and you will sweat it all out, the end results will be benificial. Nothing, no matter what it is or whst you attempt to do in life is easy, or ever do is easy, however after all the hard work, the results of beauty lasts a long time after it.
Yes.. I want a man like y’all. A Landscaper, y’all turn me on so bad
My guess is you are actually an Engineer LOL..
You didnt put landscape fabric under them ?
No. I wanted to use the planting area so didn't have room. Still looks great today by the way
👍👍