1-Enviroment Low Poly 2- Low Poly Car 3-Low Poly Character 4-Rigging Low Poly Character 5-Animated Rain and Splash Effects Awesome , everything i need at moment , CG is reading my mind, I love your channel
CG Geek: takes 20 minutes to make a rain effect that doesn't look like a blender project, it looks too realistic Me: *takes 20 minutes to find a realistic textures tutorial, 40 minutes to try and follow the tutorial, fails then gets a 1 hour mental breakdown, spends 6 days working my ass off for money to pay for my 2 hour therapy.*
I thought it was a rain tutorial hahahahahahaaaaaaaaaaaaahaaahaahaaaahaaahbjaaahbjaahbft7gzsesewrdcrfcfrcui5456t7zuhijkn 5rdci5dvhgiu 5red mkiguz5de4 mkde45 is a time of a great year of our life and to learn how we do our best friend in our world we will love to play and we can be together for more people to learn and to play the game and be able play more and play more than once a year or two years without being a good person and to learn the way that he has done and he is the one who will play it 👩💻 he play it 👨💻 has a little different play play in his head to his game play the song he will get the one that he is and he is a good friend and he is a great person and he is a great 👍 I hope 🤞 has been an awesome 👏 is a new one ☝️ I play this for my dad I think 💭 has to go back in a few weeks I think 💭 has a little different than what we had and what I would love ❤️ is to come home 🏡 night is my favorite place for my summer to play ok
We've all been there! Hell, I wish I had the donut tutorials back when I started, but with enough patience, you'll be able to make some really cool stuff! Don't give up!
Note: If you can't see the white particles baked or they are very small just increase the "effect solid radius" found in the upper plane's particle system.
@@CashCoryy Try to check the " use particle's radius " box right under the " effect solid radius ", I got the same problem with you and now it is solved. Good luck
Within the first few minutes I realized this was NOT going to be a beginner's tutorial. 😂 Somehow I watched the whole thing through. It all went so effortlessly I was simply in awe.
I'm not a pro or anything but I read a lot about anything graphics related and I have to admit this is the coolest thing I've seen in years. Subscribed!
Hi dude, This tutorial was fantastic. Some people will try to do this, so u have to explain slowly no matter if 10 more minutes added to video. If u mentioned as Tutorial then it should be clear and brief. I belive u got it...
For the glass material, you could also turn transmission up on the principled shader. But this method works too. as we say, multiple ways of doing things
If you are having problem with the splash at 12:18, under settings (where you set final resolution) set "Viewport", just under "Render Display" to "Final", that will show what the end result will be. Also, to get a better splash, increase initial Velocity on the sphere, -50m/s did the trick for me.
for people that try out this tutorial using newer versions of Blender (2.83+) if your splash simulation isnt rendereing properly as a mesh and youre stuck with a glass cube, what you have to do is enable the Mesh option under Liquid in your fluid domain. Be aware that it will severely hinder your splash sim so you might want to make adjustments to make it more "splashy", after that just apply your material and render as shown in the tutorial. also, in newer versions you dont have the same bake button, you have to change the cache type from Replay to All in the Cache settings and the button will appear. I only baked 50 frames since you dont need much for the splash effect and anything after that is just the water settling down in the domain.
This is the fastest tutorial I have ever seen in my life, I literally had to rewind every couple of seconds to get what you are trying to say or do... If this is intended for professionals, please do mention that on the video name...
I have absolutely no intention on building in blender or even dabbling in CGI in general... not whatsoever... but here I am, learning how to make realistic rain. Main because that rain looks amazing and CG Geek is legit.
For the flashing yellow light just add an area light at far end of road about half the length of the road up on Z, set to bright yellow, key frame with strengths of 10 and 0 about 24 frames apart and animate with 'contant' interpolation selected and add 'cycles' modifier for immediate regular on/ off effect.
This is fantastic, slowly intergrating Blender in my creative workflow and I found the dynamic paint feature to be fantastic! High quality, easy to follow tutorial, you're the best!
Really fantastic combination of techniques!! Just one tiny thing: Rain drops are mostly round, the impression of elongation is - as far as I know - only due to the motion blur. I think changing that would make the drops look even more realistic. ;) And perhaps an additional light source to illuminate them more dramatically...
That was INSANE!! A project of this complexity is decidedly beyond my reach, but the fantastic clarity of your instructions and presentation actually ENABLED ME TO DO IT! I mean, I have some cleaning up to do, since my brain exploded so many times, but MAN! You even sounded more enthusiastic than snarky in explaining it all to us. Ha. Spectacular. Seriously. THANK YOU. Sincerely grateful. Cheers!
Just commenting this because I had this problem. If your splashes are sitting halfway through your road, it's because the origin is set to the center of the picture. Move the 3D cursor to the bottom of the plane with the splash on it, right click and select set origin to 3D cursor.
It's funny how I was convinced that this is true rain, but after I watched whole video now i can clearly see that this is CG, with all those small imperfections...funny how our brain works
Amazing tutorial, eventhough my final render turned out to have no real sharp focus point. I must have messed something up cuz your camera settings didn't work for me. But apart from my noobyness it's really an outstanding tutorial, will most definitely use that in the future Thank you!
Amazing video:) i think you forgot to check auto refresh and cyclic for the image sequence node for the second sequence (if left unchecked only one image will be shown instead of dissolving)
make sure to rotate your image plane along -90 along Y axis instead of +90 along Y axis so that you can avoid trouble with the splash/ hair particle system in the end
Pause, rewind, pause rewind, pause rewind, I'm loving this tutorial , but please take a breath between sentences. But I will take this over a button fumbler any day. Thanks for the tut.
For those having trouble at 9:32. Turn on the add-on (Edit - Preerences - Add-ons - Node: Node Wrangler), Ctrl+Shift+left click on the orange bar with the name of the window
Nice one, I wish the particle system would have some more in depth descriptions for all the settings. I don't feel like testing hours and hours with different number configurations but the result here is quite good. (I think they plan on overhauling the particle system for a future Blender version)
yo cg geek, im just getting started and the fact that you have put all this cool stuff on youtube...man, I really love you and I really appreciate what ur doing, ur like a hero for noobs like me!
Could NOT figure out how to get my own little splash PNGs with 2.83's new fluid physics, but I found some online so I was still able to try out the animation. Very cool effect, great tutorial. Thanks!
We are not worthy to be here, you sir are a Blender master, like God level. I've learn so much by watching and for that I just wanted to say thank you. Also I'm just wondering why all the game studios hasn't coming knocking at your door because you have surpassed just about anyone that I've seen by a far measure. So please keep up the AWESOME work and I'll keep coming back for more and sharing your video's with as many people as I possibly can and I appreciate all you're doing to teach us mere mortals how to create some of the best scenes that I've ever seen. 👍💯👍
Setting it up with a transparent backdrop for more complicated land is pretty easy too- Add a color ramp to the "road" (Or whichever plane you want it to land on), Use a transparency node and a principled bsdf node with a mix shader, and set the color ramp to the factor of the mix. Sorry if I didn't describe it great, but it works!
i'm just here trying to learn visual effects after a visual effect artist seemed to ignore my messages. i wrote to him that it could be cool to work together, but he ignored me. there aren't that many visual effect artists here in Greenland and i really believe in what i have written and i would sacrifice anything just to make this shortfilm. just a new subscriber 😁
@@Tekkenfreek234 On the image sequence node in the shader editor; by default it's set to "Linear" but you can change it to "Smart" after pressing on its drop-down menu
For anyone struggling with getting the splash (white spots) for the rain to show up. Try playing around with the size, I ended up with .03 but everyone’s gonna be different
I really like these Blender videos, but honestly dude, you shouldn't call these "tutorials". They are more a demonstration of things you can do. You keep Saying "do this, do that, set this to 5, set this to 4" without explaining why or what effect it has, which means that instead of understanding I'm just repeating mindlessly. Instead of learning, I have to keep coming back to the videos and replaying many times just to figure out what things are the way they are. BTW, this has nothing to do with being "advanced" or not, it's just the pedagogy is seriously lacking.
Once you start to work with the items he shows you, you start to pick it up naturally. SLOW HIM DOWN (lol) to about 75% or 50%, and just try and follow along. You know you can stop and back up too. You can also look up other tutorials on the individual tools etc. and see how to use them and what they mean. Try and take as much time as he had to to learn these skills. He didn't learn all of this over night or in one sitting. I study and study to learn as much as I can on UA-cam. CG Geek and Blender Guru will never steer you wrong. ;)
@@KnightBott I'm more on your side than theirs however the description of certain things could be handy or even the scale of values, some values you change from 1 to 2 and 2 is 500% where as other things you change from 1 to 2 and 2 is 0.2%
This is one of the moments when you finish a few tutorials and think "I wanna try something a bit more challenging" and then realize you know nothing about Blender. Then you try to guess at how many more hundreds of tutorials you need to understand this tutorial.
It was a bit fast and undetailed, I could not make the exact thing. In-fact I believe a slow and detailed version of it described step-by-step would make it one of the best tutorials in youtube. This one has a potential of a gem tutorial. Anyways thanks for that I could have handled it in the end and it helped me a lot.
Justin Norman Exactly where i am stuck too! He’s doing this tutorial on blender 2.8 but the version at the present is 2.82. I think that’s the reason. Even i don’t have the fluid physics option. But you can try the “Liquid” in Domain type in fluid settings. Didn’t work for me, hope it works for you. If you do figure out, please let me know too! Cheers!
@@giexgi yea. Just type in Blender 2.81 and you'll find it. Though everytime you do it on the official site, it just keeps sending you to the newest one. I know somewhere in one of the replies of this comment section, someone provided a link to the actual version tho
3:36 The planet, known as HD 189733b, is a gas giant with a daytime temperature of 2,000 degrees Fahrenheit where it possibly rains liquid glass sideways amid 4,500 mph winds... FunFact
You need to turn on 'show emitter' in order to see the road on the final render. Otherwise it's ganna be just the hdr and the rain at the end. He told us to turn it off but TURN ON 'SHOW EMITTER'. thank you
Sirr you're super insane and I've never seen any youtuber create such photorealistic animation hopefully u make more vedios so we can understand more Love from India ❤️❤️
For those who have trouble with fluid simulation in newer versions of blender, this is a good tutorial that explains exactly the same process just for that part: ua-cam.com/video/_uV3XvktXN4/v-deo.html
This is a really cool tutorial! but its pretty old so choosing some settings are pretty different, it'd be cool to have the same tutorial but for the more recent blender versions!
Had an issue with the last 2 image sequences not effecting the scene at all, and the invert node connected to the multiply node just made it go green. if anyone else has this issue i seemed to fix it by ticking the cyclic and auto refresh box on the last two image sequences like he told us to do with the first one. maybe im just a noob but hope it helps someone
Notes: 5:28 Effect size I guess depends on the size of your scene, so if you don't get white spots in your bake of the image sequence, make the 'Effect Solid Radius' bigger.
@@ayushmanmukherjee1253 it's difficult to say, as it depends on your setup. I just put it up by a lot until I saw any change, just to make sure it was working, and then dialed it down again until my results looked roughly like the ones in the video. Also, if your image sequence is completely white instead of black, you went too far and need to dial it back down.
Someone please help! Not only are my raindrop splashes from 15:30 not rendering, but my road isn't rendering at all when I click F12. It shows up in Viewport Shading but not in the actual render. Any help appreciated!
Same thing here, only does the rain from fluid system render, and of course the HDR. But the road itself along with the splashes as planes are not appearing when rendering, not in cycles, nor in eevee.
its very refreshing and nice to see a actual good tutorial. skilled user explaining properly including professional looking outcome ... this is not just this this is great ... respect
is there a possibility you could make a video the splash part around 13:00 on 3.4 blender. I have tried to multiple times and researched everywhere I could. My icosphere drops water and creates a crater but edges don't turn into a splash. I don't know which option is the equivalent to the fluid/generate/subdivision. I have tinkered with other resolutions but doesn't seem to break the mesh into particles. I'd really appreciate it and so would many others I am sure.
hey you should be more specific sometimes cggeek tutorial skipped for useless explanation. just copy his node. the point turn on cyclic and auto refresh on image sequence
Does anyone know why at 12:15 when I get to the "baking liquid" it takes me several hours to download almost 40 GB and in the end no splash effect is modeled? Please i need help fast.
So I am having a bit of a problem near the end of the tutorial. Ii is the particle system for the billboards. The Billboards are not appearing with the density map. When I hit play a few pop up randomly and just stay there. I know I am missing one little button , one little setting. I went over this part of the tut for 4 hours and finally gave up LOL.
Same. I tried changing a bunch of things and rendering it differently but it results in the same issue. I can’t seem to figure out why it won’t render them in the animation
@@Grahamathan i left a comment on this video. Not sure how i’d link it. But if you search for my username in the comments i have an edit right at the top which fixed it for me. It’s a bit of an intensive work around (gpu wise) but it’s super easy.


1-Enviroment Low Poly
2- Low Poly Car
3-Low Poly Character
4-Rigging Low Poly Character
5-Animated Rain and Splash Effects
Awesome , everything i need at moment , CG is reading my mind, I love your channel
Você é brasileiro?
Ou só impressão mesmo?
Kkk
@@CarlosEduardo-od4ci Sou sim kkkk
how do you duplicate the orange boxes in the shade editing
@@ghostbaby3913 Shift+D
how to make a spalsh ?
Materials and shaders are the real killers. No matter how many material tutorials I watch, it still feels so foreign.
I can't make shit in blender but here I am, watching advanced rain making tutorial xD
You will feel amazing coming back to this in 4 months understanding what is going on
Honestly, blender now is so much better than it was a year ago. The evee update lowered that learning curve by miles. You’ll be able to do it.
Nice prof-pic girl
Blender with its 2.8x versions are very easy to learn now
If you open your lap/pc you will find this easy
Pac Tube thanks! So far I made a silly low poly axe, had no idea there's such a thing as nodes in this program xD
@@Dellojka
WTF
The last sentence I wrote was amazing 😂😂😂😂
I meant If you open your lap/pc snd follow his steps you will find this easy
lol
meanwhile im here freaking out, ecstatic that he just caslually named another website for free textures. THANK YOUUUUUU
CG Geek: takes 20 minutes to make a rain effect that doesn't look like a blender project, it looks too realistic
Me: *takes 20 minutes to find a realistic textures tutorial, 40 minutes to try and follow the tutorial, fails then gets a 1 hour mental breakdown, spends 6 days working my ass off for money to pay for my 2 hour therapy.*
cc0textures.com, take that, and look for a tutorial on how to set up blender PBR textures!
true ... {o_o)
same
Baby steps
Yellow sus
I cannot lie , I thought it was realistic .
Ahmed shakib it is tho
I thought it was a rain tutorial hahahahahahaaaaaaaaaaaaahaaahaahaaaahaaahbjaaahbjaahbft7gzsesewrdcrfcfrcui5456t7zuhijkn 5rdci5dvhgiu 5red mkiguz5de4 mkde45 is a time of a great year of our life and to learn how we do our best friend in our world we will love to play and we can be together for more people to learn and to play the game and be able play more and play more than once a year or two years without being a good person and to learn the way that he has done and he is the one who will play it 👩💻 he play it 👨💻 has a little different play play in his head to his game play the song he will get the one that he is and he is a good friend and he is a great person and he is a great 👍 I hope 🤞 has been an awesome 👏 is a new one ☝️ I play this for my dad I think 💭 has to go back in a few weeks I think 💭 has a little different than what we had and what I would love ❤️ is to come home 🏡 night is my favorite place for my summer to play ok
@Ante 1206 if your dying you can get some help and not do that
i am not having " image sequence " in texture so i cant add one please help
@@Huzzaifamughal Only in Blender 2.81
...and I'm sitting here trying to make a donut. Wow...
We've all been there! Hell, I wish I had the donut tutorials back when I started, but with enough patience, you'll be able to make some really cool stuff! Don't give up!
You gotta start somewhere man. We've all been there.
Still making my donut ha ha
You started with the donut.
I started with the sword. CG Fast Track is a good teacher
ya me too
The denoiser works even better when using the denoising passes.
It's only in the 2.8.1 beta version yet
Note: If you can't see the white particles baked or they are very small just increase the "effect solid radius" found in the upper plane's particle system.
What size did you do? I've done 1.000 and 10.000 and I still can't see the white particles in that first bake.
Thank you!
@@BrokenGlassesGaming did you ever find a solution because I'm having the same problem
@@CashCoryy Try to check the " use particle's radius " box right under the " effect solid radius ", I got the same problem with you and now it is solved. Good luck
@@CashCoryy I found the solution ! In the section of Dynamic Paint of brush , dont check the box of [ erase paint ]
I first watched this during my first week of blender, and now after 3 months i can understand everything in this video :)
im on my second day, having a breakdown. :D hopefully i will understand this too some day
This comment gives me hope lol. What other tutorials or content do you recommend for beginners?
Within the first few minutes I realized this was NOT going to be a beginner's tutorial. 😂
Somehow I watched the whole thing through. It all went so effortlessly I was simply in awe.
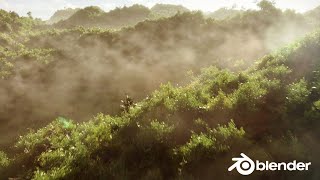
3:10 rain
5:34 surface
6:47 wet map
7:38 displace map
11:00 water splash 물 튀기는 거
13:18 environment
15:25 Splash 이미지 넣기
I'm not a pro or anything but I read a lot about anything graphics related and I have to admit this is the coolest thing I've seen in years. Subscribed!
Could you please remake this for the 3.0 series? A lot of the fluid sim and baking settings seemed to have changed so I'd really appreciate it!
Reading the manual for both versions might help. It's tedious, but often the functions are just nested somewhere else
Hi dude, This tutorial was fantastic. Some people will try to do this, so u have to explain slowly no matter if 10 more minutes added to video. If u mentioned as Tutorial then it should be clear and brief. I belive u got it...
AMAZING! Absolutely the best blender Rain I ever seen!
Thank you, master!
For the glass material, you could also turn transmission up on the principled shader.
But this method works too. as we say, multiple ways of doing things
yh but its quicker with the glass shader idk
If you are having problem with the splash at 12:18, under settings (where you set final resolution) set "Viewport", just under "Render Display" to "Final", that will show what the end result will be. Also, to get a better splash, increase initial Velocity on the sphere, -50m/s did the trick for me.
for people that try out this tutorial using newer versions of Blender (2.83+) if your splash simulation isnt rendereing properly as a mesh and youre stuck with a glass cube, what you have to do is enable the Mesh option under Liquid in your fluid domain. Be aware that it will severely hinder your splash sim so you might want to make adjustments to make it more "splashy", after that just apply your material and render as shown in the tutorial.
also, in newer versions you dont have the same bake button, you have to change the cache type from Replay to All in the Cache settings and the button will appear. I only baked 50 frames since you dont need much for the splash effect and anything after that is just the water settling down in the domain.
So that's why I never got to see the Bake button! No one ever told me that! Thank you!
the splash planes on mine does not work. they are just static after following what this guy says
What did u do to make it look more splashy?
Thank you very very much
ik this is 3y old but GOD THANK U i was getting mad ahahah
After watching this video, I'm not sure if the rain outside my windows is real or made in Blender.
Maybe we are not humans, just part of a big life render 🤔🤔
Hi 2D
@@retumaquin We are in a massive realtime rendering simulation where every atom is being constantly simulated on the quantum scale
@@retumaquin Well damn, the PC's really high end if it can handle all this..
@@bitslay Wow, you should get a god-ass pc if you want that to render.
Didn‘t realize it was possible to ADD in a DEFAULT cube 😱
*deletes cube*
....
*Adds cube*
Eric _ yeah but that‘s just sadistic
@@letterborneVods at this point it's just my natural reaction but i do feel sorry for it :(
All of the primitive objects are in their default state until you do something to them.
gnamp I know, it was a stupid joke about the default setup when you open a new file
This man has single handedly made my career
How about simple voice commands in Unity?..
"Create rain"
"More rain"
"More"
"A little more"
And its done..
SeriousName model?
@SeriousName the methods are certainly transferable.. results will vary, obviously
i am not having " image sequence " in texture so i cant add one please help
4 years later and this actually sounds realistic nowadays with some ChatGPT / AI integration in Blender.
This is the fastest tutorial I have ever seen in my life, I literally had to rewind every couple of seconds to get what you are trying to say or do... If this is intended for professionals, please do mention that on the video name...
I have absolutely no intention on building in blender or even dabbling in CGI in general... not whatsoever... but here I am, learning how to make realistic rain. Main because that rain looks amazing and CG Geek is legit.
For the flashing yellow light just add an area light at far end of road about half the length of the road up on Z, set to bright yellow, key frame with strengths of 10 and 0 about 24 frames apart and animate with 'contant' interpolation selected and add 'cycles' modifier for immediate regular on/ off effect.
This is fantastic, slowly intergrating Blender in my creative workflow and I found the dynamic paint feature to be fantastic!
High quality, easy to follow tutorial, you're the best!
Really fantastic combination of techniques!! Just one tiny thing: Rain drops are mostly round, the impression of elongation is - as far as I know - only due to the motion blur. I think changing that would make the drops look even more realistic. ;) And perhaps an additional light source to illuminate them more dramatically...
That was INSANE!! A project of this complexity is decidedly beyond my reach, but the fantastic clarity of your instructions and presentation actually
ENABLED ME TO DO IT! I mean, I have some cleaning up to do, since my brain exploded so many times, but MAN! You even sounded more enthusiastic than snarky in explaining it all to us. Ha. Spectacular. Seriously. THANK YOU. Sincerely grateful. Cheers!
HOLY THAT LOOKS SO REALISTIC
Everybody else: he does amazing tutorials! Me: omg we have the same hdri
Just commenting this because I had this problem. If your splashes are sitting halfway through your road, it's because the origin is set to the center of the picture. Move the 3D cursor to the bottom of the plane with the splash on it, right click and select set origin to 3D cursor.
It's funny how I was convinced that this is true rain, but after I watched whole video now i can clearly see that this is CG, with all those small imperfections...funny how our brain works
I'm amazed how well that turned out! Nice job. Very complex.
20 minute non stop commentary.
So amazing you are.
Cool , love them raindrops
not gonna lie , they had us in the first half
Best comment in this thread
Seriously had us in the first half but no one ended up following
Amazing tutorial, eventhough my final render turned out to have no real sharp focus point.
I must have messed something up cuz your camera settings didn't work for me.
But apart from my noobyness it's really an outstanding tutorial, will most definitely use that in the future
Thank you!
Ok I would never have thought of doing it this way. Way too cool...
I’m still on beginning stage but watching these vids r so satisfying
Hitting that like button in the first few seconds of the video has never been easier 👌
That's a talent.
I mean to make everything look so simple
Amazing video:)
i think you forgot to check auto refresh and cyclic for the image sequence node for the second sequence (if left unchecked only one image will be shown instead of dissolving)
I was going crazy till I saw this. Thank you.
1 year later and your comment saved me from hours of searching and frustration. THANK YOU!!
Thank you SOOOOOOO much.
Thankyou... i was going mad that what was wrong here
Dude that Cabinet behind you is lit 🔥🔥🔥
make sure to rotate your image plane along -90 along Y axis instead of +90 along Y axis so that you can avoid trouble with the splash/ hair particle system in the end
Pause, rewind, pause rewind, pause rewind, I'm loving this tutorial , but please take a breath between sentences. But I will take this over a button fumbler any day. Thanks for the tut.
For those having trouble at 9:32. Turn on the add-on (Edit - Preerences - Add-ons - Node: Node Wrangler), Ctrl+Shift+left click on the orange bar with the name of the window
Thank you , legend
When I do this it turns pink, instead of white how it shows in the video. How do I change the color?
@@infvmouss it turns out pink right?
enable the tick at "auto refresh" in the img sequence box
Nice one, I wish the particle system would have some more in depth descriptions for all the settings. I don't feel like testing hours and hours with different number configurations but the result here is quite good. (I think they plan on overhauling the particle system for a future Blender version)
yo cg geek, im just getting started and the fact that you have put all this cool stuff on youtube...man, I really love you and I really appreciate what ur doing, ur like a hero for noobs like me!
Thank you for this video. I appreciate the effort you put into all your videos and I just love you, man. 100% supportive of CG GEEK
wow I never knew about the hair particles can be combined with image sequence. Thank you for the tutorial.
Could NOT figure out how to get my own little splash PNGs with 2.83's new fluid physics, but I found some online so I was still able to try out the animation. Very cool effect, great tutorial. Thanks!
We are not worthy to be here, you sir are a Blender master, like God level. I've learn so much by watching and for that I just wanted to say thank you. Also I'm just wondering why all the game studios hasn't coming knocking at your door because you have surpassed just about anyone that I've seen by a far measure. So please keep up the AWESOME work and I'll keep coming back for more and sharing your video's with as many people as I possibly can and I appreciate all you're doing to teach us mere mortals how to create some of the best scenes that I've ever seen. 👍💯👍
Your hands are magical! and you are awesome!!!!!!!🤩🤩🤩
Setting it up with a transparent backdrop for more complicated land is pretty easy too- Add a color ramp to the "road" (Or whichever plane you want it to land on), Use a transparency node and a principled bsdf node with a mix shader, and set the color ramp to the factor of the mix. Sorry if I didn't describe it great, but it works!
Thank you so much for the tutorial and for sharing your secrets!! I have finished it. The rain looks amazing!
I like messed up in the texture section and I'm just like dying in the inside. I can't do this bro :'[....Let's try again then!
Watched this for about 2 hours, I can't even make a donut in a week. I'm just gonna look to download it online... LMFAOO
If youre struggling to get a nice splash around 13:00, increase the velocity of the sphere
it looks so realll!
I started making fluid simulations and to my surprise i Learned everything in blender quickly
5:35 "selecting the cannabis" lol, great tut btw
Wow man thank you, I am trying to get back to CG after having switched to business and your tutorials bring a ton of value.
Thank you
i'm just here trying to learn visual effects after a visual effect artist seemed to ignore my messages. i wrote to him that it could be cool to work together, but he ignored me. there aren't that many visual effect artists here in Greenland and i really believe in what i have written and i would sacrifice anything just to make this shortfilm. just a new subscriber 😁
Were you going to pay him? Because if not, I would ignore your messages too.
Amazing thank you!!!!
you forgot something. you need to set interpolation to "smart " on the image sequences so that blender does not show them as pixelated textures.
Where do you find that option?
@@Tekkenfreek234 On the image sequence node in the shader editor; by default it's set to "Linear" but you can change it to "Smart" after pressing on its drop-down menu
For me only cubic worked out, but thanks for the advice anyway...
this is old but i apprieciate you
For anyone struggling with getting the splash (white spots) for the rain to show up. Try playing around with the size, I ended up with .03 but everyone’s gonna be different
You made my day, big hug
I really like these Blender videos, but honestly dude, you shouldn't call these "tutorials". They are more a demonstration of things you can do. You keep Saying "do this, do that, set this to 5, set this to 4" without explaining why or what effect it has, which means that instead of understanding I'm just repeating mindlessly. Instead of learning, I have to keep coming back to the videos and replaying many times just to figure out what things are the way they are. BTW, this has nothing to do with being "advanced" or not, it's just the pedagogy is seriously lacking.
talkin' facts right there
Exactly
x2
Once you start to work with the items he shows you, you start to pick it up naturally. SLOW HIM DOWN (lol) to about 75% or 50%, and just try and follow along. You know you can stop and back up too. You can also look up other tutorials on the individual tools etc. and see how to use them and what they mean. Try and take as much time as he had to to learn these skills. He didn't learn all of this over night or in one sitting. I study and study to learn as much as I can on UA-cam. CG Geek and Blender Guru will never steer you wrong. ;)
@@KnightBott I'm more on your side than theirs however the description of certain things could be handy or even the scale of values, some values you change from 1 to 2 and 2 is 500% where as other things you change from 1 to 2 and 2 is 0.2%
This is one of the moments when you finish a few tutorials and think "I wanna try something a bit more challenging" and then realize you know nothing about Blender. Then you try to guess at how many more hundreds of tutorials you need to understand this tutorial.
It was a bit fast and undetailed, I could not make the exact thing. In-fact I believe a slow and detailed version of it described step-by-step would make it one of the best tutorials in youtube. This one has a potential of a gem tutorial. Anyways thanks for that I could have handled it in the end and it helped me a lot.
i don't even finish making donut with blender but here i am
same XD
11:36
Anyone know how he was able to get the second fluid option to be an option?
The only options I have are Domain, Flow, Effector, and None
Justin Norman Exactly where i am stuck too! He’s doing this tutorial on blender 2.8 but the version at the present is 2.82. I think that’s the reason. Even i don’t have the fluid physics option. But you can try the “Liquid” in Domain type in fluid settings. Didn’t work for me, hope it works for you. If you do figure out, please let me know too! Cheers!
@@giexgi yea, I just went ahead and downloaded the same version as him. I wasn't sure how to make it work in the new version, lol
@@giexgi I'm also stuck at this same point
Justin Norman wait can you download older versions.? I didn’t know it was possible
@@giexgi yea. Just type in Blender 2.81 and you'll find it. Though everytime you do it on the official site, it just keeps sending you to the newest one. I know somewhere in one of the replies of this comment section, someone provided a link to the actual version tho
3:36 The planet, known as HD 189733b, is a gas giant with a daytime temperature of 2,000 degrees Fahrenheit where it possibly rains liquid glass sideways amid 4,500 mph winds... FunFact
thank you
Don't forget, everything started with cube 😍
Tbh, your videos are amazing and i kinda got into low poly and mid poly car modelling because of you.
trying to watch tutorial on 0.5x speed
very difficult to follow
this helped a lot
I think ima have to do the same. This guy goes so fast
try watching some CGMatter
He is too fast 😕
blah blah lah blah many of viewers are just starting out then blah blah blah!
You need to turn on 'show emitter' in order to see the road on the final render. Otherwise it's ganna be just the hdr and the rain at the end. He told us to turn it off but TURN ON 'SHOW EMITTER'. thank you
You single handedly saved my blender file from being binned!
OMG THANK YOU SO MUCH,I'VE BEEN SEARCHING FOR THIS FOR HOURS,,THANK YOU VERY MUCH 😭
You turn it off for the road above emitting the raindrops, not the road below for the splashes.
So around 9:40, what are you connected to? When you first introduce the wet map?
im also really confused
, because of this problem my wetmap doesnt function properly
@@houdie1181 SHIFT LEFT CLICK ON A NODE it will enable viewer mode.
Very clever procedural approach! Bravo!!!
You have a very unique way of displaying your [super] computers
Thanks sooo much :D
This is looking so good, cant wait to actually use this in my animations 👍
me: oo this is great, i can use this to get back into blender
me mid video: yeap i have no clue what any of this is
This is the problem with tutorials there is no one way to make something on blender it's mostly experimentation
The rain was so realistic, I am confused...which one is real? My hand, or this anination in blender?
*WHAT?*
animation* sir. you spelled it wrong
@@pushkarc28 ngl aninstion spaund- sounds befurr
Sirr you're super insane and I've never seen any youtuber create such photorealistic animation hopefully u make more vedios so we can understand more
Love from India ❤️❤️
This is absolutely amazing! Thanks for sharing the knowledge! Cheers!
UA-cam algorithm: "You want to see something cool?"
Me: "I mean sur-"
UA-cam algorithm: "LOOK AT THIS RAIN"
cool right
For those who have trouble with fluid simulation in newer versions of blender, this is a good tutorial that explains exactly the same process just for that part: ua-cam.com/video/_uV3XvktXN4/v-deo.html
thank you random stranger i was looking for
Thx i use blender 3.1
Thank you! I was going crazy, thought the program had glitched or something
You got a separate place in heaven
Thank you very much for sharing! Most of the alternatives were using add ons.
The person who is reading this comment, I wish you great success, health, love, happiness and Good Mood.
This is a really cool tutorial! but its pretty old so choosing some settings are pretty different, it'd be cool to have the same tutorial but for the more recent blender versions!
That's the most amazing thing I've seen in a long time. I thought it was real.
Had an issue with the last 2 image sequences not effecting the scene at all, and the invert node connected to the multiply node just made it go green. if anyone else has this issue i seemed to fix it by ticking the cyclic and auto refresh box on the last two image sequences like he told us to do with the first one. maybe im just a noob but hope it helps someone
i have same issue did u fixed it?
update: i solved that issue just check the box by checking the cyclic and auto refresh box under img seq texture
@@heliux9166 if i enable the cyclic and uto refresh on all of 3 img sequences it crashes, how did u do it?
Thank you!
@@sborropoly it shouldn't crash, maybe some glitch?.. Try to reinstall blender.. Because thats the only way to solve that problem
Notes:
5:28 Effect size I guess depends on the size of your scene, so if you don't get white spots in your bake of the image sequence, make the 'Effect Solid Radius' bigger.
But how much
can u help me?
@@ayushmanmukherjee1253 it's difficult to say, as it depends on your setup. I just put it up by a lot until I saw any change, just to make sure it was working, and then dialed it down again until my results looked roughly like the ones in the video. Also, if your image sequence is completely white instead of black, you went too far and need to dial it back down.
@@cathiz3387 Thanks for the help, let's try
Got 80% of the images as like the video. Will it work? or I need 100% of the images just like the one showed in the video.
Someone please help! Not only are my raindrop splashes from 15:30 not rendering, but my road isn't rendering at all when I click F12. It shows up in Viewport Shading but not in the actual render. Any help appreciated!
I have this exact same issus, did you find any solution. Also, comment to get it higher.
Same thing here, only does the rain from fluid system render, and of course the HDR. But the road itself along with the splashes as planes are not appearing when rendering, not in cycles, nor in eevee.
FIgured it out, select the plane and go to Object properties, then under instancing check the box: Render Instancer.
I LOVE YOU SSOOOOOOO MUCH
YOU ARE AWESOME FOR 4K RAINING!!!!
its very refreshing and nice to see a actual good tutorial. skilled user explaining properly including professional looking outcome ... this is not just this this is great ... respect
is there a possibility you could make a video the splash part around 13:00 on 3.4 blender. I have tried to multiple times and researched everywhere I could. My icosphere drops water and creates a crater but edges don't turn into a splash. I don't know which option is the equivalent to the fluid/generate/subdivision. I have tinkered with other resolutions but doesn't seem to break the mesh into particles. I'd really appreciate it and so would many others I am sure.
I have the same issue, I have played around and increased the velocity to around -12m/s but still it only creates holes not water droplets
9:05 i add the image sequence, connect the mixrgb node, and change it to add, but none of the splash effects are showing up.
same
My blender 2.90 has no image sequence in the node editor
@@mustafa.blender3d nope
hey you should be more specific sometimes cggeek tutorial skipped for useless explanation. just copy his node. the point turn on cyclic and auto refresh on image sequence
cyclic and auto refresh should fix it :)
Does anyone know why at 12:15 when I get to the "baking liquid" it takes me several hours to download almost 40 GB and in the end no splash effect is modeled? Please i need help fast.
You might have been using a new version of Blender, which has a different fluid simulator.
Thank u, I finally made it. It took me a lot of time but I made it. Wow this feeling is amazing, my very own rain.
How did you do the paintmaps and wetmaps. Mine not showing.
Also theres no fluid type in fluid physics
I am so sleepy and have absolutely no comprehension of what is going on, but it looks very dope. Good job dude.
So I am having a bit of a problem near the end of the tutorial. Ii is the particle system for the billboards. The Billboards are not appearing with the density map. When I hit play a few pop up randomly and just stay there. I know I am missing one little button , one little setting. I went over this part of the tut for 4 hours and finally gave up LOL.
same
Same. I tried changing a bunch of things and rendering it differently but it results in the same issue. I can’t seem to figure out why it won’t render them in the animation
Same thing happened to me. Did you ever figure this out?
@@Grahamathan i left a comment on this video. Not sure how i’d link it. But if you search for my username in the comments i have an edit right at the top which fixed it for me. It’s a bit of an intensive work around (gpu wise) but it’s super easy.