I’m doing countertop. First layer of epoxy had a lot of bubbles for one reason or another. I’m in the process of sanding it down starting with 80 grit and working up. Just doing some by hand they don’t appear to be deep so I’m hoping the sanding and repour work. It can be very frustrating. This time after sanding I will wipe with alcohol and microfiber cloth. I will make sure it is mixed very well. Any other suggestions? Torch didn’t help keep all bubbles out first time but I’ll try again. Other than the bubbles it looked great. So I hope I have the same luck. Your table looks exceptional! Great job! I think you have to enjoy this type of thing.
Yes, bubbles are quite common, very frustrating but part of the process, so just reframe your perspective :) I have been wanting to try thinning epoxy with mineral spirits to see if it will seep deeper into the holes, and use this to do just a seal coat. But you could also try CA or hot glue to fill the voids before pouring epoxy. Use an electric sander and wear a mask! It may take several coats, but that’s okay. Yes try and enjoy it haha cheers!
You should have done a thin seal coat first which seals the voids and then go a little thicker on the subsequent coats. Great job though. Have a great day my friend.
That's essentially what I did during the first coat, but I guess I may have used too much. Anyways, thanks for watching and for the comment! Take care.
I don't know if you read all the days or not but I really like your dedication to getting it done and seen it through to the end I work in the construction world and not a lot of people do that it doesn't seem like anymore and I really did like the look of that table when you were done specially how it had set out all for a year awesome. 👍
Totally agree. I don't comment often, but I give him Kudos for being honest about his multiple difficulties rather than cutting to finished product. I'm a general contractor & I see all kinds of substandard work out there & yes it's a shame!
I had this same issue in a beautiful maple table. Even thought I had my ducks lined up by doing my research and applying a couple coats of finish oil and sealer. But I still had a massive bubble problem along certain parts of the grain. It was devastating to see. In the end I had to take it all off and try again. Surprisingly wood wax finished was the ticket, and I had zero bubbles after applying and buffing the table with it. Lessons learned the hard way. Thanks for sharing yours. Makes me feel better knowing many of us have done the same thing.
You are some are some patient fella, I dismantled and old structure (60 years) used the 2 x 4 to make a table very similar to yours, planned them on 4 sides, laminated them sanded it down to 220. I am having all kinds of trouble with bubbles, thank you for making video gave me some great ideas Mike T.
Thanks for showing your mistakes so that I also can learn from it. Very informative. Making mistakes is one of the best ways but also can be one of the hardest ways to learn. Beautiful table.
I done hardwood floors with my brother in-law years ago.. You might try a woodfloor feeler to feel the cracks, then sand it off.. Also use sheeps wool that wraps around a block with a small handle to apply a thinner coat of the epoxy 1st. Could help from allowing air to seep out of the cracks.. Then build thicker coats 2nd & 3rd
I think your video was really worth watching. I have been making a table top for a few weeks now from recycled timber beams. I taped all cracks on the bottom and the side and used deep pour casting epoxy into the topside cracks and knot holes until no more bubbles. About to sand it all back now. I am going to polyurethane the whole thing as it will be exposed a bit to the sun (Australia) and the polyurethane has some UV inhibitors. I really like the look of your table. Hoping mine turns out as nice. Well done.
Thanks so much for watching and the comment! Sounds like your table is gonna be beautiful! Cheers mate
4 роки тому+2
Hello my friend. It's a good idea to renew the table you built last year. A great repair with epoxy. The table was magnificent. And he came back to life. congratulations. See you. big greetings. Stay healthy and happy.
The epoxy just enhanced the weathering a whole lot more to make a beautiful outcome. And that table taught you new techniques to be better at your craft. Very entertaining video, and this will help if I ever decide to do something like this and encounter the same problems you did.
Not just resin the bottom, but also resin the legs and all of the wood. I resin coat metal and concrete table tops for my outdoor area. The sun can really beat the resin up, however, but that's the case for any and every sealer. But I just make it a practice to strip and reapply the resin. Curious how this looks from being in the weather for a few years.
Geez - perseverance and a learning - it looks beautiful - well done. I am starting to learn how to pour and do epoxy - so thanks.. you taught me heaps..
Great idea for the weathered look. i do hope you learned something from this project. the hot glue was a great idea but now you need to do it on the second go round. Also denatured alcohol and a soft little brush will get rid of the whit e dust. also you need to roller the underside of the edges and that will cut down on the drips which will bring the job down to 2 or a worst 3 coats. I like the look good. RC
MAN this is so helpful! I'm really glad that you felt it was worth it to show this frustrating process. I'm about to try to apply some epoxy to an island I made from bowling alley wood and this really helps me to see what problems I might have. If you've discovered any other tips about filling in those gaps so there aren't as many bubble zones, please let me know! Thanks for the video.
I enjoyed this thank you, well done for persevering. I think its stunning. I was considering pouring some resin over a rattan topped ottoman I have to level it out but I guess all the gaps would make it a bubble nightmare. You can buy the very slow drying stuff that gives it much longer for the bubbles to work themselves out.
I like to see peoples mistakes so I don’t make them . Great video , table turned out great. I like to 2 tone look of the legs and the smooth table top. Would of been cool if you wood carved an emblem of some sort in the middle .
Thanks for the great video! Now I'm sure I don't want to even try epoxy on a similar plank board bar I have in my basement! I'll stick with Murphy's and paste wax!
Thanks for watching! I think you have the right idea, epoxy pouring on a work piece that has lots of cracks and holes can be a bit of a night mare ha wax is far more consistent. Cheers!
If you seal the wood with something that dries faster and clear like polyurethane, it helps tremendously with air bubbles that pop up on the final pour
Had this happen with some knots yesterday. When the epoxy started to thicken and was unable to seep down into the knot, I took a nail to the bubbles to force the air out. The epoxy was still thin enough to level out. I made the mistake of applying heat from a heat gun to one and it thinned out the epoxy causing it to run back down into the knot forcing out more air. Once it cooled, I took the nail to it again and all was good after that.
Painters tape along the edges on the underside clears up the dripping problem. The day after pour it can be remove with a little heat from a heat gun and it will pull right off taking the drips with it and leaving perfect edge.
Good idea, although I’ve done the paint trick and it sometimes gets stuck after the epoxy dries and you have to sand it off. I’ll try with heat next time. Thanks for commenting!
Pay attention to that table in the hot sun. Most of these epoxy resins wont stand up to direct sunlight and will turn yellow and eventually crack apart .The resin finishes are much better when used on furniture kept out of direct sunlight (indoors). Very nice job !.
i usually just wet sand it with 220 / 400 / 1000 grit then use a light coat of mineral oil on top . The mineral oil gives it a nice natural look while bring out the character of the wood .
@@SecondSonWoodworks Yep... @NicholasRVonStaden is right. You need to topcoat the Epoxy with a strong UV Inhibitor, like a Spar or Captain's Varnish.. Don't expect even that to last much more than 3-4 years without light sanding and recoating with the topcoat.. Nothing holds up to harsh Sun. It's the killer.
Excellent! I would keep a tablecloth on it to protect it from the UV rays of the sun. I would also recommend doing the legs. Just one or two coats. I finished a 90"x48' Table made of chestnut. Those worm holes never filled up. Thanks for sharing.
That is a great idea, wish I would have done that because the weather and sun has already done a lot of damage to the top, unfortunately. Wow that is a big table! Good job. Thanks for watching. Cheers!
Thank you! You know after doing this table and letting it sit outside for 4 years, I will never do epoxy for an outdoor table again, the sun, moisture, and temp changes ultimately destroy it. I’m gonna do another video on it at some point, but I’d recommend using a spar urethane instead for outdoor stuff, it will last longer. Best of luck mate!
Saw elswhere on UA-cam that two or three (or four) skim coats sanded in between seals the surface for the bubble free final big pour. Less goop for bubbles to enjoy (pop) and dries faster. I think wood glue and sawdust for gaps. I think.
Good video and info as I have some resin problems myself. Just wondering, I was always under the impression the resin items do not hold up well in the outdoor weather. Have you found that this is not entirely true?
I’d say it’s halfway true, if you are in shade than it seems to hold up well, but mine was in direct sunshine and morning moisture it has cracked and changed over the last several years, will have to do another refinish at some point. This is common for most outdoor furniture though. But I think it has protected the wood pretty well and I’ll still be able to refinish. I’ve heard you can thin epoxy down to get deeper into the grain. I think doing that may enable it to last even longer.
Good work, but you may find the epoxy is not UV protected and will degrade rapidly in the sun. A good UV urethane would keep the table protected for a much longer time. The urethane should be applied over a well-sanded (250 G) epoxy for a strong mechanical bond.
Just watched some professionals doing counter tops. The don't use or recommend flame, but just mist with alcohol, and the bubble pop. You say there is a lot of sun in your area, exposed over time, it will change the color, and even crack it.
The only thing you could have done to stop the infiltration of water was to put an epoxy coat on the bottom of the table prior to doing the actual table. Just run some tape around the edge, flood the bottom. Let it dry. Clean up the edge a bit then proceed like you did on top so the water that is in it won't increase or decrease. Also less chance of separation and expansions and contractions due to water.
I am working through the same issue,making a shuffle board table out of a old bowling alley i filled the cavities with wood glue,first i used super glue did not work, Bubble's are the enemy
You started wrong. You MUST, when you have an uneven surface, with holes, you have to first POUR, no brush, epoxy into those holes, you need to fill those holes first. Let them dry and cure, sand, clean and then POUR, NO brush, epoxy to the entire surface. That is the only way you will not have a crazy amount of bubbles. Using a heat gun, is better than a torch.
Hi bro! Very nice video! How is the table after these months? I’m looking for some outside wood works with epoxy, but didn’t find many information. Thank you!
Thank you! It has been great. I put a cast iron pan on it through recently, on accident, and it damaged a spot. I will be doing a buffing video soon with this compound I saw. Hope that it will take it right out. The epoxy works great with the outdoor furniture, if you apply it right.
Working with epoxy on any wood besides MDF needs a seal coat…1oz per square foot, just enough to seal the wood then you do your flood coat. Then you only have to go over the epoxy 2-3 times during the cure process with a torch to pop minimal bubbles providing you mixed it correctly.
Yes which is just about what I did, and there were still bubbles. So people should plan to sand out bubble after a seal coat in situations like this. Cheers!
let us know if that coat that went on over the non-sanded coat ever dis-adheres and starts lifting off. I've seen that happen before and it seems like most people see it anywhere between 6 mo's and 2 years
Whenever I've used a table top epoxy finish, tiny TINY dust particles settle on the finish as it cures. You know the ones, you can see them floating around in sunbeams. After the epoxy cured, these would be all over the surface. I'm not seeing any of them in yours during your final product B-roll at the end. How did you deal with this issue?
Yeah that is always a worry. The best thing I have found is realllllllyyyyyy cleaning my shop beforehand, using my air compressor, maybe even leaf blower to get out all the dust! Good luck mate
Not sure if that would keep the leprosy away 😉 but in all seriousness, sanding actually creates more pores in the wood, so it would maybe increase bubbles… but that’s just my two sense.
This may be a silly thought, particularly since I have never used epoxy, but what if you thinned it a bit? I have done several hardwood floors and when using polyurethane, I have used a wee bit of paint thinner in the mix. This seems to let any bubbles that may come up be easier to brush out. Just wondering.
@@SecondSonWoodworks get one of these. sometimes you need more than one seal coat also but it should just be seal and flood coat for over wood but sometimes you need two flood coats ya know. two projects are never the same. ,,,,, VEVOR 1.5 Gallon Stainless Steel Degassing Vacuum Chamber with 2.5CFM 1/4HP Vacuum Pump Kit (2.5CFM Vacuum Pump Single Stage + 1.5 Gallon Vacuum Chamber)
It is what it is when you use old wearhered dried out cracked wood, you just have to do what you did, put a layer on, fill some voids, sand down, etc. until your happy
I had that same “epoxy dust/bubble” problem. After I sanded I actually used a hose with a spray nozzle and it worked just fine to remove the dust from the small craters.
Also you can tape the underside with clear boxing tape it takes away the need for sanding later,lots of tricks you can learn with a little research that saves ya time and money,lol,take your time do some research and it all works out,lol
@@SecondSonWoodworks been there myself and been kicking myself for mistakes that with hindsight should have been obvious. Loved the never give up attitude mate.
APOXY WILL BUBBLE FROM NATURAL ABSORPTION INTO THE WOOD,YOU NEEDED TO seal the wood,sand then seal. Then seal with light coat of Apoxy,sand after dry,do it 3 times and removing bubbles each time,then by the 3 you should be ready for a poor,pooring right away you get what you got, a little research would have prevented it,lol
Yes it will! And that is essentially what I did, but because there were so many cracks and voids in this table, the bubbles kept coming!! IT was super hard to get it sealed. Thanks for watching and for the comment!
You are also using your sander the wrong way, you never angled your sander, you have to go as flat as you can, not pressing, you let the sander do the work so the surface is flat and even.
Hot Glue? REALLY??? Next time, try the Starbond CA glues. Clear, brown, black, several thicknesses available, and cured in 20 seconds, Sand, finish, done. ;)
@@SecondSonWoodworks You're not the first guy coming with the idea of keeping the patina on your surface but you still need to remove the loose varnish chip and start with a fresh scuff.
You put way too much epoxy on in the first pass. A light sealer coat will keep the bubbles down and make sanding much easier. Been there done that! keep trying


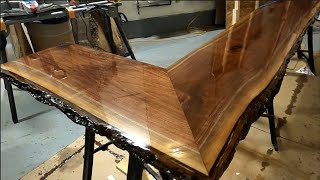


I’m doing countertop. First layer of epoxy had a lot of bubbles for one reason or another. I’m in the process of sanding it down starting with 80 grit and working up. Just doing some by hand they don’t appear to be deep so I’m hoping the sanding and repour work. It can be very frustrating. This time after sanding I will wipe with alcohol and microfiber cloth. I will make sure it is mixed very well. Any other suggestions? Torch didn’t help keep all bubbles out first time but I’ll try again. Other than the bubbles it looked great. So I hope I have the same luck.
Your table looks exceptional! Great job!
I think you have to enjoy this type of thing.
Yes, bubbles are quite common, very frustrating but part of the process, so just reframe your perspective :) I have been wanting to try thinning epoxy with mineral spirits to see if it will seep deeper into the holes, and use this to do just a seal coat. But you could also try CA or hot glue to fill the voids before pouring epoxy. Use an electric sander and wear a mask! It may take several coats, but that’s okay. Yes try and enjoy it haha cheers!
Your frustration has become inspiration. Thanks
You should have done a thin seal coat first which seals the voids and then go a little thicker on the subsequent coats. Great job though. Have a great day my friend.
totally would have saved so much labor with a thin seal coat. but you battled through it.
That's essentially what I did during the first coat, but I guess I may have used too much. Anyways, thanks for watching and for the comment! Take care.
Perhaps I should have done less the first time eh?
@@SecondSonWoodworks for sure! lol thin to win just like cards lol
@@SecondSonWoodworks yes. Put a VERY thin first coat. That seals it better. My first epoxy pour was the same way lol.
I don't know if you read all the days or not but I really like your dedication to getting it done and seen it through to the end I work in the construction world and not a lot of people do that it doesn't seem like anymore and I really did like the look of that table when you were done specially how it had set out all for a year awesome. 👍
Totally agree. I don't comment often, but I give him Kudos for being honest about his multiple difficulties rather than cutting to finished product. I'm a general contractor & I see all kinds of substandard work out there & yes it's a shame!
Thank you! I appreciate the support and the comment!
Thank you too! Appreciate the support :)
I had this same issue in a beautiful maple table. Even thought I had my ducks lined up by doing my research and applying a couple coats of finish oil and sealer. But I still had a massive bubble problem along certain parts of the grain. It was devastating to see.
In the end I had to take it all off and try again. Surprisingly wood wax finished was the ticket, and I had zero bubbles after applying and buffing the table with it. Lessons learned the hard way. Thanks for sharing yours. Makes me feel better knowing many of us have done the same thing.
Wow that is a great idea, wax, thanks for sharing! Appreciate you watching and commenting. Cheers!
You are some are some patient fella, I dismantled and old structure (60 years) used the 2 x 4 to make a table very similar to yours, planned them on 4 sides, laminated them sanded it down to 220. I am having all kinds of trouble with bubbles, thank you for making video gave me some great ideas
Mike T.
Thats awesome, sounds like a great project, but sorry about the bubbles! Good luck with them. Thanks for watching!
Thanks for showing your mistakes so that I also can learn from it. Very informative. Making mistakes is one of the best ways but also can be one of the hardest ways to learn.
Beautiful table.
Glad you found this to be helpful and thanks for watching! Making mistakes is just part of it.
Ditto!!
I done hardwood floors with my brother in-law years ago.. You might try a woodfloor feeler to feel the cracks, then sand it off.. Also use sheeps wool that wraps around a block with a small handle to apply a thinner coat of the epoxy 1st. Could help from allowing air to seep out of the cracks.. Then build thicker coats 2nd & 3rd
That is a good idea, thanks for sharing! Cheers.
I think your video was really worth watching. I have been making a table top for a few weeks now from recycled timber beams. I taped all cracks on the bottom and the side and used deep pour casting epoxy into the topside cracks and knot holes until no more bubbles. About to sand it all back now. I am going to polyurethane the whole thing as it will be exposed a bit to the sun (Australia) and the polyurethane has some UV inhibitors. I really like the look of your table. Hoping mine turns out as nice. Well done.
Thanks so much for watching and the comment! Sounds like your table is gonna be beautiful! Cheers mate
Hello my friend.
It's a good idea to renew the table you built last year. A great repair with epoxy. The table was magnificent. And he came back to life. congratulations. See you. big greetings. Stay healthy and happy.
Thank you so much! Cheers my man!
@@SecondSonWoodworks see you.
The epoxy just enhanced the weathering a whole lot more to make a beautiful outcome. And that table taught you new techniques to be better at your craft. Very entertaining video, and this will help if I ever decide to do something like this and encounter the same problems you did.
Thank you!! I appreciate your comment. Cheers to you!
You may want to epoxy the bottom also to prevent uneven moisture absorption. Love the weathered look you got.
Great idea! Thanks for watching
I saw another video in which they used a product called "redgaurd", on the bottom. Same concept and probably less time-consuming.
I thought the same
Not just resin the bottom, but also resin the legs and all of the wood. I resin coat metal and concrete table tops for my outdoor area. The sun can really beat the resin up, however, but that's the case for any and every sealer. But I just make it a practice to strip and reapply the resin. Curious how this looks from being in the weather for a few years.
Geez - perseverance and a learning - it looks beautiful - well done. I am starting to learn how to pour and do epoxy - so thanks.. you taught me heaps..
Thank you for watching, glad you learned some things. Cheers!
You can use lacquer or shellac to primer your wood before pouring your epoxy,,good table tho loved how you kept the natural patina weathered look ,👌
Great idea! Maybe I will try that next time. Thanks for watching and the comment!
Great idea for the weathered look. i do hope you learned something from this project. the hot glue was a great idea but now you need to do it on the second go round. Also denatured alcohol and a soft little brush will get rid of the whit e dust. also you need to roller the underside of the edges and that will cut down on the drips which will bring the job down to 2 or a worst 3 coats. I like the look good. RC
Thanks for watching and the comment! And yep, definitely learned a lot. Great idea for the dust. Cheers!
Good work! Don’t ever give up...you got talent!
Thank you so much! I appreciate the comment
MAN this is so helpful! I'm really glad that you felt it was worth it to show this frustrating process. I'm about to try to apply some epoxy to an island I made from bowling alley wood and this really helps me to see what problems I might have. If you've discovered any other tips about filling in those gaps so there aren't as many bubble zones, please let me know! Thanks for the video.
Glad this was helpful! Thanks for watching and thanks for the comment. Hope the island project goes well mate! Cheers
way to stay on it bro! outstanding work... i always say "nothing is perfect... but you can make it look almost perfect!
Thank you! Appreciate the positive comment :)
You can use shellac to seal the wood prior to epoxy. I learned the hard way myself.
Good idea! I will try this next time
I’m thankful that these problems arose for YOU as well lol thanks for the tips
Haha you're welcome! Cheers
Thank you soo much!!! The hot glue was a genius idea!
Thanks for watching!
I enjoyed this thank you, well done for persevering. I think its stunning.
I was considering pouring some resin over a rattan topped ottoman I have to level it out but I guess all the gaps would make it a bubble nightmare.
You can buy the very slow drying stuff that gives it much longer for the bubbles to work themselves out.
Thank you for watching! Yeah that may end up having lots of bubbles, but could be worth trying the slow drying stuff. Hope it goes well!
I like to see peoples mistakes so I don’t make them . Great video , table turned out great. I like to 2 tone look of the legs and the smooth table top. Would of been cool if you wood carved an emblem of some sort in the middle .
Thank you! This is why i share content. That’s a great idea! Next time. Cheers
Looks great brother... I recently moved from Carlsbad to the Mid-west and just started my Channel. I do miss the ocean.
Thank you man! And nice, I will check it out. The ocean is great, but so are the mountains!
Thanks for the great video! Now I'm sure I don't want to even try epoxy on a similar plank board bar I have in my basement! I'll stick with Murphy's and paste wax!
Thanks for watching! I think you have the right idea, epoxy pouring on a work piece that has lots of cracks and holes can be a bit of a night mare ha wax is far more consistent. Cheers!
If you seal the wood with something that dries faster and clear like polyurethane, it helps tremendously with air bubbles that pop up on the final pour
Great idea, the seal coat with epoxy didn’t seem to work, maybe even thin out the poly, thanks for watching
Can i use lacquer to seal the wood surface before I apply my epoxy? 😢
Had this happen with some knots yesterday. When the epoxy started to thicken and was unable to seep down into the knot, I took a nail to the bubbles to force the air out. The epoxy was still thin enough to level out. I made the mistake of applying heat from a heat gun to one and it thinned out the epoxy causing it to run back down into the knot forcing out more air. Once it cooled, I took the nail to it again and all was good after that.
Nice, good idea, thanks for watching and commenting!
Painters tape along the edges on the underside clears up the dripping problem. The day after pour it can be remove with a little heat from a heat gun and it will pull right off taking the drips with it and leaving perfect edge.
Good idea, although I’ve done the paint trick and it sometimes gets stuck after the epoxy dries and you have to sand it off. I’ll try with heat next time. Thanks for commenting!
Pay attention to that table in the hot sun. Most of these epoxy resins wont stand up to direct sunlight and will turn yellow and eventually crack apart .The resin finishes are much better when used on furniture kept out of direct sunlight (indoors). Very nice job !.
I have already seen quite a bit of wear from the sun. Amazing how strong it can be! Thanks for watching. Any tips on polishing?
i usually just wet sand it with 220 / 400 / 1000 grit then use a light coat of mineral oil on top . The mineral oil gives it a nice natural look while bring out the character of the wood .
Give it a coat of Captain’s varnish….high UV inhibitors….all boat people coat there I epoxy with some sort of UV inhibitor
@@SecondSonWoodworks Yep... @NicholasRVonStaden is right. You need to topcoat the Epoxy with a strong UV Inhibitor, like a Spar or Captain's Varnish.. Don't expect even that to last much more than 3-4 years without light sanding and recoating with the topcoat.. Nothing holds up to harsh Sun. It's the killer.
@@MarkThomas123 Sun really is the killer!!!
awesome video. I had thoughts of building a table close to yours this summer. Just ran out of time. Like the table and the epoxy brings it to life.
Thank you! I appreciate the comment. If you do build the table, hope it goes well.
@@SecondSonWoodworks Thank you!!
Excellent! I would keep a tablecloth on it to protect it from the UV rays of the sun. I would also recommend doing the legs. Just one or two coats. I finished a 90"x48' Table made of chestnut. Those worm holes never filled up. Thanks for sharing.
That is a great idea, wish I would have done that because the weather and sun has already done a lot of damage to the top, unfortunately. Wow that is a big table! Good job. Thanks for watching. Cheers!
Nice work 👍🏿 Any tips for a first time epoxy pourer covering an outdoor wooden bar top.
Thank you! You know after doing this table and letting it sit outside for 4 years, I will never do epoxy for an outdoor table again, the sun, moisture, and temp changes ultimately destroy it. I’m gonna do another video on it at some point, but I’d recommend using a spar urethane instead for outdoor stuff, it will last longer. Best of luck mate!
@@SecondSonWoodworks Any suggestions on a product. There seems to be just as many of those to choose from as the epoxy.
@@thatmanbolt2877 I have used the Helmsman and it is good
Wow dude looks amazing love the clever use of the glue gun ! Keep the awesome vids coming. I am one happy subscriber! Hope all is well man !
Reese! You are the man. Great hearing from you and thanks for the comment! I appreciate you. Hope you are well too! Take care.
did You try put dried leafs on table and apply epoxy, this time of year they looks great specially maple leafs with great colours
Ohhh that’s a good idea! I love all the things you could put into epoxy, leaves would be so pretty
Dope video. Thanks for sharing!
Thank you!
Very nice looking table
Thank you!!
Absolutely beautiful
Thank you!
Saw elswhere on UA-cam that two or three (or four) skim coats sanded in between seals the surface for the bubble free final big pour. Less goop for bubbles to enjoy (pop) and dries faster. I think wood glue and sawdust for gaps. I think.
Good tip! Thanks for sharing and watching
Good video and info as I have some resin problems myself. Just wondering, I was always under the impression the resin items do not hold up well in the outdoor weather. Have you found that this is not entirely true?
I’d say it’s halfway true, if you are in shade than it seems to hold up well, but mine was in direct sunshine and morning moisture it has cracked and changed over the last several years, will have to do another refinish at some point. This is common for most outdoor furniture though. But I think it has protected the wood pretty well and I’ll still be able to refinish. I’ve heard you can thin epoxy down to get deeper into the grain. I think doing that may enable it to last even longer.
This is brilliant. Fair play
Thanks for watching!
Good work, but you may find the epoxy is not UV protected and will degrade rapidly in the sun. A good UV urethane would keep the table protected for a much longer time. The urethane should be applied over a well-sanded (250 G) epoxy for a strong mechanical bond.
Thank you and yes you’re very correct! Thanks for the tip and watching, cheers!
3rd coats the charm
Right on!
Just watched some professionals doing counter tops. The don't use or recommend flame, but just mist with alcohol, and the bubble pop. You say there is a lot of sun in your area, exposed over time, it will change the color, and even crack it.
Great idea, thanks for sharing
The only thing you could have done to stop the infiltration of water was to put an epoxy coat on the bottom of the table prior to doing the actual table. Just run some tape around the edge, flood the bottom. Let it dry. Clean up the edge a bit then proceed like you did on top so the water that is in it won't increase or decrease. Also less chance of separation and expansions and contractions due to water.
Thanks for the tip!
I am working through the same issue,making a shuffle board table out of a old bowling alley i filled the cavities with wood glue,first i used super glue did not work,
Bubble's are the enemy
Awesome! That sounds like a cool project. Would love to see some photos! Cheers.
You started wrong. You MUST, when you have an uneven surface, with holes, you have to first POUR, no brush, epoxy into those holes, you need to fill those holes first. Let them dry and cure, sand, clean and then POUR, NO brush, epoxy to the entire surface. That is the only way you will not have a crazy amount of bubbles. Using a heat gun, is better than a torch.
Yeah you are right!’
Hi bro! Very nice video! How is the table after these months? I’m looking for some outside wood works with epoxy, but didn’t find many information. Thank you!
Thank you! It has been great. I put a cast iron pan on it through recently, on accident, and it damaged a spot. I will be doing a buffing video soon with this compound I saw. Hope that it will take it right out. The epoxy works great with the outdoor furniture, if you apply it right.
Overall nice table 👌
Thank you!
Working with epoxy on any wood besides MDF needs a seal coat…1oz per square foot, just enough to seal the wood then you do your flood coat. Then you only have to go over the epoxy 2-3 times during the cure process with a torch to pop minimal bubbles providing you mixed it correctly.
Yes which is just about what I did, and there were still bubbles. So people should plan to sand out bubble after a seal coat in situations like this. Cheers!
let us know if that coat that went on over the non-sanded coat ever dis-adheres and starts lifting off. I've seen that happen before and it seems like most people see it anywhere between 6 mo's and 2 years
Oof I hope it doesn't! I will let you know if it does. Holding up well now.
To avoid the bubbles shoulda used a sealer before the first coat of epoxy. So in effect, the first epoxy coat acted as a sealer
Yep for sure
Super cool! Love the way the finished piece looks
Thank you and thanks for watching!
Whenever I've used a table top epoxy finish, tiny TINY dust particles settle on the finish as it cures. You know the ones, you can see them floating around in sunbeams. After the epoxy cured, these would be all over the surface. I'm not seeing any of them in yours during your final product B-roll at the end. How did you deal with this issue?
Yeah that is always a worry. The best thing I have found is realllllllyyyyyy cleaning my shop beforehand, using my air compressor, maybe even leaf blower to get out all the dust! Good luck mate
Do you think you sand it before adding leprosy, it would decrease bubble
Not sure if that would keep the leprosy away 😉 but in all seriousness, sanding actually creates more pores in the wood, so it would maybe increase bubbles… but that’s just my two sense.
what about the prep work maybe sanding or planning
Yes I did that and there were still bubbles
When I use resin on a large flat surface I find the resin recedes from the edges as it dries. Why didn't you?
I wanted it to be in the edges so I let it drip over
I like that you owned your mistakes. Watching you figuring out how to fix what was wrong did not drone on and I watched the entire video. (:
I appreciate the comment and for watching. Cheers!
That's a beautiful stud pack
Haha exactly
@@SecondSonWoodworks the finest👍😁
The bubbles come from the epoxy soaking into the wood. You should try a sealer first next time.
Yep from all the cracks in the wood, and that is what the first coat was, a seal coat
This may be a silly thought, particularly since I have never used epoxy, but what if you thinned it a bit? I have done several hardwood floors and when using polyurethane, I have used a wee bit of paint thinner in the mix. This seems to let any bubbles that may come up be easier to brush out. Just wondering.
That’s not a bad idea, I’m not sure if that would work out, but may be good to try on a small scale. Thanks for watching and the comment!
If you want to work with thinner epoxy all you do is let the bottles sit in some hot water before you mix it
you need to seal raw wood prior to coat in epoxy. it eliminate your bubble problem
Do you mean apart from the seal coat of epoxy?
@@SecondSonWoodworks get one of these. sometimes you need more than one seal coat also but it should just be seal and flood coat for over wood but sometimes you need two flood coats ya know. two projects are never the same. ,,,,,
VEVOR 1.5 Gallon Stainless Steel Degassing Vacuum Chamber with 2.5CFM 1/4HP Vacuum Pump Kit (2.5CFM Vacuum Pump Single Stage + 1.5 Gallon Vacuum Chamber)
@@briancrabb4336 That would be handy to have!! Thanks for sharing
It is what it is when you use old wearhered dried out cracked wood, you just have to do what you did, put a layer on, fill some voids, sand down, etc. until your happy
Absolutely, you are correct! Thanks for watching
Also with under drops..use a 50 grit metal sanding disk on a angle grinder
Hmmm not a bad idea!
I had that same “epoxy dust/bubble” problem. After I sanded I actually used a hose with a spray nozzle and it worked just fine to remove the dust from the small craters.
Great idea! Thanks for watching and commenting. Cheers!
Can you show us how well the top is holding up after two years--Epoxy Pour on a 2x4 Table // What To Do If Epoxy Bubbles
Yes, I plan to do a video sometime later this year, stay tuned
Any reason I couldn't use a heat gun instead of the torch?
nope! You can absolutely use a heat gun. Cheers
One thing you could do to avoid bubbles is apply one coat first on the other side of the table .
Good idea
Also you can tape the underside with clear boxing tape it takes away the need for sanding later,lots of tricks you can learn with a little research that saves ya time and money,lol,take your time do some research and it all works out,lol
Great idea! Check out my recent table with the blue center, I use the tape trick. Thanks for watching!
You needed to seal the wood first also I think I would have put a thin coat of epoxy on the bottom .
Good idea! Thanks for watching
That was painful to watch. So many issues. Most pretty obvious Nevertheless a good outcome. 10 out of 10 for perseverance.
Think about how painful it was for me! So much sanding haha Thanks for watching!
@@SecondSonWoodworks been there myself and been kicking myself for mistakes that with hindsight should have been obvious. Loved the never give up attitude mate.
where to buy epoxy what brand is best
Links for the Pro Marine table top epoxy in the description. But there are lots of options you can find on the web.
Live and learn but research and experience helps save time and money.
Yes yes, agreed
tq for info..
Thanks for watching!
vv good thank
Thanks!
Why not use a plastic puddy knife ,scrap the drips off, before it got hard
Great idea, I should have done that
I thought epoxy cant take ultra violet rays from the sun
Epoxy breaks down in the sun
I think it eventually does, but it takes a quite a bit of time. Thanks for watching
Takes a bit of time
should have sealed the top first to eliminate the air bubbles
I did, but that didn’t fix it
Should have just put a piece of plywood on top with a 1X6 edgeband THEN poured epoxy...
That's a good idea! But I still think bubbles would be a problem.
APOXY WILL BUBBLE FROM NATURAL ABSORPTION INTO THE WOOD,YOU NEEDED TO seal the wood,sand then seal. Then seal with light coat of Apoxy,sand after dry,do it 3 times and removing bubbles each time,then by the 3 you should be ready for a poor,pooring right away you get what you got, a little research would have prevented it,lol
Yes it will! And that is essentially what I did, but because there were so many cracks and voids in this table, the bubbles kept coming!! IT was super hard to get it sealed. Thanks for watching and for the comment!
You are also using your sander the wrong way, you never angled your sander, you have to go as flat as you can, not pressing, you let the sander do the work so the surface is flat and even.
I actually find applying an angle to my sander to be useful when needed to get burn marks or cuts from the milling process out of the wood
You could also probably have used the glue gun before the first pour.
Yeah if only I had known then! Thanks for watching
You should have put a thin layer epoxy than let dry .
next time I will definitely do a bit less for that first coat. Thanks for watching!
Key,seal lightly 3 times,sand between each then ya can poor,reasearch you’ll find this out,lol
That is what I did but took a few more than three haha anyways research is good, cant disagree with that! Thanks for watching! Cheers.
Hot Glue? REALLY??? Next time, try the Starbond CA glues. Clear, brown, black, several thicknesses available, and cured in 20 seconds, Sand, finish, done. ;)
That is a great idea! I love CA glue. Thank you for the comment and for watching. Cheers :)
This one was a nightmare
I made it just to haunt YOU! 🤣
@@SecondSonWoodworks LOL Thanks. That table put up a fight for sure.
@@michael7324 haha yeah it really did. Thanks for watching!
You've done no prep work with a belt sander and a sealer.
I wanted to keep the weathered look, as I explain in the video, and the first coat of epoxy was meant to be the sealing coat. Thanks for watching!
@@SecondSonWoodworks You're not the first guy coming with the idea of keeping the patina on your surface but you still need to remove the loose varnish chip and start with a fresh scuff.
@@SecondSonWoodworks I understood it that way also )
A light seal coat all over the table would have stopped the bubbles, also show some content before you tell people to like and subscribe, just saying
I did do that and I’ve showed lots of content, just go look at my library. Just saying
Expensive table…
Not too bad
You put way too much epoxy on in the first pass. A light sealer coat will keep the bubbles down and make sanding much easier. Been there done that! keep trying
All we can do is live and learn right?!
but nevertheless
I kept going haha
sloppy job, super long video..
Let's see you do better buddddy
No mask no gloves your crazy! Read the label for epoxy when your bored one day🤢
Haha you’re right, I was a fool! Forgive me! I am trying to get better about wearing safety gear to protect my body.