No one in the US does it like this. Instead they use 14 pieces and step over one another. It obviously works, but the issue is water, etc get into each of the steps and its 14 points to fail. The way you do it is absolutely superb, problems are eliminated! So well done!!!
I'm in the UK, we sometimes use single pieces like you the US, here we call it single step flashing and normally use single step where there is a higher risk of wind and driving rain. On single step flashing the fold into the brickwork continues past the the next single step flashing above, so less chance of driving rain reaching the brickwork and running down behind the lead soakers. The downside of continuous flashing is the internal corners where the fold ends and driving rain can blow past the end of the fold onto the brickwork and behind the soakers.
@@gaztipton972 Thanks for your comment, it was helpful. I'm a DIYer in the process of roofing a small extension on a terraced house. I had done my research on UA-cam and planned to use the method in this video, but the roof pitch is shallow (18 degrees) and when I offered up and scribed a length of lead it didn't seem right. The horizontal cuts were so long they were running into the soaker upstands behind. I suppose I could have used wider lead strips, but I'd banked on 150mm and changing that would mess up my lead calculations and leave me with a lot of waste. Also, the more I looked at it the more I worried about the issue you raise in your comment. In driving rain (grim up north) I could imagine water getting behind the flashing, then even behind the soaker. Then I'd be banking on the membrane as the last line of defence. So I had a look around neighbouring houses with similar extensions and noticed they had all done single stepped flashing, so I'm going with that. I just made up some cardboard templates to get my head round it. The individual pieces work out about 450mm wide with a 120mm overlap and I'm much happier with that. Anyway, thanks for the comment. My head is already mashed from the slating, and hearing it explained by somebody else has put my mind at rest👍👍
@@Nagisasan36 I'm happy you found my comment helpful and thanks for your kind words. The advantages of single stepped flashings are-- 1-, You lower the risk of driving rain going past the internal cut corners, always try and overlap a minimum of 3 inches, but even if the overlap is much less, it's better than a continuous stepped flashing which has no overlap. 2-, You may be correct in thinking you'll need more lead for all the extra overlaps, but if you rotate your template around for every other flashing, then the vertical and horizontal cuts will match up with each other, then just choose the most economical width of lead to suit and you'll have very little waste. 3-, There will be none of the problems with expansion and contraction that you get with longer lengths of continuous stepped flashing.
@@gaztipton972 Thanks for your reply. Yes I figured out reversing the template as I was doing it. It worked out very well with the remaining lead. I got everything sealed today, so it's finished now. This was my first attempt at roofing. It's bloody hard work! Especially on your own, and constantly up and down the ladder figuring out what to do, forgetting tools etc. I must say one surprisingly difficult part of the job was just managing the space once I got near the top. I was constantly moving slates and tools around that were in my way. Also avoiding walking on the new slates. I was able to suspend a platform from a trestle to the top batten up to a certain point, but once I'd done the top course I ended up using planks of wood on old foam insulation boards to walk on the new roof as I did the lead work. It's a single storey extension abutting the existing house on two sides, so no ridge to hang a cat ladder from. Yesterday the inevitable happened and I broke a slate. I managed to repair it with a neat copper tingle, but annoying nonetheless. Now I just wait for the rain, chew my nails and watch. If it leaks, I'm getting a roofer to look at it - I'm knackered.
Really nice to see you back at work and looking after your back by using a bench at elbow height and not bending over. Keep the videos coming. Best regards.
Thank you. I’m working between 1 and 3 days a week at the moment. I feel I’m getting there. Just going to take time. Doing things like the bench at the right height really helps. Thanks for watching.
Thanks for watching my vids. I really appreciate it. And I think it’s really cool when they reach people all over the world. I’m curious. What is PA short for ?.
Thank you. I’m working between 1 and 3 days a week at the moment. When ever I work it always makes my back worse no matter how careful I am. I think it will get there. Just going to take time . Thanks for watching.
@@slbleadworks lts very hard I know Stuart .Being self employed the catch twenty two you’re backs killing you and you have to pay the bills .I hope things improve for you and you can achieve a happy medium.All the best Stuart
I seem to be having good days and bad. I’m still only working 2 to 3 days a week. And whenever I work it makes my back feel worse. Yesterday was a bad day. I’m off work today and it feels better. I think I’m getting there but I still need more time.
Always wondered how this was done , many thanks for sharing your knowledge - subbed Just one question , couldn't see any headers so assume cavity , if so what about cavity trays and weeps?
No the lead doesn’t need to do that. You just need to weather the soaker up stands. You need to bring the lead out onto the roof for single lap tiles. Some people like it done like this on slates too.
@@slbleadworks thanks for responding. I've never seen it done that way before. Do you have other videos showing how the tile was laid before the lead? I can't understand how you won't get leaks with the lead not covering the tile also.
@@jib6984ify No I don’t think I do. But on top of every tile sits a soaker. The soaker has a 75mm upstand. And 100mm out onto the tile. I’m sure you could probably Google an image of this.
Thank you. I have good and bad days and typically I’m working between 1 and 3 days a week. Whenever I work it always flares up no matter how careful I am. I think it will get there. Just needs more time.
Sorry I tried to show as much as I can. You just need to make sure there is 100mm minimum overlap. I usually take mine past so I can get all the angles the same . Thanks for watching.
@@Ireland1 I obviously did, I always use 1.2m it divides into 6m, It's easier to handle, But it does need an extra overlap which would waste the lead. Been using 1.2 for years, Not no more 👍
Have done an awful lot of them. Once shown many years ago. It wasn't hard. You always use your oil. We never had that. Your videos first time I had seen that used. Not sure what clips you are using. We used to use the offcut lead pieces. Fold them up and slot in the joint. Then spread them with a cold chisel. Then mortar point them. No mastics. Never knew any rules for length. Sub divide the total length into workable length. Cut it at that. Half the time the people that make the rules can only pilot a desk. And can't do the job. If it works it works. Never been good with rule books. Great believer in the old platitude. Made to be broken. Are you still on light duties. Have your bone bending sessions helped.


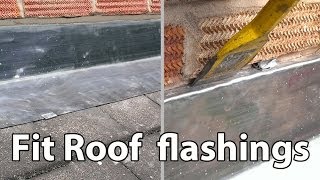


No one in the US does it like this. Instead they use 14 pieces and step over one another. It obviously works, but the issue is water, etc get into each of the steps and its 14 points to fail. The way you do it is absolutely superb, problems are eliminated! So well done!!!
Thank you and thanks for watching.
I'm in the UK, we sometimes use single pieces like you the US, here we call it single step flashing and normally use single step where there is a higher risk of wind and driving rain. On single step flashing the fold into the brickwork continues past the the next single step flashing above, so less chance of driving rain reaching the brickwork and running down behind the lead soakers. The downside of continuous flashing is the internal corners where the fold ends and driving rain can blow past the end of the fold onto the brickwork and behind the soakers.
@@gaztipton972 Thanks for your comment, it was helpful. I'm a DIYer in the process of roofing a small extension on a terraced house. I had done my research on UA-cam and planned to use the method in this video, but the roof pitch is shallow (18 degrees) and when I offered up and scribed a length of lead it didn't seem right. The horizontal cuts were so long they were running into the soaker upstands behind.
I suppose I could have used wider lead strips, but I'd banked on 150mm and changing that would mess up my lead calculations and leave me with a lot of waste.
Also, the more I looked at it the more I worried about the issue you raise in your comment. In driving rain (grim up north) I could imagine water getting behind the flashing, then even behind the soaker. Then I'd be banking on the membrane as the last line of defence.
So I had a look around neighbouring houses with similar extensions and noticed they had all done single stepped flashing, so I'm going with that. I just made up some cardboard templates to get my head round it. The individual pieces work out about 450mm wide with a 120mm overlap and I'm much happier with that.
Anyway, thanks for the comment. My head is already mashed from the slating, and hearing it explained by somebody else has put my mind at rest👍👍
@@Nagisasan36 I'm happy you found my comment helpful and thanks for your kind words. The advantages of single stepped flashings are--
1-, You lower the risk of driving rain going past the internal cut corners, always try and overlap a minimum of 3 inches, but even if the overlap is much less, it's better than a continuous stepped flashing which has no overlap.
2-, You may be correct in thinking you'll need more lead for all the extra overlaps, but if you rotate your template around for every other flashing, then the vertical and horizontal cuts will match up with each other, then just choose the most economical width of lead to suit and you'll have very little waste.
3-, There will be none of the problems with expansion and contraction that you get with longer lengths of continuous stepped flashing.
@@gaztipton972 Thanks for your reply. Yes I figured out reversing the template as I was doing it. It worked out very well with the remaining lead. I got everything sealed today, so it's finished now.
This was my first attempt at roofing. It's bloody hard work! Especially on your own, and constantly up and down the ladder figuring out what to do, forgetting tools etc.
I must say one surprisingly difficult part of the job was just managing the space once I got near the top. I was constantly moving slates and tools around that were in my way.
Also avoiding walking on the new slates. I was able to suspend a platform from a trestle to the top batten up to a certain point, but once I'd done the top course I ended up using planks of wood on old foam insulation boards to walk on the new roof as I did the lead work. It's a single storey extension abutting the existing house on two sides, so no ridge to hang a cat ladder from.
Yesterday the inevitable happened and I broke a slate. I managed to repair it with a neat copper tingle, but annoying nonetheless.
Now I just wait for the rain, chew my nails and watch. If it leaks, I'm getting a roofer to look at it - I'm knackered.
Really nice to see you back at work and looking after your back by using a bench at elbow height and not bending over. Keep the videos coming. Best regards.
Thank you. I’m working between 1 and 3 days a week at the moment. I feel I’m getting there. Just going to take time. Doing things like the bench at the right height really helps.
Thanks for watching.
I just found your channel. Great content. There is a need for some good quality lead videos like this. I learned some great tips watching this one.
Thank you and thanks for taking the time to leave a comment.
Would you consider subscribing please. I’m really trying to make the channel grow.
Thank you from PA, USA. Always love watching a craftsman!
Jeff
Thanks for watching my vids. I really appreciate it. And I think it’s really cool when they reach people all over the world.
I’m curious. What is PA short for ?.
Great to see you back Stuart.How are you.all the best
Thank you. I’m working between 1 and 3 days a week at the moment. When ever I work it always makes my back worse no matter how careful I am. I think it will get there. Just going to take time .
Thanks for watching.
@@slbleadworks lts very hard I know Stuart .Being self employed the catch twenty two you’re backs killing you and you have to pay the bills .I hope things improve for you and you can achieve a happy medium.All the best Stuart
@@jimmyadams6608 thank you
Mint job. Pleasure to watch
Thank you and thanks for watching.
I use a old wood chisel for clips still get the odd blown brick ,nice job mate😊
Thank you and thanks for watching
I use a hammer thru flat headed screwdriver, as you say you will blow some brick on the tighter joints with the bolster
Ok thank you. And thanks for watching.
How’s the back doing mate?
I seem to be having good days and bad. I’m still only working 2 to 3 days a week. And whenever I work it makes my back feel worse. Yesterday was a bad day. I’m off work today and it feels better. I think I’m getting there but I still need more time.
Am I wrong but can you bend the lead 90°and have it laying on top of the tiles??, very nice clean tidy job
You can do this but it’s not necessary on these type of tiles. You need to use lead soakers on every course.
@slbleadworks thank you do you need soakers on the method I mentioned
Nice work 👏
Thank you and thanks for watching.
Hi Stuart. Did you set the soakers in or did the roofers when they tiled?
Yes the roofers install them as they go.
Makes life easier for everyone.
Hope you had a good Christmas and thanks for watching.
Lovely job.What are those tiles called?
Thank you. I’m sorry I don’t know this. But I can try and find out from the roofer next time I see him.
@@slbleadworks Cheers .
@@richardjones3112Redland Rosemary's
Always wondered how this was done , many thanks for sharing your knowledge - subbed Just one question , couldn't see any headers so assume cavity , if so what about cavity trays and weeps?
Thanks for subscribing I really appreciate it.
I can’t remember the detail of this one to be honest.
Isn't the lead supposed to have excess that hangs/sits on top of the tile to prevent leaks at the seam where the tile meets the wall?
No the lead doesn’t need to do that. You just need to weather the soaker up stands. You need to bring the lead out onto the roof for single lap tiles. Some people like it done like this on slates too.
@@slbleadworks thanks for responding. I've never seen it done that way before. Do you have other videos showing how the tile was laid before the lead? I can't understand how you won't get leaks with the lead not covering the tile also.
@@jib6984ify No I don’t think I do. But on top of every tile sits a soaker. The soaker has a 75mm upstand. And 100mm out onto the tile. I’m sure you could probably Google an image of this.
@@slbleadworks oh I see. Thanks for the clarification. It seems then, if I'm not mistaken the lead is more a final dressing perhaps?
@@jib6984ify the lead is responsible for weathering. But it also needs the help of the soakers in this instance.
Very nice how’s your back.
Thank you.
I have good and bad days and typically I’m working between 1 and 3 days a week.
Whenever I work it always flares up no matter how careful I am. I think it will get there. Just needs more time.
Why 80mm waterline, is that tge brick height? Thanks
It’s the height of the soakers.
For someone who is just starting out doing this would you recommend doing shorter lengths each time? Like maybe 1M instead of 1.5M?
It would be more manageable thats for sure. I’d recommend 1.2m sections.
Thanks for watching.
👏🏻👏🏻👏🏻👏🏻
Thank you and thanks for watching
Didn’t get to see how you did the overlapping.
Sorry I tried to show as much as I can. You just need to make sure there is 100mm minimum overlap. I usually take mine past so I can get all the angles the same .
Thanks for watching.
👍
Thank you and thanks for watching
I always thought the length of code 4 shouldn't exceed 1200 mm.
you always thought wrong
@@Ireland1 I obviously did,
I always use 1.2m it divides into 6m,
It's easier to handle,
But it does need an extra overlap which would waste the lead.
Been using 1.2 for years,
Not no more 👍
@@PeakyBlinder1.2m is the recommended length, 1.5m is the max 👍
Have done an awful lot of them. Once shown many years ago. It wasn't hard. You always use your oil. We never had that. Your videos first time I had seen that used. Not sure what clips you are using. We used to use the offcut lead pieces. Fold them up and slot in the joint. Then spread them with a cold chisel. Then mortar point them. No mastics. Never knew any rules for length. Sub divide the total length into workable length. Cut it at that. Half the time the people that make the rules can only pilot a desk. And can't do the job. If it works it works. Never been good with rule books. Great believer in the old platitude. Made to be broken. Are you still on light duties. Have your bone bending sessions helped.
Great job. Bolsters for brick work, Screw drivers for screws. The clue is in the title.
Why not just fit the lead in the right place at the eaves?
Saves waste, lead is expensive after all.
Very good point. Thanks for watching.
Cast lead is the banana lead, it's terrible.
Ok ok. Luckily I don’t come across it very often.
@@slbleadworks it is terrible and all mottled as well
Not nice atall