*NOTE* at 1:07 I have the fence set at the thickness of the my walnut 1" NOT the thickness of the gang of boards. The next cut at 90 degrees to square them the fence is set at approximately 2" but should be dictated by your pieces.
The best how to make a cutting board on UA-cam 90 percent of the ones out there are loud music and no instructions and running at the speed of sound a total waste of time. Thanks to you I can now make a 3d Cutting Board :-) I hope you do more on different patterns. 10 stars for you.
Thanks for the feedback Charlie. I try to make videos that are easy to follow and now forever long. I'm hoping to get some more videos up soon so stay tuned.
The step of framing the end grain portion of the board is essential for reducing tear-out when you send it through the planer. End grain and planers don't mix well. Until just recently I would just put a sacrificial piece on either end of my end grain boards and then just cut them off. I now put a piece of either contrasting wood or a species that is also in the main part of the board. Makes for a nice connection and protects the end grain from tearing out. I have also found that a belt sander following the planer step gets me to the RO sander much quicker. Finally, after going up to 220, I raise the grain with denatured alcohol, go back to 150 and proceed to 320. Sometimes I raise the grain again. I really appreciate your discussing the dimensions and the angles - thanks for that.
Those are all great tips Rob. When I first shared this video there was a lot of discussion on mixing short and long grain and whether or not it would lead to splitting. Like you I like the decorative contrast. Since this video I've added a drum sander to the arsenal which is much much kinder to the end grain. I'm glad you liked it. I don't post videos as often as I'd like but I try to make them entertaining and informative.
I've checked out other videos on how to make this board. Your video is the only one that makes any sense to me on how it's done. I liked how you explained each step as you were doing each step. No music or stupid sound effects to get in the way either. Nice job.
Thank you Roc. I know how tough it can be sometimes to try and teach yourself a new skill so I try to make it easy to follow, and show different techniques when possible. I have some more videos in the works so be sure to stay tuned!
Hey there! love the video very helpful with some questions I had about making this board. Thank you! Keep up the great work. As you move forward in your Chanel you should include full plans and cut list for your project
very nice! I was wondering, if i can stack them up and glue together so i can make a bowl using your method, thanks and keep your video's coming, thank s again Bob
Thanks for the subscription Bob. You could do it like that, but I'm not sure how efficient your wood use would be. Typically how I've seen people do bowls with this pattern is they rip their rhombuses and glue up a bunch of individual groups too make hexagons what ever size they need to turn and then glue them all up using a band clamp.
@@TheOlmsteadWorkshop thanks for getting back to me so fast!. Yeah I would waste a lot of wood not I tried the way u suggested, my saw was off, so never did work out. Just wondering if it would work stacking them up. Thanks
Great video, I want to try this! How do you figure out how much material is needed to make a certain size board (say 12"x18")? I wouldn't mind having a bit extra, but don't want to come up short.
The end grain needs to have a piece of EDGE grain next to it, to support those grains as it goes through the planer. Otherwise, the planer will just tear the edge grain wood away from the remainder of the cutting board.
the original length and width of the boards dont really matter because when you cross cut your strips that will determine that will determine the length of your board and the number of strips will determine the width. The boards I started with were about 8 inches wide x 6 feet long.
Great video! Thanks so much for all the info. I've seen some people set there saw to 60º and some set it to 30º. Not sure it really matters, but just curious.
The 2 different angles you mention are really the same thing. Just measured from different points. 60* is measured from the table and 30* is measured from the point where the blade is at 90.
I’ve been trying to make this unsuccessfully btw. After cutting at 60 degrees, then cutting back at 90, do you need to make two cuts on each piece at 90? You don’t mention that. And also how many inches do you cut at 90 degrees?
You cut all your strips with 60° angles making them parallelograms / /. You fence will most likely be set to the width of your gang of boards, but it is always best to.measure off your pieces. You'll be cutting off both sides of your strips removing /| and removing |/ so you should end up with a | | shape again.
Sorry, another dumb question I hope you can answer: When making your 90 degree cuts, do you strictly do 1 inch or do you vary the distance in order to square? I finally got one finished but it’s a bit off. Still looks okay for amateur.
What on earth am I doing wrong / misunderstanding?.... after cutting the parallelogram, fence set at stack thickness ie. 2”, I can’t get even close to squaring up, rotating the parallelogram so the maple is on the sides. A cut to square up starts at about half way up the maple, leaving a 60 degree “chamfer” on the maple sides. After ruining several pieces I tried drawing it on fusion360 so I could adjust the dimensions without wasting wood. I get the same problems. I love your video & altho it seems clear I’m apparently missing something. Hopefully you understand my explanation & can help.
After cutting your 60° parallelograms, and rotating your pieces at 1:45 the blade should be set back to 90° to square your cuts. You're then cutting off the tips of the parallelograms. The shot at 2:10 shows all my cut pieces. The walnut, and cherry still look like parallelograms with the maple looking like triangles. Together they make a square. I hope this clears it up.
@@TheOlmsteadWorkshop thank you so much for trying to help my denseness I really appreciate it. I looked at mtmwood that you referenced. Using it I was able to salvage my pieces by cutting the parallelograms narrower, roughly 1”. Everything else the same. The maple pieces at .5” wide now on the sides, 60* & 2” total outside didn’t allow the 90* cut to make the maple triangles like yours at 2:10. By cutting the parallelogram narrower I got essentially squares like yours. ??? I must have got lost in the weeds somewhere but all good in the end. Thank you again for your video & guidance.
Thank you for this video. I’m having a similar issue at this point I cut the parallelograms down to stack thickness. When I go to bring them back to square I am cutting 1/3 into the walnut. It looked like your just barely. I don’t get it. I’m 1/2”,1”,1/2”. Cut at 60. Any thoughts? Thank you.
I followed this and after the 60 degree cut, back to 90, my cuts are no where near square. my boards were 2 inches thick; so cut at 2 inches. no way does this work. Any other suggestions?
Hi Ken when you make your 60° cuts you want them to be the width of your center board. So if your glued stack is .5inch-1inch-.5inch you would want to cut 1 inch wide strips and then turn them to cut them square at 90. Sorry for any confusion. It's been a number of years since I made this video so I may have to go back to make a note. If you've cut them at 2" already you can cut them in half. You may end just shy of 1" depending on your blade kerf but it shouldn't impact the final product.
@@TheOlmsteadWorkshop thank you. Yes, you made a point of placing the wood correctly but no mention of the width to cut at 90!! Just said make initial cut the width of the gang of boards which is 2inches. Is that still correct?
I think the width of the gang of boards is incorrect. At 1:40 in the video I've already cut the initial strips and then rotated the 90° to make the 90° cuts. They look more like 1" than 2" which would have matched the center board width, not the gang of board width. For the 90° cuts your squaring off the parallelograms turning them into rectangles. This exact measurement may vary a bit but essentially you want the cut to make the side pieces triangles. Cutting right where your two wood species touch. If you take a look at 2:10 you can see it looks like the walnut looks like / / so you want to make your vertical cuts like |//|
Thanks for posting the video! Question ... at about the 1:10 point in the video, you say "set the fence to the same thickness as the gang of boards". I assume that would be 2 inches based upon how you set up the laminates (1/2" maple, 1" core, 1/2" maple). Am I interpreting that correctly?
Are you sure that first cut is the same distance as the height of the stack? i.e. 2inches? cause it doesnt work out when i model it in sketchup. Maybe im doing something wrong? Thanks
The very first cut was approximately an 1/8 just to maximize the amount cuts I was getting out of the boards. When cutting the first set of strips they should the width of the thickness of your glue up. What are you seeing in SketchUp?
@@TheOlmsteadWorkshop Thanks for the reply! Yeah sorry, i meant the width of the strips. So blde set to 60 degrees and distance from fence to blade at table surface is 2 inches with your glue up? In sketchup with the 2 inch strips the second cut to square up the rhombus doesnt work. it cuts into your mid layer. It works out to make the pattern if you have the width of strips at 1 inch
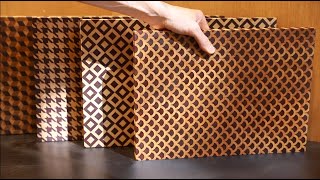
I didn't give an exact measurement to square the rhombus as it can depend on a few factors such as the thickness of the blade kerf, and the precision of the milling and gluing of your boards. If you take a look at 2:13 in the video not all of mine are exactly perfect 😅. The finished impact is the corner of a cube might not meet exactly lined up at a corner of the one next to it, but when cutting and organizing your strips for the final glue up any small imperfections are scattered as strips are flipped and rotated. The video thumbnail is the exact boards I built in this video if you want to try and spy some imperfections 😉
Where is Evey getting 1 inch plus thick boards. I can get 13/16 in rough boards or have sawmill saw the size I need but it's wet. I need kilmed dry 1 inch boards. Just can't find it. Suggestions?
Hey Bob typically I get mine from a hardwood dealer. I have gotten 12/4 Walnut which is about 3" thick there before. You'll save money and have greater selection over any traditional big box stores or Rockler. In southern California I use San Marcos hardwood co.
@@bobhoffman8717 the hard wood dealer I use is a good 45 minute drive from me. Not always convenient, but greater selection and prices. I drive a subaru outback so I'm usually strapping lumber to the roof rack to get it home.
I had the same issue that you did a while back - hard to find nice dark walnut or nice red cherry in that thickness. First, I milled all my lumber (maple, cherry, and walnut) to 3/4" and then I laminated two pieces of walnut together and two pieces of cherry together. The important thing is the ratio - the maple has to be half thickness of the cherry or walnut.


*NOTE* at 1:07 I have the fence set at the thickness of the my walnut 1" NOT the thickness of the gang of boards. The next cut at 90 degrees to square them the fence is set at approximately 2" but should be dictated by your pieces.
The best how to make a cutting board on UA-cam 90 percent of the ones out there are loud music and no instructions and running at the speed of sound a total waste of time. Thanks to you I can now make a 3d Cutting Board :-) I hope you do more on different patterns. 10 stars for you.
Thanks for the feedback Charlie. I try to make videos that are easy to follow and now forever long. I'm hoping to get some more videos up soon so stay tuned.
The step of framing the end grain portion of the board is essential for reducing tear-out when you send it through the planer. End grain and planers don't mix well. Until just recently I would just put a sacrificial piece on either end of my end grain boards and then just cut them off. I now put a piece of either contrasting wood or a species that is also in the main part of the board. Makes for a nice connection and protects the end grain from tearing out. I have also found that a belt sander following the planer step gets me to the RO sander much quicker. Finally, after going up to 220, I raise the grain with denatured alcohol, go back to 150 and proceed to 320. Sometimes I raise the grain again. I really appreciate your discussing the dimensions and the angles - thanks for that.
Those are all great tips Rob. When I first shared this video there was a lot of discussion on mixing short and long grain and whether or not it would lead to splitting. Like you I like the decorative contrast. Since this video I've added a drum sander to the arsenal which is much much kinder to the end grain. I'm glad you liked it. I don't post videos as often as I'd like but I try to make them entertaining and informative.
I've checked out other videos on how to make this board. Your video is the only one that makes any sense to me on how it's done. I liked how you explained each step as you were doing each step. No music or stupid sound effects to get in the way either. Nice job.
Thank you Roc. I know how tough it can be sometimes to try and teach yourself a new skill so I try to make it easy to follow, and show different techniques when possible. I have some more videos in the works so be sure to stay tuned!
Hey there! love the video very helpful with some questions I had about making this board. Thank you! Keep up the great work. As you move forward in your Chanel you should include full plans and cut list for your project
Thanks Cody I'm glad you enjoyed it. I've been working on getting my website up to speed with build articles and plans so stay tuned for more content.
very nice! I was wondering, if i can stack them up and glue together so i can make a bowl using your method, thanks and keep your video's coming, thank s again Bob
Thanks for the subscription Bob. You could do it like that, but I'm not sure how efficient your wood use would be. Typically how I've seen people do bowls with this pattern is they rip their rhombuses and glue up a bunch of individual groups too make hexagons what ever size they need to turn and then glue them all up using a band clamp.
@@TheOlmsteadWorkshop thanks for getting back to me so fast!. Yeah I would waste a lot of wood not I tried the way u suggested, my saw was off, so never did work out. Just wondering if it would work stacking them up. Thanks
Great video, I want to try this! How do you figure out how much material is needed to make a certain size board (say 12"x18")? I wouldn't mind having a bit extra, but don't want to come up short.
simple easy and beautiful no hide any thing super i love your video and speech......maple walnut cherry you mean.
Thank you. Be sure to subscribe as I'm going to be working getting more videos out on the channel.
Do you have written instructions for this??
Nice
That is a great way to make tumbling blocks! Thank you! Why don´t you use end grain around the edges as well?
Thanks Maggie. I'm still learning a lot myself, but I like to show people that you don't need to have the fanciest shop to get some amazing results.
The end grain needs to have a piece of EDGE grain next to it, to support those grains as it goes through the planer. Otherwise, the planer will just tear the edge grain wood away from the remainder of the cutting board.
Yes, but the board is subject to cracking because the grain direction is not all uniform, so expansion forces won’t be uniform. Thanks for the video!
Great Video! Well done! How long and wide are the boards to create this cutting board? Thanks
the original length and width of the boards dont really matter because when you cross cut your strips that will determine that will determine the length of your board and the number of strips will determine the width. The boards I started with were about 8 inches wide x 6 feet long.
Great video! Thanks so much for all the info. I've seen some people set there saw to 60º and some set it to 30º. Not sure it really matters, but just curious.
The 2 different angles you mention are really the same thing. Just measured from different points. 60* is measured from the table and 30* is measured from the point where the blade is at 90.
I’ve been trying to make this unsuccessfully btw.
After cutting at 60 degrees, then cutting back at 90, do you need to make two cuts on each piece at 90? You don’t mention that. And also how many inches do you cut at 90 degrees?
You cut all your strips with 60° angles making them parallelograms / /. You fence will most likely be set to the width of your gang of boards, but it is always best to.measure off your pieces. You'll be cutting off both sides of your strips removing /| and removing |/ so you should end up with a | | shape again.
69 degrees or 60??
60° edited for clarity
Sorry, another dumb question I hope you can answer:
When making your 90 degree cuts, do you strictly do 1 inch or do you vary the distance in order to square?
I finally got one finished but it’s a bit off. Still looks okay for amateur.
@@verb8m1 you'll want to make that 90 degree cut so it looks like the two wood species meet at a point
What on earth am I doing wrong / misunderstanding?.... after cutting the parallelogram, fence set at stack thickness ie. 2”, I can’t get even close to squaring up, rotating the parallelogram so the maple is on the sides. A cut to square up starts at about half way up the maple, leaving a 60 degree “chamfer” on the maple sides. After ruining several pieces I tried drawing it on fusion360 so I could adjust the dimensions without wasting wood. I get the same problems.
I love your video & altho it seems clear I’m apparently missing something.
Hopefully you understand my explanation & can help.
After cutting your 60° parallelograms, and rotating your pieces at 1:45 the blade should be set back to 90° to square your cuts. You're then cutting off the tips of the parallelograms. The shot at 2:10 shows all my cut pieces. The walnut, and cherry still look like parallelograms with the maple looking like triangles. Together they make a square. I hope this clears it up.
@@TheOlmsteadWorkshop thank you so much for trying to help my denseness I really appreciate it. I looked at mtmwood that you referenced. Using it I was able to salvage my pieces by cutting the parallelograms narrower, roughly 1”. Everything else the same. The maple pieces at .5” wide now on the sides, 60* & 2” total outside didn’t allow the 90* cut to make the maple triangles like yours at 2:10. By cutting the parallelogram narrower I got essentially squares like yours.
??? I must have got lost in the weeds somewhere but all good in the end. Thank you again for your video & guidance.
Thank you for this video. I’m having a similar issue at this point I cut the parallelograms down to stack thickness. When I go to bring them back to square I am cutting 1/3 into the walnut. It looked like your just barely. I don’t get it. I’m 1/2”,1”,1/2”. Cut at 60. Any thoughts? Thank you.
I followed this and after the 60 degree cut, back to 90, my cuts are no where near square. my boards were 2 inches thick; so cut at 2 inches. no way does this work. Any other suggestions?
Hi Ken when you make your 60° cuts you want them to be the width of your center board. So if your glued stack is .5inch-1inch-.5inch you would want to cut 1 inch wide strips and then turn them to cut them square at 90. Sorry for any confusion. It's been a number of years since I made this video so I may have to go back to make a note. If you've cut them at 2" already you can cut them in half. You may end just shy of 1" depending on your blade kerf but it shouldn't impact the final product.
@@TheOlmsteadWorkshop thank you. Yes, you made a point of placing the wood correctly but no mention of the width to cut at 90!! Just said make initial cut the width of the gang of boards which is 2inches. Is that still correct?
@@TheOlmsteadWorkshop thank you so much for your reply by the way
I think the width of the gang of boards is incorrect. At 1:40 in the video I've already cut the initial strips and then rotated the 90° to make the 90° cuts. They look more like 1" than 2" which would have matched the center board width, not the gang of board width. For the 90° cuts your squaring off the parallelograms turning them into rectangles. This exact measurement may vary a bit but essentially you want the cut to make the side pieces triangles. Cutting right where your two wood species touch. If you take a look at 2:10 you can see it looks like the walnut looks like / / so you want to make your vertical cuts like |//|
I think my originally intention for the cut the width of the gang of boards was for the 90°s was to square the pieces back up.
What are the dimensions of the wood that you started with?
Thanks for posting the video! Question ... at about the 1:10 point in the video, you say "set the fence to the same thickness as the gang of boards". I assume that would be 2 inches based upon how you set up the laminates (1/2" maple, 1" core, 1/2" maple). Am I interpreting that correctly?
That is exactly right Frank. In my case the fence was set at 2"
Are you sure that first cut is the same distance as the height of the stack? i.e. 2inches? cause it doesnt work out when i model it in sketchup. Maybe im doing something wrong? Thanks
The very first cut was approximately an 1/8 just to maximize the amount cuts I was getting out of the boards. When cutting the first set of strips they should the width of the thickness of your glue up. What are you seeing in SketchUp?
@@TheOlmsteadWorkshop Thanks for the reply!
Yeah sorry, i meant the width of the strips. So blde set to 60 degrees and distance from fence to blade at table surface is 2 inches with your glue up? In sketchup with the 2 inch strips the second cut to square up the rhombus doesnt work. it cuts into your mid layer. It works out to make the pattern if you have the width of strips at 1 inch
I didn't give an exact measurement to square the rhombus as it can depend on a few factors such as the thickness of the blade kerf, and the precision of the milling and gluing of your boards. If you take a look at 2:13 in the video not all of mine are exactly perfect 😅. The finished impact is the corner of a cube might not meet exactly lined up at a corner of the one next to it, but when cutting and organizing your strips for the final glue up any small imperfections are scattered as strips are flipped and rotated. The video thumbnail is the exact boards I built in this video if you want to try and spy some imperfections 😉
Is is supposed to be a roumbos?
Where is Evey getting 1 inch plus thick boards. I can get 13/16 in rough boards or have sawmill saw the size I need but it's wet. I need kilmed dry 1 inch boards. Just can't find it. Suggestions?
Hey Bob typically I get mine from a hardwood dealer. I have gotten 12/4 Walnut which is about 3" thick there before. You'll save money and have greater selection over any traditional big box stores or Rockler.
In southern California I use San Marcos hardwood co.
@@TheOlmsteadWorkshop ok thanks, the hard wood place nearest me don't have that thick of boards
@@bobhoffman8717 the hard wood dealer I use is a good 45 minute drive from me. Not always convenient, but greater selection and prices. I drive a subaru outback so I'm usually strapping lumber to the roof rack to get it home.
I had the same issue that you did a while back - hard to find nice dark walnut or nice red cherry in that thickness. First, I milled all my lumber (maple, cherry, and walnut) to 3/4" and then I laminated two pieces of walnut together and two pieces of cherry together. The important thing is the ratio - the maple has to be half thickness of the cherry or walnut.
Awesome