Texture Reprojection in RealityCapture! [Rendered in UE5]

Вставка
- Опубліковано 2 чер 2024
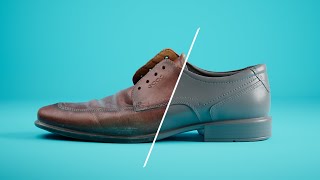
- This video is all about Texture Reprojection in RealityCapture. The ability to transfer albedo, normals, and displacement from a high-res scan, onto a newer, cleaner mesh, with clean topology and UV's is a whole lot easier than you might think. From there, the axe that was scanned for this project was rendered in Unreal Engine 5. If you want to see a video about how I made that scene, do let me know in the comments below!
Try Photogrammetry with RealityCapture here: www.capturingreality.com/
Links to relevant tutorials:
Intro to Photogrammetry: • RealityCapture to UE5 ...
Cross-Polarized Photogrammetry: • The Key to Cleaner 3D ...
Creating Lofoten with Photogrammetry: • Capturing Lofoten in U...
If you want to support the channel, join my Patreon!
/ williamfaucher
Use Discount Code WILLIAM50 for 50% off 3500 PPI Credits here:
www.capturingreality.com/real...
Audio by Epidemic Sound: www.epidemicsound.com/referra...
If you want to support the channel, join my Patreon!
/ williamfaucher
Join this channel to get access to perks:
/ @williamfaucher
---------------
Timestamps:
00:00 - Intro
01:20 - Into RealityCapture
02:06 - Cleaning the higpoly mesh
04:08 - Cleaning the lowpoly mesh
05:19 - Texture Reprojection in RC
08:44 - Baking Albedo, Normals, and Displacement
--------Cameras and Gear Used To Film This Video ------
DISCLAIMER: This video/description contains affiliate links, which means that if you click on one of the product links, I’ll receive a small commission. As an Amazon Associate I earn from qualifying purchases. This helps support the channel and allows us to continue to make videos like this. Thank you for the support!
My Streaming / Recording Setup (How this Video was Recorded)
Nikon Z6II : geni.us/OPxBG
Sigma 35mm f/1.4 Art : geni.us/ByMa
Deity S-Mic 2 Shotgun Microphone: geni.us/ed6pyO
Aputure MC Pocket LED: geni.us/uVZNl
Godox LEDP 260c LED Panel: geni.us/OgidwX
Godox Parabolic Softbox : geni.us/oHZ2b9
Godox SL-60W Studio Light: geni.us/68wx


Your work with photogrammetry is nothing short of amazing. I'd love a full breakdown of your scene here!
same !
Totally agree! would like to see the UI 5 scene presented !
Same, I would love it!
Count me in!
A full break-down would be awesome. Thank you for the high-quality content!
Great work William! Would love to see a breakdown of the scene. It looks amazing as always. Keep it up!
I definitely want to see the making of that render!! Sooooo good 🔥
Damn. This is some top tier learning curve and experience! Thank you for making it out!
Absolutely amazing! A breakdown of how you made the final scene would be awesome! 👏
Thank you for the video William!
I'd love to see the process you went through to make that shot in unreal!
(btw your tutorials have been an incredible inspiration to me and have greatly improved my work so a big big thank you!)
Here’s another vote for the Unreal render video!! Thanks for all you do William, your videos are arguably the best 3D tutorials on the whole platform. All killer no filler…
As always a good workflow, thank you for your videos🙏
As always, it is very enjoyable to watch and every word is a compulsory lesson.
Just perfect. Thank you.🤗🤗
Another perfectly explained video. Well done. I remember when the Reprojection functionality was added. Prior to that it was an ordeal to get the megapoly meshes out of RC, into another app for baking...gosh I was grateful when they added this.
In my workflow I often transfer the colour from High to Low and also do a reprojection (Texture) from the photos again giving me two colour layers. I find the reprojection can be sharper in most cases however reprojecting from the photos is sharper in other cases so a quick paint mix between them helps get the best of both.
Cheers Will!
Amazing final output. I will definitely excited to see how you done this. Pls upload the video.
Awesome stuff William i use this workflow but applying quad remesh to retopo instead of zremesher and i love the results, sadly when looking to upload to sketchfab for selling purposing i was directed towards just keeping the mesh triangulated and auto unwrapping which im still a little disapointed about but i find this workflow gives amazing results overall, glad to see more content on subjects like this, really incredibly usefull for people wanting to learn photgrammetry and generating clean detailed models. Your cross polarization video is what got my first watertight meshes working in rc using auto alignment and that was incredibly satisfying and intersting to problem solve and apply to my workflow
Can't wait for the making of :)
Would love to see that tutorial of the render. Exactly the kind of scenes I'd like to make. Love this too!
This guy is LEGENDARY!
Excellent information. Absolutely useful and helpful, thanks a lot!
I really like the final render an I'm all in for a video about it pls, I follow you since a long time and you're just the best, a master sharing his knowledge
Incredible as always. I would love to see how you build up and render this final scene :)
Wow another amazing video!
AMAZING!! Would love to see a breakdown of the scene Maybe even A step by Step would be really appreciated, but that Might be too long. But loving the content!
A full break-down would be really awesome.
Thank you for a nice and informative video. Would love to see a video on how you make the render and made that scene
Would love to see a full break down of the shot! New to unreal and a step by step from start to finish would be awesome! Keep killing it!
Looks awesome. Would love to see the full video breakdown.
You are such an inspiration to my journey and I would love to see a video in how you made that scene in UE5
Awesome photoscan! Would love to see how you put together that nature scene! It's looking super realistic
William, all your videos are golden - def. would enjoy seeing a breakdown of the Axe Scene!
Excellent work, would love to see the scene breakdown, cheers!
Thanks for the info William. Would love a full breakdown of this scene.
Fire as always 😘
nice loved it !!
nice work! breakdown video of the render would be great!🔥
Thanks loved it, yea to more tutorials of unreal
Great Video 🔥 Love your content. I would love to see a video about the renders.👍
A breakdown of the scene would be amazing!!!
thanks, waiting for the next video
You should do a video about the Unreal 5.1 update. They added a lot of cool stuff like nanite foliage and better lumen reflections.
You are amazing Guru.😎😎😎
Render tutorial PLEASE PLEAS PLEAS !!!!!!!! including all explanation How you Export frames, what Settings you use, etc etc.
Very good video. Only th essential to know about to simplify and to retroproject texture.
amazing job
I don't even have a PC/Laptop but i truly enjoy your content
You're too kind! Thanks so much :)
Amazing re projection work! Would love to see how you made the ue5 scene
Awesome! lI'd ove to see some axe making process magic
Thank you! I'm working on it!
Would love to see the render scene breakdown. Thank you!
Excellent info
awesome videos ! Would love to see your UE5 scene workflow
Thanks for your knowledge! Would like to see a video tutorial
Amazing work! Please do the video of how you made the final video in UNREAL5. Thank you so much!
Yes please share your scene breakdown. Not sure if your using Virtual Height Field Mesh for Displacement or not for the ground texture or if your going full nanite. Displacement in general in UE 5.1 would be great to understand more since it has changed so much from UE 4.26/4.27 as it seems to be getting replace with nanite or other methods. Beautifully shot!
I would love a video of the Unreal axe shot !
This is a great video! I would have liked to see the UVs before and after.
Well the UV's are entirely up to you, you do the UV's yourself
please make the breakdown video. your lighting looks great.
I definitely want to see the making of that render
Cool!
Can you do a detailed lesson from scratch to the end how did you make such a beautiful and high-quality rendering of an axe in Unreal?????
Hi there! It's in the works! :)
make that video! This is awesome =)
absolutely great! Please make a breakdown of how making this photorealistic animation :-)
End results 😍
I'd love to see the Axe cinematic tutorial, looks fantastic, was it done with pathtracing? Thanks you
Oh please you are already making that render tutorial :)
Great video, thanks for sharing my bud. Yes, please! I'd love to se a breakdown video of that render but there are 5.1 elephants in the room...
If it comes out of ZBrush and you want to reimport, try Forward Axis "-X" and Up Axis "Z"
Is it possible to use Reality Capture for Baking From Highpoly to Lowpoly mesh for regular 3D models? I mean a Modeled mesh not a Scanned one.
If so, I wonder how will it perform compared to Substance and Marmoset?
and Like everybody else I would also like to see a breakdown video of the Render.
Yes William we want a Tutorial for the scene that you have created but in more detail.
if you want a cleaner retopo and having nice loops I recommend you 3D coat, it have tools for retopo better than Zbrush especially when it comes to making nice loops.
I'd love to see how you use Unreal for prop renders, I'm tempted to use Unreal for my portfolio since I dont have Marmoset Toolbag yet.
I for one would like you to make the video on how you did this beautiful render in unreal. Thanks in advance
yes the render pleaaaase 🙏
Let's see a video on how you made the axe video please!
2:54 You can also smooth your mesh inside Reality Capture. It's not as good as Zbrush but it might work just fine.
Amazing. Show us the render breakdown m8 !
Nice explanation. Does this approach gain anything over simply doing a traditional bake to your low poly in Marmoset, using the original textures created by the scan? I can see how it would be easier/faster, just curious if RealityCapture contains data that isn't translated to the textures you would use to bake traditionally.
The resolution can be a lot higher since it uses the actual source photos to transfer the albedo, and the projection more accurate as well
Yes, make that other video, young William. Did you make a metallic mask after the fact?
Yes. Please make a breakdown.
Of course we would love a breakdown, but you told us that you would do a New Movie Render Queue tut in your next video and to be perfectly honest. We're having so much trouble with Motion Blur, ShutterSpeed, Physics rendering (becausse of temporal) and so many other thing we don't understand from the different parameters (like High Quality paremeter, New/Bad/Shitty Console Variable). Since your very first video on movie render queue, it's like so many things have change, we're lost here. we NEED that Movie Render Queue tut before anything else.
Btw cool video as always !
"You get the point, don't bite my head off"...BWAAAAAAHAHAHAHAHA William knows the YT comment world all too well!
My main question at this point isn't even how you texture. How do you achieve this photorealistic lighting? I've watched all your videos on lighting and it really helped artistically but i never achieved photo realism on unreal engine. Because the texture and model may look outstanding but it doesn't look as good depending on the lighting. Would really love to see a tutorial on that. Thank you for your invaluable videos though ❤️
are you gonna do a video about the new RealityScan app?
Maybe you can make a video on UE 5.1 changes and improvements.
we wanna see how you made the render!
when you reproject and you get the normal and displacement layer and the colors are weird, when you try to export does the colors change to the original colors of the axes? or does it export the weird colors?
Please do make a video about how you made the scene
William I have a doubt about one detail, the camera has a kind of counter of images that can be taken with qualities, for example 2500 photos. I'm no expert on this so I'm a little confused about how much precept I can get from a camera to scan objects. Will this really impact the quality of scanned objects?
i think it depends on the size of the object you're scanning.
Do you have any solution for displacement maps an tesseletion on UE 5?
Hi! Can I import a 3D model made in reality scan into reality capture?
any chance of a tut on using hdri's with path tracer? I've found without using the built in denoiser the renders come out incredibly noisy that resolve can't handle it
I already have a tutorial on the pathtracer ;)
Can I ask why you can't just simplify the original geometry to get a low poly count, then export and smooth in ZBrush then re-import. Would that work instead of Export>clear>import>simplify>export>clean>import?
Notice that I didn't use the simplified mesh in RealityCapture at all. I just wanted to show why I am doing the retopo in Zbrush. However, the polished high-rez model needs to be imported into RealityCapture. It's the high-rez model that needs to be polished, as we are baking down normal and displacement maps.
Make a video about it! :D
need it
Is Reality capture turning the retopo mesh into triangles? I'm having that issue and I would like to keep the quads as they were originally. Is that even possible?
It shouldn’t. Unreal triangulates though.
@@WilliamFaucher actually I have the triangles when importing it in Blender. I'll try again and see if it's an importing option turned on or something. Amazing video btw! Thank you
I have face Flickering issue and i have post many channels and i have not received any solution from any one .Please help if you know
Looks like the coupon code doesn't work anymore for the credits discount =(
Auto like)
Thanks a lot for this guide.
The only thing I can't figure out is why my assets never look as realistic as yours. The same leaves and megascans in Unreal engine...
It's all about the lighting, lighting is everything :)
@@WilliamFaucher Thank you very much for the answer. :)
on export using FBX there was no normals or displacement files. I really wanted to see you export that model, I knew I'd screw it up
You need to simplify the model in order to get normals or displacement. Otherwise if you are just exporting the high rez model… you don’t have any normals or displacement to bake FROM.
@@WilliamFaucher thank you for the clear explanation, I really appreciate it!
Not a 3D artist here... Can someone explain why you don't want a bumpy topo? Like aren't real world things bumpy? Wood is rarely smooth, a metal axe head is going to have lots of dings and rust etc.
can we get a gaya tutorial?
Don't see reason why go back to rc for decimation. Polish and decimate in zbrush
I don't use the decimated mesh in RC, I just wanted to show why I didn't use the simplified mesh in RC in this case :)
I fear alien's grabbed up Will and flew him off, like the helicopter scene in Walking Dead...
lmao what?
@@WilliamFaucher Just some bourbon inspired silliness. : ' )
nice to see how easy this has gotten, but almost 40k polys for an axe prop is probably a bit overkill ;)
It's not if it's a hero closeup, I'm not making games here. If anything, I didn't use enough polies. If this were a VFX shot, 50k would be my base model, and then I would subdivide it 2-3x more with displacement.