Interesting design. I'm pretty impressed with making your own hinges. I'll stick with manufactured hinges but I really appreciate the creativity. Thanks.
Nice box and interesting hinge system. I enjoy building boxes of all kinds from band saw boxes to just boxes. I even built my grandson, who has a little banjo that has a twelve sided head, a case for his banjo. What a build! had to match the multi sidedness and it was quite the challenge, but came out OK. I'll eventually get the video up on youtube, but I just finished it and it will take a while to edit down the footage. But I love what you did here!!
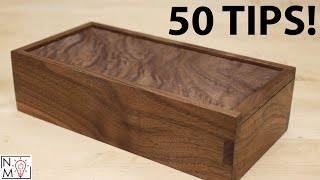
Very nice. Very original. I can think of several ways of dealing with the alignment problem: 1) You could sand or plane away the difference in alignment before finishing. 2) You could set alignment pins into the corners of the lid that mate with holes in the corners of the base. 3) You could fit an insert into the base that stands proud of the lip and holds the lid in place when closed. This could be on all four sides or just the front where it's most needed.
A little samurai carpenter flavor.....with the hearing protection riding dirty.....lol Love your videos....please be careful....it's a lot harder to do woodworking with missing digits....more videos please....
@18:27 Hint: Use a thin plastic washer between the wood and the brass linkage. This will allow for a tighter fitting while reducing the friction needed to open and close the box (you will be able to lubricate the linkage mechanism) . You might also be able to make washers from a plastic soda bottle. Nice work. Keep pics so that you can insert them in the next build. 100 thumbs up xD
I was waiting for a finger or hand to go into that tablesaw blade, especially when you were resawing that small piece. Use a band saw or use pushblocks and feather boards. or use that Irwin ryoda you have, its for ripping boards!
It's fairly hard to get a finger in the blade while resawing since the blade is completely buried in the wood. A bandsaw would work better but mine wasn't up to the task at the time.
Good work but you made me cringe while you were using the table saw. Its a lack of education or safety protocol like this that gets people digits cut off. Please use a push stick from now on when your fingers are that close to the blade. Keep in mind that occasionally you will get that odd piece of wood with a soft spot in it that will crumble or cut super fast through the soft spot causing your fingers to go into the blade. At the very least, when wood crumbles apart at high speeds it shoots out shrapnel that could your fingers would appreciate doing without. Once again, nice work though.
You might be able to avoid cutting the chamfer on the back if you change the "closed" angle of the rear linkage. If the pin for the top is forward of the pin for the bottom, the lid will lift off as you start opening it. (obviously the front linkage might have to be moved a bit also...)
You're right that would work, but then the top in the open position would potentially not be even with the bottom or other problems. It's pretty tricky working with these links.
Hey man ?? Where can I buy a bag of that fairy dust u were using ? 😅 Lovin the work man... just found ya... subbed & likey-liked... 👍😎 BTW... if u use Loctite to lock threads on something like this, get a weaker "retainer" grade as opposed to "lock" grade so u can still dis-assemble it if necessary... (just the engineer in me coming out ) 🙄
I really enjoyed this and you make dovetails look easy. Good job! Liked and sub'd. Oh Im sure you are aware but some of your shots were out of frame during the glue up. Your vids are far better than my shots (hence why I haven't uploaded.). Keep it up I will be checking out your other vids while I'm here. -Sean
Thank you! Dovetails on thinner stock are much easier that thicker stock. Yea, its hard to keep everything in frame sometimes haha. You should upload some stuff man! I'm sure you have some cool stuff to show.
I came to wood working after retiring from being in music all my life. I have a studio and we did music vids there as well. Believe me, when I started trying to shoot shop vids, its a whole 'nother story! With music vids you simply shoot the shot as many times as you need to, but how do you re shoot a cut out or a glue up for example. You get one shot at it lol! I made about 10 videos before I started getting the angle and frame right etc. It's indeed a challenge, more than most know that haven't tried it. But it's fun and one eventually figures it out, though I still get the occasional flub. What's really fun is when you get so into what you are doing that an hour or so has passed and of course your battery ran out 30 minutes ago! All kinds of fun things like that. My first attempt at dovetails, lets just say, didn't turn out quite this good lol! But the fun for me is learning a new art.
Hey man awesome ! I love your work! I've just started on woodworking and your helping me a lot ! Can you tell me how to make that template for the dovetail. I've been reading 1:6 , 1:7 and so on ,,,,
So glad to hear that. To make the template, you can draw a straight line 6 or 7 inches long (depending on what slope you want) and measure out 1 inch away from the line on one end and connect that point to the end of the line. That will give you the 1:6 or 1:7 slope. After you have the angle you can make the template however big you want since the angle will be constant no matter where you are on the line.
If it's mixed with glue how does it come off? I'm sure your customers appreciate perfect joints, but I'm not to that point yet. This was just a gift anyway. To each their own man.
I do that trick to rather than begin again and I know alot of wood workers that do the same and some of them have it to an art you can not see it. mistakes happen, perfect joints would be great but sometimes things happen looks great to me . keep building bro. Im so impressed with hinge hand built, nice. as a side note ( and im not trying to make anyone angry ) but dont worry about the dust trick ( which I love because Im not perfect) but with the distrssed wood being so popular the dust trick is not even needed any more the fad is beat the crap out of nice wood and paint it, now if the angry guy wants to slap someone that who he should get lol it hurts to have those customer requests but I get them 80 % of the time now, good Job Hipster
Lorraine Lovrek another safety nurd! How safe do you think you are? You missed, no bench gloves, no eye protection, no ear defenders, no overalls, was he wearing safety boots? Did he do risk assessments? COSHH on glues, we can go on forever. The vid is about making a box, not how safe you can make yourself while making a box! Besides health and safety is at work, isn't he at home? Other than that it's a riving knife not a driving knife, a push pad not a block and its stick, not Styx! Now go make some tea you should safe in there!
Lorraine Lovrek......I absolutely agree. The "safety" assumption is that the piece can't possibly fail while cutting it. I'm may not be an expert but had the piece broken while pushing it through the table saw, the pressure being applied could have forced the fingers into the blade. I nearly lost a finger recently doing the exact same thing. Years of working on my table saw with no incident until.......one is never so much an expert that accidents can't happen, ESPECIALLY when overconfidence results in not needing safety equipment.


Interesting design. I'm pretty impressed with making your own hinges. I'll stick with manufactured hinges but I really appreciate the creativity. Thanks.
this is my thank's to all creatives and annovatores in new design 'learned alot from you .
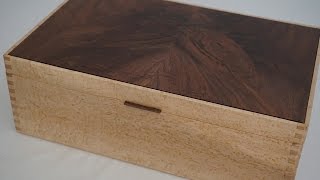
Excellent design. The hinges and the contrasting woods look great. Thanks for sharing your ideas. Best wishes.
Very nice box! Great work! And some "butter fingers" - very fun!!🤣🤣👍✌
Nice box and interesting hinge system. I enjoy building boxes of all kinds from band saw boxes to just boxes. I even built my grandson, who has a little banjo that has a twelve sided head, a case for his banjo. What a build! had to match the multi sidedness and it was quite the challenge, but came out OK. I'll eventually get the video up on youtube, but I just finished it and it will take a while to edit down the footage. But I love what you did here!!
Good idea dude I like it thanks for the video
Very nice. Very original.
I can think of several ways of dealing with the alignment problem:
1) You could sand or plane away the difference in alignment before finishing.
2) You could set alignment pins into the corners of the lid that mate with holes in the corners of the base.
3) You could fit an insert into the base that stands proud of the lip and holds the lid in place when closed. This could be on all four sides or just the front where it's most needed.
Beautiful work. Congratulations!
Nice to see someone using Irwin tools. I think they're nicely made but under rated because of the modern material handles.
Very Nice! Making your own hinges is something you don't often see, impressive!
Go here if you want the best woodworking plans online: HootWood. com
If you're interested these are some great woodworking plans you could use: HootWood.com
Very nice box. Great way to make the hinges.
I love the hinges! Beautiful work.
Great design, room in lid for storage too. brilliant
Very nice,love the walnut
Good job and the hinge mechanism was neat.
Enjoyed this video A LOT!
A little samurai carpenter flavor.....with the hearing protection riding dirty.....lol Love your videos....please be careful....it's a lot harder to do woodworking with missing digits....more videos please....
Can't deny I've been influenced by the samurai.
HipsterCarpenter fhc um
@18:27 Hint: Use a thin plastic washer between the wood and the brass linkage. This will allow for a tighter fitting while reducing the friction needed to open and close the box (you will be able to lubricate the linkage mechanism) . You might also be able to make washers from a plastic soda bottle.
Nice work. Keep pics so that you can insert them in the next build. 100 thumbs up xD
Crazy hinges! Love that dark wood too
Thanks! I really like the combination too.
great box.. great lid.. thanks
With your japanese hand saw, you better use the big tooth side when cutting along the grain. that's why there's two sides. Very nice box anyway !
nice video. explained well, not too much speexh, enough infos, well done.
Thanks!
A great box indeed, lovely design. Well done...subscribed 👍🏼😊
Great job on this! Really love the look of the finished piece and the mechanism you made.
Thanks!
If you're interested these are some great woodworking plans you could use: HootWood.com
Nice work. Your channel name drew me in for a chuckle but the work made me a subscriber.
good job!,i like how you fixed "the splinter" when you used the chisel,probably ill use that tip in the future if that happen,good job ;)
Very nice. Very clever
Thanks!
I was waiting for a finger or hand to go into that tablesaw blade, especially when you were resawing that small piece. Use a band saw or use pushblocks and feather boards. or use that Irwin ryoda you have, its for ripping boards!
It's fairly hard to get a finger in the blade while resawing since the blade is completely buried in the wood. A bandsaw would work better but mine wasn't up to the task at the time.
Loved the hinges...
Thanks!
Cool Nice Job!!!
That was the sketchiest resawing technique I think I've ever seen
Keep using the tools that you have...even if their not exactly the right tool for the task. The finished product looks nice
Good work but you made me cringe while you were using the table saw. Its a lack of education or safety protocol like this that gets people digits cut off. Please use a push stick from now on when your fingers are that close to the blade. Keep in mind that occasionally you will get that odd piece of wood with a soft spot in it that will crumble or cut super fast through the soft spot causing your fingers to go into the blade. At the very least, when wood crumbles apart at high speeds it shoots out shrapnel that could your fingers would appreciate doing without. Once again, nice work though.
Beautiful,i want one too 😃
Lindo trabalho com ótimo acabamento. Parabéns! Abraços!
add some magnetic snap closures to align the top when you shut it....a very nice box man and great work
Budda Bing I could have done something like that and I have on other boxes. Thanks for the view and kind words!
would a opposing rare earth magnets help hold the lid and base together and help it line up...nice work!
wow. too cool 😊
GraphicsThatGlow thank you!
Try Japanese pull saws, thinner kerfs and 10 times sharper. Use them right and stay sharp a lot longer and you can get replacement blades if needed
You might be able to avoid cutting the chamfer on the back if you change the "closed" angle of the rear linkage. If the pin for the top is forward of the pin for the bottom, the lid will lift off as you start opening it. (obviously the front linkage might have to be moved a bit also...)
You're right that would work, but then the top in the open position would potentially not be even with the bottom or other problems. It's pretty tricky working with these links.
Hi, can you tell me what oil you use for finishing please .... it's a verry good job, well done
The wobbles on your tablesaw are terrifying. Please please please level it out! Love the finished product.
If you watch my newer videos, I use a new table saw now. No worries ;) Thanks for the comment!
Catching up now. Love your work. :)
Thanks!
Very good
unique!!! nice way..
Good job..
Bom trabalho muito bom mesmo Great job very good guy Carlos Brasil. Bye
Cool hinge!
just came across your channel looks great , keep up the work :)
Thank you!
Nice job . Going to subscribe so I can see more
Welcome Frank!
Hey man ?? Where can I buy a bag of that fairy dust u were using ? 😅
Lovin the work man... just found ya... subbed & likey-liked... 👍😎
BTW... if u use Loctite to lock threads on something like this, get a weaker "retainer" grade as opposed to "lock" grade so u can still dis-assemble it if necessary... (just the engineer in me coming out ) 🙄
Good job
ชัย ซอฟท์เน็ต Web Application thank you!
Es un buen trabajo y queda bonita, pero creo que tiene un fondo desperdiciado, es a mi gusto, gracias por tu vídeo, un abrazo
Fuckin' awesome!
Bravo!!!
+colas11 Thanks!
may I know what you used to clean the surface?
i like it!
Congrats
V. Nice
Good looking box but I would never install the hinges thingy.
Where do you get your wood, that walnut is beautiful
Cool
awesome videos man. Im going to see if i can get you some more subscribers. your stuff is great! keep it up!
+Matt Thayer Thanks!! I appreciate any help I can get.
Your mismatch can be fixed with a hand plane.
du hast einen neuen Abonnenten!
I really enjoyed this and you make dovetails look easy. Good job! Liked and sub'd.
Oh Im sure you are aware but some of your shots were out of frame during the glue up. Your vids are far better than my shots (hence why I haven't uploaded.).
Keep it up I will be checking out your other vids while I'm here.
-Sean
Thank you! Dovetails on thinner stock are much easier that thicker stock. Yea, its hard to keep everything in frame sometimes haha. You should upload some stuff man! I'm sure you have some cool stuff to show.
I came to wood working after retiring from being in music all my life. I have a studio and we did music vids there as well. Believe me, when I started trying to shoot shop vids, its a whole 'nother story! With music vids you simply shoot the shot as many times as you need to, but how do you re shoot a cut out or a glue up for example. You get one shot at it lol! I made about 10 videos before I started getting the angle and frame right etc. It's indeed a challenge, more than most know that haven't tried it. But it's fun and one eventually figures it out, though I still get the occasional flub. What's really fun is when you get so into what you are doing that an hour or so has passed and of course your battery ran out 30 minutes ago! All kinds of fun things like that. My first attempt at dovetails, lets just say, didn't turn out quite this good lol! But the fun for me is learning a new art.
Battery running out happens all the time! Or you set up the perfect shot, do the work, then go to hit stop... and you never hit record...
Not hitting record has happened to me as well. More than once lol!
Hey man awesome ! I love your work! I've just started on woodworking and your helping me a lot ! Can you tell me how to make that template for the dovetail. I've been reading 1:6 , 1:7 and so on ,,,,
So glad to hear that. To make the template, you can draw a straight line 6 or 7 inches long (depending on what slope you want) and measure out 1 inch away from the line on one end and connect that point to the end of the line. That will give you the 1:6 or 1:7 slope. After you have the angle you can make the template however big you want since the angle will be constant no matter where you are on the line.
Did I hear some Andy Mineo playing in the background at 3:30? Great work man keep it up!
You sure did! and Thank you!
nice
wow
Muito bom parabéns
could we have the measurements?
What hardware did you use to make those hinges?
I got some thin brass (maybe around .0625") and brass binding post screws
+HipsterCarpenter Thanks. I love the ingenuity of that hinge
Which table saw model is that?
Kristijan Vuletic It's an old Ryobi. Not sure of the model
te vas a quedar sin dedos!
Noob question what kind of dog breed is that?
West Pro Gamer she's some kind of lab mix. I've had her for 4 years.
Hi,is the router Dewalt 611?
吴伟 yes it is!
Thank you for answer. It's a good tool. I like your job!
Constructive here, not critical as I love the box itself, but there's so much wasted space in that deep lid
JOAQUÍN
That table saw is really unstable
Hi! what´s the name of the 1:24 tool?? what kind of saw is?? thanks!
Perro Dinamita it's a japanese style pull saw. This one is an Irwin from Lowe's
HipsterCarpenter thanks!! great job!
Show
Why can't you just sand the front down to even up the offset?
I totally could have done that, but I had already finished the wood and didn't want to go through the trouble.
Not safe work techniques, with no TS guard, no push sticks and wearing a watch, very dangerous
show
your whole table saw is moving during use.... that must suck dood =\
I got a new table saw about 3 months ago.
awesome dood, grats on the upgrade
Every time I see someone rub sawdust into the gaps of his joints I want to slap him
And why is that? It's an easy way to fix a small mistake in your joint, no reason to get angry about it.
It' ugly and comes off after some time and you can see it.i could never sell furniture with fixes like that to my customers. That's why.
If it's mixed with glue how does it come off? I'm sure your customers appreciate perfect joints, but I'm not to that point yet. This was just a gift anyway. To each their own man.
your box is very nice. i'm sorry that i didn't say that in the first place. keep on building things.
I do that trick to rather than begin again and I know alot of wood workers that do the same and some of them have it to an art you can not see it. mistakes happen, perfect joints would be great but sometimes things happen looks great to me . keep building bro. Im so impressed with hinge hand built, nice.
as a side note ( and im not trying to make anyone angry ) but dont worry about the dust trick ( which I love because Im not perfect) but with the distrssed wood being so popular the dust trick is not even needed any more the fad is beat the crap out of nice wood and paint it, now if the angry guy wants to slap someone that who he should get lol it hurts to have those customer requests but I get them 80 % of the time now, good Job Hipster
Way too long video, nice box though, the hinges dominate the box too much, normal hinges may have been a better choice...
you don't believe in safety on power tools do you you were working with no driving knife and no guard and no push blocks or Styx
Lorraine Lovrek another safety nurd! How safe do you think you are? You missed, no bench gloves, no eye protection, no ear defenders, no overalls, was he wearing safety boots? Did he do risk assessments? COSHH on glues, we can go on forever. The vid is about making a box, not how safe you can make yourself while making a box! Besides health and safety is at work, isn't he at home? Other than that it's a riving knife not a driving knife, a push pad not a block and its stick, not Styx! Now go make some tea you should safe in there!
+edward charles của
I also dont think they believe in punctuation
Lorraine Lovrek N
Lorraine Lovrek......I absolutely agree. The "safety" assumption is that the piece can't possibly fail while cutting it. I'm may not be an expert but had the piece broken while pushing it through the table saw, the pressure being applied could have forced the fingers into the blade. I nearly lost a finger recently doing the exact same thing. Years of working on my table saw with no incident until.......one is never so much an expert that accidents can't happen, ESPECIALLY when overconfidence results in not needing safety equipment.
Sorry you do not talk I do not watch Julien
I wanted to watch but I couldn't. I dont like hipsters. I did give you a thumbs down though
You won't be doing any woodworking projects with practices like that !!!!!!!