This video was extremely helpful and clear. I was able to do this repair, avoding a quoted cost of around $1,000! Here are some lessons I learned that may be helpful to others, I realize much of this is in different comments down below, so I want to consolidate. First off, the actuator part is a Dorman 604-290 Blend Door Actuator. Its important that you get the 290. If you lose the Adjust Cam that it sits on, the part number is FL3Z19788B. You shouldn't need to replace it, just be careful you don't drop it. You will also need a 7mm socket to remove the six (6) total panel screws. The two (2) screws that hold in the actuator are Torx T20. As the video shows, i was not able to get a socket wrench in there, so you'll need to have something to put the T20 bit into that is small enough to hold. I ended up dropping a T20, but had several back ups. The hardest part in all of this is positioning the cam so that it moves the temperature blend dial. You will be able to rotate that dial with you fingers to put it into the correct position. Once you have it plugged in and screwed down, you should definitely reconnect the battery and test your work before putting trim panels back on. YOU MAY NOT NEED THIS NEXT SECTION: The first time I did this, I actually had the actuator plugged back in and screwed down, but it was not in the correct spot and the cam was not moving the dial, so adjusting the thermostat ended up moving the white gear on the actuator into the wrong position. After taking it out, I ended up having to draw a marker line on the gear tine 180 degrees from the gap and plugging in the actuator in a way that i could watch it rotate. I hooked up the battery again and adjusted the thermostat until it rotated the actuator gear into the correct position, then immediately shut off the truck aux power. After that, I disconnected the battery again and was able to place the cam and the actuator in the correct position. I hope this helps!
Great detailed video!! There's no way I would have attempted removing the entire dash as the dealer recommends for their repair. The main issue I ran into, besides EXTREMELY tight work space, was realigning the new unit on the rotating cam. Even though the teeth line up, depending on the last temperature setting, this will change the positioning on the gear. I had to turn on the heat and adjust the temperature to rotate the cam so it would drop on the thermostat needle and set into the set posts to reattach the unit. Tested it before putting everything back together and thankfully it worked. As others mentioned, you will definitely scrape your arms changing out this part but absolutely worth it saving on an outrageous dealer repair.
Thank you SO much for this tutorial. Glad I read the comments before removing the actuator or I surely would have lost the cam below it. As others have commented, aligning the cam was difficult for me. The red tab on the connector broke off. The red tab is designed to prevent the black clip from pressing down, releasing the connector. Sort of a safety measure. Hey, Ford engineer team, I sure hope no one gets in there to release it. Mine is a 2016 King Ranch and the torx screws securing the actuator are T-20. Getting the the vertical trim console trim back together was PITA for me. But it was late in the day and was getting tired. My truck is covered by a bumper-to-bumper extended warranty that would have covered this. However, it's the weekend before Thanksgiving and we're travelling in the truck for the holiday. No time to schedule with the dealer. Frankly, I don't want the dealer pulling the dash anyway, it'll never be the same if they do. Thanks again.
Can't thank you enough for posting your video. Couldn't have got this replaced without it. Probably couldnt even find the dang actuator without it. I've done lots of repairs on vehicles but this was definitely one of the most difficult to get to. Thanks again.
I have a 2017 F250 and this video saved me a lot of money. Local ford dealership quoted $1,850.00 and needed a couple of days to do this repair! With the information from this video I was able to replace this part for a little more than $45.00 and it only took a couple hours. It wasn't easy - but is possible. The hardest part was aligning the cam with the new actuator, because you're basically working blind. It's critical to make sure the blend doors pin is in the groove of the cam. Thanks for posting this video!
@@tankdome37 Going from memory I believe there is a pin on the blend door that fits into a groove on the cam. If it doesn't go in there properly it's not going to work. Also, the new actuator won't want to set back into place "naturally" to reattach the screws if they're not aligned. Someone mentioned a good idea of having the old part right there to refer to since you won't actually be able to see what you're doing.
I’m going to have to do this on my 2017 F350. What is insane is the TSB for this quotes 5.7 hours of labor. The dealer is high AF if they think they can charge $1800 when there is a published TSB for this issue.
Great video! Exactly what I was looking for. I’ll be attempting this fix tomorrow. Update: it worked. I was able to use your video to double check the steps many times. So thankful to you for making and posting this!
This worked! Ran into some snags, the red tab somehow snapped off and is lost forever as I was pushing it out, thought I was screwed but took over an hour to push on the plastic piece the tab is supposed to push on to release the connecting wire housing. Getting that out was extremely difficult because you are working blind, with one hand, and no room. Also be extremely careful when you remove the old actuator that you don’t lose the plastic piece that attaches underneath and around the gear as it is not attached at all to the vehicle (not sure what it’s called, size of a smallish hockey puck) because this is what the actuator sits on and rotates the gear. Other than those snags this is doable if you work slow and carefully. Helps to keep the new actuator right underneath you as you work so you can look at it and see what you’re feeling with your hands.
So i lost the small hockey puck thing... when i was pulling out the actuator i heard something fall and clank around but didnt think anything of it. after i tried unsuccessfully attaching 2 different actuators i came to the conclusion that the mysterious clanking sound might have been something that attached to the shaft. first comment on here and thats my problem. anyone have a picture of what this hockey puck thing looks like? or know the name of it? im hoping i can get one from the dealership or something...
Life saver!!! Thank you. I was just going to manually move the stupid thing over in the winter and summer. Felt horrible knowing that basically a $1,500 piece of plastic was lost behind my dash because I couldn’t find what that thing was anywhere. Thanks again!
Thank you so much for taking the time and recording the step details of everything needed to get the Job done. May God bless you abundantly for the money you saved me. Thank you Sir
Thanks for the great video Charles! Nice step-by-step procedure. I just finished replacing this actuator in my 2015 Lariat. Using the torx bit in a socket adapter is genius for working in the tight space. The only other tip I will suggest is to tie a long piece of dental floss to the tools ( and screws ) so that retrieval is easy if one gets dropped. Other than that, the toughest part for me was getting the loose cam follower correctly positioned so that it was engaging the damper lever properly before installing the actuator.
Fixed the problem perfectly , terrible place to get to but it’s done , thank you ! Only problem I have now is when I put it all together and turned the truck back on I have a check engine light , now to figure this out !
I just did this on my 15 f150 lariat… holy moly you saved me 1200$ canadian bukaroos :) I did lose the red clip on the back of the connector, but it still clips into place. My forearms are completely scratched up and bruised, maybe adding some padding or heavy duty work towel to support the forearm between the vent openings. Super upload bud 🎉
thanks for tutorial, I changed mine successfully. The two torx screws on my actuator are 6-Point Torx Size 20. the screws are located at Front (not the very front left one) and Rear Right. The Rear Left hole on the actuator was meant for a positioning rod, you can feel it with a smaller screw bit (no indentation in the "head area" unlike the other two torx). I used a mini T wrench for the torx and used some double-sided 3M tape to secure the torx bit in its socket. I also tied tools to my finger with a dental floss to prevent dropping. I was able to complete the work without disconnect any wiring except the 12V main battery. I broke the original actuator's red holding clip (push-back and down) and lost them in the abyss, but the wiring connection seems to be tight without the holding clip. there is only one proper orientation to set the actuator, pull out the cam and study in case it gets loose, you won't make too much error when setting the cam as there is only one position if installed correctly, you will not be able to fully seat the actuator if the cam is off. a decent 2-hour work for the first time, I used non-marring orange plastic pry bars set
Warning: If you are on blood thinners, expect your arm to be black and blue. That having been said it's worth it. The project took me 3 1/2 hours. I look at it this way, I made nearly $500 an hour. The bruising will go away.
Torx bits aren't 5 star, those exist and are a completely different tool. Also, trim tool kits are cheap and can be had at most auto stores and HF, I'd recommend them highly over a screwdriver. Best video of the issue I've seen. Thanks!
I have ordered the Actuator for this repair. I, like others have been told by Ford that the cost to repair would be over $1500. I am certainly going to try this repair myself. Thanks for the video. My issue is on My 2016 I have Heat on the driver side but AC on the Passenger side. I have just noticed today with the warm weather that I have AC on the drivers side but pushing out heat on the passengers side. Hope this fixes my problem. Will be a project for next weekend.
Just did this process. You gotta have some rather thin forearms brother. That was an absolute bear of a job. Working blind…one socket is Aaron Hernandez…lost forever in my dash. Great video though!
Thanks for great video. Was able to replace passenger blend door actuator on 2015 Lariat. Wanted to recommend this tool for torx mounting screws. Titan micro bit/driver set part #11205 from Auto Zone $13. Actuator part # Motor craft FL3Z-19E616-B. Replacement took me 2.5 hours took my time no rush. Good luck!
This video is by far a money saver! Here are my tips after successfully completing the fix: •If you don’t have a short, stubby ratchet I recommend buying one. With the tight space, it helps tremendously and will make it easier. I bought a small 1/4 drive ratchet and and 1/4 drive T20 socket for it. •There is a 7mm bolt that is holding the vent in place. Instead of using vice grips to move the vent over to get your arm in there, remove that bolt and it will move enough to reach past the actuator. •Use something like a glove to protect your arm from the edge of the plastic on the dash (you will understand this when you arm is in there). •when you feel that the screws on the actuator is loose enough, use your fingers to remove them preventing the possibility of the screws being lost.. •and lastly, this will let you know real quick your fear of getting stuck. Stay calm, and take your time. The only other thing that I did was that when I removed the actuator, before I installed the other one I removed the cam carefully and looked at how it aligns with the actuator just to visualize it.
@@TheBanks148 I could not move my hand in there at all, but I got my 14yr old daughter to try and she replaced it perfectly lol, I showed her the vids, we got the gear lined up properly, taped the screws to the bit with electrical tape so we didn't loose them getting them started, she ran them in with her fingers then we switched to ratchet.
Worked like a charm. Only issue I had is the heat that moves the blend door came loose. Took it off put it on the new part. Closed the blend door lined up the guide hole on the part and the gear. I tested it while holding in place. Worked fine. Put screws back in good to go. You are pretty much doing this fix blind this way. You cannot see. It can be done though. Thankfully.
Man thanks so much for this video. I did this today and boy oh boy that was a hell of a job. Working blind, insane. After I finished installing I put everything back together and gave her a test. It didn’t work, was still blowing cold out of passenger side. I disconnected the battery and pulled that 7.5 number #13 fuse by passenger foot plugged it back in. Bam! It worked!! My question is, do you think the old one would have worked if I would have just tried doing that? If not, why do you suppose you have to disconnect battery and mess with fuse? Thanks again man, really appreciate it!
Man I appreciate you posting this! The same thing happened to me and I came to the comments to see if anyone else had a suggestion. I followed what you said and mine works now. Thanks so much!
You did a reset procedure it normal to have to do that with installing a new actuator so it can reset back to neutral postion. But I doubt it would have fixed the original problem it probably binded up. but it is possible if only resetting the actuator without replacement works it possible you have a bad ground or rubbing wires which cause it to lose its memory on certain conditions like bumps or humidity.
I wear XXL size gloves and Chinese finger-trapped my hand on the sharp, curved metal piece shown on the right at the 5:00 mark. Took all the skin off one side of my hand getting it out. My dad was there and wears L size gloves and he was able to complete the job after I couldn't. So caution to those with big mitts: this may not be a repair for you!
I have a 16 lariat and my passenger side is stuck on heat. I’ve replaced the blend door on the floor board of the passenger side. Do you think I should replace this part also? Thanks!
The one on passenger floor is for driver side. The one he replaced in this video is for the passenger side. If you are having issues going between defrost, floor and main that is actually a different actuator behind steering wheel. There are other videos out there that show how to access that one.
Fair warning. This will absolutely be a pain in the ass.. depending on how lucky you are you can do this pretty quick and easy. The hard part is that the new one won't exactly line up with the pin on the door. I spent probably a good 2 hours trying different stuff to try and line up the cam gear on a pin and line the actuator up blind. I was about to to give up when I finally got it on. Probably would have been quicker and less arm damage from the plastics to just remove the dash 😂
Awesome video, definitely going to try this method to solve my same issue. Could you tell me what the actual part # is? I am seeing a few different ones listed around the web. Thanks.
Called BlendDoor Actuator specialist to work on my 1999 Lincoln Continental. Finished in 30 minutes. Handed me a bill for $1000. $2000 per hour! I complained. As a brain-surgeon I didn’t even make close to that. He replied:”I didn’t make this much when I was a brain surgeon either. “
Hey Charles, I really appreciate this video! Have you heard of anyone replacing the actuator and it not fixing the issue? I followed every step and even tried the battery/fuse trick and no change. I still get hot air out of the driver vents no matter what. I pulled it back out and double checked everything and it will still not work.
The driver side has a different blender door. If you replaced the passenger one like that in the video. It will not fix the driver side blender door. There are 3 blender doors on the f150
I was able to get it installed but still blowing cold air. How do you "re-calibrate". It seemed to go into place perfectly, but is there an alignment that needs to happen?
You can pull the Fuse for 30 seconds or disconnect the battery. Turn on power to vehicle and wait like 30 seconds prior to turning on HVAC system. The fuse is a 7.5 amp and I believe it was location 12 or 13 on passenger side (left foot).
I did this today and boy oh boy that was a hell of a job. Working blind, insane. After I finished installing I put everything back together and gave her a test. It didn’t work, was still blowing cold out of passenger side. I disconnected the battery and pulled that 7.5 number #13 fuse by passenger foot plugged it back in. Bam! It worked!! My question is, do you think the old one would have worked if I would have just tried doing that? If not, why do you suppose you have to disconnect battery and mess with fuse?
I don't know how tiny your hands are, but I just went out to change mine and there's no way my hands are fitting in there... Ironically, I tapped in the actuator several times and it's working again lol.
so there is a part (mickey O'Donohue mentions) that is like a small hockey puck that the actuator sits on that then controls the actual door actuator arm. anyone know the name of this part? mine got lost somewhere in the dash during removal
@@sexybjjgod @prentice fleming replied to a different post of mine and found it. i ordered it but haven't installed it yet as it hasn't come yet. It is the cam follower. Adjust Cam - Ford (FL3Z-19788-B)
Whoever at Ford thought it was a good idea to put the actuator back there needs to be taken out back and taught a lesson. This is not fun to change out. I think I took a few layers of skin off my forearm. I did find a nice little ratcheting 90-degree screwbit driver that holds a T20 bit at Harbor Freight that worked great in getting the screws out.

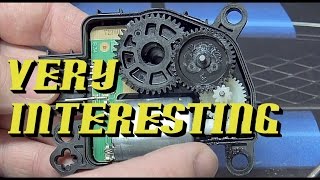


This video was extremely helpful and clear. I was able to do this repair, avoding a quoted cost of around $1,000! Here are some lessons I learned that may be helpful to others, I realize much of this is in different comments down below, so I want to consolidate. First off, the actuator part is a Dorman 604-290 Blend Door Actuator. Its important that you get the 290. If you lose the Adjust Cam that it sits on, the part number is FL3Z19788B. You shouldn't need to replace it, just be careful you don't drop it. You will also need a 7mm socket to remove the six (6) total panel screws. The two (2) screws that hold in the actuator are Torx T20. As the video shows, i was not able to get a socket wrench in there, so you'll need to have something to put the T20 bit into that is small enough to hold. I ended up dropping a T20, but had several back ups. The hardest part in all of this is positioning the cam so that it moves the temperature blend dial. You will be able to rotate that dial with you fingers to put it into the correct position. Once you have it plugged in and screwed down, you should definitely reconnect the battery and test your work before putting trim panels back on. YOU MAY NOT NEED THIS NEXT SECTION: The first time I did this, I actually had the actuator plugged back in and screwed down, but it was not in the correct spot and the cam was not moving the dial, so adjusting the thermostat ended up moving the white gear on the actuator into the wrong position. After taking it out, I ended up having to draw a marker line on the gear tine 180 degrees from the gap and plugging in the actuator in a way that i could watch it rotate. I hooked up the battery again and adjusted the thermostat until it rotated the actuator gear into the correct position, then immediately shut off the truck aux power. After that, I disconnected the battery again and was able to place the cam and the actuator in the correct position. I hope this helps!
You are the only one that knows what a 2015 to 2019 F150 is. Thank you so much for your help. Great job.
Great detailed video!! There's no way I would have attempted removing the entire dash as the dealer recommends for their repair. The main issue I ran into, besides EXTREMELY tight work space, was realigning the new unit on the rotating cam. Even though the teeth line up, depending on the last temperature setting, this will change the positioning on the gear. I had to turn on the heat and adjust the temperature to rotate the cam so it would drop on the thermostat needle and set into the set posts to reattach the unit. Tested it before putting everything back together and thankfully it worked. As others mentioned, you will definitely scrape your arms changing out this part but absolutely worth it saving on an outrageous dealer repair.
Thank you SO much for this tutorial. Glad I read the comments before removing the actuator or I surely would have lost the cam below it. As others have commented, aligning the cam was difficult for me. The red tab on the connector broke off. The red tab is designed to prevent the black clip from pressing down, releasing the connector. Sort of a safety measure. Hey, Ford engineer team, I sure hope no one gets in there to release it. Mine is a 2016 King Ranch and the torx screws securing the actuator are T-20. Getting the the vertical trim console trim back together was PITA for me. But it was late in the day and was getting tired. My truck is covered by a bumper-to-bumper extended warranty that would have covered this. However, it's the weekend before Thanksgiving and we're travelling in the truck for the holiday. No time to schedule with the dealer. Frankly, I don't want the dealer pulling the dash anyway, it'll never be the same if they do. Thanks again.
My truck has the warranty and they “don’t cover actuators”
Can't thank you enough for posting your video. Couldn't have got this replaced without it. Probably couldnt even find the dang actuator without it. I've done lots of repairs on vehicles but this was definitely one of the most difficult to get to. Thanks again.
This vid is a money saver! Bought the part for less than $25, took a couple of hours to replace. Heat/cold work great. Thanks for making this vid!!
Great tutorial! Took us about 3 hours start to finish! There are a few “tight” spaces but every thing went well. THANK YOU!!
I have a 2017 F250 and this video saved me a lot of money. Local ford dealership quoted $1,850.00 and needed a couple of days to do this repair! With the information from this video I was able to replace this part for a little more than $45.00 and it only took a couple hours. It wasn't easy - but is possible. The hardest part was aligning the cam with the new actuator, because you're basically working blind. It's critical to make sure the blend doors pin is in the groove of the cam.
Thanks for posting this video!
Wow, that's expensive. My local dealers were $1300cad incl parts
Mine just quoted me $1800
How do aligned them cam?
@@tankdome37 Going from memory I believe there is a pin on the blend door that fits into a groove on the cam. If it doesn't go in there properly it's not going to work. Also, the new actuator won't want to set back into place "naturally" to reattach the screws if they're not aligned.
Someone mentioned a good idea of having the old part right there to refer to since you won't actually be able to see what you're doing.
I’m going to have to do this on my 2017 F350. What is insane is the TSB for this quotes 5.7 hours of labor. The dealer is high AF if they think they can charge $1800 when there is a published TSB for this issue.
Life saver dude! That install went smoothly because of this video. Thank you!
Thanks for the good quality video, showing all the steps, and explaining everything! I’ll be doing this soon!
Great video! Exactly what I was looking for. I’ll be attempting this fix tomorrow. Update: it worked. I was able to use your video to double check the steps many times. So thankful to you for making and posting this!
This walkthrough was awesome!! I used a mini screwdriver with interchangeable bit to get to the actuator. Thank you!!
This worked! Ran into some snags, the red tab somehow snapped off and is lost forever as I was pushing it out, thought I was screwed but took over an hour to push on the plastic piece the tab is supposed to push on to release the connecting wire housing. Getting that out was extremely difficult because you are working blind, with one hand, and no room. Also be extremely careful when you remove the old actuator that you don’t lose the plastic piece that attaches underneath and around the gear as it is not attached at all to the vehicle (not sure what it’s called, size of a smallish hockey puck) because this is what the actuator sits on and rotates the gear. Other than those snags this is doable if you work slow and carefully. Helps to keep the new actuator right underneath you as you work so you can look at it and see what you’re feeling with your hands.
So i lost the small hockey puck thing... when i was pulling out the actuator i heard something fall and clank around but didnt think anything of it. after i tried unsuccessfully attaching 2 different actuators i came to the conclusion that the mysterious clanking sound might have been something that attached to the shaft. first comment on here and thats my problem. anyone have a picture of what this hockey puck thing looks like? or know the name of it? im hoping i can get one from the dealership or something...
@@shanek8481 It is the cam follower. I believe the part is Adjust Cam - Ford (FL3Z-19788-B)
Life saver!!! Thank you. I was just going to manually move the stupid thing over in the winter and summer. Felt horrible knowing that basically a $1,500 piece of plastic was lost behind my dash because I couldn’t find what that thing was anywhere. Thanks again!
Thank you so much for taking the time and recording the step details of everything needed to get the Job done. May God bless you abundantly for the money you saved me. Thank you Sir
Thanks for the great video Charles! Nice step-by-step procedure.
I just finished replacing this actuator in my 2015 Lariat. Using the torx bit in a socket adapter is genius for working in the tight space. The only other tip I will suggest is to tie a long piece of dental floss to the tools ( and screws ) so that retrieval is easy if one gets dropped. Other than that, the toughest part for me was getting the loose cam follower correctly positioned so that it was engaging the damper lever properly before installing the actuator.
Yo you got a part number need to do this on my truck and I have no idea how to look it up get like 3 options when I look it up
@@gu4awsome1996 This one is the "B" model
Fixed the problem perfectly , terrible place to get to but it’s done , thank you ! Only problem I have now is when I put it all together and turned the truck back on I have a check engine light , now to figure this out !
Thanks so much! Saved me a couple grand in an hour and a half. Excellent video.
I just did this on my 15 f150 lariat… holy moly you saved me 1200$ canadian bukaroos :)
I did lose the red clip on the back of the connector, but it still clips into place.
My forearms are completely scratched up and bruised, maybe adding some padding or heavy duty work towel to support the forearm between the vent openings. Super upload bud 🎉
Awesome video, just saved me $2000 from having dealership installing this $30 part. Thanks! 👍
thanks for tutorial, I changed mine successfully. The two torx screws on my actuator are 6-Point Torx Size 20. the screws are located at Front (not the very front left one) and Rear Right. The Rear Left hole on the actuator was meant for a positioning rod, you can feel it with a smaller screw bit (no indentation in the "head area" unlike the other two torx). I used a mini T wrench for the torx and used some double-sided 3M tape to secure the torx bit in its socket. I also tied tools to my finger with a dental floss to prevent dropping. I was able to complete the work without disconnect any wiring except the 12V main battery. I broke the original actuator's red holding clip (push-back and down) and lost them in the abyss, but the wiring connection seems to be tight without the holding clip. there is only one proper orientation to set the actuator, pull out the cam and study in case it gets loose, you won't make too much error when setting the cam as there is only one position if installed correctly, you will not be able to fully seat the actuator if the cam is off. a decent 2-hour work for the first time, I used non-marring orange plastic pry bars set
Warning: If you are on blood thinners, expect your arm to be black and blue. That having been said it's worth it. The project took me 3 1/2 hours. I look at it this way, I made nearly $500 an hour. The bruising will go away.
Torx bits aren't 5 star, those exist and are a completely different tool. Also, trim tool kits are cheap and can be had at most auto stores and HF, I'd recommend them highly over a screwdriver.
Best video of the issue I've seen. Thanks!
Thanks so much for the great directions 50$ and and 2.5 hours later I have AC before the summer on the passenger side!!!
I have ordered the Actuator for this repair. I, like others have been told by Ford that the cost to repair would be over $1500. I am certainly going to try this repair myself. Thanks for the video. My issue is on My 2016 I have Heat on the driver side but AC on the Passenger side. I have just noticed today with the warm weather that I have AC on the drivers side but pushing out heat on the passengers side. Hope this fixes my problem. Will be a project for next weekend.
Where did you order the part from?
Just did this process. You gotta have some rather thin forearms brother. That was an absolute bear of a job. Working blind…one socket is Aaron Hernandez…lost forever in my dash. Great video though!
So True
Thanks man. I got me weekend plans now:)
Thanks for great video. Was able to replace passenger blend door actuator on 2015 Lariat. Wanted to recommend this tool for torx mounting screws. Titan micro bit/driver set part #11205 from Auto Zone $13. Actuator part # Motor craft FL3Z-19E616-B.
Replacement took me 2.5 hours took my time no rush.
Good luck!
Thank you for video. This just saved me at least $1,500.
It works, awsome, got my truck fixed
This video is by far a money saver! Here are my tips after successfully completing the fix:
•If you don’t have a short, stubby ratchet I recommend buying one. With the tight space, it helps tremendously and will make it easier. I bought a small 1/4 drive ratchet and and 1/4 drive T20 socket for it.
•There is a 7mm bolt that is holding the vent in place. Instead of using vice grips to move the vent over to get your arm in there, remove that bolt and it will move enough to reach past the actuator.
•Use something like a glove to protect your arm from the edge of the plastic on the dash (you will understand this when you arm is in there).
•when you feel that the screws on the actuator is loose enough, use your fingers to remove them preventing the possibility of the screws being lost..
•and lastly, this will let you know real quick your fear of getting stuck. Stay calm, and take your time.
The only other thing that I did was that when I removed the actuator, before I installed the other one I removed the cam carefully and looked at how it aligns with the actuator just to visualize it.
Thank you I couldn’t figure out what size star it was I’m in the middle of the repair wish me luck
Started trying to do this and did get stuck temporarily, in a bigger guy, big hands, don't think I can do it, but not giving up just yet
@@mark.mahorneywere you able to finish it?
@@TheBanks148 I could not move my hand in there at all, but I got my 14yr old daughter to try and she replaced it perfectly lol, I showed her the vids, we got the gear lined up properly, taped the screws to the bit with electrical tape so we didn't loose them getting them started, she ran them in with her fingers then we switched to ratchet.
She didn't mind doing it bc it was the heat on her side of the truck and back seat, she was proud of being able to do it.
Thanks Dude! Awesome informative video
Worked like a charm. Only issue I had is the heat that moves the blend door came loose. Took it off put it on the new part. Closed the blend door lined up the guide hole on the part and the gear. I tested it while holding in place. Worked fine. Put screws back in good to go. You are pretty much doing this fix blind this way. You cannot see. It can be done though. Thankfully.
Great video!! Saved me about $900!! Not for the faint of heart though, your arm will hurt! Try not to drop anything…
Great video!!! I need to do this with my fathers truck lol...wish me luck
Man thanks so much for this video. I did this today and boy oh boy that was a hell of a job. Working blind, insane. After I finished installing I put everything back together and gave her a test. It didn’t work, was still blowing cold out of passenger side. I disconnected the battery and pulled that 7.5 number #13 fuse by passenger foot plugged it back in. Bam! It worked!! My question is, do you think the old one would have worked if I would have just tried doing that? If not, why do you suppose you have to disconnect battery and mess with fuse?
Thanks again man, really appreciate it!
Man I appreciate you posting this! The same thing happened to me and I came to the comments to see if anyone else had a suggestion. I followed what you said and mine works now. Thanks so much!
You did a reset procedure it normal to have to do that with installing a new actuator so it can reset back to neutral postion. But I doubt it would have fixed the original problem it probably binded up. but it is possible if only resetting the actuator without replacement works it possible you have a bad ground or rubbing wires which cause it to lose its memory on certain conditions like bumps or humidity.
Great walkthrough. But you should mention that it's a T20 torx bit that you need
Could you access it from the glove box area?
I have dual climate and my passenger side heat is working but my drivers side and back is not. Is this the correct actuator I need to replace?
I wear XXL size gloves and Chinese finger-trapped my hand on the sharp, curved metal piece shown on the right at the 5:00 mark. Took all the skin off one side of my hand getting it out. My dad was there and wears L size gloves and he was able to complete the job after I couldn't. So caution to those with big mitts: this may not be a repair for you!
Did it have a cam follower on there?
THANK YOU!!!
Thank you!!!
How do u get it to line up!
I have a 16 lariat and my passenger side is stuck on heat. I’ve replaced the blend door on the floor board of the passenger side. Do you think I should replace this part also? Thanks!
The one on passenger floor is for driver side. The one he replaced in this video is for the passenger side. If you are having issues going between defrost, floor and main that is actually a different actuator behind steering wheel. There are other videos out there that show how to access that one.
Is the procedure the same for the drivers side?
Fair warning. This will absolutely be a pain in the ass.. depending on how lucky you are you can do this pretty quick and easy. The hard part is that the new one won't exactly line up with the pin on the door. I spent probably a good 2 hours trying different stuff to try and line up the cam gear on a pin and line the actuator up blind. I was about to to give up when I finally got it on. Probably would have been quicker and less arm damage from the plastics to just remove the dash 😂
Do you have a link for the part
Awesome video, definitely going to try this method to solve my same issue. Could you tell me what the actual part # is? I am seeing a few different ones listed around the web. Thanks.
FL34-19E616-B
Cuántos actuadores tiene la lariat sport 2016
Great video. I would not attempt to remove dash but I would attempt this method. Do you remember what size 5 star bit it uses?
T20, I did today work for me just be careful with mach the gears after put the actuator!
Called BlendDoor Actuator specialist to work on my 1999 Lincoln Continental. Finished in 30 minutes. Handed me a bill for $1000. $2000 per hour!
I complained. As a brain-surgeon I didn’t even make close to that.
He replied:”I didn’t make this much when I was a brain surgeon either. “
What size was ur 5 star tool to get the torque screws out?
T20
Whats the oem part number I tried these
Hey Charles, I really appreciate this video! Have you heard of anyone replacing the actuator and it not fixing the issue? I followed every step and even tried the battery/fuse trick and no change. I still get hot air out of the driver vents no matter what. I pulled it back out and double checked everything and it will still not work.
The driver side has a different blender door. If you replaced the passenger one like that in the video. It will not fix the driver side blender door. There are 3 blender doors on the f150
@@sdennis8 I appreciate the reply. I figured that out. Thanks!
I was able to get it installed but still blowing cold air. How do you "re-calibrate". It seemed to go into place perfectly, but is there an alignment that needs to happen?
You can pull the Fuse for 30 seconds or disconnect the battery. Turn on power to vehicle and wait like 30 seconds prior to turning on HVAC system. The fuse is a 7.5 amp and I believe it was location 12 or 13 on passenger side (left foot).
I did this today and boy oh boy that was a hell of a job. Working blind, insane. After I finished installing I put everything back together and gave her a test. It didn’t work, was still blowing cold out of passenger side. I disconnected the battery and pulled that 7.5 number #13 fuse by passenger foot plugged it back in. Bam! It worked!! My question is, do you think the old one would have worked if I would have just tried doing that? If not, why do you suppose you have to disconnect battery and mess with fuse?
Great question about the fuse
I don't know how tiny your hands are, but I just went out to change mine and there's no way my hands are fitting in there... Ironically, I tapped in the actuator several times and it's working again lol.
so there is a part (mickey O'Donohue mentions) that is like a small hockey puck that the actuator sits on that then controls the actual door actuator arm. anyone know the name of this part? mine got lost somewhere in the dash during removal
Hey man, any chance you found the name of that part?
@@sexybjjgod @prentice fleming replied to a different post of mine and found it. i ordered it but haven't installed it yet as it hasn't come yet.
It is the cam follower. Adjust Cam - Ford (FL3Z-19788-B)
Can't find that part number
What’s the part #?
Dorman 604-290 or Ford OEM part is FL3Z-19E616-B. I have replaced both of them on my 2015 F150.
Whoever at Ford thought it was a good idea to put the actuator back there needs to be taken out back and taught a lesson. This is not fun to change out. I think I took a few layers of skin off my forearm.
I did find a nice little ratcheting 90-degree screwbit driver that holds a T20 bit at Harbor Freight that worked great in getting the screws out.
Question.....does this actuator control the passenger side climate and the defrost as well?