Marking the Fence Layout and Setting Your Posts

Вставка
- Опубліковано 4 чер 2024
- This video will cover the standard in ground installation of the posts.
Here’s a list of typical items required for marking your layout and setting your posts:
• A Drawing of your Layout Plan
• Tape Measure
• Walking Wheel or Measuring Tool for Long Runs
• Marking Spray Paint
• Steel Rebar or Wood Stakes
• Hammer
• Rubber Mallet
• Level
• Straight Edge to Fit Over the Post Hole
• High-Visibility String
• Carpenter’s Square or Angle Finder Tool
• Manual or Powered Post Hole Digger
• Bagged Cement for the Post Holes
• Wheelbarrow or Mixing Tub for Cement
• Shovel
• Hose or Water Source
• River Gravel (optional)
There are two other crucial items to make sure you have taken care of.
The first is getting a fence permit if your city requires one.
The second item is to have your utilities marked.
Start on an end or corner of the layout and mark the ground with your paint. This layout marking will represent the outer edge of your fence line. Using your measuring device, go the full distance to the next corner or end in the layout.
When I come to my next stopping point, I mark the ground with paint again. I then go back and connect my two points with the marking paint. Repeat this process until your entire layout has been marked.
The next thing you want to do is run your string line so you have a clean and straight reference point for digging your post holes.
With your rebar or wood stake in the ground, wind or tie your high visibility string to it.
With the layout runs fully marked and the string line run, the last thing to do is go back and mark the individual post hole locations throughout. What we are looking to mark is the rough ‘on-center’ location of the post. This ‘on-center’ spacing will vary depending on if you are installing our Stronghold Iron or Infinity Aluminum fence.
With all our post locations marked on the layout, we can begin digging our post holes. There are two measurements you will need to determine before you begin digging the post holes.
The first is the width of the post hole. The rule of thumb is to aim for roughly 3x the size of the post for the size of your post hole. So if you have a 2” post, you will want a post hole roughly 6” wide.
The second is the depth of your post hole. This will vary depending where you are located and what length of post was provided.
Now you can begin digging. Line up your digging tool with your marked location and begin digging. Try to dig your hole as straight down as possible. The rule of thumb for digging the post hole 3x larger than the post not only ensures enough concrete is used, but it also gives you some wiggle room in digging the post hole. You want to be as close as possible, but don’t worry about perfect.
As you dig your hole, keep the top of it clean and free of debris. You can check the progress of your hole by laying a straight edge of some kind across the hole and then measuring from the bottom of your edge with a tape measure to determine the post hole depth in relation to the yard surface. If you accidentally over-dig the post hole, we do not recommend pushing dirt back in. Our recommendation is to purchase some river pebble or stone chips. Pour the gravel in and smooth it out until your depth measurement gets to where you want it.
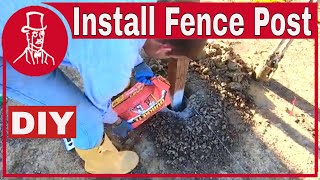
With all of your post holes dug, you are ready to mix your cement and begin setting your posts. When mixing your cement, you want it on the dry side. Aim for something roughly the consistency of chunky peanut butter. The reason you want a thicker, drier consistency is so your post will stand in the cement without any additional support.
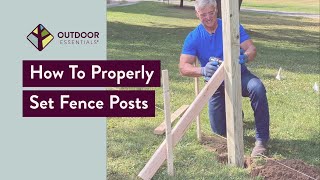
Place your post in the rough center of the hole and begin shoveling in the cement. You will want to fill the hole within 2-3 inches below the yard line. We do this so that you can back fill dirt on top of the cement for a cleaner look and allowing grass or landscaping to grow back.
With your post set in cement, use your level to ensure the post is plumb on two faces of the post. You can fine-tune the post’s placement by tapping it with your rubber mallet. With your post set, move onto the next one and repeat the process. Be sure to pay attention to the spacing between your posts as you go so that your fence panels install correctly. I recommend going back and checking plumb about every 3-4 posts to make sure nothing has shifted.
Once all of your posts are set and the concrete has set up for a little bit, you will want to go back and fill that 2-3” at the top of the hole with the soil you dug out. You will want to slightly mound the dirt around the posts since the loose soil will likely settle and level out once it re-compacts.
Jason Kauffman
Iron Fence Shop®
800-261-2729 Toll Free
sales@ironfenceshop.com
www.ironfenceshop.com


This is so much easier than those other UA-cam videos. People make this more complicated than it actually is!! Thank you!!!
Glad it helped! We work with a ton of DIY folks and we always tell them its much more common sense and planning than technically difficult.
You are awesome thank you!! We put up perfectly level and straight posts for the very first time thanks to this video. Of course I screen shot the supply list you provided which was super helpful, but for anyone who reads this..... remember a knife for the cement bags hahahahahaha the keychain knife I luckily had in the truck barely made it lol
This a very thorough and professional video. Thank you.
Glad it helped out!
Very Useful information. It is very useful for me to install fencing at my farm in India. Thank you , Regards, Ravi Patil ,Farmer , Latur, Maharashtra, India
This is going to be my first project on my own. Wanting to do it well for these people, thanks for the info years later!
How’d if go and turn out wishing the best for you all out there and you too pal with all my heart:);)
Remember doing this for my tia: me, my brother, my tio, my dad, my cousin and grandpa we built that fence real good and did everything just like in this video a real sweet nostalgic loving memory we had through some hardworking bonding time as a familia;);):):):):););):):) wouldn’t trade it for the world:);) 🌎 💗
Jason, Great job! The more videos I watch, I realize that I am able to install my own fence and save thousands of dollars. Just know, if I go with the DIY method, you have to be there to answer the questions I may have. :)
Glad the videos help! Sometimes something visual goes a long way.
Thank you so much
Great info thanks 🙏🏼 keep videos coming. Also do you have measurements how to build and size of material I need? Thanks 🙏🏼
Hi Adrian. We would need to talk to you over the phone or get a quote request from you through the website to get an idea on the materials you need. You can call us at 800-261-2729
Great job and nice video :)
If I’m installing posts into ground that has a slight slope, should I start at the low point or the high point?
So long as you are double checking each post between setting them, there is no right/ wrong answer. I find it's usually easier to start at the high point when I've dealt with grades.
Great
Was supporting the posts while concrete is drying not necessary? I’m also setting square aluminum posts
IF you mix the concrete on the dry side with a chunky peanut butter consistency, you should be able to stand the posts up in the hole without support. Just remember not to mix the concrete too wet and keep it to a drier mix.
If the fence turns at say 130 degrees, do you need the swivel mount?
You would for the aluminum fence. On the iron, the angle brackets only allow about a 20 degree deviation from 90. However, you could also 'pivot' the post between two panels with angle brackets on both sides of the post to get a little more angle with the iron
How do u keep the post exactly at proper depth for the proper finished height - measure from hole depth to a marked spot up from the bottom of pole or different method
You can go about it a few ways. The key number you want to watch is the amount of post above ground. If your fence is 4ft tall and you want a 3in gap under it, then I want to measure from top of the hole at the ground to the top of the post to make sure I have that 4ft 3in. If I don't then dig deeper or add some gravel to build it up. We recommend that you are looking at that installed 4ft 3in post height WITHOUT the cap on the post too. That way, when you add the cap on, if one post is slightly off from the other, you don't really notice.
👍
how far apart are the post holes you did`nt explain
Hi Rick. It's going to vary based on the type of fence and application. Iron and aluminum fence space differently and even aluminum to aluminum can space differently by manufacturer depending on how they are built.
811 only comes out for free to mark utilities from the pole to the meter. Not from your house to a barn. I found that out unfortunately.
Did you notice how the iron stick ran away about 1 centimeter when you knocked on it with the hammer?
3:30
Hi Don. Those rebar pieces don't have to be precision laid so the slight movement is ok. They are just there to attach the string to. The spray paint mark and hole you dig is where the precision is needed.
Iron Fence Shop® you want the rebar relatively plum to the string/fence line, especially for terminals.
Where are you guys located
Hi Francis. Our sales and support office is in Stow, OH and we ship out of three different warehouses across the entire US depending on what materials you are getting and where you are located.
Why not show 3 4 5 to get squared corner
no need he used a speed square
Because there's more than one way to skin a cat and get the same result
Good video, only thing I didn't like is I didn't hear you say a 2x2 or 4x4 aren't actually those measurements...a 4x4 is actually 3.5x3.5
With steel and aluminum posts (that we sell and handle) the posts are true sized. So a 2x2 steel post is actually 2 inches by 2 inches. However, if you are using wood or composite posts, you are correct. Those are sized nominally meaning that a 4x4 wood post is actually a 3.5 x 3.5 wood post. I didn't bring up nominal post sizing only because we don't sell those types of posts. Good comment though if you are using these tips for a wood fence!
@@Ironfenceshop thank you for your reply.
Boss hog
Great info, but would be nice if he speak slower nd give and example of each, the Maj. of people its likely not tech enough to fu that pace....
Sarong ,manok in araneta coliciosm manila.
You can set the video playback speed to be slower.