Create Stylized Clumps of Hair - Maya Curve Warp

Вставка
- Опубліковано 26 сер 2024
- Create Stylized or anime looking hair quickly in Maya 2018 using the Curve Warp deformer.
quick overview:
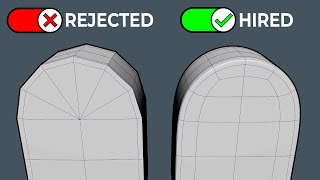
- Create basemesh to act as the hair clump, using poly modelling.
- Create a curve and an aim curve to control the direction and flow of the hair clump.
- Tweak some Curve Warp attributes to get a nice taper on the shape of the Hair clump.


Thank you for sharing your knowledge. It has helped me so much.
Thank you kindly. This is exactly what I need.
Very useful thank you so much!!!
Thank You! This is amazing!
How can I dublicate the mesh without loosing the curve warp?
so, is it no sound, right?
Hiya, really nice video. Thanks, I have an issue. When I curve warp both my mesh and curve together it doesn't stick to the curve at all. It just places it in another location, making it larger etc. Pls help
Nevermind, I managed. I never actually put the object centre on grid. However, I don't know why it does that after FT and the Hist are deleted.
@@TristanzGodz Depends on the pivot point of the object.
If you just freeze transforms you basically make the pivot point 0, 0, 0
So if your object is not on world origin, your pivot point will be while your object is somewhere else entirely.
So thats why it would affect the curvewrap stuff as well.
@faithG_ Nice tutorial. Where can I get the custom inputs in the panel for the curve warp? at 0:53?
TheIntratec9 Do you mean the tools settings? I am not sure exactly what you mean @ 0:53...
If you simply double click the move tool icon on the left side, the tools settings menu will pop up. Now whatever tool you choose will display its settings in that window.
I mean the stuff with the letters FT and CP on them. I can't seem to find them on my copy of Maya 2018, and AMTN, and MigNT.
TheIntratec9 That bar with the icons on top is a custom shelf.
I basically add menu items by ctrl+shift+clicking to a shelf.
For example if you go to file>save scene. and ctrl shift click it.
It will add an icon to that shelf.
Some icons are actually mel scripts added to my shelf.
Like MigNT.
@faithG_ Thanks for the help. I think I got that part right.
Oh, but do you mind telling me what coordinates you put on your original curve? I want to make sure it looks right.
Specifically for curve1