How to Replace a Honda Water Pump

Вставка
- Опубліковано 5 вер 2024
- Here's how to replace a water pump and engine coolant on a Honda with a 4 cylinder engine.
This procedure applies to the Honda Accord, Element, CR-V and Acura TSX.
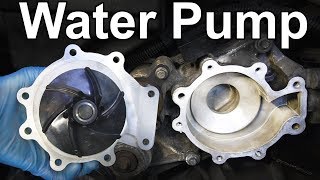
The water pump is responsible for circulating coolant in the engine block. On Honda K24 series engines, the water pump is driven by the accessory belt, instead of the timing belt. This makes replacing the water pump fairly easy.
Signs of water pump failure include a noisy bearing, coolant leaking from the mating surface, weep hole, or gasket, or a broken impeller. Replacing the water pump as a maintenance item before failure is recommended, because when the water pump does give out, the engine may over heat, causing serious engine damage.
Replacing the water pump is fairly straight forward. The accessory belt is first removed, followed by the power steering pump and idler pulley. The power steering reservoir and hose is unclipped out of the way, allowing free access to the water pump near the bottom of the engine block.
Next, the coolant must be drained from the radiator, and optionally, the engine block itself. There are six 10mm bolts that hold the pump to the block. Have a catch can ready down below when pulling the old pump off the engine as there may still be coolant left in the block.
Clean all mating surfaces on the new pump and engine block with brake cleaner. Replace the gasket if necessary. Reinstall the water pump and torque it to 102 inch - pounds using a torque wrench. Getting the bolts exactly the same torque is critical to avoiding leaks, or broken bolts.
Replace the idler pulley, power steering pump, belt and power steering reservoir. Refill the cooling system with a borate and silicate free compatible coolant. This is important, as the wrong coolant could cause buildup of deposits or internal engine corrosion. Do not use GM Dexcool coolant!
Leave the radiator cap off and start the engine. Allow it to warm up and the bubbles to escape. Turn the heat on high, and don't rev the engine. Once the cooling fans turn on, and no more bubbles pop up from the radiator cap, replace it, and refill the coolant overflow jug.
Take the vehicle for a test drive and ensure there are no leaks or issues with overheating.
Replacing the thermostat is also recommended while the coolant has been drained from the engine. That procedure can be found here:
• How to Replace a Honda... d
Get your tools and parts to change your Honda's water pump here:
Waterpump:
amzn.to/3kaOrXb (US)
amzn.to/3Aeyip1 (Canada)
3/8" Ratchet set:
amzn.to/3hA7LLD (US)
amzn.to/3zgHE2d (Canada)
Honda Engine coolant:
amzn.to/3nyL1Q3 (US)
amzn.to/397hXGR (Canada)
Link to Etsy shop where you can purchase speedkar99's brother's socks, t-shirts or hoodies:
www.etsy.com/c...
Check out the speedkar99 Facebook page:
/ speedkar9
Check out the speedkar99 Linkedin page:
/ speedkar99
Follow speedkar9 on Instagram for behind the scenes coverage:
/ speedkar9
Subscribe for more videos just like this:
www.youtube.co...


Get your tools and parts to change your Honda's water pump here:
Waterpump:
amzn.to/3kaOrXb (US)
amzn.to/3Aeyip1 (Canada)
3/8" Ratchet set:
amzn.to/3hA7LLD (US)
amzn.to/3zgHE2d (Canada)
Honda Engine coolant:
amzn.to/3nyL1Q3 (US)
amzn.to/397hXGR (Canada)
how many miles did it have? it was still good, yes?
This is a prime video to the point, no waste of time for viewers, no non-sense talking like other people do by assuming every viewer is a grandma who does not know the car has an engine. Good job man.
Glad you appreciate it
This guy is the best! Straight up and to the point, no crappy music intro, no stories, no yada yada yada, knows exactly what to say to get you through the repair. Thank you! 👍
This is the best no-nonsense how to video I’ve ever watched. You told us every bolt size and how to get to them. Very well done.
This is one of the best videos I have ever seen on youtube! Of any kind or subject matter. Concise and to-the-point yet detailed. This should be used as an example of how to make a video. Oh. And BTW. After watching this, I could would tackle the water pump on my sister's car.
+Windom Sparks I'm glad you liked it, hope it works out for your water pump replacement
@@speedkar99 how long does it take to change the water pump??
An hour or two.
@@speedkar99 thanks!!
@@speedkar99 ,l a lllx i
ATTENTION CR-V OWNERS! (Second generation at least). Yes, it’s the same engine, but there is MUCH LESS SPACE around the water pump than there is in this video. To get the pump out through the top I had to unbolt the alternator and some other parts. The six bolts for the pump were also very difficult to get to as there is not enough room for a ratchet like there is in this video (I eventually got at it using two universal joints). If I were to do it again I would go through the bottom by removing the main crank pulley. Truly a quality video though!
+Jordan Van Ek thanks for the tip.
Jordan, spot on. I didn`t see your post until after I tried to do it myself. You are right, CRV 2nd Gen is different. I had a hell of a time getting to 3 lower bolts and trying to slide out. Now I am having a mechanic finish the job for me.
Thank you Jordan for the tip I got a 2007 crv and searching for best video to get the job done
Watched this thought all mine like a slice of … oh no 🙊 this isn’t anything good need reservations at your own funereal lol
That, and 1st gen Elements. The lower H2o pump bolts were a PITA. I did not however take out the Crankshaft pulley which should give you more space.
God, this video is the best. No kids with dumb stuff! Straight forward, no bs whatsoever! Thank you!
This is the definition of a proper how to video. No b.s straight to the point. Bravo sir
That's my style. 😊
This is one of the best videos I have seen on how to fix vehicles..
Thanks, glad you appreciate my efforts
I m a 58 yr old woman gonna try to attempt this today only because of you n this video! You make it easy enough step by step I think I can do this
This seems pretty similar to an 06. I don’t know why all the other videos were well over 30 minutes. It was intimidating. Thanks for the quick video it eases my mind
Glad you found it helpful. Should be same for most k series
Juan, this is the best instructional video I've seen and I watched quite a few !! No fluff and giving tips how to access the bolts, what tools, extension to use, what to look for when checking what needs to be replaced. THANK YOU !!
+DeepRthought Thanks for the feedback, I'm glad you enjoy my videos!
Thank you for such concise instructions. Wasn't interested in paying 400-500 bucks for a shop to install a 30$ part.
Your welcome
speedkar99. Do you think is the same procedure on a 2006 honda odyssey..?
Its not really the cost of the part....it's the experience the knowledge and the professionalism....
He gives socket size needed, etc. Editing is spot on. Much better than any other video I have seen on the subject.
+Guru Meher Khalsa Thanks. Glad it helped
Dude you just saved my life, I thought I was gonna have to mess with the timing belt for this job like in older Honda engines.... great video!!!👍👍👍👍
+Juan Rodtiguez Thanks I'm glad this video helped you!
Juan Rodríguez que tanfasil fue para camviar la vanda del timpo
Exactly what I thought!!!
Which engine would that be? On older Honda's cause I got a b18b1 and looks exactly like his lol
It is for 2003-2007 Accord 4 Cylinders
Never let the rain dampen your spirits 😀. Great video.
great video. concise, no jibber jabber. thanks.
+MrTeknotronic thanks, short and to the point is how it should be
Thanks so much for this. Dealership wants $900 to do this. I can now do it myself for $40 thanks to you!
+Suisiders Thanks I'm glad my video helped
speedkar99. Thanks for the video. Do you think is the same procedure at a honda odissey??
Great video. Very concise the way a how to video should be made. Includes the torque spec on the critical bolts. Doesn't contain nonsense like "my toddler plays soccer on Thursdays" etc that some fools put in their how to videos as if viewers would want to know that. This video is better than Honda instructions could be. Exceptional.
Thanks
I'm a mechanic and I watch vids all day this was quick precise and told me all i needed to know. 5his was excellent
im doing this tomorrow, thank you for the last piece of advice. It's wintee in my place and I have to do it at sunrise
Couldn't agree more with all the positive comments. Great video. Thank you. I hope we get to see more of them from you.
Straight forward and direct,
exactly what I was looking for
Anyone who works on this should be aware of tight clearances.
and the practicality of changing something like this out periodically is just good preventive maintenance application.
Spend a few hours to replace these parts ,
water pump - o-ring seal gasket-and perhaps a serpentine belt.
and then don't worry about it for another hundred thousand miles.
Great video tutorial thx.
Thanks, and good point on maintenance
changing it on my 92 accord lx and its the first time in 25 years changing the timing belt and water pump and its all clean thankfully has 80k km on it atm and most of the seals are still good
Terrifically detailed video . Personally I woukd not have the cuhunnas to tackle that job, you need to be a surgeon of some kind! Thank you
This may be the best how to video ever
BEST VIDEO EVER ON YOU TUBE WHEN IT COMES TO HONDA PARTS REPLACEMENT ,GREAT JOB GUYS
+HERMON B thank you
Easily the best video describing how to do this. Many thanks for being so clear and to the point.
However, on a 2004 CR-V it's a nightmare. There's not enough room between the water pump and the bodywork to get a rachet and socket into the pump wheel (the 3 lower bolts). I've had to undo the engine mount to let the engine drop a couple of inches so I can get at them from the wheel well.
Even then it's a struggle.
I managed to get my rachet onto the nuts but I had to use a 1/2 inch rachet, a 1/2 to 3/8 adapter and a 10mm socket from my 3/8 set to get the correct length to fit over the bolt. Everything else I had was either too long or too short.
Glad it helped
So hard to get the bolts, do you know it is same as 2007 CRV ?
@@tomlau6117 The 2007 CRV looks different to my 2004 CRV. I don't know if they changed the engine as well. However, on this vid it looks v similar ua-cam.com/video/3Tb-mXqFVmA/v-deo.html&ab_channel=AUTOREPAIRGUIDE
Wow, this is like watching This Old House with Bob Vila; quick, direct, and straight to the point.
One of the best video's I've seen on the Honda CRV,. Very well done and very helpful.
Glad it helped. This was in an accord but it's the same procedure
This the most easy, straightforward , to the point video that ever watch!!! Thank you sooo much man!! I wish other youtuber can learn from you. Good luck!
I'm glad you like the video style
Keep going man, this is one of the best formatted videos I've seen. Too many guys talk about a bunch of unecessary bullshit.your right to the point . Make more. People will respond , this could be a gig for you.
Cool to see a smart . Articulate Hispanic MAN
Good luck Bro.
+Dan Thanks, straight and to the point is my style!
Btw What is Hispanic?
nice tutorial video - straight to the point, no wasted seconds.
+Kathy Eslao short and to the point is my style
I already know my way in and around a Honda but I still enjoyed/watched the whole video. Straight to the point & informative Right on man!
Glad you enjoyed it
For some reason I really like this guy.
Thanks
This video was certainly helpful - Thanks!!
On a 2005 CRV, there is not room to remove the pump without removing something. We ended up taking off the crankshaft pulley, and dropped the pump from the bottom. To remove the pulley, a special tool is required to hold the pulley still, and a ratchet with a long extension (the pole from a floor jack in our case) to provide enough torque to break the bolt loose.
+Kevin Scaggs thanks glad it helped
THIS DIY REPAIR VIDEO IS AS GOOD AS IT GETS. Bless you.
Awesome thanks
Best automotive video on the net. Thank you
You are welcome
Thank you for the best vid on the topic. Another guy gas a 40 minute vid. Sheepshead! Great job
I really like the tip about refilling coolant slowly. I've done mine once, complete job and managed to bleed it all okay in the end. But I never knew that tip at the time. It makes sense, if you go slow the air has time to be pushed out. Will keep it in mind :-)
THIS GUY IS GOOD EVEN THOUGH IS FAST
wish i would have seen this yesterday!!! other vids made this look complicated. i would have saved $150
I love your videos. They are very accurate and detailed yet short and to the point. I appreciate the time and effort you put on these videos. Keep up the good work.
This is the Best video showing how to do this. Excellent quality!!! Apreciate everything you provided. I didnt get dizzy from a shaking camera which is always a good thing. You are the best bro!
This video is awesome. No bs...step by step explanations...love it! Helped me changed the water pump on my 2.4 crv...much appreciated!!!
That's my style! Thanks.
I want to do the same work on my 2005 crv. Did you have to remove anything else? I saw a DIY from someone mentioning the removal of motor mount. Also, I noticed the service manual mentions the removal of crankshaft pulley, so i see some inconsistency. Would you mind sharing some details?
I wish l had neighbors like this guy, hey wanna beer….help me fix my car. Lol great job man.
Love the video, Very helpful. However the Honda Element is much tighter in this area. Manual says remove the Crank pulley, others have said to remove the alternator. I did neither. I was able to get the job done by placing a jack under the oil pan to support and elevate/lower the engine to aid in removing lower bolts using a 1/4" drive extension swivel and short socket thru the fender well with tire removed. I also removed the upper water pump side "engine mount, completely this is key to remove the pump from above" as well as removing the power steering pump and belt tensioner assembly as you have shown.
+corblom11 good to know thanks
Great video, special thanks for verbally listing the bolt sizes and quantity for each part.
No dirty underware today ? YOUR LOOSING YOUR COOL MANN ,COME ON...LMAO! Hey thank you for all your videos your really an inspiration Your doing a lot of justice for the poor GBU. bro
Thanks
I don't own one, but this is a great video. Wonderful description of what you are doing and using to remove the water pump. Thanks
+Patrick johns thanks I'm glad you learned something
one of the best diy videos I've ever seen.
Great job
+chooseanameforme888 feel free to check out my other videos
By far the best video thismy honda is the next gen up but procedure is almost the same except auto tensioner removal.
Yeah it should be similar for most k-series 4 cylinder engines
soeedkar99 I ran into a twist doing a water pump on a 2010 Accord 2.4 model. My water pump pulley is different andonly has three small holes. So from underneath I took a Phillips screwdriver and put it through a hole to jam the pulley to remove the three 10mm bolt's separately by a rotation of the pulley. Then the pulley is free and can be pushed aside getting at the remaining water pump bolt's on the bottom. On assembly I hand tighten one of the pulley bolt's to install and get the top bolt's started, be careful of the gasket on installing. Then take out the pulley bolt to move away for access to the remaining three bolt's with a extension and a swivel adapter. I just torque them till one half turn before they snap off. Great video of the process and thank you.👍
Glad it worked out for you
What a great video! straight forward instructions, good camera angles and use, and no dumb jokes or music. I like it!
Perfect video! This is exactly what they should be!
Working on front wheel drive engine is harder that rear wheel drive engine ... I admit it ..
The engine space is sooo tight ..
Holy crap! Best tutorial I've seen for sure.
Thanks! Check out my other videos for more.
Awesome mechanic's teaching
Thanks Scotty Kilmer easy as now
Thanks to you..
And your videos
You are welcome
***HONDA ELEMENT- this is an excellent video showing what to do. The element is a little harder as you need to also jack the motor and remove the motor mount or the pump will not come out. The pump is extremely close to the frame rail on the element which makes this repair very difficult especially removing and reinstalling screws on water pump
Yea the clearance is tight
Man… you make it look and sound so easy, i I want to go ahead at attempt this! First Ill need to take a day off… I know thats how long it’ll take me! 😂 👍👍
Incredible and concise. Thanks. Now I actually have time to fix it.
Your welcome
Damn, that looks sooo much easier than a timing belt driven one.
Oh yeah, it sure isn't as difficult as the timing belt
This video was great! Covered everything. Knocked this out with no problem thanks to this video.
+Cody Garduno thanks! Glad you enjoyed it
Great video .. you just earned a subscriber from Nigeria .. do this repair apply also to a Honda CR-V 2000 . My water pump is licking and I will like to do the repair myself
I'm not sure if those old crv had the k series engine
Hands down best video thumbs up for smooth sailing tutorial from begin to end even when nature prevailed my friend bless you and your great spirit
Thanks for the kind comments
Incredibly great step by step video!
Number 1 video 👌🏽 now i just gotta see if I can copy and complete
Go for it
One of the best repair videos. Great job!!
You saved me a lot of money thanks
Great video! I am jealous that my 2000 Honda CR-V iisn't as easy to just pop out a water pump like that. The water pump on mine is part of the timing belt system and the timing belt has to be removed in order to get to the water pump! I don't know what Honda was thinking when they built my vehicle!
speedkar99, your video is AWESOME! And, to paraphrase the ending, I won't let a little broken water pump dampen my spirits. Excellent instruction!!!
+highfeather1 thank you
Gre at video dude . Do more. Right to the point clear and concise . No b.s. good job
+Dan awesome thanks
Excellent demonstration! Very well explained and the video was was superb. It was a pleasure to see this video. No mumble jumble. Just right to the point and nothing more. Congratulation for a job well done and thank you for sharing.
I'm happy to hear your feedback
Bro excelent video really good on details, God bless you
great video on how to do this, thanks!
Welcome
Excellent video. Now I know that it is wise for me to take it to my mechanic.
Excellent! On point, great description. One of the best on UA-cam.
Thanks
Good video, Straight to the point NO BS!!! Thank you...
That's my style!
I loved your video! You didnt bullshit with other convos, you showed every step quickly and great video quality. A++++
Thanks, no non-sense is my approach
Супер 👍все просто и понятно объяснил даже без знания языка .
Nice and informative, thanks! Haha, I know about the rain. Belgium has turned into a swamp and everytime I stick my head outside, we get a downpour :s
+Koffi Banan Thanks, yeah that day was an annoying rainy one, made the job so much harder to get done.
your video was very good. to the point and very descriptive. thank you for this.
You are welcome
Wonderful tutorial! Thank-you!
so far at 30 seconds in, awesome video! to the point and without the ums and ahs of a prolonged un edited video. Well Done!
+Gil Marty Short and to the point is my style, no need for BS. Glad you liked it.
The BEST video! 🙏 thank you
Welcome
Staying on point, good voice good diction Thank You..
And now we're going to comment ..
great video!
Again, best video out there! Made me decide to do this. Thanks!
Thanks
Nice fluid video with no bs. Thumbs up
+mrfreewayboy that's my style! Thanks
Very helpful video best how to for a car I’ve seen on here
Dude your video is awesome. You make it look easy. Thank you!
Thanks I'm glad you found it helpful.
I agree, this is how to do a how to video, perfect!!!!
Thanks
Glad you appreciate my video styl
How tight can yyou torque on the water pump bolts
Great tutorial... Not sure what year this Element is, but on an 03 there's definitely not enough clearance to remove that old water pump without taking off the alternator also. We tried every conceivable angle but there's not as much room to work as there in on yours. This was still super helpful, but that was a definite frustration.
you should also include the tools and tool sizes on your videos good helping video 👍
+GMAN PRZ Thanks for the tip
Thank you for your excellent video and your time to explain everything 👍👍👍👍👍😎
+Mr Chevy 57 thanks glad it helped.
Yo i didnt know the power steering reservoir actually pops out of place like that. Thats good to know. Thanks bro!! That’ll help with replacing the belt
Yeah it pops out pretty easily
This helped a lot thank you!
I had to take off a lot more to get the type S water pump off
but this was a great guide!
this diy crystal clear..tq
Welcome
Ok, the best video so far on this year and make however, I think that gasket and all that calcium deposits could of been avoided by using the recommended Honda “blue” coolant. It looked like just water was being drained from the radiator.