Let There Be LIGHT! (Building a HUGE Overhead Softbox Diffuser)

Вставка
- Опубліковано 15 тра 2024
- Let There Be LIGHT! (Building a HUGE Overhead Softbox Diffuser)
▷ MY STORE - shirts, pint glasses & hoodies: paulshardware.net
⇨ Sponsor: Corsair K65 Plus Wireless Keyboard | go.corsair.com/oq99xY | Amz: geni.us/c2ABKtM
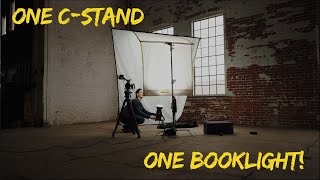
Today we're building a big overhead softbox! We wanted to improve the main build area lighting in the "studio" (garage) so after doing a bit of research I build a large (a bit less than 4 feet x 6 feet) softbox diffuser complete with smart controls for dimming and a ceiling mount. Building a cheap and big softbox light diffuser for photography and video making was a lot of work, but it was fun and (spoiler) it turned out great!
MATS 🧱
Light Bulbs ($14/4-pack) - geni.us/AwWrKq9
Fixtures ($20/each) - geni.us/Lfh7rgp
Kasa Smart Dimmer Plug ($18) - geni.us/ELcAKBB
Diffusion Fabric ($23) - geni.us/UcIZZQ0
48"x96" Black Foam Core Board ($37/each) - www.artsupplywarehouse.com/de...
40"x60" Black Foam Core Board ($20/each) - www.artsupplywarehouse.com/pr...
Wood ($2.64/8ft 1"x3" strip) - www.lowes.com/pd/1-in-x-3-in-...
Corner Brackets ($12/8-pack) - geni.us/fd99mNp
Piano Hinge ($17/4-pack) - geni.us/7T6Tz7
Hook and Loop Tape ($12/20ft roll) - geni.us/NqS7pzp
Washers ($7/30-pack) - www.lowes.com/pd/Hillman-30-C...
Aluminum Tape ($30/2 rolls) - geni.us/VSrVg
Wood Glue ($7) - geni.us/CsAvo
Welding Blanket ($20) - geni.us/AlhdlZ
Drywall Screws, Lath Screws (already owned)
TOOLS 🧰
Nail Gun (already owned) ($36) - geni.us/eVfPe
Miter Saw (already owned)
Makita 18v Drill + Driver (already owned) - geni.us/wLGLyDq
Hammerhead Oscillating Multi Tool ($26) - geni.us/pC5o
► TIMESTAMPS
0:00 Intro: We Need More Light
1:03 The Basic Plan - Big Overhead Softbox Lights and Materials
4:23 Smart Dimmer Plug and Light Mount Bar
5:21 Building the Frame
9:23 Finishing the Upper Part of the Frame
12:34 The Foamboard Wrap
15:35 The Aluminum Tape Inside Part and Ceiling Mounts
17:31 Updated Mount for Fixtures, Diffusion Silk Application
19:40 Four Corner Eye Screws, Hanging it from the Ceiling
20:37 Let There Be Light!
Design Inspired by this video
Filmmakers Academy - How To Build A Soft Box: • How To Build A Soft Box
Please note that links above may be affiliate links -- clicking them earns me a small commission if you make a purchase and helps support my UA-cam channel. Thank you!
▷ MY STORE - shirts, pint glasses & hoodies: paulshardware.net
▷ SOCIAL
Twitter: @paulhardware
/ paulhardware
Facebook:
/ 195425877329550
Instagram:
/ paulhardware
:::Send Me Stuff:::
Paul's Hardware
P.O. Box 4325
Diamond Bar, CA 91765
► Edited by Joe Aguilar - ShaostylePostProductions
/ joe_editing
Audio file(s) provided by Epidemic Sound
www.epidemicsound.com/ - Наука та технологія


Woodworker here; you did a fine job Paul and Joe. Not everything needs to be fine woodworking made of the most expensive exotic woods. For functional projects, there's nothing wrong with using cheaper materials. That said, you guys did a great job. It's sturdy and serves its purpose. Looking for ward to more project videos!
Paul, as a tech enthusiast and fellow DIY’er I have to say I really appreciate your videos like this. Sometimes it’s just nice to see somebody build something useful that isn’t a PC. Keep up the great work and thanks for all you do!
8:43 "its not going anywhere" All you need for a project to succeed is have someone shake it and state those words. Well done guys!!
i was going to say something like that hahahah as soon as i heard it. Solid job.
17:16 "i got all this foot-age!" Joe is hilarious
That was a killer line.
I'm so glad we have Paul who shows us how to DIY a softbox instead of partnering with a lighting company for a pro light source that costs big bucks.
This video is very enlightening.
I see what you did there
A few tips.
A small frame for the silk. Iron the silk. Fix silk to frame with stapler on the topside of the small frame. That way can add hinges that are similar to doorhinges in shape to access the lightbulbs and also be able to remove entire silkframe and clean the cloth.
Also you can tension it a little bit so it is nice and straight instead of a convex shape.
Paul is the light we need in the world.
Hey Paul, tip from a "semi-pro" having made a pair of canvas tops for my 48 Jeep:
When you get to the point where you're going to sew velcro to the diffusion silk, don't use the glue-backed velcro. The glue will get all over the needle and start wrecking stuff - like needles, the silk, and your sanity.
For the DIYers out there, you can get a plastic miter box with a hand saw at the big-box stores pretty cheap.
the garage updates are so much fun! given your position as a content creator, the stuff you tend to add / build overlap pretty well with tech. gives me a lot of good ideas, thanks!
DIY solutions will always be to save money at the cost of time. Which one is more important for you to save on will dictate how you solve your problem. This turned out really good regardless, even with the "cut corners".
17:07 I feel your pain man... Just did this the other day with a board and your reaction brought me riiiight back to that wonderful moment..
I love the DIY Projects Paul always does on the channel!
This is a great video. Do-it-yourself wins appeal to more than just PC hobbyists. The professional videography/studio operations/set design of a thoughtful creative team are a+ entertainment.
I have always enjoyed your DIY projects over the years, very enlightening.
I got a kick out of the bow tie suggestion. It came together nicely.
Speed Square. Extremely useful for all woodworking projects.
Oh Paul! SHOP SAFETY! Keep your fingers out of the line of fire from your nail GUN! It's called a gun for a reason.
He did actually. I was watching.
I know... Joe yells at me too. I will try to be better about that 😳
@@paulshardware That's also why the wood fell on your toe. Life reminded you that you should have closed toed shoes on damn you! At least it didn't give you a splinter through the sock too. I've gotten a splinter stuck in my foot through a sock before.
Ty joe for getting onto him. Lemme tell, nailing ya finger SUCKSSS.
Going to need to get Paul chainlink gloves as a safety measure
Soft box = fluorescent style lighting of the 80s, without the 60Hz hum
I'd add some mesh at the top opening to keep insects out while still allowing air to circulate so the heat from the bulbs can escape.
Love the "Garage Logs"
Thank you, Paul and Joe. That was very enjoyable, and now I know how to make a diffuse box. More or less....
Thanks for making this video. This gave me tons of inspiration to get creative with my lighting setup !! I have needed a lighting overhaul and now I’ve got just the right ideas and info needed to get handy and use what I have and pickup a few things and make something that fits my needs perfect. THANKS PAUL ! ❤🤠
I love Paul. He is the Best!!!!!!!!!!!!!!
Def not a bot.
Awesomesauce video Paul and Joe!! I have to say Paul, this idea was so bright! 😊
A great DIY for people on a budget.
Caffeinator out.
paul's hardware has become a woodworking channel! yes!!!
I like that you build it first, and then check if it fits through the door......the Irish way.....will be grand...
I've always enjoyed nice, light videos like this.
See what I did there?
Nice job, fellas.
I did see. Very punny!
"Footage" lol Joe is a comedic genius
I actually winced when I saw Paul putting his left hand on the wood, in front of the nail gun.
Ooooo! I really like the end result! Yay DIY
Great job Paul and Joe! Looks fantastic!☺
Paul Builds, Garage Boat Builds? Kitchen Stove Hood? Ha! Just Kidding, Pauls Arts and Craft... He he.
Ty Paul. Your content always helps to relax me.
Kudos to you for DIY'ing and sharing the process!
Well done, I love the results
I really enjoy these little project videos you put out. Keep up the great work, Paul!
Wow I am impressed. Good job guys!
I love these videos. So satisfying to watch something come together.
I'm all about the DIY lighting modification. I think you guys did a great job. But although I don't usually like to be a glad hander I will echo the thing about the nail gun and your fingers. I'm a guitar player so I get uptight about that shit, but overall excellent video! Cheers
And to think, GN was so proud of their little sound box. Pfft...they got nothing on some Paul skills. Lol, seriously this is quite ingenious. Really like your DIY vids.
Wow I actually need something like this for my home studio... never expected I'd get it on your channel, but thanks!!!
looks great overall!!
Amazing work guys!
Thank you Paul, I've been toying with starting a small youtube channel specializing in miniature painting (warhammer and dnd style stuff) and I always get very discouraged when I see the prices of things like softboxes, directional lighting, etc. I always talk myself out of it but seeing stuff like this and having a background in woodworking and set design for theater works really encourages me to bite the bullet.
If you can find a free broken TV, as long as it still lights up, you can easily turn them into cheap light boxes. There are many YT videos demonstrating how-to.
How does this video not have more views. Very creative!
Love this type of content , Well done .
Great job looks sweet well done
i'm enjoying these update videos, look forward to the next ones.
Paul's Hardware Store sure came in handy for this project Light box is...brilliant! 😎👍
Excellent DIY
Looks great
That looks really cool paul❤
Paul the finish product look good and work good, you did a good job
Exelente trabajo Paul🎉
Pretty cool. Fun video!
A quick safety tip for rigging things overhead - always default to forged eye screws/bolts. The bent eye screws you used can come unbent and then you've got a light box crashing down on your head. Similarly, if you can, I'd swap out the top hooks for forged eye screws and connect to the chain with carabiners at both the top and bottom.
Nicely done
This came out great!
I love Paul’s DIY projects. I’m sure these can be tough to film, thank you for this!
You guys did a great job.
Great stuff as always bro
Great job, looks good and sturdy...
@Paul's Hardware, you say your not a woodworker but I say you did pretty dang good man.
Paul's DIY is a channel I'd watch all day long.
Excellent!
Gracias Paul
_weird little mothman noises_
"Oh, hohoho... _savory_ light! Come to _me!"_
Seeing Paul's set develop always brightens my day.
Love the build vlogs man, well done!
"Total Eclipse of the Heart" was written by Jim Steinman, the man who collaborated with Meat Loaf for all of his albums. I was a big fan of Meat Loaf in the 70s. Unfortunately, some music critic back then said that all Jim Steinman songs (all of them) sounded like they were all of the bad songs that Bruce Springsteen refused to record. I actually kind of agree, and I think of that comment whenever I hear this song. That guy's opinion has stuck with me for 50 years. Good Luck with al the projects.
Then again, some music critics are full of shit. I'm not really a fan of Meatloaf but I do like that song. Music can be written to match certain styles. His writing style isn't for everyone but doesn't make it bad as a blanket statement.
Dang it came out pretty decent
The guy is resourceful. You can learn a lot from Paul. Touché. Fresh Kicks too. I'm a boot guy
Looks good
Great job on the project, I tend to plan and overresearch and then things get backed up vs just making something functional
I would have made a lightweight collapsible portable version.
1: Make the top part as your did. But maybe with T-slot aluminum extrusions and brackets instead -- like in those Ender and DIY 3D printers.
2: make the bottom part with aluminum extrusions or lightweight materials like thick cardboard, plastics (3D printed t-slot bars).
3: Connect the two via threaded strings. There are fabric versions and steel versions. Connect them via each corner. Threaded allows you to have some support in case one individual thread snaps. Its also more resistant to bending.
4: Mount non-breathing polyester fabrics one the four pyramid sides. Alternatively use aluminum insulations (warning heat buildup possible) or other cloth with silver spraypaint in one side. (I spray my old umbrellas with silver when the silver coating wears off).
5: Attach velcro to the inner rim of the bottom part. This allows you to attach the defuse cloth inside AND allows you to have a grid in front as needed. If you need more diffuse light just mount the cloth at the edge.
5: At this point, you should be able to collapse the thing. But if you handle it thru the top part, the bottom part should just hang.
Nice work.
softbox will def make your video and product shoots look super clean
Well done! 😊
THAT is why you keep the product boxes guys ;-)
Let there be light 😊
excellent!
Nothing is as permanent as a temporary fix. I imagine we will see the soft box in this exact same form for years to come. And I wouldn’t have it any other way.
Paul, rando landscaping comment. Plant some creeping fig along that back cement block wall and give it a few years, and that wall will look like a giant green hedge and be very pretty. It will also keep you backyard cooler, which is a nice thing in San Dimas or San Dimas adjacent properties
Had to check a couple of times, Thought I was watching a Black Tail Studio video. 😋
Looks pretty slick Paul! I’d love something like this for my pc building/photo shoot spot. Might just have to build one myself
Sweet!
This video was truly enlightening. 😁
:P
Nice! ❤
these are you best vids dude. please drop more things on your foot :D
Enjoyed this video! You guys did an awesome job. Looks and works Great. A+ 🦶ouch
Peak Imperial measurement, "1 Thermaltakecase box height big". :-) very nice.
lots of light. preferably securely mounted and nicely diffused.... perhaps some Lite Stable Diffusion?
An angle finder might help you. They are very cheap. Both for those angled cut and the trapezoid shapes that you fold over instead of cutting which would have looked neater. Drill the outer piece of wood on a screwed joint slightly larger than the screw and pilot the inner piece. This will clamp the wood tightly. Also you can dip the tip of cheap screws in some paste wax, or even paraffin wax to lubricate the screw and stop them breaking. Lastly make some corner brackets so you can nail and screw two pieces of wood both square an aligned. Well done, it's never as easy when you have to do it yourself.
I think the lighting is better overall when comparing the two. I can't tell if its brighter but to me the look is overall more uniformed
Lmao paul you crack me up you and joe rock thank you for sharing god bless
Very nice. I would have lined the inside with some kind of reflective foil material though. Shiny silver cellophane would be an inexpensive option.
Nice video......wass enlightening...😉
Cool !
A quality build! May I recommend your next tech upgrade be a ladder of appropriate size?
You should be happy with that TP-Link outlet. I have several of the indoor outlets and one dimmer like you have. I also have some TP-Link smart switches. They have all been the most reliable of all my smart home devices. I've had some of them for at least 5 years. I set them up once and never had to again. One of the outlets also monitors energy use in real time and keeps daily/weekly/monthly stats. I use it to see how much my PC costs me to run.