You sir are like the Bob Ross of woodworking. I was almost expecting “Today we are going to build a Happy Cooler”. Just stumbled upon this video as I am looking to build something like this. So glad I did. This is by far the easiest instructions to follow. Thank you very much.
I absolutely love the simplicity of this design and your clear instructions and explanations. It is a beautiful piece and you have inspired me to build my own! Thank you!
Sal Hinojos Awesome Job! I really enjoyed watching you work. I was inspired by you to build a double cooler and I will be using some of your ideas. I will be sure to give you the credit when friends ask me about the inspiration for the build. You are awesome, Tom! Keep building and posting.
Tom, this is a beautiful build! Thank you for sharing. I recently built a single cooler version with a drain similar to yours, and it’s the only thing I would change if I were to build another one. Even with the drain, there is always some residual water left behind which means I have to wedge a 2 x 4 underneath one side to get all of the water out. I was thinking about drilling/installing a drain plug on the bottom center of the cooler and running PVC over to one of the corner legs and mount the drain to the bottom shelf. Thoughts?
Rob, yes, and it's simply a design element of the cooler that wasn't intended to be used in this configuration. In my original, I never added a drain at all. The coolers sit snugly in position, I reach under and open their drain plugs if the water gets too high and when I'm done and want to clean them out, I simply lift them out of the enclosure and do it that way.
I agree with many of the commenters here - this is a great, simple plan. Thank you for posting. One quick question - what size do you recommend the legs be? Did you use 1x2's? Big thanks and keep up the great work!
Christopher: Thank you and I THINK i made the legs out of true 1 X 3's. In other words, lumber that the finished size is actually 1 X 3. Lumber is commonly sold at the finished size but called out by it's rough cut size and that's how 2x4's have come to be known as 2 X 4's when they are actually 1 1/2 X 3 1/2. After trim and finishing, the end size is 1/2 inch less on each dimension (except the length which can commonly be a bit longer than the called out length, go figure). The first cooler I built was from rough cut reclaimed redwood about 100 years old and was truly 1 inch thick. This made screwing together and avoiding splitting the wood easy. I don't think that thickness is necessary for the structural integrity, you could get away with less, but it made assembly easy and carefree. I think I milled leftover 4 X 4's to 1 inch X 3 inch (actual) for the legs and frame. Now, that being said, you could easily construct this out of 5/8 inch rough cut cedar fencing to keep costs down if you are purchasing lumber. Pre-drill and countersink the screws and you can avoid splitting the wood. When you countersink a screw (imbed the head of the screw below the surface of the wood) it acts like a wedge and can split wood along the grain or near the end cuts so, when you pre-drill, use a countersink bit and don't over torque and over tighten the screws. Because you use two pieces of wood joined at 90˚ for the legs, they will be plenty strong and this design allows all the structure of the project to share support well so it is strong and sound.
Phil, thank you and that tool is known as the 'counter sink bit' and they are very useful.once the head of a screw begins to enter into the wood, it acts as a wedge and can easily split the wood. The counter sink bit allows you to recess the screw head without splitting the wood.
Jonathan, don't be so hard on yourself. These are not built for plumbing. The cooler enclosure in this video was gifted to a friend and I don't have video of the mechanics and I don't remember exactly how I did it. Mostly, I wanted the look of the brass spigot coming out the side. What I do remember is that it never worked as I wanted it either and that is because the drain plugs on the sides are placed higher than the bottom of the coolers so, they never drain completely. I remember orienting the coolers so the drain plugs would face each other to the center of the unit. Then I connected them with a T fitting in the middle that dropped down to a long pipe that angled downward toward one of the sides, where it protruded and I could attach a threaded fitting and a valve. But this configuration means you will forever need to sponge out the remaining water from the bottom of each cooler. On my original enclosure that I built over a decade ago, I never added a drainage system. So, on that one, I simply reach under and open the existing drain plugs and allow them to drain. Then, when as much water flows out that can flow out, I close the drain plugs, lift each cooler out and turn it upside to empty it. You could always seal those plugs, drill and add drains in the bottom center of each cooler and then drain those independently to a spigot on either side. But once plumbed, those coolers become permanent fixtures and can no longer be lifted out to clean. Doing nothing, no drainage system at all, may be the most convenient solution. Not as 'cool' looking but easy.
Sorry, I do not but, all measurements are subjective to fit the cooler ot coolers you shoose and the. height that best fits you and your needs. You can easily formulate plans of your own by watching. Thank you for watching.
Parabens maravilhoso o video, fiquei encantado com sua aula,.. sou artesão e vou fazer uma pra mim,.. moro no Brasil, em Rio das Ostra, tenho uma pagina no facebook , Celso artesanato R.O.. obrigado, abraços.
Leo, I don't know off-hand and don't remember but I THINK they were 32 quart coolers. The beauty of this design is you can build it AROUND whatever coolers you have, and one or two coolers, it doesn't matter... you make a custom fit!


You sir are like the Bob Ross of woodworking. I was almost expecting “Today we are going to build a Happy Cooler”. Just stumbled upon this video as I am looking to build something like this. So glad I did. This is by far the easiest instructions to follow. Thank you very much.
Nice work。 Like the thought process and execution。 Always enjoy watching your videos。Thanks
Only a fool would give this video a thumbs down. An enjoyable project to build on a weekend
Thank you for this video. I really enjoyed how you broke everything down so well. Very discripted.
This is awesome, Tom! The cooler is beautiful, love the redwood.
I absolutely love the simplicity of this design and your clear instructions and explanations. It is a beautiful piece and you have inspired me to build my own! Thank you!
Cool work man!!! For a crowd, that's the way to go!!! The only thing I would add, is a set of swivel wheels.... Thanks for the video!#!#!
I am happy that you enjoyed it and found it helpful. People LOVE these at gatherings and, if it’s not a big enough crowd, fill only one side.
Beautiful work Sir, you have shown me some new techniques and ideas for some of my cooler projects. Thanks again and great video!
Fantastic! Glad I came across this video!
That’s craftsmanship at its best!
😍 This will be one of my next projects... 👍🏼🙏
Sal Hinojos
Awesome Job! I really enjoyed watching you work. I was inspired by you to build a double cooler and I will be using some of your ideas. I will be sure to give you the credit when friends ask me about the inspiration for the build. You are awesome, Tom! Keep building and posting.
Good work!
Awesome job!
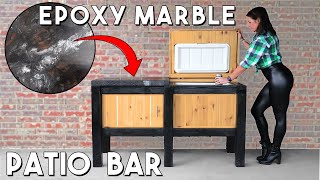
This is a great patio cooler design
Thanks Tom
You're welcome and it will give you many years of enjoyment!
Beautiful.
Great job, but for safety have the waste cut away from the fence leaving more stock near the fence.
thank you sir
Very nice.
notable resultado, gracias por compartir tan hermoso trabajo
Thanks a lot for your well made video it helped me make my own and I'm happy with the result. It was my first furniture. :)
I am happy that you enjoyed the process and have a finished piece that you are happy with. Now you can make more things!
@@wildbuslife Yes! Multiple raised garden beds for next year that is what's on my winter to do list. :)
Well Done Sir!!
Thanks for sharing..
Thank you! Drop by for a cold one some time.
Great job thanks I’ll try to make one
Have fun!
Good job , well done, I think you have some volume issues
best one yet
Thank you Gregory!
" I wanna be able to make micro adjustments". WAAAAAHHHHH!!!
Tom, since you have the redwood, consider making ice buckets to keep your long necks cold at the table or horseshoe pitch.
That's a great idea!
Tom, this is a beautiful build! Thank you for sharing. I recently built a single cooler version with a drain similar to yours, and it’s the only thing I would change if I were to build another one. Even with the drain, there is always some residual water left behind which means I have to wedge a 2 x 4 underneath one side to get all of the water out. I was thinking about drilling/installing a drain plug on the bottom center of the cooler and running PVC over to one of the corner legs and mount the drain to the bottom shelf. Thoughts?
Rob, yes, and it's simply a design element of the cooler that wasn't intended to be used in this configuration. In my original, I never added a drain at all. The coolers sit snugly in position, I reach under and open their drain plugs if the water gets too high and when I'm done and want to clean them out, I simply lift them out of the enclosure and do it that way.
I agree with many of the commenters here - this is a great, simple plan. Thank you for posting. One quick question - what size do you recommend the legs be? Did you use 1x2's? Big thanks and keep up the great work!
Christopher: Thank you and I THINK i made the legs out of true 1 X 3's. In other words, lumber that the finished size is actually 1 X 3. Lumber is commonly sold at the finished size but called out by it's rough cut size and that's how 2x4's have come to be known as 2 X 4's when they are actually 1 1/2 X 3 1/2. After trim and finishing, the end size is 1/2 inch less on each dimension (except the length which can commonly be a bit longer than the called out length, go figure). The first cooler I built was from rough cut reclaimed redwood about 100 years old and was truly 1 inch thick. This made screwing together and avoiding splitting the wood easy. I don't think that thickness is necessary for the structural integrity, you could get away with less, but it made assembly easy and carefree. I think I milled leftover 4 X 4's to 1 inch X 3 inch (actual) for the legs and frame. Now, that being said, you could easily construct this out of 5/8 inch rough cut cedar fencing to keep costs down if you are purchasing lumber. Pre-drill and countersink the screws and you can avoid splitting the wood. When you countersink a screw (imbed the head of the screw below the surface of the wood) it acts like a wedge and can split wood along the grain or near the end cuts so, when you pre-drill, use a countersink bit and don't over torque and over tighten the screws. Because you use two pieces of wood joined at 90˚ for the legs, they will be plenty strong and this design allows all the structure of the project to share support well so it is strong and sound.
Fantastic video and soooo inspiring! But what is the tool called that drills a pilot hole as well as the recess??
Phil, thank you and that tool is known as the 'counter sink bit' and they are very useful.once the head of a screw begins to enter into the wood, it acts as a wedge and can easily split the wood. The counter sink bit allows you to recess the screw head without splitting the wood.
@@wildbuslife If I'm going to build this then I'll need one of those!! Many thanks for your quick reply!!
Eu nao prenderia as caixas por dentro deixaria soltas para retirar lavar
Can you show how you did the plumbing? I made one and I’m not too happy on the drain system I put. Wondering if you could shed some light?
Jonathan, don't be so hard on yourself. These are not built for plumbing. The cooler enclosure in this video was gifted to a friend and I don't have video of the mechanics and I don't remember exactly how I did it. Mostly, I wanted the look of the brass spigot coming out the side. What I do remember is that it never worked as I wanted it either and that is because the drain plugs on the sides are placed higher than the bottom of the coolers so, they never drain completely. I remember orienting the coolers so the drain plugs would face each other to the center of the unit. Then I connected them with a T fitting in the middle that dropped down to a long pipe that angled downward toward one of the sides, where it protruded and I could attach a threaded fitting and a valve. But this configuration means you will forever need to sponge out the remaining water from the bottom of each cooler. On my original enclosure that I built over a decade ago, I never added a drainage system. So, on that one, I simply reach under and open the existing drain plugs and allow them to drain. Then, when as much water flows out that can flow out, I close the drain plugs, lift each cooler out and turn it upside to empty it. You could always seal those plugs, drill and add drains in the bottom center of each cooler and then drain those independently to a spigot on either side. But once plumbed, those coolers become permanent fixtures and can no longer be lifted out to clean. Doing nothing, no drainage system at all, may be the most convenient solution. Not as 'cool' looking but easy.
Do u have any wood plans for this video to make the rustic cooler
Sorry, I do not but, all measurements are subjective to fit the cooler ot coolers you shoose and the. height that best fits you and your needs. You can easily formulate plans of your own by watching. Thank you for watching.
Parabens maravilhoso o video, fiquei encantado com sua aula,.. sou artesão e vou fazer uma pra mim,.. moro no Brasil, em Rio das Ostra, tenho uma pagina no facebook , Celso artesanato R.O.. obrigado, abraços.
Obrigado, aproveite o projeto e apareça para um resfriado se você visitar a Califórnia, EUA!
How many Qts are the coolers ?
Leo, I don't know off-hand and don't remember but I THINK they were 32 quart coolers. The beauty of this design is you can build it AROUND whatever coolers you have, and one or two coolers, it doesn't matter... you make a custom fit!
Wow this is awesome! Would you consider doing commissions??
I actually do commissions every day so, yes, certainly. I am in LA, where are you?
@@wildbuslife I am in South Orange County. Would IG be a better place to contact you?
@@Nozam yes, PM me there.
Come on man you can't be that experienced and still be cutting on the wrong side of of a tablesaw blade. Absolutely ridiculous!
Fala muito, fala muito