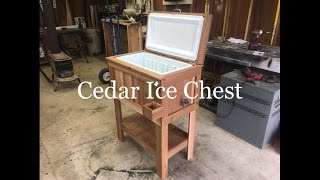
How to Make a Patio Cooler Ice Chest

Вставка
- Опубліковано 8 лип 2024
- Plans Available here: academy.diypete.com/products/...
Learn how to build a DIY Patio Cooler Cedar Ice Chest with DIYPETE. He'll show you all of the steps needed to build your own cedar ice chest.
For more info, project photos, and downloadable plans check out:
www.diypete.com/icechest - Legs are 33 1/2 inches.
*Note that these are affiliate links, meaning that when you buy something that is recommended below, it helps support the Channel. Thanks in advance!
*Tools Needed
Kreg Jig - amzn.to/1X7Bd9H
Power Drill - amzn.to/1OxMfnt
Orbital Sander - amzn.to/1VUVNYy
Table Saw - amzn.to/1X7Eje5
Nail Gun - amzn.to/1X7EVQU
*Supplies Needed
Wood Glue - amzn.to/1OxNqD7
Box of 2 1/2 inch Kreg Screws - amzn.to/1X7F0E0
Box of 1 1/4 inch nails - amzn.to/1LwlddE
4 inch Riser, 1/2 inch threaded Piping, 1/2 inch coupler, Red knob spigot/valve
2 1/2 inch or 2 inch locking caster wheels
52 Quart Igloo Contour Cooler (I found mine at Target for $29.00)
2 Hinges
3 Handles
Start making your cuts for the legs of your cedar ice chest. I’d recommend using a miter saw. Remove hardware from the cooler.
Assemble the legs. I used a Kreg Jig to drill 4 pocket holes in one board for each leg. Then connect using wood glue and 2 1/2 inch Kreg screws. Assemble the frame for the cooler out of 2×4 boards. Connect each 2×4 with 2 1/2 inch screws. You can make it as snug as you’d like. I left about a half inch of play on each side to make it easy to remove the cooler if needed. Use the cooler as a template or measure the cooler to determine how long to cut these boards.
Attach the 4 corners to the top frame. Use 2 1/2 inch wood screws and put about 4 for each corner. Drill a pilot hole before putting the screws in so the wood doesn’t split. Add the apron. Rip fence boards on a table saw and then glue and nail them to the top as shown in the photo. This will create about a half inch overhang on each side. I cut the apron to 3 1/2 inches wide.
Create the cooler support out of 2×4’s
Place the frame upside down on a flat surface and slide the cooler in place. Next, put the support at the base of the cooler and attach to the legs using screws and pocket holes. If you don’t have a kreg jig, you could pre-drill and then run screws in at an angle.
Add fence pickets around all sides to hide the cooler. I started by attaching a board in the middle of the sections and then moved to the left and right. Use as many full width fence boards as you can. Rip the outer boards on a table saw to get a perfect fit. I’d recommend spacing the boards roughly 1/8 to 1/4 of an inch from each other. Add trim horizontally on each side. Rip fence boards into 2 inch strips and then glue and nail the trim in place.
Place the cooler in the frame and then mark where the hole will go through the side of the wood surround. Then drill a small hole through the wood from the inside. Next, use a larger bit or hole saw from the outside to finish the full sized hole. This is where the piping will go through.
Determine the height and width of your cooler lid. Mine was a little less than 2 inches high and so I ripped a couple 2×4 boards to make them 2 inches tall. Then place the boards around the perimeter and cut to size. The lid should be snug with the wood. Attach the plastic cooler lid to the wood using 2 inch screws. Pre-drill and then put in the screw. Make sure the outer part of the lid is flush with the wood. The inner part will protrude from the wood because it is what will allow the cooler to stay in place when the lid goes down. The inner portion will seal the cooler.
Cut 4 fence boards down to size and rip them each to the same width on the table saw. Leave about an 1/8 of an inch between each. Use glue and an air nailer to keep them in place.
Facebook: / diyprojectswithpete
Instagram: / diypete
Pete Sveen
1627 W Main Street Suite 182
Bozeman, Montana 59715 - Навчання та стиль


Thank you for the project idea... I recently finished my cooler; giving it as a gift to my Son & family...They love it... added side shelves both right & left...
That's great James! Awesome job, I'm sure it was a hit with your sons family. Keep up the good work.
My nephew and I just did this build today after watching this video several times. It went great. Thanks so much for the detailed video and plans. We used PT instead of cedar and I made it much shorter as it is designed to fit under a shelf on the patio. We did 24" legs and its plenty tall enough. The cooler didn't come with a drain so going to add one out of the bottom since there is no shelf. Very excited about this one. Doing your cornhole build next
Pete thanks for talking about pocket holes and walking through this process with the tool needed to do it. I told my husband, use pocket holes...and he looked at me like wtf is that? I think you gave him way more confidence in building something now that he's watched your videos. Thanks again. Your home is lovely.
watching these 'DIY' videos and projects are addicting...love this project.
Thanks so much for watching Machio!
Thank you Pete. I replicated this project, with a few alteration (bigger) and added my favorite sports teams.
So far, this is the best cooler and best diy video I've seen yet. Great job
DIY Pete is THE MAN...!! Just finished my ice chest -- awesome project! My first woodworking project of any kind and Pete's video made it soooo easy. Final test was whether the bottle opener would work -- passed with flying colors!! Built mine out of old pallets...the wood was a little tricky at times, but project came out just fine. Thanks, Pete, I'll send you some pics. And remember: There's a cold beer here in Colorado with your name on it...!!
Hey Bill! Awesome work! :) Oh man, a cold beer sounds great right now! Hope all is well down in CO!
Thanks for the idea Pete. Building it in our construction class. Keep up the good work and ideas DIY Pete You da man.
Thanks J! Have fun with the project and enjoy that class!
Hi I just saw these at a wedding. They were so cool. I'm so glad theirs a video on how to do this so I can do this for my daughter's wedding. Thank you so much.
They'll be great for your daughters wedding. We just used a couple at my younger brothers wedding and they were a "hit" :) Best of luck with the building!
Thanks for the video and instructions, I built one with Eastern Cedar and it turned out awesome. Wish I could post a pic of it.
I admire the passion you have in sharing your great work.
Thanks, I appreciate it! :)
Nice, I need to build one of these. Thanks for posting.
My wife loves that Moose Drool beer.
Thanks Mike! Yeah gotta love Big Sky Brewery! Cheers
Another awesome video! Really digging all the great work you put into these projects! Easy to follow! 👍
sillysausage72 Thanks!!
Greetings from Flathead Lake, Montana! I want to thank you for posting this how-to video. I followed your video and made one very close to the one you made, and it turned out awesome. Very easy to make. I've had a lot of compliments on it. Thanks.
Hey Jim! I hope all is well up in the Flathead area, I was just up there in August! Thanks so much for giving the project a shot, and great work completing it. Thanks for commenting and take care up in NW Montana!
Awesome stuff! This video was quick enough to not get tired of watching, but still had all the important tips and instructions that a beginner like myself needs. When i return from my deployment, I am definitely referencing this video again. Thanks, Pete!
Cheers Manny, glad you liked the video! Thank you for your service!
2x4's make for solid kreg construction and it looks great. Much better design than the others I have researched.
Mark Redshaw Thanks!
I want to thank you for your great Corn hole board set plans, I was able sell the one's I made which helped me when I needed some extra money in these crazy times.
Wonderful!
I'm definitely trying this project this summer! Thanks Pete! Nice work!
Fabricio R N Awesome Fabricio! GO FOR IT!!!
The video is awesome. I just built mine this weekend and it turned out amazing. I've got a lot of compliments already. Your instruction is very good.i used redwood 2x4 instead of the cedar because they weren't available. It was my first wood working project and I'm pretty stoked
Nice work William!
Glad I stumbled on this channel. Boseman Montana is amazing, we loved coming down from calgary every summer
Great spring/summer project! Thanks!
Gracias Pete, es una idea excelente!! Saludos desde México.
Gracias Jose!
In the mountains, snow for ice and Moose Drool. You my friend are living large. Great video.
Thanks for watching! Hard to beat Moose Drool :)
GREAT video! any thumb downs had to be mistakes. I love that you used the pocket hole jig. I got one last birthday & I am always looking for simple pocket hole projects. What a beautiful finished project that didn't require a lot of complicated cuts etc. I have some medical disabilities so will likely have to shave a few steps off. I'm thinking that if I find a cooler with an attractive finish, maybe stainless, I can skip all the skirting. I'll be using pine so an ebony stain with a stainless cooler may work (won't be as gorgeous as your cedar ice chest). But, that's what i liked about your design and instructions, you left room for builder to make changes. I'm subscribing so i can check out some of your other projects. Looks like you often add led lighting & i am a rgb led light addict so I'm sure I'll try many of your projects. Thanks again for a great video,. Lisa
I built one for my wife for her birthday. It turn out great. Thanks for sharing your video.
Awesome Mark!
Muito bom, parabéns!
Gracias!
Great build. I've built and sold 2 of these and the build couldn't be more straight forward. Doesn't take much time either. My kinda build. Keep it up!
thank you, i learned a lot from your videos. i'm planning to make those project in my beach house soon. i will do the patio cooler first this coming summer. it's cool.
Awesome, good luck!
Dude, Pete kicked ass on this project. And super thorough on explanation... great job. My father in law built us one of these about 10 yrs ago with a our favorite football team logo branded on the front and I am to this day amazed by it...
That is awesome your father in law made one a while back! Thanks so much for watching man, cheers!
Thank you Pete! I have been looking for a rustic cooler to make as a gift for my cousin who owns a ranch here in S. Texas. We are just starting to dig out of Hurricane Harvey. I have finished my house and have the evenings to work on this project to distract me a bit. I am going to work on this cooler over the next couple of nights and am really looking forward to it. I am a 51 year old woman who has been teaching myself how to use the tools I have accumulated over the last 3 years.
I want to teach myself how to build simple but artistic projects that will increase my skills without increasing my frustration create pile of unfinished projects.
Your a great teacher and I cannot thank you enough!!
Any and all from anyone who would like to offer advice is much appreciated!!
Hello! I've been thinking about everyone from Houston a lot and am so thankful everyone is digging out and on the road to re-building. I'm so glad the videos have been helpful and you enjoy them :) Keep up the great work and have fun with the cooler build! Cheers - Pete
To save a little money, I used pine 2x4s for the main frame and the section where the cooler sits on since they are covered by cedar eventually anyway. Great project!
Awesome Nick!
The best DIY channel on youtube. Keep on going!
Greetings from Sweden!
+Gustav Ferdman Thanks Gustav!! Appreciate the compliments and the views from Sweden. Cheers, my friend!
Great project. Easy to follow instructions. Love this video. TFS
Thanks for the support!
Hands down, best video showing how to do this! I am planning to build a 60" table that will incorporate this exact design concept. This will go great with my new Oklahoma Joe's 3 in 1 BBQ smoker.
That's going to be awesome!! Can't wait to hear how the build goes. Cheers!
Awesome! Thanks
Came out great, thanks!
Best detailed video, thank you! And thanks for using something other than pallets lol, I really don't feel like breaking a pallet down. Going to make this soon.
Thanks Cross family!! Hope all is well!
Gostei muito do seu projeto
Bueno por principio quiero felicitarlos por tan bonito video. Luego, agradecerles lo preciso que fueron desde el principio cuando dijeron lo que se necesitaba para hacer este hermoso trabajo.
Hola, soy José Arturo Gutiérrez, vivo en El Paso Tx. Hace 12 años emigre a este bendecido país junto con mi familia. Hasta hace 1 año decidí dedicarme a la carpintería. No ha Sido facil ya que hace mucho que estudié y casi no practique. Saben lo que significa ver sus videos?... Sí. Me dan aliento y despierta mi creatividad.
Gracias de nuevo y un sincero saludo de este su amigo. Bendiciones y adelante.
Excellent video Pete -- thanks for posting!
Thank you Lena!
Wow absolutely loved this tutorial. Thank you so much. I will definitely try to make one this summer 🍻
Awesome to hear Karen!
thanks Pete have built 4 coolers now with your plans all donations for local fundraisers. raised good money all for kids with medical problems.
That is so awesome you are helping others with all the money you are raising Mike. You rock!!
Just finished building mine following your plans. My cooler was a bit bigger so made some adjustments, came out great. 😅
Great job Pete!
That's a great project easy to make. Thank you for sharing!
Thanks for watching!
Looks great!
Stone and Sons Workshop Thanks!
Great video and awesome cooler. I need to make one of these for my deck. Thanks for sharing.
+domc23 cutaia Thanks! looking forward to seeing a photo of your ice cooler when ya make one. Cheers!
You are the best man and yes I will do that when i am home as I have the same size of your cooler box to make it more sophisticated and cool...
Awesome!
Looks great! Going to try this in the spring. Thanks for sharing your video
Thanks!
Looked at this video for the sixth time I made several with different finishes. Good work I enjoy
Great job with all the projects. Cheers!
increíble video felicidades y sigue adelante ☺
Gracias Alex!
I loved the video and really like how you say 'measurement'.
Thanks for watching!
I love this great job
Absolutely loved this~!
Muy buena explicacion compadre me gusta tu proyecto
Muchas Gracias
Love your work
really inspiring
Thanks Sebastian!
Done with mine came out great!
Awesome, great to hear!
That looks awesome, great work! Had to laugh at the snow considering it was a gorgeous 84 degrees today in SC 👍
MrsDavis913 South Carolina sounds amazing to me right now. Although I can't complain about our mild winter this year, 84 degrees and sunshine would be awesome :) Cheers - Pete
DIY PLuy
From all this Corona Virus stuff going on I wanna be prouductive while staying home so I’ll be sure to work on this project. Thank you so much since this is a gift to my dad!
Well played Brandon. Well played brother!
Have fun!
Really nice job. Easy to follow and well done. Thanks!
Thanks for the video. Made mine using your method and it came out great
Great to hear Felix!
Just started on mine today, thanks for the help.
+Ramon Olivas Good luck!
muy bonito trabajo
cuando haga la mia lo voy a postear para que la vean
I love the cooler it's pretty easy to make, the only thing I would add, is a small wood box or tray under the bottle opener to collect the bottle caps.
Thank you for such a detailed video , made it easy for me to build this :)
Good day Pete, I build this ice cooler and it's absolutly beautiful. I like the fact that you use cedar instead of recycled wood or old pallets wood. We held a deck warming party in September (just an excuse to gather with friends at our house and celebrate our new deck) and this cooler happen to be the most interesting thing on the deck with the outdoor kitchen. I had a lot of positive comments on how nice and functional it is. I wish I could send you a picture as I modified it a bit by trimming the edge of the boards with a router to give it a different look. Thank you very much for putting out there such a nice project and the DIY video is so well done, explain every steps clearly and is easy to follow. By the way I live just north of you in Calgary, Alberta, Canada. Cheers from Alberta and keep up the good work!
Hi Andre! Great to hear from you and I hope all is well up in Canada! What a great addition to your new entertaining spot :) If you have Facebook, you could post a photo there: facebook.com/DiyProjectsWithPete --- otherwise feel free to shoot an email to: kate at diypete .com - Cheers!
Beautiful work!!
Thanks!
This was awesome! Great idea Pete!
+Mark Humphreys Thanks Mark!
Stupendo complimenti
Grazie!
Thanks Pete by far the best video I seen well explained I'm not very good handyman but this I have to try it.
Thanks so much!
Gracias
Hi pete. my son and i. we just finished building a cooler chest just like the one you did in the video came out real nice thanks to your video and ideas. we sure will enjoy it for this Fourth of July weekend thanks again.
Great job Pedro, and have an amazing Fourth!
Nice cooler looks very nice and clean saludos amigo
Marcos Lopez Thanks Amigo!
Am building this now. You made a nice and easy to follow video. Thanks Dude.
Have fun with the build!
Well done! And good video editing. No wasted time.
Thanks!
purchased the cooler and materials today. hope to have it done this weekend..thanks
+easterlake Have fun with this and I can't wait to see your new ice chest!
Well how did it come out?
I would put a little bottle cap catcher under the opener. Great video!
That's a great idea!
Came across this project just Now. Excellent Idea and even better execution!!! Awesome
Thanks Pepe!
+DIY PETE I'm actually building one right now. Will send the pictures of the progress. Thanks !!!!
Love it!
Love the Moose Drool
Cheers!
I can't believe people are worried about how u talk instead of how u work. it's a great vid and straight forward. I've looked at many videos on this subject and yours come out at top 5.. thanks,,keep doing what u are doing,,,
Thanks for watching!
Amazing! We can't wait to try this
Have fun with the build!
Great job buddy! I'm going to use this!
Awesome, have fun!
Many regards from Guayaquil, Ecuador.... Good Project!!! next weekend I´ll do one like this,...
Great to hear Ramiro! Cheers bud!
I just saw one of these at Costco. I am going to have to build one myself. Awesome video!
Great to hear from you!
Great Job can't wait to start mine...
+Arturo Tirado Nice, have fun!
Nice project and great beer choice with the Moose Drool!! I'm from Missoula....cheers!
Awesome! Thanks and I hope all is well over in Missoula!
DIY PETE
Ok I just added another project to my deck upgrade.......the cooler great video,can't wait till spring 2017 thanks guys
Hey Laurence, sounds awesome!
Looks like a fun project for gifts.
Thanks!
COOL!
In every sense of the word 👍
Thanks Shahid :)
amazing, great cooler idea
Thanks!
just built this. Great plan. thanks.
Thanks and nice work!
Thanks! great 👍 my next project !
Fantastic!!!!!!!
That for the video. I just finished building one and it turned out great.
Hook'em Horns
+Rudy Torres Congrats on the project!
Looks awesome, great job
Thanks!
Best cooler vid I've seen. Good job.
Wow, thanks!
Just came across you video, very informative! You have a new subscriber. Great job!
Thanks so much for subscribing Fly, I APPRECIATE YOU!!!
Hell yeah!!! I'm telling my brother about this cooler mini-project so we can build 1 or maybe 2 who knows...
Great to hear!
Great informative video .