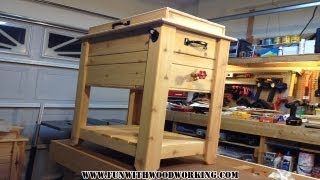
How to Build a Rustic Cooler -- by Home Repair Tutor

Вставка
- Опубліковано 4 чер 2014
- www.homerepairtutor.com/how-to...
(who doesn't love a rusting cooler, they're sweet!!)
Wanna learn how to build a rustic cooler from FREE pallets?
I was able to do this with only one saw and a drill & impact driver. Hi Friend, this is Jeff from Home Repair Tutor and you'll love this way awesome rustic cooler project. Primarily because it's so darn easy.
You can expect to spend about a day and a half on this project but in the end you'll have a great result.
It all starts with about 5-8 pallets. You can visit a local landscape supply company and ask them if they don't mind parting with a few old pallets. Chances are high they'll say yes and show you which ones to take.
Get the pallets home and either scrub or power wash them. This makes the wood look great and allows you to choose the slats that appear the best. I used the Dremel Ultra Saw to cut all the slats to size and assemble the rustic cooler frame.
Then I used a 50 qt Igloo cooler that was sitting my garage collecting dust. You'll have to make a frame for the cooler lid and add some accessories (like a battle cap opener and brass drain). But I show you how to do all this in the video.
For all the details watch my video
• How to Build a Rustic ...
If you think this video would help a friend feel free to share it
• How to Build a Rustic ...
For tips on home repair & improvement make sure you check out more Home Repair Tutor videos on UA-cam.
If you need help with garage storage solutions check out this video
• DIY Garage Overhead St...
I share many tips that a lot of people have found to be SUPER helpful.
Have a great day!
Jeff - Навчання та стиль


Best video by far! Easy to understand. You didn't fly thru the instructions so that's great.I will have my hubby's dad built one. He started but his looks nothing like this. LOL!Thank you for putting this video up.
I'm making one myself and out of all the videos this was the best one. Thank you for all the tips.
the best how to video I've seen yet. no fast forward or music blasting in my ears.
step bye step instruction great job.
just got done making the cooler , turned out excellent . had a good time making it .thanks for the help.
nice..I have a cooler just sitting here. gonna make this. made a bbq table then used a flame torch to burn the grain then added Thompsons water seal clear..can't wait to make this to match my table..thanks!
Great video! I've been binge watching your videos today. All tutorials are easy to follow. Keep up the good work! 😍
I gotta get me one of those ultra saws! Great video!!.. I've been binge watching your videos today every tutorial is very easy to follow. thanks fore existing!😍
Great video. I was looking for something like this and it is a great weekend project.
Congratulations! Very well, your work is excellent, greetings from Valencia Venezuela.
Realistic right here. From used pallets. Same as what I’m doing tomorrow. His will be fun. Thanks
P.S. Washing the pallet is a great idea, I didn't have a power washer nor did I want to rent one so I was able to take the pallets to my local car wash and power washed them, thanks.
Dennis Myles that's an awesome idea, great suggestion buddy!!! Thanks for sharing.
If you're interested these are some great woodworking plans you could use: HootWood.com
That what i did
I made 1 of these except it was a bath tub my 12 yr old is in the marching band and we provide food drinks ect for them and I watched your video and you saved me a lot of time I was loading 12-15 big coolers but thanks to you now its just 1 I've got it secured to a 5 by 8 trail or it was so much fum to I'm not good with this type of work so I've learned something new with your helpful video and moving onto other things thank you for the video and your time to teach others keep paying it forward
Raven Keel thanks so much for your kind words and encouragement. Great job making a cooler that not only looks great but helps a group of kids. Sounds like you took this cooler project to a whole new level :D
Un muy buen proyecto Gracias por el tip amigo lo aré de seguro se mira asombroso
This is perfect. Looks super easy. Will be doing this for this summers bbq
Jeff, I made it and my family loves it. Thank for your tutorial. I made some errors but nothing so glaring that it ruined the project. Keep up the good work, I have subscribed.
Dennis Myles awesome!!! I'm so stoked that you did it. Feel free to send along some pics :D
I really appreciate how simple your video was with fantastic directions and great advice on how to approach certain aspects of the build. Thanks!
I made one also with your video. Thanks for all the tips and the idea
I have a TON of pallet wood. this helps out with weekend ideas. thanks for sharing.
My pleasure Al Smith - let me know how your project goes. I'd love to see your work!!
I've watched so many videos on how to make one of these & this is the BEST one I have seen!
thanks, it's a fun project
If you're interested these are some great woodworking plans you could use: HootWood.com
Denise Thomas liar
Looks Great! You could also make the box larger and install some 2” styrofoam for extra insulation.
I made one and now working on a second one . Thanks for making the steps seem so easy.
Great video man. I'm gonna go off this for mine
turned out great man. cant wait to get started!
This is a cool video. I am doing it now. Great tutorial.
simple and looks really nice. youve done a great job. thanks for sharing.
Thanks James Norris - it's a fun project
Very cool! Thanks for sharing.
If you're interested these are some great woodworking plans you could use: HootWood. com
Great idea! Thanks for sharing!
thanks, hope you give it a try
Parabéns, muito boa idéia !
Nice lawn. Top left looks killer also. So does the wood work.
Best Vid I've seen on how to do this awesome video man !👍🏾
+Alain Gonzalez thanks
Nice, I am building one this weekend. Good job sir.
Thanks Dennis Myles - keep me posted on your project. I'd be happy to answer and questions :)
Thank you for your help
great job my friend looks awesome
Veronica Magana thank you :D
I'm finishing mine up within the next day or so! I've already made one rustic cooler for a Christmas gift (using a different design that was A LOT MORE WORK), but this one really grabbed my attention. I love the design! Unfortunately, the wood that I had available to me was less desireable for this cooler. I used a mixture of pallet wood for it, hoping to give it a unique look (sort of a checker pattern is what I was going for). It's my first one, I plan on making many of these! Thanks for sharing!
That's awesome James Smith and I like your idea for the checker pattern. I'd love to see your final look. Send me some pics at jeff@homerepairtutor.com:D
Jeff Patterson I forgot to shoot you the pictures! I'm still relatively new to woodworking, but I made 3 of these! They turned out pretty good. One of them I stained "ebony" colored and I really fell in love with this particular stain because it gives a glossy look to it as well. My second one got a "espresso" colored stain, which gave a salt and pepper look to it. That one was probably my favorite! The third one I was really disappointed with (the one I mentioned above)! I used an oak stain, however, the wood was less desireable and I'm just not happy with it. I actually sold the first two, the third one I couldn't bring myself to sell it while I'm not happy with it. I'm actually considering taking it apart and starting over with better wood. I really like these coolers and get compliments on them all the time. Thanks to you! I've taken on several projects over the past year or so. I've made a group of birdhouses that turned out great, I've made several different styles of wine racks, shelves for the house, I had a laughable attempt at a park bench. It's functional and I kept it in the front yard, but I wasn't very pleased with the conclusion of it. I also made a planter/birdhouse combo that I plan to sell. They aren't perfect either, but many people like them. I've never been a very handy person when it comes to this sort of stuff, but you and others like you have given me confidence to give it another try. After watching many videos on woodworking and seeing how simple you all make it look! Thanks again!
I'd love to see your pictures James, post them over on our Facebook group. Here's the link facebook.com/groups/hrtcommunity/
this is awesome!
Very nice! I really like your suggestion of power washing the pallets. Of all the pallet videos I've seen lately I haven't seen anyone suggest that. Thanks!
Thanks Ticky66MN - it made a huge difference. I wasn't sure if the wood would look good but after power washing the slats I was surprised at their appearance.
How did you plug up the inside of the cooler hole?.. When the faucet is in off position?.. Elaborate please for us first timers..thank you
Cool project bro!
+Ken Kucel thanks, cool mustache 👍
great design. using recycled pallet wood is one of my favorite things to do
chris parker yep, and it's free. Doesn't get any better.
Great video! As an "extra" I would think to stain it would really look great. Just my opinion. But, more work, of course. Sand, then stain.
This was awesome. I did one using a small non working mini fridge. Kinda fumbled my through it. This is much simpler. Just did one with a cooler. Wanted to pull my hair out because I was fumbling again. Ah, the faucet....thank you!!! Will save this for the next one.
Question, so you just driller out the drain and then fit the faucet and appropriate connections? What about leakage? Did you use any silicone to get a water tight fit? Thanks!
Excellent!
Some nice simple ideas in this good-looking build! :D
Thanks Henry's DIY Club
muito bom 👍🇧🇷 vou fazer uma igual
The Honey badger loves this cooler
Great video. Thanks!
Thank you Janet Ramos :)
Great video! How did you hold up the cooler at 4:00? Look like you added the supports later on at 5:27.
Muy bien te doy 5 estrellas
Is it easy to stain pallet wood as it is, or does it have some kind of sealant on it already? You should put your bottle opener above the catcher, and most of the caps will just fall right in there. Thanks for explaining the lid portion so thoroughly. That was the part I wanted to see.
Good question Stev en. I didn't stain the pallet wood but only because I wanted a natural look. That said, I'll like stain it next spring to get a darker appearance. One thing you could do is clean the pallet wood you're using (with power washer or cleaning solution), let it dry, and apply a stain to one piece to see how the stain is received. One DIY guiding principle to live by is Test Test and Test. Either with stain, cleaning solutions, paint, you name it :D
Very nice video. If I had to add anything, maybe take some spray foam and fill in the voids to make it double-insulated so those beverages stay cold longer!
That's a great idea Chris Jenkins - gotta keep the beers ice cold!!! :)
Nice!
Great job
+jason molley thank you
awesome you made it simple
+Oralia Villarreal thanks
I am having trouble getting the drain to go together at the end. I don't know what I am doing wrong. My husband does plumbing and he can't figure it out either.
Very good....
Hi I'm interested in making one but out of reg wood not pallet. Can you help?
Did you water proof the outside, or do you just store it in inclement weather? Also, while I like the idea of the adjustable legs am thinking of putting wheels on mine. I have a screened porch attached to my deck. Wheels would allow me to just take the party inside. Thanks!
If you're interested these are some great woodworking plans you could use: HootWood. com
No thanks.
What size of screws you use?
you are awesome dude :)
+SERDAROTmkd thanks, mostly curious more than anything else
Nice job Jeff really liked and am using your video to build one. I am having a problem with the original drain in that the threads on it are not pipe threads but garden hose threads so a pvc coupling won't work. Went to the local home improvement store and couldn't find a adapter for it. Any ideas on my problem?
+trapzee1 I built several of these and with one of the coolers I ran into the same problem. It's been two months and you've likely figured it out but what I did was completely remove the original drain. I then used a piece of 3/4" (I think that was the size) pvc pipe and ran it straight through the cooler. Then I added a female coupling to the side of the pvc that the spigot attaches to. After that I used some glue around the pvc pipe on the inside of the cooler to prevent leaks (perhaps some caulk would work). Problem solved! The hardest part is cutting the pvc pipe to exactl length to reach the spigot and NOT stick to far into the cooler. I did this with mine and haven't had any problems yet and it's been over a year now. Good luck
I would have mounted the receptacle under the opener...
Idea, use an old camper absorption refrigeration unit and use calcium carbide to generate a flame for the absorption refrigeration system. Place a bag of ice into the ice chest then the melting ice could then supply the water that drips onto the calcium carbide to generate the gas needed to cause the flame to operate the absorption refrigeration system for hours of cooling off one bag of ice. 😊
Can I have the dimensions of all the wood and labeled
Steve-o has really mellowed out these days.
Is 1x4x8 wood?
Nice job!! How do you may-sure your wood? Lol I’m from Brooklyn making fun of someone’s accent
I'd like to use something like this for a farmers market, to sell meat. Do you have any ideas for how I could make the cooler and lid easily removable from the wooden portion, so that I don't have to schlep the entire contraption from the freezer to the farmers market and back?
Hi Jeff,
How did you remove the support beam in the middle of each pallet? Typically, there are 3 beams with pallet wood running across. How did you remove the middle one?
Benciano I cut all the pallet boards at the edges and didn't have to cut out the support beam :D
Jeff great video.qq is their a size limit regarding the cooler?
The only limitation would be slats lengths Peter Mangold. The slats of the pallet would have to be longer than the cooler. Do you have a pretty big cooler you want to use?
Great video gotta say but are you getting sponsored by Dremel ultra saw?
Buy a set of countersink drill bits and sink those screws.
👍
nice
Thanks Luis Guevara
1) what's the measurement on the legs?
2) where do you get a bottle cap receptacle?
David Ikard I think the legs were around 35 inches but you'd have to see if that works for you. Got the bottle cap receptacle on Amazon :D
What would be a good price to charge for something like this?
hmm, all depends on how long it takes and the type of materials...
All About That Money also the quality of the project... This one here I'd say $30-$40 (only because my local hardware store sell VERY nice ones for $80-$110 but if you use a nice Walnut or oak for wood you sand it, stain / paint it and make all the boards fit perfectly flush with no rigid corners you could get around $100... But if you throw an Artic cooler in it then $100 + price of the cooler haha
People around me are charging 150 with the ice chest included....but they use more expansion foam on it to beef it up...
You are so smart
Nope, just liked doing this project...many people have done this before me
@@HomeRepairTutor This is basic building skills. My 10 year old daughter made one better Then u did..
so what does in cost in material to make this?
cindybsurfin $75-$100 if you have the tools. You can check out the cost break down over on Home Repair Tutor www.homerepairtutor.com/how-to-build-a-rustic-cooler/
Rafter Square? You mean Speed Square?
yup real easy when you got the right tools and stuff ha i cant find even a decent hammer at my spot it was wifes relatives place I got lucky and found a working drill rather then everything by hand kinda a bonus
+Cory ryder im wanting to take this a step further too you see I make insolated boxes for various companies so we have alot of scrap insolation that is perfect fit for 2 by 4 I have a few cool ideas for custom patio sets :)
I love this
BeachBumLivin did this exact project a year before yours. Is that where you got the idea from?
+Mark Woodworth I did see his concept, but wanted something that was easier to build
+Jeff Patterson
Yours does have a more finished look. Nice job!
Thanks Mark
I have seen a house on my way to work that has at least 3 dozen wooden fence panels that are leaning against trees in their back yard. They have been there for at least 7 years. I am going to see if I can buy those for a song. They are already very weathered looking.
Those would be perfect kevin baker - keep me posted on your project. When you're finished I'd love to see pictures!!
I pass the remains of an old barn...I may check that out too.
I'd love to see that wood Laura, it's gotta look awesome after you clean it up :D
Kreg jig at 2:24 would be ALOT easier
Yah, the Kreg Jig is fantastic. I use it a ton in this project ua-cam.com/video/ov2NvqZ0pgA/v-deo.html
Nice cooler! The dislikes are probably for saying, "super awesome" :)
***** thanks, yah that was a mistake on my part :D
Lol, it wasn't a mistake at all, I was just ribbin' ya :) You have great delivery, easy to understand, I enjoyed the video.
Thanks man, I really appreciate your kind words. Making the videos is a lot of fun :D
very cool project. hearing you say "mayzured" made me want to pull ur eyes out. less transitions just make one smooth video. good info
+Kristian Figueroa um, I guess thank you.
What are the specifications of the pressure washer you used?
It's an electric pressure washer AJ, only goes up to 1800 PSI
Fuckin awesome! I'm gonna show my man this video, I think he would love to build this. Thanks for the video!
❤👍👍👏👏👏👏🇧🇷
Speed square
Yes, speed square bweiss09 :D
That's ars-some
stop saying slats !!! the powerwash is good thinking Brother
Okoko
I liked everything here but the drain pipe location. Am I the only one that thinks its too high? Why wouldn't you put it right at the bottom, that way ALL the water will come out. As you have it right now, your gonna need to tilt it to get rid of the water.
I used the existing hole in the cooler so as to keep the design simple OverkilledUnderdog - hope that explains my reasoning :D
Measured not “maysured”. I cringed every time I heard it. Other than that awesome video and build. I’ll be making one over the winter for the summer.
This is definitely the ideal wood working book I have ever read, “Bαzοmο Tdy Plαn” (Google it). The text is simple to read and the photos and drawings outstanding. This is a “must have” woodworking book mainly because everything you need to know about woodworking is found here and it really guides you throughout the topic well. .
I made it with woodprix instructions !
I like this wood working book “pepe amazing plan” (Google it). Not only does it cover wood working techniques, however it even describes the expansion cycles of trees that lead to the characteristics that craftsmen find advantageous in lumber. I also gave my dad another copy.
If you're interested these are some great woodworking plans you could use: HootWood. com
Your choice of screws sucked--I built one using course thread Drywall screws, They counter sink themselves flush with the wood so you dont have all the heads sticking above the surface-looks a little neater.
+Tom Langley our cooler stays outside all year, so drywall screws would rust and eventually discolor the wood. But if you keep your cooler covered all year long that's okay :D
Good and very accurate designs are on the Stodoys plans website.
At the 6:46 mark that's actually a female adapter