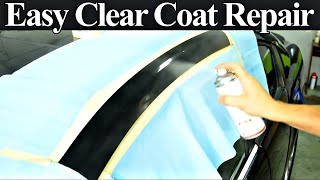
Clear Coat Damage: wet sanding clear coat to fix clear coat failure?

Вставка
- Опубліковано 5 лют 2025
- Clear coat damage can show up in many ways when it comes to your car. From peeling clear coat, flaking clear coat, to complete clear coat failure as is the case in this detailing tutorial. Clear coat problems can take on many forms of damage and every situation is unique.
Most of us would love an easy way to fix clear coat on a car and often people ask if you can wet sand clear coat to fix these many types of clear coat problems.
In the is detailing video, Darren demonstrates wet sanding on this clear coat failure to see what is possible.
You can decide after watching this detail video if wet sanding car clear coat represents a good ROI for you and your world of car ownership.
Shop Darren's Favorites on Amazon: www.amazon.com...
#clearcoatdamage #clearcoatproblems #wetsandclearcoat
What is Clear Coat: www.best-auto-...
Clear Coat Polish: www.best-auto-...
Clear Coat Damage: www.best-auto-...


I've never worked with failing clear coat. I was asked to work on one that the client is just going to sell. I know you can get paint codes and have primers and clear coats mixed up at the local automotive shop. The problem is that multiple panels have clear coat failure. I may go the sand, buff and polish route. With It being a grey and not a black paint might get better results? Not planning on charging them just wanted to try and help them out. Thanks for the videos!
If you're going to do all that work, you might as well sprayed a new coat of clear.
Very delicate process to feather in the demarquation between clearcoat and basecoat! Honestly, if you are gonna try to fix failing clearcoat, the only way I would go at it is the feather incompletelly the spray paint basecoat then clearcoat. You can get quite a good result doing it that way and it's not insanelly expensive either. Getting basecoat and clearcoat from an automotive paint shop should cost under 100$ for spray cans. Obviously, if the paint failed on that area, the rest of the vehicle is probably not far behind... so you could have to do this again on other spots on the vehicle. Still, much less expensive than bringing it to a body shop that will charge you 1000$ per pannel.
What do those areas look like after spraying with the in a can clear coat?
Helpful for my car's issues with demarcation lines with the clear coat and base color issues.
This is the lesser amount of abrasive polishing to try and get the feathered look but alas, it's still going to show some demarcation issues. I have a 2001 Camry, silver type color and I'll try it. Not sure what polish abrasive you used but I have a Maguires type light abrasive polishing compound for finishing the coat of the paint. I'm using a dual action harbor freight tool that I used when restoring my 78 Datsun 620 pick up year's ago.
i want my 15 minutes back
No
It's clerr you did not enjoy it.
'99 c280 I'd just sand the whole top of that thing order a pint of base black and a can of 2k clear then prep and respray it two coats black let dry then sand again prep and spray 2k clear call it a day. buff next weekend.
u could then sand and buff again after cure but by that point it'll look good even with orange peel. at lasts there's no paint missing. good job though explaining. depends on what you want new great look or just to look fixed and not failing everywhere. a newer car you'd want to strip the paint off take off trunk sand it down respeay base and clear off the car. wait for cure then sand with 5k grit to remove orange peel them buff polish to make it easy and perfect. I've repainted 20 + yr old cars after this happened. sanded it all cleaned n drird then resprayed base and clear with crappy Wagner paint sprayer meant for drywall it came out decent though had orange peel. my friends car he paid someone else 400 to sand orange peel a couple weeks later and polish. the paint guy said I did great with little experience and wrong sprayer if u hve the time patience and tools you can fix paint. it's only layers on a surface not rocket science. mess up a few times and then you'll never mess up again
Try some spray clear coat on the deck lid. Wonder what would happen?
I tried using polish on my clear coat (before watching your video) and it destroyed it! Now I am thinking of wet sanding down the peeled clear coat and applying some fresh wipe-on clear coat to seal in the old clear coat. It's either that or pay $2000 or more for a new paint job.
The "right" way is to wet sand the whole panel free of clear coat, spray a coat of factory paint, then seal it with 2k clear. But if you're wanting an easier way, you're pretty much on point. Wet sand it on the peeled area as much as you can, trying to bevel the edge of the clear. Go up/down/left/right to get a hatch pattern etched into it. It's easier for the new paint and/or clearcoat to stick, and there's less chance of pooling. You can either use a rattle can of 2k clear after, or try the wipe-on clear - but the wipe-on is less durable (kinda like the touch-up paint pens), and roughly the same amount of effort. Let it fully cure, then give it a good buff and polish, and it'll be about as close as it'll come to factory without sanding the whole panel.
2500 grit (I would wet sand more than you did) then da polisher with orange cutting pad and meguiar's Ultimate compound works for me. Finish with autoglym super resin polish two applications. It will then looks its best possible without being repainted.
Will it stop the original flaking problem as well, please?
@@slavojalois1639 No. It'll continue more quickly than before, due to the cut and compound.
People tend to freak out when it comes to the finish of a car, reality is it's only paint.
Great video, Thank you. However, I am just a little bit concerned about the tassels hanging down (at 9:55) right near the spinning buffer pad. Just an observation.
Please tell me this is a joke. My step son works at a body shop. He is laughing his ass off at this.
I'm no expert but with my little experience of paint repair, I know that clear coat isn't actually clear (like water) when wet sanding on it... It's milky looking
Very illustrative. I think of a rotary buffer as a fine sanding disk. I believe the DA cannot get much heat into the paint and in this case, less effective on blending the clearcoat and basecoat.
So how do you fix the mess you created.
Loved this video. I'm interested to see the result of sanding the edges extremely deep to almost level it. Sure the protection is now minimal, however what about applying multiple layers of a ceramic coating on top, would that make a noticeable difference? :) This stuff is fun to watch!
Question. I have a 01 zinc yellow gt mustang with paint fade and clear coat failure. Have you ever spoke with an auto body person tell you what to use to "blend in" line of clear coat chipped?
My clear is failing in the form of changing weird off color(s) in many areas. A 2005 Tahoe. I am not original owner. Could it be overspray doing this? It has had body work but i don't know how much. Oh, its a very dark metallic green. Looks almost charcoal to me. Thanks
Tip for viewers: turn playback speed to 1.5x speed lol way more palatable
thank YOU
Why does no one use an air hose to blow off the loose cc?
So how many years old is that clear on the car?? I believe in having a great foundation instead of covering over old material. It's sand time and fresh paint and clear for me.
After trying to sand down the clear coat, that was getting the surface smooth.
Should you re apply clear code?. Or just buff it out as good as you can.
Clearcoat is what protects the paint. You have to clear coat it, or the basecoat/the actual paint will continue to oxidize and fade, and the clear coat will continue to peel. But if you're doing it DIY, it just takes a can of 2k clear after that. Spray it down in smooth, overlapping sections, wait about 5-10 minutes, then do one more coat. Baby it for about 30 days after that - no chemical exposure or deep washes/buffing/polishing that you can avoid. It takes about that long to fully cure.
Low quality clear coat for mass production, once you got the bubbling the entire panel is gone so is best to sand it a apply clear coat
Do NOT operate heavy machinery while watching/listening to this video!! You WILL fall asleep!! FAST!!
Last mont i had my cars trunk paint job its metallic light blue, but after a month its reflections doesnt look so clear looks little blur and matte.what can be problem and solution plase?
Why not use DA wet sand and then compound then polish
There's a couple problems with cutting compound for this.
1. It'll eat into the base coat more, and you want to avoid that as much as possible.
2. Most formulas include a protective coating in it. To finish this properly, and avoid more peeling/damage to the paint, you need to seal it with 2k clear. It can't adhere properly to the cutting and polishing compounds, and some of the cutting compounds - it's hard to get them off even with denatured alcohol, acetone, etc - which also runs more risk of damaging the exposed paint.
I can easily sand yhat areauntil the clear coat edges are feathered and the base coat is slightly color sanded then re-clear right over the area , wet sand and polish and you would never know that paint was peeling off...easy fix
Getting famous off of comments day 243, so I can live the dream, live every day like it’s your last🤙🚀🤙
I have a piece of equinox hood is peeling anything would help thank you for this video
You're supposed to be a professional auto detailer? You didn't even sand and feather the edges. What I earned was to avoid your shop.
My personal opinion, if you're trying to make it look Good and last. You should take the trunk deck off sand the clear coat entirely and respray possibly even add another coat of base coat. If you've never done it before, take your time and do as much research as possible first, and remember nobody was born knowing how and only one way to know if you're any good or if you ever want to attempt it a second time is to try the first time...
I'm considering this for my car. Very cheap so I'm not too scared using it to gain experience. It has a low mileage for it's age so perhaps it could live on for a while, but the clear coat is garbage, perhaps 20% of the surface of the hood and roof are gone. You're suggesting I sand the entire panels instead, or perhaps the entire car in this case? I'll have to learn how to know I've sanded enough (i.e. clear coat 100% gone). Adding a layer of base coat would be because it's damaged (from not having protection of a clear coat) and you could make it look a bit better? I suppose it's safe to sand a bit more thoroughly, if you're planning to paint base coat too? Thanks.
@@Tuatara1989 I’m about to fully repaint an older car I own and upon practice and research, I’d sand your whole clear coat off and spray a new fresh base coat and then top it off with sherwin williams clear coat. I’ve found it on Amazon for $125 and it’s really good. I’m store it’s double the price.
@@Tuatara1989 it’s called sherwin williams finish 1 ultimate refinish overall clear coat fc720
Why use 2500 grit tho? That's too fine or sand paper
Im selling my friends ‘99 CLK. It has a strange scratched looked all over the paint. It looks like the clear coat has failed in some weird way. Have you ever seen this happen?
Fellow detailer and a painter. It's...painfully clear you're not a painter and haven't ever done body prep or fixed this the right way.
When you're dealing with the peeling clearcoat, you have to wet sand it down - and you did that here. You don't *have* to have the constant spray, but if you don't, you need to constantly clean your work area from abrasives and the residue from sanding. You didn't do that here. If you'll notice, there's discoloration along the edge. That's why. All the schmutz collects there, if you're not using steady water flow. You also want hatching on the edges of the peeling - you can't just go straight back and forth. You can. But it'll look like shit, and it'll be harder for fresh paint and clear to adhere. Bevel and hatch the edge, and it's a much easier job - just slightly harder than running a fuckin' power tool over it full-blast.
The clear is bubbling because you're using the buffer at high speed and holding it there. It generates heat, and that causes the damaged clear to peel and bubble more. Part of finessing this is to oscillate the other way too - up and down, to control the heat, or use the buffer in short bursts.
When approaching it in the first place, a block can cause it to peel more. Use a pad by hand and try to bevel the edge of the clearcoat, so the worst damage (the actual peeling) is off. Then polish, then use a touch-up pen or a can of factory-match spray and apply a light coat to the area, let it flash, and then go over it with 2k clear, lightly buff and polish again. It won't look 100% factory fresh, but the damage will be contained, and it'll look fairly close unlesss someone's eyeballs are right next to it.
When you're dealing with paint - clearcoat included - prep and control are everything. Paint work is all finesse. You're using a really heavy hand in this vid, and actually making the edges of that peeling worse than they need to be by buffing it all to hell - but that's Milwaukee gang for you. All cash, no finesse.
These aren't hard jobs. They're next to impossible to fully factory match, but for DIY good-enough repair (or, say, prepping a used car for a dealer lot), it's not low ROI unless you just suck at it or haven't ever done it before. Keeping your hand light and being meticulous about prepping that surface is really the hard part. After that, it's just standard paint touch-up. Body shops don't like to do it because people will inevitably complain it isn't fully blended - which takes more time and a very high level of skill (and that one's still beyond me, and I'll cop to that). But for making a car more presentable, it's all of a couple hours of work on the weekend to do a whole car.
The paint without clearcoat looks better after buffering. But for how long ?
That depends on the environment. A lot of sun will beat it up pretty fast.
It's almost like polishing headlights: The better the protection, the longer the lifetime.
Exactly! Nobody would know for certain as there are many "moving parts" to your observation/question. Probably not very long, as there is no clear coat for protection and that type of paint formulation is meant to be covered with clear coat and not meant to withstand the elements like old school single stage paints.
I made a dumb mistake and wondering if you have a tip? My car I’m restoring has a paint job that is about 8 months old. Recently I was detailing my interior and I used a carpet extractor on the floor mats. With the car covered in thin plastic drop cloth to keep overspray and dust off (was also painting the seat rails), I placed the damp floor mats on the hood of the car overnight to dry. Now I’ve noticed I have dark spots noticeable in the shape of the floor mats on the car. I don’t currently own a polisher, but I’ve tried clay bar and Meguires Ultimate Compound (mildly) so far and haven’t seen any improvement. Someone suggested I tried a heat gun to remove what they think are “moisture spots”. I guess I’m aiming to try the least aggressive or least abrasive methods first. Can’t believe I made this mistake… do you have any ideas or input? Thanks so much in advance from a subscriber and viewer!
But how do you fixed?☹️
Yes, this talk is very needed when there is a vehicle that has a clear coat like that, specially in Puerto Rico since we are summer and sunny all year long. Seen lots of vehicles like that and wanted to learn how to do it properly before sending someone to a paint shop.
What about also applying Optimum clear coat restorer?
Optimum clear coat restorer is uber expensive.
Is that the forced rotation flex da?
Great commercial for CSI and Millwaukee
It needs to be sanded down, repained and clear coated. Not polished every 4 months
What pad is that on the rotary?
sand it first with 400 and go to 1000 then put clear coat on
Why does it seem that it’s always the Mercedes-Benz and on the trunk area they must’ve not used high quality paint to last
I would say this is an extreme waste of time however it is totally personal preference. Time to remove that trunk lid and have the clearcoat removed and resprayed. Still won't be perfect but will be a lot closer. An investment yes but if a person loves the vehicle and wants to keep it perhaps the investment makes sense.
I agree with your assessment. Thank you for your perspective! But, not al body shops are created equal, so if you have it repainted by a quality body shop, it could be virtually as good as ever.
My guess is that the shine you are getting on the basecoat is just the polishing oils that are now attached to the basecoat. That should go away after a few washes. You could get the same result with just waxing that area. I think this is a waste of time trying to fix this with sanding and polishing. Just sand and paint, it will take more time for sure and will be more expensive but at least your will really fix the issue, not just make it look 20% better.
Go buy a new deck lid for 160.00
I assume it's Flex forced rotation cordless polisher you use, a beginner will be disappointed when they try to copy you with their free spinning Da!
Sand the whole thing down primer sealer the areas re base coat/clear coat. Wait , 2000 sand, buff it. Not worth the effort to piece meal it.
WHAT !! if I brought my car to you to have the clear coat fixed and you presented me with this you would not see money, stars probably, you should be bloody ashamed.
Ok, you demonstrate, with your method, it's not possible to repait this type of damage and have a acceptable result. Thank you. Or it's a fake vidéo? It was the 1 April? 😉
Get it fix the right way
On my 15 years of experience peeling clear coat doesn’t have solutions, the only one solution is repainted or maybe weet sand and apply new clear coat...
It won't be perfect, but yes, wet sanding ALL loose clearcoat off, prepping/scuffing up the area and laying down a shot of fresh clear, will make a difference.
However, the remaining clear MUST be firmly attached or it will show... every single flake.
And then again, is it worth it?
@@flemmingjensen3202 You nailed it!! The clear coat is failing. It will continue to fail at different rates. If you fix this by simply sanding and blending the currently failing areas, and then apply clear coat over the entire panel that is affected, then you have essentially laid new clear over old clear coat that is in the process of failing. This means unless you have removed ALL the clear coat of the entire panel, you certainly run the risk of having all your efforts at risk due to an unstable foundation.
Total agree with you mate.......I have 30 year in this industry......
Maybe try adding a ceramic coat over the base color to add some additional shine
@@samsalternatives8086 Don't waste your time and money....
I’m a beginner but I’m sure I can do (sand, paint, clear coat) better than that. 😅
i still think that FLEX makes the best rotary polishers electric and battery
Yes
Oh your going to hear it from the forum/Facebook crowd
I thought you were going to take clear coat in a can and spray the areas that had no clear coat. I would be curious to see the result of that.
I know that's one of our first instincts but it won't work. Trust me
Yes I was thinking the same, if you cut the paint and clear coat back enough to key for a new clear cote applied heavily to the missing areas and then cut the whole lot back with 2500 grade and then buff with the cutting compound.
This is wrong
Horrible results
thanks for being truthful etc. But would we be better after sanding, spray some new clear-coat on to deminish the 'lines' showing where the old c-c is missing. (like 'filler')? Can you do another 'Vid' cos my clear-coat Peel is like Zebra stripes all over my Bonnet (& Red color at that) thanks mate.. John from Sydney au.
You would have to feather out the new clearcoat with sandpaper so it blends in with the already existing clear coat
Dont waste your time or your clients time and money.......Sand it back base and clear coat it.....
Hi mate, isn't there some 'clear-coat' liquid remover? Just spray on wipe off, wash then re clear coat a brand new job? thanks
@@johnspinks3656 no you’d have to sand it off
@@joseg6628 BUMMER,taa
i did see can use iceatone (or nail polish remover) & quickly rinse off b4 damaging the base-coat,to remove clear-coat. dunno if i'd risk that though??
Hey Mr Eighty Twenty, what do you mean exactly? Sand everything and re-apply both base and clear coats?
He don't know what he's doing
I wouldn't let you touch my paint work pal 😅😅😅😅😂😂😂🖕
Who taught you to operate a rotating machine WITH LOOSE STRING HANGING FROM YOUR WRIST a definition of absolute STUPIDITY should have a warning sign DONT DO THIS AT HOME 😢😢
You waste your time doing things that way, and I'm wasting my time watching it. I'm feeling sleepy
This has got to be one of the most ludicrous videos I’ve ever seen! It teaches nothing but just makes you wish you were on drugs.
Demonatize this video
Why do you speak to your audience like they're toddlers. Very condescending for such terrible advice .
so you fixed nothing?
I’m falling asleep
So redundant..
great video and tutorial good friend. who gives a shit what the peanut gallery has 2 say.lol.b well good friend
boring