Making a Outdoor Concrete Gas Fire Table

Вставка
- Опубліковано 15 лип 2024
- UPDATE:
See what the table looks like 2 Years later and what needed to be done.
• Fire Table - 2 years l...
I wanted to try making a concrete counter top and I wanted a gas fire table for the backyard, so I decided to combine the two ideas.
If you want detailed instructions on how to pour a concrete counter top watch this video, It's great and what I followed to make mine.
• How to make a Concrete...
Bookmarks:
Step 1:
Building the Mold: 0:00
Pouring: 2:30
Removing the mold: 6:00
Step 2:
Building the burner cover: 7:12
Step 3:
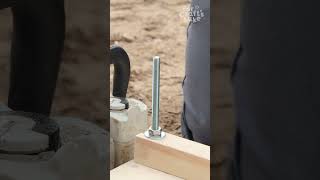
Building the Base: 10:11
Step 4:
Finishing he surfaces: 15:36
Reveal: 18:55
Products used:
The concrete that was used is Rapid Set Mortar Mix for Home Depot
www.homedepot.ca/product/rapi...
The additive was Rapid Set Flow control form Home Depot, It's needed to turn the mix into liquid for pouring
www.homedepot.ca/product/rapi...
Wood used us Cedar deck boards
The burner was found at a discount auction but search for "Fire Table Insert" and you should be able to find something near you. For example
www.homedepot.ca/product/para...
Notes:
Music from www.Bensound.com
A few things I didn't film in the build process:
One was filing the edges of the mold with silicon, you can see just before I pour the concrete all the corners of the mold are black, that's the silicon.
The other is placing rebar in the concrete. There is one 2 foot long piece in the middle of each side. I'm not sure if the rebar was needed but decided to add it due to the hole in the middle. I actually almost forgot to add it and when I remembered the mix was starting to firm up so it was a bit of work to get them in, this is why the surface is smooth after pouring and when it is shown curing it's not as smooth :)
Also I forgot to vibrate the mold after pouring to remove air bubbles so there were quite a few very small ones, but the grout filled in any of them and it adds to the overall texture quite nice. - Навчання та стиль


Really nice video. Very helpful and did not show repetitive steps.
Thanks.
Trying to keep it interesting to watch.
Still hard trying to cut down a few days of work to under 10 min, even when sped up :)
Well done, this is my late Aug, early Sept project. It's a little different from the usual stuff you see. I really like it...
Great result.. and nice workshop.. I just realised how pro you are after seeing you at work .. today I injured my finger as was trying to cut wooden circle for my photogrammetry turntable using compass cutter for paper :). Took me about 2 hours but finally I managed to cut it.. broke the cutter cutting the second one :). Now its trying to recover after I used glue :) as I need to cut a few more paper rings to increase the thicknes of the turntable as drawing pins I used to keep polyester cloth went through it and njured my finger again :D.. yay!
Anyway, thanks for really well made and fun to watch video :). Cheers!
Is there anything this guy can’t make. Very handy guy. Turned out great.
Amazing what know how and tools can do! Thank you.
Fantastic work, just watched this in ore! If only you were my neighbor 😜
lol, thanks.
Great build! Did you have any issues with the concrete cracking from prolonged heat (I know Michael Builds said his did after a few uses). Also, any scorching of the wood base? Great work, from one pocket-hole fan to another.. lol
Thanks.
Haven't had any cracking issues. Table doesn't really get hot, maybe a bit right next to the burner. Could be Michaels burner had a higher BTU rating.
Pocket-holes solve so many problems :)
Great video, I intend to replicate this to disastrous effects in the next few weeks 🤣. Do you still remember the measurements ?
I’m keen to know how deep the table top is and the height of the inlay pieces you used for the centre so I can make the recess for the fire tray like you did.
Thanks,
The thickness of the table was about 1.5 inches, but this had more to do with a size that would work out to the right volume for 2 bags of mortar.
Really I found the fire element 1st, then designed the table around it, so your measurements would vary depending on the element you use.
great! can you elaborate on the drill and mixer used?
Any decent drill will work. If your using a cordless one make sure you put it in low speed mode.
The mixer is nothing special. You can get them at any play that sells building supplies.
Hi great video and thanks for sharing. I can't access any of the links. I'm getting an access denied message on all the links. Can you have a look what's the problem is.
Not sure what the issue it. 1st I've heard of this. Not likely something I can address.
Great Job! I love how you recessed the pan to flush mount the cover. Have you had any issues with cracks? Mine is developing a few tiny surface cracks.
Can you leave a link to the fire pit insert please?
there is a link in the descripting to a insert. It's not the exact one I used but similar. I purchased mine at a auction so don't have a link
I'm curious as to why you didn't add any reinforcement to the mortar mix, especially as thin as it was when poured? I would be concerned about cracking due to the weight at the edge of the table.
See the description for more details, but there is rebar inserted, it just didn't get recorded. Also in the description is a link to the video that I referenced in this build, the mortar mix dries incredibly strong and the wood frame under the table disperses the weight.
I'm amazed at how we think we need to add reinforcement to these counter top and table pours. Especially with mortar mix, Are we doing table dances and driving cars over these things?
I poured a sidewalk at my inlaws house about 20 years ago, I made sure my base was compacted extremely well, no rebar, no wire mesh, to this day it doesn't have a single crack in it. The only place I think rebar needs to exist is if you have to do a monolithic pour, and in heavy equipment applications. Rebar just makes it hell to tear out if you ever have to!
ya, I didn't plan to add any repar, but since the hole in the center was quite large compared to the total size of the table, I decided to add some to be safe.
@@DaveRigDesign yeah sure, I don't fault you for doing that at all. I think it's better to be safe than sorry, I just think it's funny how many people get on these pour videos and comment about lack of rebar.