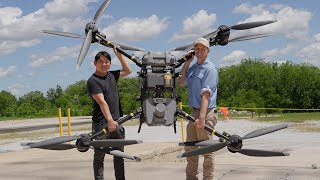
Building the Ultimate 5-inch FPV Freestyle Drone

Вставка
- Опубліковано 6 лют 2025
- TS80P Smart Soldering Iron - www.amazon.com...
In this video, we dive into the process of building a powerful 5-inch 6S FPV Freestyle Drone (quadcopter) for making cinematic flight video.
I got inspired years ago seeing the stunning, cinematic flight videos of landscapes and even racing videos done by FPV drones back when they were getting popular. This year I decided to go all in and purchase some of the highest performing parts to build my first racing drone and get a sturdy start in the FPV hobby.
The objective of this video was to share my experience of building and flying my first FPV drone, at the same time giving my insights and tips to inspire and help others get into the drone hobby as well.
----------------------------------------------------------------------
Parts list for FPV Drone with purchase links:
Brushless motors: amzn.to/3Ck4lqv
Brushless motors (cheaper alternative) - amzn.to/43xxUkk
Flight Controller + ESC - amzn.to/3oOKcWt
FPV Camera - amzn.to/3X3t8sf
FPV Camera Option 2 (fits frame without sanding) - amzn.to/42CFVDb
Video Transmitter - amzn.to/3CjtLo2
VTX Antenna - amzn.to/3qAeLzx
Receiver - amzn.to/3NmCKLu
RGB LED lights - amzn.to/3Cjugyq
LiPo Battery - amzn.to/3N2tgnc
Frame Kit - amzn.to/3MYGDow
Propellers - amzn.to/42CADYi
Other gear used for the drone:
Transmitter - amzn.to/43AzRN0
FPV Goggles: amzn.to/3YCclNQ
Balance Charger - amzn.to/3N1N9L7
TX Neck strap - amzn.to/3X1o4om
🔨 Tools and other supplies used:
Wire Cutters for Electronics - amzn.to/3ECut1B
Screwdriver kit - amzn.to/3V6vgNX
Heat-shrink Tube Kit - amzn.to/3AksTPE
Superglue - amzn.to/3VylTXX
Needle-nose Pliers - amzn.to/3ECTKc3
Soldering lead - amzn.to/45Vi44q
Soldering flux - amzn.to/3p4Do6W
Zip ties (small) - amzn.to/42CHPUm
Zip ties (medium) - amzn.to/3J7r8td
Mark4 frame protectors and mount 3D designs - drive.google.c...
👉 FPV Drone Wiring Diagram - drive.google.c...
👉 Full tutorial video on building an FPV Drone - • 2022 - 5" Freestyle FP...
👉 How to configure your drone in Betaflight - • Betaflight 4.3 Basics ...
👉 How to set up your TX12 Transmitter with a drone simulator - • RadioMaster TX12 Using...
👉 How To Tune an FPV Drone - • How To Tune an FPV Dro...
Betaflight download: betaflight.com...
FPV Drone Simulator I use: store.steampow...
Understanding your Flight Controller: oscarliang.com...
👕 Grab my exclusive Merch here! - max-imaginatio...
----------------------------------------------------------------------
Visit my online Storefront: sites.google.c...
----------------------------------------------------------------------
☕ Buy me a coffee: www.buymeacoff...
----------------------------------------------------------------------
Instagram: @max.imagination - www.instagram....
Instructables page: www.instructab...
----------------------------------------------------------------------
Music credits:
Music from Uppbeat (free for Creators!):
#uppbeat
Tags:
How to Build 5inch Freestyle FPV Drone, FPV drone build, DIY drone, Drone building tutorial, FPV quadcopter, Quadcopter assembly, Drone parts, FPV camera setup, Flight controller configuration, Propeller selection, Motor selection, fpv drone freestyle, fpv drone cinematic, fpv drone, Video transmitter setup, Receiver installation, Battery selection, Drone wiring, PID tuning, Betaflight configuration, Racing drone build, Long-range drone build, FPV drone racing tips, tutorial, 6S, 5 inch, 5", powerful fpv drone, fast fpv racing drone, speedybee f4, brushless motor drone, speedybee tx800, elrs, radiomaster tx12.
fpv drone troubleshooting, racing drone quad build, fpv,racing quad, analog fpv drone, build, 2023 fpv drone build 2023, how to, how to build, beginners, fpv racing drone build, cinematic fpv, beginner fpv drone, professional fpv, freestyle build, Professionals fpv drone, iflight xing2 2207, 1855kv.
DISCLAIMER: This video description contains affiliate links, which means that if you click on one of the product links, I will receive a small commission with no additional cost to you. This helps support the channel and allows me to continue to make more of these videos. Thanks for your support!
#fpvdronefreestyle #maximagination #fpvdrone


Nice build for a first one. Very neat and clean. You'll find that a majority of us couldn't care less about dirt and grass getting in the electronics. I've come home and you'd think the quad took a bath in dirt 🤣😂🤣. As long as it doesn't get too wet. Even the motors get covered. Just spin them a little and keep it moving. All that TPU covering things up looks nice but just adds unnecessary weight. If you have skids, no need for pads. Any weight savings you can make improves performance. Some guys suggest not allowing anything to touch the flight controller like wires crossing the top. The vibration can mess with the gyro. Best to run wires underneath above the ESC. The style vtx antenna on the SMA is different. Can't say I've seen that type used before. Most go with a stubby or lollipop. Something a little less prone to getting thrashed in a crash. There could be a risk of it getting snapped off. That would make for a bad day. My first flight lasted about 5 secs. Unlike you, I made the mistake of not knowing about fpv sims to practice. I thought my R/C plane experience would be enough. I was wrong 😂🤣😂🤣. Multirotors fly totally differently.
Hi there! Thank you for the comment... I find the covers actually handy since I don't want the internal parts all covered in mud, scrap cleaning all that! 😂😂
The drone is extremely jumpy and powerful already for me, that little bit of added tpu weight is not felt much, in fact it helps protect it rather than be an inconvenience (in my case anyway). However, I will consider removing unnecessary weight such as the LEDs (since I don't want to fly in the dark).
Conformal coating the boards will probably be what it takes before I do consider removing the covers.
About the antenna, I replaced it today with a Foxeer Lollipop antenna, works great improving the video signal 👍
Thanks for your other tips mentioned above, I'll consider them.
Be careful out there with your drone too! Sim practice is always beneficial before every real flight even if you're a rather advanced pilot. Especially if you haven't flown in a while 👍
@@MaxImagination who needs practice lol no need to worry about that too much also conformal coating is only necessary if you are intending to get it wet also leds are not what you need for night flying you need a special analog camera for that such as the foxeer toothless starlight, also the vtx is mounted upside down in a way that can cause a short just be warned of that
The level of perfection is great, I was looking to build an FPV drone. thanks for the guide.
Glad I could help! Cheers.
I wouldn't put rubber grommets on the frame. Instead, use press nuts regular nuts so that the stack screws don't wobble around. It will make tuning your quad a lot easier. I can't believe GEPRC wants the stack to wobble around like that, but they do.
I think it also comes down to preference. Personally, I think it's safer using this amount of grommets as it protects the flight controller and ESC stack from getting destroyed upon impact or shock. This of course only lasts if the stack is tightened down really well. Thanks for your tip, though!
Yeah I was very weirded out seeing gummies on the frame itself
Lots of great info. And the kind of "common" sense that comes with making thing properly. Like twisted pairs, keeping things neat, and so on. I'm a retired computer engineer and small plane pilot planning my first build, and this vid is in the keepers pile.
Thanks! Glad I could help a fellow enthusiast!
just a suggestion, i saw in the bag that came with your rgb lights was some included race wire, i would solder the motors to those then solder from the racewire to the esc, if its inline between motor and esc and sits on top of your arms it will prevent prop strikes from ripping up your motor wires. if it wasnt racewire that was included i'd definitley get some you can get it on racedayquads for like $1.50
Good advice and get a smoke stopper. Hopefully he reads this.
Thanks for the tips, I will consider implementing those features!
No racewire, I have the same leds
You have circular polarized antennas on the goggles and linear antenna on the drone. That’s why you don’t have a good video feed. Good quality circular polarized antennas are a must if you want good range no matter the drone orientation in space.
Thanks for pointing this out! Just the other day, I changed out the 2.4g antenna for a circular polarized Foxeer Lollipop antenna.
Dude, I am so excited to get into this with your tutorial. This is the drone video I have been waiting for someone to create/upload. Subscribed.
Glad you found it helpful! Thank you!
This showcases entering into the hobby perfectly, with true enthusiasm. Gj bud
Thank you for your comment!
This is well built, and a nice video as well. There's a lot more to build and experience and I'll see you there.
Building bigger and more is the plan 💯 Thanks for your comment, Odysseus!
Well dome!! Not a bad setup for your first build. I litterly used almost everything you did for my first build about a month ago, other than a different frame. Welcome to the FPV world!
Thanks so much! Happy flying 🚁
This is my favorite video so far
Fantastic project 😁👏🏼👏🏼👏🏼
Thank you! Cheers!
@@MaxImagination LED ???
FANTASTIC work, Max! Beautiful build!!! 😃
You did everything right! Even training on a simulator! Well done and fantastic flying!!! 😃
Stay safe there with your family! 🖖😊
Thank you very much, MC! Glad to see you back...
Have a great weekend! 😊
Well done, Max!
For better range, I recommend a good rhcp antenna on the quad (like the foxeer lollipop, TrueRC singularity, Lumenier Axii2,..) and a pair of goggles with a module bay for an ImmersionRC Rapidfire will give you the best range
Thank you, M J!
Just yesterday, I replaced the 2.4g antenna on the VTX for a foxeer lillipop. This has fixed the video feed issue 👍
Cheers.
Best video of building drone!
Really appreciate that! Thanks
That is an awesome beginner setup, definitely better than mine. I do believe that you're gonna want to remove some weight once you get better, but the added protection seems like a good idea to get started. I love CNHL batteries btw.
Many thanks! Will consider dropping the LEDs and maybe the side covers in the near future as I get to fly more. CNHLs are dominating the market, sure are great choice of batteries. Cheers 👍
Ha! I was about to ask about RX sitting on top of the gyro, but decided to keep watching before posting. And seconds later you added a dedicated RX 3d printed pocket. Good job! I like the build - very clean :)
Yep! After realizing it wouldn't be so smart, I included an STL file of that RX mount along with other parts and sent those to a friend to help me get printed. Cheers!
12:04 😮 nice little sound you got over there
excelent work... Excelente trabajo.,
Gracias! 😀
Pasa buena semana!
Another excellent, well-laid-out presentation. Great video Max 👍
Glad you enjoyed it. Many thanks, James!
Finally a real drone 🙌🏽
Thanks Joshua! Enjoy your weekend 🙌🏽
@@MaxImagination no problem have a great weekend as well 😊
miniware makes a nice iron. sweet quad man.
They sure understand quality 👍
Thank you!
Love you bro from India 🇮🇳 ❤
Awesome video and nice place 👍👍👍
Thanks for watching!
Awesome video max all is a inspiration keep up the good work
Appreciate it! Thank you!
That's a really nice project! I'd add some features to it. For example, using machine learning, I'd training it to lock height if I choose to. E.g: If I let it goes up to 10 meters height, if I release the throttle, it would kept still at the same height. That'd be sick!
Thanks for your comment! As long as the machine learning software can be trusted, might work!
Don’t need machine learning, just buy a DJI.
Great video! This is the exact build I've been planning on doing except I'll use an 03 air unit. Great video!!!
Thanks for your kind comment!
Amazing project Max
Loved your work👏👏👏
Thank you, Sahil! Have a nice weekend ✌
Awesome build max, one of the most awaited projects and you nailed it with awesome looks as well as extraordinary build quality and learning a lot from your projects and you are helping me a lot to get motivated....
Have a great weekend buddy and looking forward for more fvp drone projects😊😊🤜🤛
Thank you very much, Kumar! Always the kindest of encouraging words from you, buddy! Have a great weekend!
I’ve just been buying prebuilt drones, I actually have a Mark 4 also. I’m planning to learn soldering and then I want to build my own 👍
Sweet! Best of luck with your future drone builds!
@@MaxImagination thanks, I just flew my AOS with crossfire for the first time. The TBS Tango remote feels allot better than the DJI remote.
Well done max. Very impressive 👍
Thank you, Tanya!
Welcome to the FPV community
Loved the video! Very informative for beginners and fun for everyone else! The only thing i disliked is how you tightened the nuts on the motor. You only need it tight enough that the prop won't budge. The nylon insert will do the part of keeping it from vibrating off. Normally, you wouldn't need a locking wrench to hold the bell when tightening it
Thanks for your tip and compliments! I will consider that for when I use my drone next time 👍
Every single video you drop is a 🧨 .Thanks max ❤❤..
I appreciate that! Comments like these really motivate me ❤
That was a great build video
Many thanks!
Unbelievable 😮 this is awesome
Thank you! Cheers!
I also wanted to comment on the soldering iron. The one you showed, the TS80P is a great iron, a cousin or friend of the famous TS100 iron. I have a Sequre Si012 iron (Google it) and I think it is one of the better ones as I believe that it is a bit higher in wattage and that matters.
I have worked in aerospace and there they take soldering very seriously. We use very good irons mainly from JBC but one day I brought in my Si012 to check out. I gave it to one of the best techs there who has been soldering for over 25 years and they said that it was great, no problems or issues, heats ridiculously fast, recovers fast, the tips are good quality, just all around a great iron.
So seriously a $26 iron is as good as a expensive iron used in aerospace - yes!...ish Not in any and all cases though but for our hobby these irons should work perfectly. So the one mentioned in this video is very good, the one I mention i think is slightly better.
Also the TS80P tips are expensive, like 3-4 times more expensive than the ones for the TS100 or my iron (uses the exact same tips). None the less if you take care of the tips (keep them clean, make sure they always have a coating of solder, etc...) they can last a long time.
I would pick a different solder for sure. There are science reasons to use a different solder but for sure you want to be using a 63/37 rosin core solder wire like this one from Kester: www.amazon.com/dp/B00AVLM4SO?ref=nb_sb_ss_w_as-reorder-t1_k0_1_13&=&crid=NTDWHLZKAFCP&=&sprefix=kester+solder For sure one of the best solders you can get. Does it matter - yes. A lot - could be but usually not that much but it is much easier to make a good solder joint with the Kester.
Great Video. Thanks
Thank, Neil! You may also like watching how I devepoled my own security camera - ua-cam.com/video/Ul0h5Maeoeg/v-deo.html
Cheers.
Good work Max . I enjoyed the evry part of built with the details you described ❤
Glad you enjoyed it! Many thanks!
This video is very informative, thanks for your hard working
Thanks for your comment!
Great presentation
Glad you liked it. Thanks!
@@MaxImagination Where is L E D ??
Very clean build
Thanks, SL Yasas!
Very clean build! Well done.
I appreciate that! Cheers.
Your Videos helped me build this so easily ! thanks ,i just finished the beta flight tests!
Nice work! Glad to hear. Cheers!
did you have to do any additional ELRS configuring behind camera to the receiver to get it to bind to the controller?
Yes, I had to find the correct communication protocol (SPI RX) and mostly play around with the lettered/numbered Channel Mapping to get the transmitter giving the right commands.
I have the exact same setup with exact the components you're using I'm currently having issues with pid tuning and vtx noise
Good job bro well done 👍
Thanks ✌️ Subscribe for more!
U are a genius
I appreciate you!
If you ever feel generous and want to support my work, here’s my BuyMeACoffee page: buymeacoffee.com/MaxImagination. It means a lot!
Finally. Whta is ths fligh simulator did you used?. Que divino trabajo hiciste. Te pregunto esto por que necesito para mi propio trabajo sacar fotografías espectrales. Después te comparto parte de mi trabajo. (español)
Hola, Jorge. Gracias por su commentario! Usé un simulador de vuelo gratuito llamado FPV Skydive (consulte el enlace de la página de descarga en la descripción del video).
enjoyed the process
That's awesome 👏
Thank you! Cheers!
Very clean build, however I don't think twisting the wires would do much in the way of reducing noise. You could shield the wires with some copper foil and solder a wire from that to a ground pad for actual rf shielding. You can also heatshrink it. It's the exact same thing that happens in USB cables.
Hi and thanks. Good tip, I heard from another fpv pilot that it is best to use coax cable or rf shielded cable on the video signal wire, like you mentioned. Cheers.
Your work is incredible! Awesome drone build🙌🔥
Glad you like it! Many thanks, Kristoffer! 🙌
I wish I could make it this good like you do 😂 i just can’t afford it. Good job tho :)
Maybe you will one day! I appreciate that!
Hey man! Awesome video I loved it. Just Wanted to know if I can build this whole set up but with the 03 unit instead of your camera system that you used .
Hey and thanks! Yes, you can. I suggest you look up tutorials on UA-cam - how to install the DJI camera unit with the connections, configuration in Betaflight, and so on.
It's laid out in an excellent way.. Hope you keep making videos like this
That's the plan! Thanks for your positive feedback!
@@MaxImagination ❤
good stuff.
Thanks for watching!
Tell me the name of multi screwdriver you used
The screwdriver I used came from this kit: amzn.to/3J887am
Temu
Nice!
10:42 the experience of every drone pilot in the history of drone piloting
Very impressive
Thanks for watching!
Running wires over the top of the flight controller is usually not recommended because it can interfere with the gyro. Its probably ok but if issues with the gyro show up, try moving the wires under the FC. the side plates block dirt but it also blocks air. You get no air flow with the sideplates, if youre having trouble with range, your vtx could be overheating and lowering the power. Cool build!
Thank you for your suggestion! I haven't had issues with it, but certainly a good piece of advice to other newcomers in the FPV drone hobby. Cheers!
@@MaxImagination cheers my man, keep rippin
Sheesh men I'm your big fan
I actually made a drone too but not enough fast and bad thing about it I didn't upload it💀
Keep up dude I will support your vids
Many thanks! Consider taking a clip of your drone, I like to see what others make... Documenting what you do is very beneficial. No worries... Cheers!
Great video max . If you shield all the cables the video breakage will stop and you will get a longer range .
Thanks for the tip! This is very helpful...
I would *highly* recommend not having the props anywhere near the motors when checking motor direction.. you can tap the motor housing with your finger to get a sense of the direction, which is much safer imo
Good point. That loose prop can grip and get flown up, hitting someone's face. Cheers.
Nice overview video, God bless.
Thank you!
Im afraid the vtx will overheat of you obstruct airlow with these side covers. Its super easy to overheat them (talking from experience) especially when at high output power
Also, when the vtx heats up it wil drop its power to protect its self. So fpv feed can suddenly disappear
Yeah we don't care if dirt gets in there. Sometimes mine looks like it took a bath in mud 🤣😂🤣😂
The side covers don't fully touch up against the VTX, plus, there's plenty of airflow underneath and from the back of the frame for the unit to breathe via its front and back holes (for LED). This wouldn't be my concern.
Hello Sir, Your video! So good work
Many thanks!
@@MaxImagination Yes brother thanks
perfect video man...straight to the point and very detailed....made me consider building my own...the beta flight stuff is sketchy for me...
Thanks for watching! Glad it has helped you. About betaflight setup, I suggest you watch the tutorial videos I linked in the video description.
Nice build. Make the jump to digital you will be much happier. Buy once cry once.
Thanks. I am considering it as recently, I am not too happy with the analog video feed for client projects. Will try!
Welcome to FPV 😊
Thanks! :)
bro build its first quad and is alread a damn pro. good job :)
Cheers! I'd highly recommend other beginners out there to use a simulator one month prior before buying parts to build your own quad, this will level up your flying skills fast.
My dream build is to have a bunch of extra parts and a few extra quads
The more, the merrier! 💪
I'm going to build this drone little by little
Awesome. Go for it!
This is interesting, I have never seen the wires swing over the ESC board before. Since this is your first build, why did you chose to do it this way? Is there any downside?
From what I remember back when I made the drone, I did this as it was a shorter route for the wires to take. It doesn't seem to cause interference at least. I don't see an issue.
How do you change the wire antenna for the SMA? Any recommendations on any videos?
You change it by pulling off the current antenna you've got on with a pair of pliers and clipping on the SMA antenna you want.
I just bought the same parts for a 6 inch drone
Great! Did you purchase a bigger frame? The Mark 4 frame doesn't work with props larger than 5".
I want to be friends with this guy. Super dope video my man.
Thanks for watching!
Just tell., If the motor goes in wrong direction What is the correct solution?
BetaFlight can reverse them if they are spinning the wrong way. Some of us prefer to have props spin outward. That way if you fly through a tree, in theory, the prop pushes the leaves and branches away instead of grabbing them and pulling them in increasing the chance of getting tangled if you fly "props in".
Thanks for the tip, Amen_ Ra!
Hello Max i just wandering if you could make a tutorial of rc car but with a suspension
Hello there. I will consider it for a future video. Thanks.
I didn't hear any discussion about a gimbal and yet your footage doesn't look incredibly shaky.
I'm a smooth flier 😉
Nice clean setup!!
Thank you! Cheers!
Nice video and build 🔥🔥😎. The drone definitely needs a tune. The video shakes a lot. But nice drone!
Thanks, Hexagun! I am new to all of this but I will definitely work on some more tuning 👍
hi loved the video but d you how what the range on this drone
Hi there. The range can be up to 1-2KM. Preferably flown in a 200M radius not to lose video signal.
Dream❤
OMG Max, This is AMAZING!❤ So I was interested to give you an idea to make. So this is what, Can you make a pair of Apple Airpods.
Hi there. Thank you for watching! I'll keep the idea in mind, thanks 👍
Hi sir,
what is the Size of the flight controller you use?
About 50x50mm
I like your video.
Thanks!
Thanks
Hi max can you build for me o you know how build a combo ready to fly . I dont have the time and the exprience to build
Hi there. I don't sell my projects yet, but you can find pre-built quadcopters on sites such as Amazon.
Have you got an STL file for the 3D printing of the Gopro case? I haven't found it in your links.
Yes, I have updated the description just now with all of the drone's 3D printed parts' design files for you to download. Cheers.
@@MaxImagination Subbed.
Im new how do U know the right place to solder the wires on like for each wire on to individual soldering plates
You can know the connections by following the diagram linked below :)
We built almost the exact same drone, nice work!
Nice! Thank you!
What size are your props? I have an 5 inch Arris x220 v2 with 5nch props but they touch the middle frame. Do you recommend 4.5 inch props or 4 inch?
Mine are exactly 5 inches in diameter and I don't have an issue with them touching the frame or anything. Which frame do you have? If this is your issue, I suggest downgrading to 4.5 inch or 4.75 inch props if possible.
@@MaxImagination A 5 inch 220mm X frame i believe im saying it fight? Lol. 👍 Okay yeah I figured 4.5s would fit. Do you think if i cut down the tip a little bit the prop will still work?
If you do have to shorten the ends, you can. However, make sure you don't take too much off! Just little snippets at a time...
Cheers.
Hey I can't seem to find where he bought the wires little help here please ?
Which wires? Wires are normally included with the part such as the wires connecting the motors to the ESC stack.
Wow, you even share all the thing needs to build! Come on guys, make the subs reach at least 100k and he'll get the silver button!
I appreciate your kindness! All the best, cheers. 😀
Hi bro from India Bengaluru
Hello 👋
Nice to e-meet you!
@@MaxImaginationI'am Very happy bro
What sort of range can you get from this setup?
1-2km only with a quality set of goggles and FPV system.
could you make an airplane powered by dc motors that flies?
I am considering it for a future project!
Please do a video on building the ultimate 7 inch fpv drone, with return to home feature
Hi, thanks for the suggestion. I will keep it in mind!