How to Install Torch Down | Torch Down Roofing Guide

Вставка
- Опубліковано 8 лип 2024
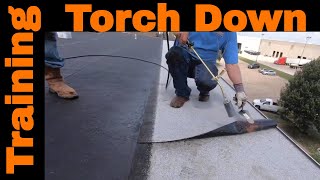
- If you have a flat roof, one of the materials you can choose to install on your roof is torch down. In this video we will show you how to install torch down roofing on a roof field. We'll be installing Polyglass' torch down cap sheet in this video.
**Please note that torch down roofing is dangerous and should be installed by a licensed professional. Using an open flame can pose a fire risk and therefore must be handled carefully. Make sure to wear fire resistant gloves when installing torch down roofing.
Keep all flammable scrap and debris at least 10 feet away from the building. A fire extinguisher is needed within 50 feet of anywhere where more than 5 gallons of flammable or combustible liquids or 5 pounds of flammable gas are being used on the job site. No one on a job site can be more than 100 feet away from a fire extinguisher at all times. There must be at least one fire extinguisher for 3,000 square feet of work area.
The full list of OSHA’s Fire Protection and Prevention regulations can be found here: www.osha.gov/sites/default/fi...
-----------------------------------------------------------------------------------------------------------------------
0:00 intro
0:10 explanation
0:50 setting up to torch the first roll on your field
1:56 side lap explanation and purpose
2:35 kick out the material in front of you while torching
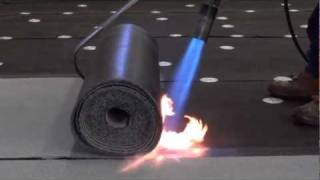
3:09 how much of the roll to burn with the torch
3:31 torching the first roll of material
3:59 overheating the cap sheet
4:16 dog-ear the corners of the cap sheet
4:55 torching at the seams
5:35 how to torch a new roll at the joint of the previous roll
9:03 how to granulate seams
-----------------------------------------------------------------------------------------------------------------------
This is just one tutorial from our latest series, “Torch Down Roofing Guide,” where we will walk you through every step of the process when installing torch down material on a roof. From low rise to pipe flashing, from the glass base to the granulated cap sheet, we will give you all the details on how to install torch down roofing. So check out the rest of that series in the playlist marked on our channel page!
We are a licensed and insured roofing contractor based in Burbank, CA, so keep that in mind when you watch our videos, as roofing regulations are different across the country.
We service the Los Angeles area, and if you’re looking for a trusted roofer, be sure to contact us today for a free estimate!
Contact Us!
► Facebook: / roofrepairspecialist
► Instagram: / roofrepairspecialist
► Read our Google ratings: bit.ly/34bQrVP
► Read our Yelp ratings: bit.ly/3mZChzP


Thanks for watching! Let me know if this video was helpful, and what other tutorials you'd like to see for torch down roofing!
Thorough explanation.
Subscribed 👍
I like the way you went back and squeezed out 1/4” on the edges to confirm a tight joint.
You are a great teacher 🧰🪚👍
Everything about this video is wrong.😂😂😂 what a gong show.
I am trying to educate myself in preparation for getting our torch on roof replaced. This video was very helpful. Thank you.
Good luck!
I'm impressed that you built that structure to make the video. I call that going the extra mile. Most people show on-the-job installation which I also learn a lot from. But your vid is top of the mark.
Thank you, we actually built these structures for training purposes.
He did it to pass his torch down class. It’s a requirement. He’s smart to make a video out of it, but it’s required.
The absolute hardest part of my torchdown roof replacement project is finding someone in Olympia WA that would do the job as perfect as shown in your video.
Thank you, I appreciate the compliment. Don’t settle. If you can’t find anyone I would recommend finding a qualified roofer and have them install whatever product they are most comfortable with. Better to have a properly installed inferior product then a poorly installed superior one.
I’m in Portland. If you still need someone to install that at a professional level I’m here bud
Nice. I've done torch downs since the 80's. I usually over heat some areas, learned something new today by 45 ing that lap that's under the top. Thanks.
Love it, I always feel the same, always something new I can learn to improve my craft
Thanks for the video!
I love watching all your videos. We’re a family owned roofing company that has been around since 1992. My dad was a journeyman with the local union since the late 70’s. For years all we did was Hot Mop…so with all the newer products coming out…your videos have been very informative and I’ve learned a lot.
Thank you and God Bless!
Thank you for watching and your support, if you approve of my work bring a roger yourself I consider that a huge complement.
Excellent tutorial!
Thank you!
Thanks for sharing, great technique.👍
My pleasure!
Great video guys!
Thank you
Great videos
Glad you like them!
Thank you for sharing professional skills!
My pleasure!
This is a Master class. You are very good teacher. I like your video 👍👍👍👍
Thank you. I am not sure about Master, but I do my best.
Thank you so much Fourier
Your welcome.
Thank you for your video, I like the granulated seams as well!
Thanks for watching!
Great info!
Thanks for watching!
Thanks for a great video!
My pleasure!
Very nice a lot of good information in this video thank you !
My pleasure, thanks for watching
thank you, much very helpful.
Glad it helped!
Thank you so much For your easy to understand explanation. very professional unreliable method.
Thanks
what's unreliable method mean?
Excellent and very informative video A+
Glad it was helpful!
Awesome video, Great instruction and I like your 2 step method. 👍
Thank you! Cheers!
@@RoofRepairSpecialist do you have any tip or video on how to wrap an outside corner and a circular shape like a vent base using rubber 😉👍🏽
I will make video lol this guy is a great seller
I live in North Wales in the UK. I plan to Felt the flat roof on a garden room. I hope there are suppliers that can provide this type of felt product.
Thanks for the video tutorial. I'm repairing our old roof with plans to replace the entire roof in the near future. What material is the underlayment for the torch down cap? Is it felt paper? What do you use to secure the underlayment to the plywood sub? Galvanized nails/screws with washers? Thanks in advance!
My favorite base is polyglass elastobase V. Secured using ring shank galvanized metal cap nails
Do you have a video about adding a mid ply or.not for needs or how to do it?
No I don’t believe so. Do you think that would be useful
How do you do an inside corner? Mine transitions into the siding. What do you run up on the vertical surface? All 3 layers? Then compression bar? Do you Mount the compression bar underneath the siding on the sheathing if you're redoing the siding anyways or does it have to be on top of the siding? I'm guessing you use OSI quad?
This is a tricky question. I don’t have a video yet on inside corner. However I alway recommend using a z bar for your siding and having the membrane tuck under the Z Bar. We use Chemlink products. Usually M1
What do you do when the roll starts to run off away or towards the seam?
Great and very helpful video. Can this torch on roof being painted and sealed? Like can I paint it white?
Yes, most common options are an acrylic or silicone
is there a brand that you recommand? @@RoofRepairSpecialist
Depending on where you are and what’s available, a few solid brands are; APOC, polyglass, ASC, Gaco
thank you@@RoofRepairSpecialist
how about installing a corner scupper then tying the roofing in
Watch my video on scupper
is this a finished project or can you add something more comfortable to walk on if you've used it on a bedroom balcony ?
Don’t recommend using this product as a balcony or walking on it. On a hot day if you walk on it you will start damaging the material. Use a product rated for traffic.
thnx for the video but what is under the torch roof?
Different options, usually what’s called a glass base. We prefer polyglass elastobase
I have a 30 years old flat roof with small pebbles on it. I need to put a new one because I am also planning to have a solar panels also on the roof. Should I remove the old roof and put a new one or just put two layers of bitumen on top of the old one? Thank you.
Removing would definitely be your best option.
Sweep the roof to get the loose Rock Off, you can torch base right down to the substrate, I would recommend taking a flat shovel to level it as much as you can, then sweep, I've done it before you just got to make sure you've got good adhesion on your base layer.
3 layers is code , then you need to remove but of i think always better to start fresh
Question maybe it’s just your sample roof but what do you do on opposite side of the over lap with tar strip.
There’s no tar strip on that side.
It’s the same idea, not sure if I have a video specifically on that. Take a look at the other videos, should be on there
@@RoofRepairSpecialist I'll check it out. You guys are looking at a job I have next friday.👍👍
what material you use about 7:15 in the video? thanks
If I understood correctly you are asking about the laps. That is not a product. Rather when we heat up the granules they are imbedded in the role allowing the bitumen/ tar to come to the surface.
wouldn't primer work well on the overlapped granules? Great point in burning them though
Definitely, both work
I like using primer.
youre roofer has hands of steel
Lol, he really does. However much I try to get him to wear gloves he hates it. I've bought different types of gloves trying to find something thats comfortable with no luck.
Here in uk we would remove pebbles jet wash roof of ,alow to dry,apply bitumen primer and overlay with torch on ... why remove a roof thats not leaking? Will now be a perfect base for your torch on roof
So you pressure wash all the granules off? that is interesting. I have never seen that here, however I do see the value in it.
Instead of pressure washing just buy double the smooth. Essentially same thing
hi . where to buy this granules?
We get them from our local roofing supplier.
Holle sir
I need job waterproofing Mambrn
Sorry, not sure I understand
@@RoofRepairSpecialistI’m from india I want to instal our cement porch ..what’s warranty that’s collr and any other problm
Where I can buy polyglass membranes in Los Angeles
JB wholesale roofing supply
Are this products energy start rated?
The energy star product is called PolyFresko
🤝🤝🤝🤝🤝🤝🤝🤝👍👍👍👍👍
Thanks
Tell me which countries you export these products to
Like us and subscribe to our channel
Why not primer instead of melting the granules off?? Primer would integrate bitumen into new granules
No reason both work and we use both methods
i dont' think i've ever seen anyone torch the seams separately from the field... and the cutting of the 45 angle seems completely unproductive since you're heating the part that overlaps to remove the granules anyway
Just cause you haven't seen it doesn't mean it can't or shouldn't be done, some of our guys do it this way, some of them do the seams at the same time.
@@RoofRepairSpecialist don't understand the point of your comment... i didn't say it can't or shouldn't be done, just said i've never seen it that way
That 45 degree angle is much better seal
Te Gustaría aprender flat roofing? Entra a este canal 🇬🇹👍🏻
No man this all messed up nail base is not strong good for no ice roofers tho, torch down should be solid bled all around and firm, no cut flaps ( spidercut) for drains there should be a solid bleed out and there should be only a few nails around scuppers in the correct places the cap should be de granulated at 6" at the base of the flashing and please don't put m1 or caulking on the drain holes and block the water flow that is meant to catch the leaves
Вы сами сделали кучу ошибок.
Polyglass is absolute trash, it’s the cheapest material on the market. Only cheap jacks use polyglass, cap nails all throughout the flashings, 😂😂😂😂😂
Sounds like you really know what your talking about😂
Don't tell my clients- I've installed a bunch of it, no problems. Oh, and that's "Mister jack" to you...