Excellent video again Jon, completely agree when you mention that using the tool even once or twice will pay for itself, also by buying your own bearings you know exactly what is going back in. I've used Bearing Pro Tools for removal and installation of cartridge bearings on a Fulcrum hub and they worked fine, keep up this content Jon ,really useful, thanks for the time and effort you take to produce these.
Hi Neil, Glad you enjoyed it. Yeah, I've seen a lot on the Bearing Pro Tools stuff. Have also referred people to them in the past. They do some 'Hub Specific' tools that are great, like the over axle press (Or whatever its called!!).... great tool that solves an annoying problem. More videos planned 👍
Jon, your videos are fantastic. I have just replaced the wheel and freehub bearings on my Hunt MTB rear wheel. It's done over 5,000 miles in all weather conditions, so they've really done their time. All four bearings removed, hub and freehub cleaned up and new bearings fitted. Smooth as silk. Thanks, Jon (I am Jon as well)
Thanks for the bearing press recommendation. I bought one and it made fitting my first press fit bottom bracket and enjoyable task. I have seen a video of bottom bracket extractors which look interesting and less brutal than whacking out the old cups
Hi James, "an enjoyable task"..... thats what bike maintenance should be. There is nothing nicer than working on your bike, putting stuff together, and it all goes smoothly. I don't see many press-fit BB's nowadays. If I did, I'd do a video on one.
Great presentation. I will never do this type of repair on my own but I feel more knowledgeable when I bring it into a shop. Keep these shop presentations coming!
Great how-to video. Having some one walk you through the process makes it a whole lot easier. Good to know what tools to use & what to be mindful of when replacing those bearings. I guess the hard part will be tracking down a new set of bearings?
Hi S.J. Glad you enjoyed it. As I say, the best thing to do is to measure them. If you type into Google "Bearing 28x15x7", you'll get loads of results for 6902 bearings. Measuring is best. 👍
I know that accepted practice is to always replace bearings that are removed by punching or pulling on their inner races, but I recently overhauled the freehub on my 20+ year old bike, which required me to remove both sealed cartridge bearings by punching them out from their inner races. Neither required an excessive amount of force though, and upon examination both appeared to be working fine and rolling smoothly. So although I had purchased replacement bearings, I decided to try to reinstall the old ones and see how well they performed. And so far, no issues at all, smoothly rotating wheel, no noise, rubbing, seizing or wobble, just like new. Now I don't have that many miles on them, not even 100, but I've gone over a fair number of small potholes, bumps and such, and they still spin just fine. I'll keep a close watch on things and if I detect any issues I'll replace them with the new bearings, but so far so good. Anyone else try this and how did it work out?
Been there. Done that. Just realise that the bearings in a bike are going to be actually smashed from all sides when the bike is in use and stop to worry. They are made from hard steel for a reason and a bike has no high speed rotating parts at all. Tolerances are big compared to even a simple drill or dremel. It is not a mechanical watch or car motor.
Excellent video, is it possible for you to do a video on servicing the Vision Team 30 Disc wheelset bearings and how to remove the bearings and how to put it back together in a rear wheel. This will a great video for us out here who owns Vision Team 30 disc wheelset.
To be honest, Shameel, I've not seen any Vision Team wheels in a while. I used to see a lot of Team 25 rim. Think I may even have a pair somewhere. I'm pretty sure that Vision use a Novatec centerlock hub on that wheel, which is what both Fulcrum and HUNT use. I'm going to be doing a wheel bearing video very soon, and I suspect the process will be very similar, if not the same.
Hi, I've really enjoyed watching your videos and love the very thorough explanations on how to do things. I was wondering if you every re-use cartridge bearings and just give them a good clean, re-grease and perhaps a new seal? I know new ones are relatively cheap but wouldn't mind being able to reuse them at least every alternate occasion the bearings need maintenance then replace the next time and so on.
The process of extracting a bearing (pulling the inner race) puts excessive pressure on the individual bearings, and can deform them. For this reason, it’s not recommended to reuse them. I suppose the counter-argument may be that the only thing it’ll affect is the bearing, so what does it matter. Hope that helps 👍
Haven’t had a chance to check your other videos but do you know if you can use the bearing puller/press on a full suspension mountain bike pivot bearings? Excellent video thanks for sharing 🛠️👍
Thank you for the video! I tried that on an old merlin wheelset and it was a total nightmare because of that "preload" tube. I followed exactly your procedure but I ended up seizing the tube and the whole thing was so stiff, the tube was a bit off so the axle wouldn't fit etc. I then just removed the top bearing to try again, this top I didn't press it too much, but there was still a gap between the tube and the bearing. I pressed a bit more and then again the whole thing starts seizing up. We're talking fingertight pressure here when pressing (I have the exact same bearing press tool). I'm having a lot of problem understanding when to stop pressing, my brand new novatec freehubs the tube is slightly loose aka you can push it to the side easily but I have no idea how to get to that same "looseness". I thought maybe the whole thing being stiff with new bearings was normal for this wheelset, but testing it of course when coasting the freehub would "seize" and spin along the freewheel. Anyhow, I'll try again later with a new set of bearings but really I'm at loss here.
Well spotted, Garfie1d73, thank you so much for letting me know. Sorted. Was only a matter of time before I did that....... And I'm sure it'll happen again!!
Excellent video, two questions, 1. how were you able to deduce that the measurements taken equated to a 6902 bearing set? is there a chart that us mere mortals can use? 2. can you recommend a good after market bearing supplier, i have heard the NTN bearings are good? Thanks again, i really enjoy watching and learning..
Hi Alistair, The quickest way is to search the size online. If you type into Google "Bearing 28x15x7", you'll get loads of results for 6902 bearings. However, the 6902 is the most common bearing, so I knew what it was. Bearing recommendations. My rule is, if you want them to last, buy steel. If it's a budget job or, say a winter hack, I use basic steel bearings bought in bulk from Amazon. They run well, and last. Link below: amzn.to/3SZ0gkp However, if there is a request for a 'Branded' bearing, then I go to these guys, as they sell both Enduro and NTN: www.airevelobearings.com/ Hope that helps, and glad you enjoyed the vid. Jon
Hi Majid, My rule is, if you want them to last, buy steel. If it's a budget job or, say a winter hack, I use basic steel bearings bought in bulk from Amazon. They run well, and last. Link below: amzn.to/3SZ0gkp However, if there is a request for a 'Branded' bearing, then I go to these guys, as they sell both Enduro and NTN: www.airevelobearings.com/ Hope that helps.
Hi John, have you done a video on cleaning and lubricating a freehub, I am keen to understand the debate between light grease and lubricant etc? Many thanks, Tim
Hi Tim, This is an interesting subject right now. Until relatively recently, the advice from wheel manufacturers was to use a small amount of high quality mineral oil. Take Mavic for example, they've always sold their own high quality mineral oil. But now we're seeing more and more that wheel manufacturers are recommending a light coating of grease over the pawls. HUNT being a fine example of this. Although pawl design has changed, the fundamental mechanism of a ratchet system of some type remains. So, if the technology hasn't changed, why are we doing it differently? Additionally, the freehub contains small delicate moving parts....... Is grease the best thing to use in a place like that? Saying that though, grease will do a better job of keeping moisture out. I don't know what the correct answer is. Personally, I use a small amount of mineral oil on each pawl...... Works for me.
Hi Jon I don't suppose you've tried the bearing puller on bottom bracket bearings have you? As in regular screw-in cups with bearings inside, not PF. I've got a GXP BB which goes through non drive side bearings like they're going out of fashion, looked at this bearing puller a few times but never pulled the trigger
Just down in the workshop now looking for an old BB that I can use as a guinea pig, but don’t have one. Basically, it’ll pull any bearing between 8-25mm, that it can grab from behind
I have a 15 x 28 x 7 millimeter sealed bearing that has failed catastrophically. The inner-rings and ball-bearings fell out during disassembly, but the OUTER-ring only is still pressed inside the aluminum hub-shell. Do you have a tutorial on how to remove a sealed-bearing OUTER-ring? I'm guessing it must involve removing the opposite side bearing, and any axle sleeves, and then carefully reaching inside the hub-shell from the opposite side with some type of long punch, and gradually tap-tap-tapping the OUTER-ring out, if there is any surface available on which to make contact with a bunch. Tks.
I would always advise, where possible, to pull the thing out straight. Do you have a puller set like the one I use? If so, just switch to a larger puller collet. I think it goes upto 25mm, so it may well grab the inside of that 28mm. If not, then yes, get the other side out, then tap out from the other side. Good luck with it, and let me know how you get on. Jon
May I ask you what did you put on the lower legs of the bearing puller? Is that a tap or something to prevent scratches? Great videos and I really like your narrative! Subscribed 😉
Does it matter if the preload tube is a tiny bit loose once you've put the bearings back in? It rattles around a bit horizontally if i shake it but would be secure once back on the axle. Nervous about tightening the bearing in more and getting the tube misaligned! Thanks
Hi, The short answer is, 'No'. The preload tube is there to stop you crushing the bearings, and applying too much lateral load when you do everything up. This biggest cause of damage to bearings is not radial load, but sideways lateral load. It sets the amount of preload between the two bearings, and stops it all moving. The key thing is to make sure the bearings are seated all the way down into the hubs. That tube will sit tight, once you do it all up.
@@ribblevalleycyclist great, thanks for the reply! I find these videos really useful. Especially with the advice on what tools to get that don't cost the earth.
i love the video, and i was looking to get those press/puller sets you have listed. will these work on pretty much any bike bearing size? i have a tern GSD and it's got one or two unusually sized bearings, and I don't really see and specs listed for either of the sets. Thanks!
I've yet to find a bike bearing it won't deal with. The only issue you may face is what is known as an over axle drift. This is where the drift you need is a tube, that pushes the bearing in over the axle. This press set doesn't have the over axle drift.
Brilliant. One problem with a couple of my hubs is that they're old (orange) Easton hubs and its made of Swiss cheese. By the time I need to the bearings, the splines are so deeply notched, there's not much life left. BTW, does every bearing have an inside face vs an outside face? Some the seals are the same colour on both sides
Hi Ric, Orange = Full Seal. A tight seal that prevents water getting inside the bearing Black = Non Contact Seal. Seal isn't a tight fit, so water can get out. Sometimes they use both. Full seal on the outside to stop water getting in. Black on the inside to let it out if it does get in.
Hi Jon, I’ve also seen tutorials were the space between body and preload tube is filled with grease, before putting the final bearing in place. Is there any harm in that or would it actually make a better moist seal for instance? Since you’re only applying a bit of grease on the preload tube I’m interested to know why to choose for either. Thanks! 9:35
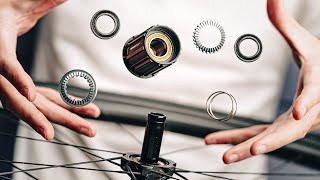
I think this video is gonna be super helpful in helping me service my campy rear hub bearings. Liked and subbed! One thing i noticed was what about the bearing remaining on the rear wheel axel after the hub is removed 3:18? Any idea why Tactic Racing hubs use 3 bearings in the rear? At least that is my impression after looking at their spare parts list. Wonder if I'm also missing a bearing aside from the two 6803 NTN bearings i will place an order on...
Hi timtimzi, That damage to the freehub body at 3:18 is known as cassette bite. It usually happens when the cassette isn't tightened enough, and therefore moves a bit. Never stripped a Tactic hub, but you used to get a lot of hubs with a third bearing in the middle...... There was a reason for it, but I can't remember for the life of me why!!!
Interesting. I have to remove freshly pressed press fit BB cups, somehow I broke the sleeve inside. Wacking them out doesn't work, I'm scared to bang too hard. Can I use a tool like that to pull one of the cups out? I have a 3d printer and a BB press fit tool, so in principle i can design and print anything
I can't quite tell if the bearing puller collet, I think you called it, is just expanding against the inner ring of the bearing or is it actually catching on to the bottom edge of the bearing ring? In my Hub there is no space between the bearing ring and the sleeve separating the two bearings so I'm not sure what the bearing puller can actually grab onto. It's a very thin and tight joint between the sleeve and the bearing so I'm not sure how something could actually wedge in there and grab onto the bearing ring enough to pull it out. Maybe you could clarify what's going on in there?
@@ozzzybeno889 Hi , If it’s a press-fit BB, you don’t tend to use a puller. They’re usually knocked out from the other side using a tool like this: amzn.to/3PpfTja Obviously though, double check your bearing type.
Agree with Aperfectcircle. However, it's always worth having the ability to measure, as the seal can corrode, or with some bearings, it's written around the outside edge, which can wear.
Hey! Does it matter what type of bearing you use for the freehub? I need to replace bearings in an XDR freehub for Zipp 303s wheels. The existing bearings are marked 6803. Will any 6803 sized bearing do the job?
The important thing is that they are the same size. A 6803 bearing has a dimension of 17mm inner, 26mm outer, and 5mm width. My advice is to play it safe, extract them, and measure them. But any one will do the job, as long as it’s the same size
Would you ever go back to cup and cone? I just bought the FH-QC500-MS and the HB-QC400 Shimano cartridge hubs and I worried about how good they are. Any experience?
A good question, one I've not considered, until now. Yes, I would. C&C does require a little more maintenance, but as a person that is well-equipped for that, I don't really mind. I also get some pleasure out of the simplicity that C&C gives. You also don't need a load of specialist tools, just a couple of cone spanners. Up until recently, Shimano only used C&C. So, those Dura Ace wheels you'd see on bikes winning The Tour...... C&C.
thanks a lot for sharing. i wanted to service mine freehub (Cube hub) and it need to be unscrew from the non drive side and its terribly tighten. I´ve seen some freehubs that that pop out after removing the wheel. do you have recomendations of such hubs? the ones that i can easily remove the freehub, clean, etc? thanks
Mate ive a ebike and on the long side of the axle its just a axle theres no thread like most have so is there a way i can put a inner freehub in order to get a freehub on
The proper way to do it.... Ground down screwdriver, same diameter socket and hammer here.... 👌 Oh and a nice piece of timber to rest the freehub body on 😎 and i meant your method the proper way 👍
I’ve done one on headset bearing replacement, link below. But not one on that includes internal routing….. Not had one in. How To Replace Integrated Headset Bearings (AHeadset) - Road Bike Maintenance ua-cam.com/video/nVTBMBjWPhw/v-deo.html
The links I shared are UK links, and they're still showing in stock. Worth pasting the product description into the search. But if there is a new one on eBay for £10, I'd go for it. I'd buy a spare one for that money!!!!
@@ribblevalleycyclist I think he meant the press is £10 less than the one in your link, not for £10. If they were £10, I'd buy all their stock and sell them on for £20 each!
Where I live, time is expensive. Those tools are cheaper than the service fee i paid to have a new rear wheel fitted, pulling the parts off my old one and placing them on the new one. I was pretty sure i could do the work, but i went off their recommendation. I was a bit bummed by the whole deal. Enough to start price checking their items. Seems like every item is $5 more than a big store like REI. Or any online retailer. I find it sad, its where i got my 1st bike. But my frugal nature has me looking elsewhere. Im also not listening to mechanics anymore unless its via youtube or something. I can do all this work. I could have had a decent wheel machine and built my own wheel for the same money. Im new to cycling as an adult, it was my 1st time back @ my old shop. I wanted to be a patron so im okay with everything, but i wont be doing that stuff anymore.
I wish you didn't skip tightening the puller and tightening the press. So I could see how much pressure you use. You skip the last few seconds on both of those with the skip editing.
Sorry Logan, it’s a balance between keeping it short, whilst keeping it informative. Neither need a great deal of force……. if I had to guesstimate, less than 3-4nm. Or less than a stem bolt.
There are many hacks out there. It's down to patience, your freehub type and luck as to whether you can get them to work. If you're doing lots of bike DIY, then it's good to own these tools, because you'll use them on other jobs. If you're not, then you'll just need to buy a new freehub.


Excellent video again Jon, completely agree when you mention that using the tool even once or twice will pay for itself, also by buying your own bearings you know exactly what is going back in. I've used Bearing Pro Tools for removal and installation of cartridge bearings on a Fulcrum hub and they worked fine, keep up this content Jon ,really useful, thanks for the time and effort you take to produce these.
Hi Neil,
Glad you enjoyed it. Yeah, I've seen a lot on the Bearing Pro Tools stuff. Have also referred people to them in the past. They do some 'Hub Specific' tools that are great, like the over axle press (Or whatever its called!!).... great tool that solves an annoying problem.
More videos planned 👍
Jon, your videos are fantastic. I have just replaced the wheel and freehub bearings on my Hunt MTB rear wheel. It's done over 5,000 miles in all weather conditions, so they've really done their time. All four bearings removed, hub and freehub cleaned up and new bearings fitted. Smooth as silk. Thanks, Jon (I am Jon as well)
Hi Jon, glad you found the video useful. There is nothing better than having the correct tools for that complicated job.
Thanks for the bearing press recommendation. I bought one and it made fitting my first press fit bottom bracket and enjoyable task. I have seen a video of bottom bracket extractors which look interesting and less brutal than whacking out the old cups
Hi James, "an enjoyable task"..... thats what bike maintenance should be. There is nothing nicer than working on your bike, putting stuff together, and it all goes smoothly. I don't see many press-fit BB's nowadays. If I did, I'd do a video on one.
Great presentation. I will never do this type of repair on my own but I feel more knowledgeable when I bring it into a shop. Keep these shop presentations coming!
Will do, Mike. Glad you enjoyed it 👍
Great how-to video. Having some one walk you through the process makes it a whole lot easier. Good to know what tools to use & what to be mindful of when replacing those bearings. I guess the hard part will be tracking down a new set of bearings?
Hi S.J.
Glad you enjoyed it. As I say, the best thing to do is to measure them. If you type into Google "Bearing 28x15x7", you'll get loads of results for 6902 bearings. Measuring is best. 👍
Excellent as always
Thanks, Jason 👍
Fantastic video! Watched the whole thing and was very engaging and informative
Glad you enjoyed it! 👍
Excellent video!, just what I needed. Can you also make a video about servicing/changing the bearings of the pivots in an MTB bike please?
Thanks. Frustratingly, I don't get many MTB through the workshop door, so we could be waiting a while.
Really great and informative video. Great work!
Much appreciated!
I know that accepted practice is to always replace bearings that are removed by punching or pulling on their inner races, but I recently overhauled the freehub on my 20+ year old bike, which required me to remove both sealed cartridge bearings by punching them out from their inner races.
Neither required an excessive amount of force though, and upon examination both appeared to be working fine and rolling smoothly. So although I had purchased replacement bearings, I decided to try to reinstall the old ones and see how well they performed.
And so far, no issues at all, smoothly rotating wheel, no noise, rubbing, seizing or wobble, just like new. Now I don't have that many miles on them, not even 100, but I've gone over a fair number of small potholes, bumps and such, and they still spin just fine.
I'll keep a close watch on things and if I detect any issues I'll replace them with the new bearings, but so far so good. Anyone else try this and how did it work out?
Been there. Done that. Just realise that the bearings in a bike are going to be actually smashed from all sides when the bike is in use and stop to worry. They are made from hard steel for a reason and a bike has no high speed rotating parts at all. Tolerances are big compared to even a simple drill or dremel. It is not a mechanical watch or car motor.
Excellent video, is it possible for you to do a video on servicing the Vision Team 30 Disc wheelset bearings and how to remove the bearings and how to put it back together in a rear wheel. This will a great video for us out here who owns Vision Team 30 disc wheelset.
To be honest, Shameel, I've not seen any Vision Team wheels in a while. I used to see a lot of Team 25 rim. Think I may even have a pair somewhere. I'm pretty sure that Vision use a Novatec centerlock hub on that wheel, which is what both Fulcrum and HUNT use. I'm going to be doing a wheel bearing video very soon, and I suspect the process will be very similar, if not the same.
Is it raining again? Great mood and thank you for turorial!
Hi, I've really enjoyed watching your videos and love the very thorough explanations on how to do things. I was wondering if you every re-use cartridge bearings and just give them a good clean, re-grease and perhaps a new seal? I know new ones are relatively cheap but wouldn't mind being able to reuse them at least every alternate occasion the bearings need maintenance then replace the next time and so on.
The process of extracting a bearing (pulling the inner race) puts excessive pressure on the individual bearings, and can deform them. For this reason, it’s not recommended to reuse them. I suppose the counter-argument may be that the only thing it’ll affect is the bearing, so what does it matter. Hope that helps 👍
Haven’t had a chance to check your other videos but do you know if you can use the bearing puller/press on a full suspension mountain bike pivot bearings? Excellent video thanks for sharing 🛠️👍
Thank you for the video!
I tried that on an old merlin wheelset and it was a total nightmare because of that "preload" tube. I followed exactly your procedure but I ended up seizing the tube and the whole thing was so stiff, the tube was a bit off so the axle wouldn't fit etc.
I then just removed the top bearing to try again, this top I didn't press it too much, but there was still a gap between the tube and the bearing. I pressed a bit more and then again the whole thing starts seizing up. We're talking fingertight pressure here when pressing (I have the exact same bearing press tool).
I'm having a lot of problem understanding when to stop pressing, my brand new novatec freehubs the tube is slightly loose aka you can push it to the side easily but I have no idea how to get to that same "looseness". I thought maybe the whole thing being stiff with new bearings was normal for this wheelset, but testing it of course when coasting the freehub would "seize" and spin along the freewheel.
Anyhow, I'll try again later with a new set of bearings but really I'm at loss here.
Great video mate, what grease gun and grease do you use, I like it 😊
Hi Dave,
Yeah, great isn't it! Park Tool mate. Here you go:
Park Tool GG-1 Grease Gun:
amzn.to/3qOetWm
I enjoyed your presentation . I do believe the footage should be the view in detail (close up?) On the actual bearing , slower with better light.
Your thumbnail hast a small typo: "Freebub" ... Great video as always!
Well spotted, Garfie1d73, thank you so much for letting me know. Sorted. Was only a matter of time before I did that....... And I'm sure it'll happen again!!
Another great video with very clear instructions. What sort of cleaning agent do you use?
Hi Frank,
Glad you enjoyed it. The dirt wasn't too bad, so rather than dilute some degreaser, I was lazy and just used brake cleaner 🤣🤣🤣
Excellent video, two questions, 1. how were you able to deduce that the measurements taken equated to a 6902 bearing set? is there a chart that us mere mortals can use? 2. can you recommend a good after market bearing supplier, i have heard the NTN bearings are good? Thanks again, i really enjoy watching and learning..
Hi Alistair,
The quickest way is to search the size online. If you type into Google "Bearing 28x15x7", you'll get loads of results for 6902 bearings. However, the 6902 is the most common bearing, so I knew what it was.
Bearing recommendations. My rule is, if you want them to last, buy steel. If it's a budget job or, say a winter hack, I use basic steel bearings bought in bulk from Amazon. They run well, and last. Link below:
amzn.to/3SZ0gkp
However, if there is a request for a 'Branded' bearing, then I go to these guys, as they sell both Enduro and NTN:
www.airevelobearings.com/
Hope that helps, and glad you enjoyed the vid.
Jon
Great video, thank you. Which brand replacement bearings do you tend to use and where do you tend to get them from?
Hi Majid,
My rule is, if you want them to last, buy steel. If it's a budget job or, say a winter hack, I use basic steel bearings bought in bulk from Amazon. They run well, and last. Link below:
amzn.to/3SZ0gkp
However, if there is a request for a 'Branded' bearing, then I go to these guys, as they sell both Enduro and NTN:
www.airevelobearings.com/
Hope that helps.
Hi John, have you done a video on cleaning and lubricating a freehub, I am keen to understand the debate between light grease and lubricant etc? Many thanks, Tim
Hi Tim, This is an interesting subject right now. Until relatively recently, the advice from wheel manufacturers was to use a small amount of high quality mineral oil. Take Mavic for example, they've always sold their own high quality mineral oil. But now we're seeing more and more that wheel manufacturers are recommending a light coating of grease over the pawls. HUNT being a fine example of this. Although pawl design has changed, the fundamental mechanism of a ratchet system of some type remains. So, if the technology hasn't changed, why are we doing it differently? Additionally, the freehub contains small delicate moving parts....... Is grease the best thing to use in a place like that? Saying that though, grease will do a better job of keeping moisture out. I don't know what the correct answer is. Personally, I use a small amount of mineral oil on each pawl...... Works for me.
@@ribblevalleycyclist thanks John, when you say mineral oil do you mean the same stuff as used in mineral oil hydraulic brakes?
Hi Tim,
No. Like the stuff you'd use on your chain. This is my go-to general purpose workshop oil:
Fenwicks All Conditions Chain Lube:
amzn.to/45ZDNqQ
Always press one bearing at a time? or can press both the same time? Thanks for the excellent video.
I prefer doing one at a time, gives you more control over what each one is doing.
Hi Jon
I don't suppose you've tried the bearing puller on bottom bracket bearings have you? As in regular screw-in cups with bearings inside, not PF. I've got a GXP BB which goes through non drive side bearings like they're going out of fashion, looked at this bearing puller a few times but never pulled the trigger
Just down in the workshop now looking for an old BB that I can use as a guinea pig, but don’t have one. Basically, it’ll pull any bearing between 8-25mm, that it can grab from behind
I have a 15 x 28 x 7 millimeter sealed bearing that has failed catastrophically.
The inner-rings and ball-bearings fell out during disassembly, but the OUTER-ring only is still pressed inside the aluminum hub-shell.
Do you have a tutorial on how to remove a sealed-bearing OUTER-ring?
I'm guessing it must involve removing the opposite side bearing, and any axle sleeves, and then carefully reaching inside the hub-shell from the opposite side with some type of long punch, and gradually tap-tap-tapping the OUTER-ring out, if there is any surface available on which to make contact with a bunch.
Tks.
I would always advise, where possible, to pull the thing out straight. Do you have a puller set like the one I use? If so, just switch to a larger puller collet. I think it goes upto 25mm, so it may well grab the inside of that 28mm. If not, then yes, get the other side out, then tap out from the other side.
Good luck with it, and let me know how you get on.
Jon
May I ask you what did you put on the lower legs of the bearing puller? Is that a tap or something to prevent scratches? Great videos and I really like your narrative! Subscribed 😉
Adhesive pads that are designed to go underneath furniture feet to prevent scratches
@ribblevalleycyclist thanks and good solution
Awesome Job!
Thanks!
Does it matter if the preload tube is a tiny bit loose once you've put the bearings back in? It rattles around a bit horizontally if i shake it but would be secure once back on the axle. Nervous about tightening the bearing in more and getting the tube misaligned! Thanks
Hi, The short answer is, 'No'. The preload tube is there to stop you crushing the bearings, and applying too much lateral load when you do everything up. This biggest cause of damage to bearings is not radial load, but sideways lateral load. It sets the amount of preload between the two bearings, and stops it all moving. The key thing is to make sure the bearings are seated all the way down into the hubs. That tube will sit tight, once you do it all up.
@@ribblevalleycyclist great, thanks for the reply! I find these videos really useful. Especially with the advice on what tools to get that don't cost the earth.
@jrubinstein42 Got some more good tool videos on the way 👍
i love the video, and i was looking to get those press/puller sets you have listed. will these work on pretty much any bike bearing size? i have a tern GSD and it's got one or two unusually sized bearings, and I don't really see and specs listed for either of the sets. Thanks!
I've yet to find a bike bearing it won't deal with. The only issue you may face is what is known as an over axle drift. This is where the drift you need is a tube, that pushes the bearing in over the axle. This press set doesn't have the over axle drift.
Brilliant. One problem with a couple of my hubs is that they're old (orange) Easton hubs and its made of Swiss cheese. By the time I need to the bearings, the splines are so deeply notched, there's not much life left. BTW, does every bearing have an inside face vs an outside face? Some the seals are the same colour on both sides
Hi Ric,
Orange = Full Seal. A tight seal that prevents water getting inside the bearing
Black = Non Contact Seal. Seal isn't a tight fit, so water can get out.
Sometimes they use both. Full seal on the outside to stop water getting in. Black on the inside to let it out if it does get in.
@@ribblevalleycyclist great thank you!
Hi Jon, I’ve also seen tutorials were the space between body and preload tube is filled with grease, before putting the final bearing in place. Is there any harm in that or would it actually make a better moist seal for instance? Since you’re only applying a bit of grease on the preload tube I’m interested to know why to choose for either. Thanks! 9:35
I think this video is gonna be super helpful in helping me service my campy rear hub bearings. Liked and subbed!
One thing i noticed was what about the bearing remaining on the rear wheel axel after the hub is removed 3:18?
Any idea why Tactic Racing hubs use 3 bearings in the rear? At least that is my impression after looking at their spare parts list. Wonder if I'm also missing a bearing aside from the two 6803 NTN bearings i will place an order on...
Hi timtimzi,
That damage to the freehub body at 3:18 is known as cassette bite. It usually happens when the cassette isn't tightened enough, and therefore moves a bit.
Never stripped a Tactic hub, but you used to get a lot of hubs with a third bearing in the middle...... There was a reason for it, but I can't remember for the life of me why!!!
Interesting. I have to remove freshly pressed press fit BB cups, somehow I broke the sleeve inside. Wacking them out doesn't work, I'm scared to bang too hard. Can I use a tool like that to pull one of the cups out? I have a 3d printer and a BB press fit tool, so in principle i can design and print anything
This is the tool I use to knock out press fit BB's:
amzn.to/3OMsw7A
I did the same thing. The FSA BB has a sleeve it two parts so it's much easier to fit than the Shimano single sleeve.
I can't quite tell if the bearing puller collet, I think you called it, is just expanding against the inner ring of the bearing or is it actually catching on to the bottom edge of the bearing ring? In my Hub there is no space between the bearing ring and the sleeve separating the two bearings so I'm not sure what the bearing puller can actually grab onto. It's a very thin and tight joint between the sleeve and the bearing so I'm not sure how something could actually wedge in there and grab onto the bearing ring enough to pull it out. Maybe you could clarify what's going on in there?
Hi mate great vid just wondering if the press/puller sets would work with press fit bottom brackets?
Hi Ozzy, Press will, puller won’t, it’s too small. Think it’s maximum is 25mm
Ah gotcha thanks for reply have you got a link for the tool you use?much appreciated
@ozzzybeno889 Hi, this is the press I use:
amzn.to/3LI0oRC
Hi mate I meant the puller for bottom bracket!
@@ozzzybeno889 Hi ,
If it’s a press-fit BB, you don’t tend to use a puller. They’re usually knocked out from the other side using a tool like this:
amzn.to/3PpfTja
Obviously though, double check your bearing type.
Where can you find the appropriate bearing number for the size bearing you just measured? Is there a manual or industry guide?
The bearing number is normally on the seal
Agree with Aperfectcircle. However, it's always worth having the ability to measure, as the seal can corrode, or with some bearings, it's written around the outside edge, which can wear.
Google your hub bearing size
Great video!
Thanks!
Hey! Does it matter what type of bearing you use for the freehub? I need to replace bearings in an XDR freehub for Zipp 303s wheels. The existing bearings are marked 6803. Will any 6803 sized bearing do the job?
The important thing is that they are the same size. A 6803 bearing has a dimension of 17mm inner, 26mm outer, and 5mm width. My advice is to play it safe, extract them, and measure them. But any one will do the job, as long as it’s the same size
Would you ever go back to cup and cone? I just bought the FH-QC500-MS and the HB-QC400 Shimano cartridge hubs and I worried about how good they are. Any experience?
A good question, one I've not considered, until now. Yes, I would. C&C does require a little more maintenance, but as a person that is well-equipped for that, I don't really mind. I also get some pleasure out of the simplicity that C&C gives. You also don't need a load of specialist tools, just a couple of cone spanners. Up until recently, Shimano only used C&C. So, those Dura Ace wheels you'd see on bikes winning The Tour...... C&C.
thanks a lot for sharing. i wanted to service mine freehub (Cube hub) and it need to be unscrew from the non drive side and its terribly tighten. I´ve seen some freehubs that that pop out after removing the wheel. do you have recomendations of such hubs? the ones that i can easily remove the freehub, clean, etc? thanks
Hey Jon could you do some mountain bike videos?
Oh no, far too muddy for me 🤣🤣🤣🤣. Joking aside, to be honest Steve, I rarely get them in, as it's not something I usually deal with.
3:11 don't forget the most important must have.... a good brew
Mate ive a ebike and on the long side of the axle its just a axle theres no thread like most have so is there a way i can put a inner freehub in order to get a freehub on
Can you share the puller info ..of the top bearing
This was the puller I used:
amzn.to/4bGn9Rh
Hi can you tell me what degreaser you have used?
Hi, Sorry for the late reply. It's this one:
amzn.to/44CToxj
Thanks,
Jon
The proper way to do it.... Ground down screwdriver, same diameter socket and hammer here.... 👌 Oh and a nice piece of timber to rest the freehub body on 😎 and i meant your method the proper way 👍
If I said I’d never used a socket and a hammer to deal with a stubborn bearing, I’d be lying 🤥 😂
@@ribblevalleycyclist Nice one fella... Keep the DIY coming... Great content pal 👌
889 - it is me) salute from Russia, 2024🎉😊
Thanks for the vid! Can you do a video on replacing headset bearings for road and gravel bikes that have integrated cables.
I’ve done one on headset bearing replacement, link below. But not one on that includes internal routing….. Not had one in.
How To Replace Integrated Headset Bearings (AHeadset) - Road Bike Maintenance
ua-cam.com/video/nVTBMBjWPhw/v-deo.html
Good video Jon, for a man of a certain age this is 'bike porn' at its finest...it features a bike, a workshop, bike tools...what's not to like! 😉👍
Hi Pete, Glad you liked it. I'm thinking of doing a wheel bearing one too...... But I'll just have background music when I do the work.
Currently unavailable for both tool sets.
The same press set is available on eBay for £10 less
The links I shared are UK links, and they're still showing in stock. Worth pasting the product description into the search. But if there is a new one on eBay for £10, I'd go for it. I'd buy a spare one for that money!!!!
@@ribblevalleycyclist I think he meant the press is £10 less than the one in your link, not for £10. If they were £10, I'd buy all their stock and sell them on for £20 each!
@@jonford6119 Oh yeah, I see that now. Was a long day yesterday!!!! Would be good if they were £10 though 🤣
Where I live, time is expensive. Those tools are cheaper than the service fee i paid to have a new rear wheel fitted, pulling the parts off my old one and placing them on the new one. I was pretty sure i could do the work, but i went off their recommendation.
I was a bit bummed by the whole deal. Enough to start price checking their items. Seems like every item is $5 more than a big store like REI. Or any online retailer.
I find it sad, its where i got my 1st bike. But my frugal nature has me looking elsewhere. Im also not listening to mechanics anymore unless its via youtube or something. I can do all this work. I could have had a decent wheel machine and built my own wheel for the same money. Im new to cycling as an adult, it was my 1st time back @ my old shop. I wanted to be a patron so im okay with everything, but i wont be doing that stuff anymore.
I wish you didn't skip tightening the puller and tightening the press. So I could see how much pressure you use. You skip the last few seconds on both of those with the skip editing.
Sorry Logan, it’s a balance between keeping it short, whilst keeping it informative. Neither need a great deal of force……. if I had to guesstimate, less than 3-4nm. Or less than a stem bolt.
What if you dont have these tools? how can you remove those 2 bearings? ua-cam.com/video/QIbjsCwOr9c/v-deo.html
There are many hacks out there. It's down to patience, your freehub type and luck as to whether you can get them to work. If you're doing lots of bike DIY, then it's good to own these tools, because you'll use them on other jobs. If you're not, then you'll just need to buy a new freehub.
Good video b Ulisses bad