Blender + QGIS 3D Elevation Map

Вставка
- Опубліковано 5 січ 2023
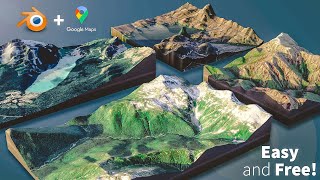
- This tutorial goes over the steps on how to export Digital Elevation Model (DEM) and Map Texture data from QGIS and add it to Blender to create a 3D Elevation model. By no means am I an expert at this, but wanted to show you some very basic steps on adding these datasets to Blender.
Useful links:
Blender - www.blender.org/
QGIS - qgis.org/en/site/
Digital Elevation Model (DEM) data - earthexplorer.usgs.gov/ - Навчання та стиль


Great explanations of the process.... Nothing omitted. Thank you!
Glad it was helpful!
Thanks....exactly what I needed! I've done this in 3dsMax, but was not sure about Blender...clear and concise video!
Glad it was helpful!
9:46 see how rendering is counting up the samples to "4096" at the end of the line on top? That is the "Max Samples" setting I wrote about earlier, you can bring that number down without quality loss, again depending on your requirements. But 4k for such a render is usually overkill. 1024 should do fine without great visible differences.
one thing to note, I believe you need to "merge" your two dem panels in QGIS before bringing into Blender. There is a seam, which you can see in Blender, just before you subdivide/smooth the model--that shouldn't be there
Great point, I appreciate the feedback
6:56 if you have a dedicated GPU card (Graphics Processing Unit) installed in your computer (such as Nvidia or AMD cards) you can speed up the display of your work significantly if you select it in the "Device" dropdown menu (2 lines below the Eevee/Cycles dropdown menu). You can enable it in the Preferences (very top left menu "Edit"->"Preferences"->"System" Tab in the right column, once 'System' is selected on the right of the column you'll see at the top "Cycles Render Devices", choose either 'CUDA' (if you have an Nvidia card) or OptiX (which is still CUDA but with AI enhanced denoiser for better quality) AND(!) tick the checkbox of the GPU below that (should say the name of the GPU, i.e. "NVIDIA GeForce ...."). You can additionally(!) tick the CPU box as well, it'll use the fastest method/ressource available depending on the task at hand.
Furthermore you may want to select the 'Experimental' option in the 'Feature Set' dropdown above 'Device', which enables experimental improvements in performance and/or quality. You're using Blender version 3.2.2, which has been around for a while, there's been numerous new releases since that version number was the 'new hot stuff', with a lot of improvements since. To make full use of the 'Experimental' selection you might want to grab either an Alpha version such as 3.5 Alpha or a more recent stable release of your choice, either LTS (long term support version, which are more suited for production use) or the latest Stable release version (which is currently version 3.4.1). Alphas being Alphas might break your files (not definitely, but potentially), so make backups of the files you intend to open with the Alphas (and of course don't ever open the backups in an Alpha if you want to be on the safe side). Usually the Alphas are fine to work with as well, they are the latest and greatest of what Blender has to offer and can handle your files just fine. It's just that there's usually a number of new features or improvements that may not be supported by older versions so if you save files from within an Alpha they might appear corrupted if trying to open them in an older Blender version that doesn't have the new features. Some Alphas might also be somewhat unstable regarding certain functions which aren't ripe yet so to speak.
TLDR: use your GPU when able, much faster. use experimental feature sets, even faster/better quality/less ressources needed or whathaveyou.
oh and you can reduce the 'Max Samples' rate as well if you want to have quick and dirty previews (below the "Devices" dropdown menu, there's TWO such options, one for the viewport display and below that one for rendering your scene). Generally they are chosen by a factor of 8 (so 8, 16, 32, ...,128, 256, 512, 1024, 2048, 4096, 8192). The higher the value the longer the waiting time and the better the quality - although some higher settings really don't bring visible differences so unless it's important keep the numbers down. A sample is basically a simulation of light-rays and light-ray-bounces and the resulting accumulative illumination on the surrounding objects/pixels of said bouncing light samples (if I understand it right. something along those lines).
If you chose to use OptiX earlier in the preferences also make sure to select OptiX in the "Denoise" dropdowns below the Max/Min Sample options as well (again two available, one for viewport and one for rendering).
anyways, sorry for the ramble, I hope this helps speed up your workflow
oh and if you have an AMD card don't use CUDA, they use something else. "HIP" instead of CUDA/ OptiX, I believe.
I appreciate the advice, thanks so much!
Thanks man
Hello and thanks for your tutorial. How can I set the accurate elevation of an area? I used the "Strenght" tool like you did at 4:55, but it's just "realistic", not accurate. Thanks for your time and answers.
Hey is there anyway mask the plane and just show the displacement area only? I want to be able to take the displacement and put it onto a different base.
hello sir, DEM is going below the mesh even the whole elevation of the place is positive
Is there a way to label some points with place name ?
How can we crop the boundary of the area we want from a base map?
Hi, I'm struggling with EarthExplorer. I can't download anything from them. I would like to extract the elevation data of France
There are other sources you can check out, such as this - www.eea.europa.eu/data-and-maps/data/eu-dem
@@gissolutions4604 thank you very much !
Hi, I tried your tutorial, but when I import the elevation image in Blender it appears upside down. I've never changed the software settings...can you help me to resolve this issue? Thank you for sharing these tips!
Thanks so much for the feedback. I haven't been able to recreate this particular issue...not exactly sure why that's happening for you...
Hey, did you manage to resolve the issue. I got that too.
This is happening to me too. I am also getting a double of my "elevation" texture. Like when I upload the jpg to the texture, 2 of the clipped DEM jpgs appear. 😕
I followed this but my map doesn't match up with the elevation. Also when I import my elevation image, it loads like a paper folded with the elevation in the middle, how do I fix that?
Sounds like the basemap is not aligning with the digital elevation? Perhaps try another area or something could be missed in the process. Keep me posted.
@@gissolutions4604 did a few locations and had an issue of the elevation being below the plane, but tried a volcano in Japan and it turned out fine. Thanks
How i can Exporting 3D buildings from Blender to ArcGIS
Thanks so much for reaching out. I’ll add this topic to my list of upcoming demo videos.
Can you render it as an animation
Looks like you can go to the Output Properties tab; click the small folder to designate a path, under file format change to FFmeg Video; under Container select MPEG-4 Select; you can change the Quality to a higher quality if you'd like; Finally, click the Render menu at the top and select Render Animation or Ctrl+F12. Wait for all frames to render then it'll save off to the folder you've designated earlier. Hope this helps?