Це відео не доступне.
Перепрошуємо.
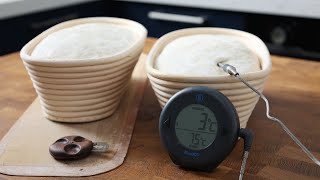
Sourdough Proofing Box

Вставка
- Опубліковано 18 чер 2020
- Update***
I added this video a couple of years ago and this setup has run perfectly since then. Barely uses any power due to the insulation, temperature is consistent throughout the chamber regardless of how much I load up the space. Cost was negligible if you can find a cheap old fridge or freezer.
Should work for any fermentation needs, not just dough.


I really like this idea. We have a old dorm room style refrigerator and I think I will be giving it a new life! Thank you for the idea! God bless you
You are most welcome!
great job mate , good set up for yogurt.
Ots all my grandmother used to do during the great depression in the 1920s
Thanks for all your comments. People like your grandmother knew what they were doing 🙂
Your fridge is pretty cool, could also use it for other types of fermentation. I have a similar setup with a heat mat in the bottom.
Hey thanks! I tried using a heat mat but it took 4 hours to reach 24 degrees C. The two globes heat it up in 10 mins.
MrMick1982 I have a heat mat and inkbird set up in the bottom of double silver bubbled insulation bags....big ones I get a monthly meat pack in. They can sit in the sturdy cardboard box, folded at top and use a clothes peg. Or the silver bags can fold flat. A nomadic solution.
I just wanted to clarify, do you keep the freezer operational and running while proofing or do you use it purely as an insulated box? Thanks for sharing the video by the way.
It doesnt really get hot enough for me to actually turn the freezer on however if you live in a warmer climate then yes you would want to plug the freezer in to kick in when it gets too warm. My recommendation however would be to set your thermostat so that there is a wider window between heating and cooling so that your heating and cooling at not competing against each other. Also dont set the cooling to only 1 degree as you dont want the condenser turning off and on all the time or it will age it quickly. If the freezer is well sealed this shouldnt be too much of a problem.
@@BrentMcLaughlin Thanks!! Looking forward to seeing the video of your latest project.
I got the same idea after watching the Brod &Tailer proofing box which goes to a 89 degrees celcius. For a long time I want to make an Arduino slowcooker with PID control. In that way I can use different size of pans for slow cooking, but the principle will keep the same. And the insulation of the fridge or freezer will benefit the efficiency of this 'slowcooker' (which I can off course also use as a proffing box).
My question to you or anybody else is: Can a freezer or a fridge be used for an inside temperature of 90 degrees celcius?
I've never raised it beyond the temperature for proofing dough. Would be interested to know your findings but yeah be careful.
@@BrentMcLaughlin Well, to be honest I think 90 degrees Celcius is a risk for a freezer, since it isn't build for it.
Cool setup. Where and how did you cut through the freezer to slip in your cables? Any worries about hitting a coolant line as you were cutting? Thanks
Hey Matthew, the hole for the cables is about 2cm in diameter. I used a circular bit on my drill. I have made a second one and haven't had any problems hitting a coolant line. This one the hole came out of the bottom centre of the fridge floor while the recent one I drilled in from the bottom centre of one side. I just go slowly. First I drill a guide hole then add the circular bit. The number of cables is 1 for the thermostat probe, two for the globes and one for the fan, so 5 in total. Just make sure you silicone up the hole once the cables have gone in to avoid moisture getting into the walls of the fridge.
I have now built three of these. The original one uses a freezer and the other two are fridges. All single compartnents
Looks great. What are the globes? They are doing a good job I gather. Thanks for showing this, using a freezer shell with inkbird and the heating lights and fan. Guess the concrete is a heat sink and protects above and below frames. Price is right. Could carry some dayglo.paint. Really good, like it.
Thanks! Yep the concrete sheeting helps keep the shelf above the globes from being a hot spot. The bottom one protects the plastic. Thanks for the positive feedback. I had to google Dayglo paint 😁
Brent McLaughlin well did you like it? A million hippies could not go wrong,
Very nice 👌
To keep the dough from sticking to the cookie sheet. when dough has proof on it under the roasting pan lid with the jar of hot water next to it remove jar. Use a metal spatula to. Pull dough off the cookie sheet.
This is so cool, I’m looking for something to control the prove of my pizza dough. Do you have any plans or video on assembly?
Hmm I am currently building another unit but im almost done. I should have filmed it as I went. If I get time ill try to do another video. Cheers
I'm very interested in the thermostat set up because I have one and if I set it for 30° i.e. The range of the temperatures from low to high is 32° for high AH and 26° for low AL. Is that right or could you set it up to be closer to the target temp? Thanks
How do you set the inkbird thermostat? Thanks
Hi Ana, I set the inkbird thermostat to turn the lights on (heat) at 23°C (73°F) and turn off at 24°C (75 F). Technically I have also set the freezer to kick in at 25°C (77°F) but the ambient temperature is usually less than 25°C indoors so it rarely turns on the cooling. That said the temperature is always around 23°C to 24.5°C.
When yeast breaks down as it ferment in the dough it creates carbon dioxide this carbon dioxide is what creates the bubbles in the dough as it proofs. While under the lid of a roasting pan. With a jar of hot water to maintain heat an moisture. Takes about 1/2 hour to proof bread dough dough it my way an doesn't require an expensive energy bill to do. Past the time it takes to actually bake it in the oven
When place tray in oven over night to rise. Repeat process one more time an make sure the oven is off. The insulation properties of the oven will allow it to keep warm an temperature constant tell ready to. Kne it one last time before bakeing
U don't need all that energy suckling crap to do it all u need is a.
1 a roasting pan pid
1 a cookie sheet.
1 jar of water microwaved for 3 minutes. At a time
1 thick clean towel
Take dough place it on the cookie sheet. Add jar of water in microwave tell water starts to boil cover it with the roasting pan lid an drap the towel over it to trap in the heat an humidity and let it rest. For 20 to 30 minutes. Tell water in jar goes warm.
Remove lit an towel check dough. Nea it once. Repeat the process 3 times. If u dont get to baking it right away set in the oven off. To. Rise over night. The dough may stick to the sides of lid. But it wont harm the dough back into a ball the last time. This allows for full fermentation and carbon dioxide. Created by the yeast to develop in the dough as it is proofing