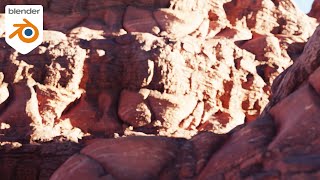
Easy Procedural Canyons with 3 Nodes

Вставка
- Опубліковано 2 сер 2024
- Follow along to start your adventures with procedurally generated canyons!
Grab the VALLY-Shader here: gum.co/VALLY
More Free Stuff: gumroad.com/markfaasen
More from me and some art:
Instagram: / mark.faasen
Twitter: / faasenmark
Artstation: www.artstation.com/markfaasen
Chapters:
0:00 Shader Creation
3:56 VALLY-Shader
5:49 Outro


Oh nice, thank you for this! Now I can build my own Canyons and hike through them. Very corona-lockdown friendly
Hiking simulator 2021
really great, i was literally planning to work on something similar myself today so this is a really good starting point for a landscape i was creating. many thanks and keep up the good work
Excellent and simple workflow. Thanks for sharing
Super creative and really helpful! Great work man. Every other mountain tutorial I find lacks detail.
I've been trying to figure out how to make canyons for a long time, but this is the best method I've come up with so far! Thank you so much!
Looks amazing! Thanks for sharing
Looks amazing to say the least!
WHOA DAMN!!! This is amazing!!! Thank you ✌️
Wtf, you did amazing! Thank you so much for sharing this! It’s beautiful! You even have a gum road we can play with? Man, what a legend.
Awesome tutorial! Congrats on your first video, it's really high quality.
thanks for the feedback! :)
That's crazy. Thanks man!
The quality on that thing is ridiculous! thanks for the vid🔥
Way easier than it should be. Glad I found this
This is Dope Thanks for this dude 👏🏻
Color ramp node is definitely the kings of all nodes :)
Nice work. Thank you.
I have been looking for something like this for years 😂🎉 excellent
super creative work.....really helpfull.
Great tutorial, thanks 😊
You are such an awesome person
This is great!
Cool! Thanks man!
Nice, thank you for sharing this video
Genius! thanks a lot men!
Wow this is really helpful 👌🏼
Best thing is I just got to understand noise and displacement a bit better. ¡Gracias!
That's Dope dude!
Sold! I'm a fan!
Wow!
wow!
I just downloaded Blender today to follow your tutorial. Wow! I was able to follow along and make the shader! In a few parts you moved pretty fast but I think that's OK since this is not a "how to use Blender" tutorial. I'm hooked, definitely going to be working with blender more.
Wow that is really amazing, well done Eric! Thanks for the feedback. I hope this is the beginning of your Blender adventures ;)
We always love more kitchen appliance users! The blender is the best kitchen appliance for artists! :D jk. love to hear it.
what a great tutorial
Thanks! So cool! :)
You are the best :)
I love you!
Wow. Blender is unstoppable.
thank you.
Neat. Nowadays you can do the same trick in Geometry Nodes.
Great tutorial, came from Reddit to show support, subbed :)
Bro I was trying to make my own maps by indexing the squares and jointing cert's, however thanks dude.... Maps here I come
This is fantastic and well done! 😎🤘🏼 +1 sub
Wow, take a bow! Great tutorial. Thanks a bunch. On my way to Gumroad to visit you!
Thanks! Means the world to me :)
wow
🤯🤯🤯
Bester Mann!
Very cool shader, thanks! Question, is there a way to reduce the detail of the mesh? My 12GB 3060 always runs out of memory trying to render it. Cheers.
EDIT: Got it, it's the adaptive subdivision, had to tune that down. Another question, is there a way to add an HDRI to the backdrop? It doesn't seem to work doing it the usual way.
Great Tut! Thank you for sharing. Just asking, is there any way to apply geometry from the diplacement nodes, so the geometry become permanent in order to reduce calculation from at the render step?
Thanks for the feedback, glad you liked it. Currently there is no built in way to do this. But it is possible to render from the top to get a heightmap. This map can be used to displace a plane in the traditional way. Have never done this tho...
@@MarkFaasen Nice hint !! Thanks, I think that should works
Это восхитительно... И как я сам до такого не додумался??
Subscribed :D
Oh hi mark
This is amazing, followed the tutorial but the one issue I'm having is I'm seeing a lot of jagged areas, mainly at the peaks of mountains. Any suggestions?
Thank you! This is so cool :)
How did you animate it generating randomly?
Can I scale this bigger and wider to be used for scenes for character models?
Amazing tutorial, Just wanted to know if it will work on eevee?
Thanks! As of writing, the adaptive subdivision and vector displacement is cycles only. You could bake the texture and use it with an regular displacement modifier, but that's rather hacky
Is it possible to add a directional texture (like canyon rock layers that are horizontally separated) onto a displaced noise terrain like this one? I'm trying to figure it out but it doesn't seem to work even with box projection.
Man, you just earned that FUCKING SUB
Wao, 😍 unbelievable, but sir one question please, I followed every step of yours but my canyons looking more flat. Could you please help me. It would be very helpful
Hey, without more info it's hard for me to to tell what could be wrong... Maybe try to apply scale or increase subdivision?
Hi sir, I noticed that I don't have Adaptive subdivision in subdivision modifier. I'm using blender 3.1. This might be the reason for flaty look of my canyon ?
Ah yes, might be. I think you have to enable experimental mode first. Maybe something has changed since 3.1
How do I upload the valley shader into a file that already has stuff in it (I made a plane and wanna flying it through the valley)
You can append the plane in the valley file from the the file that has stuff in it. But I tried to make fly through animation a while back with bad results because the adaptive subdivision messes up the mesh when the camera moves. You have to turn that of or bake the textures to a height map
This is very nice tutorial!
But one question...
How can i Render it?
hitting F12 will render using the camera (there are good tutorials for setting that up). Alternatively you can go to View>viewport render image to just render your viewport. Hope this helps
Yeah this doesn't work in my version of Blender (v3.0) despite following all your steps, using cycles experimental and activating Displacement AND bump in settings, it's flat, completely flat... maybe my version of Blender is flawed or something. Oh and when I added a noise texture it crashed LOL
I thought maybe I was doing something wrong, maybe I'd missed something, so I downloaded your VALLY file and opened it.... the plane was Flat, totally flat
Maybe this is something that can only be done with Geometry Nodes in my version
hmm yeah something might have changed, i havent tested it yet. But thanks for your feedback and telling me what you have tried sofar. I will check it out soon
This happened to me and I found that the height only shows in Rendered view in Viewport Shading, all other views were flat.
I am using laptop ,6gb 3060 nvidia graphic ,16 gb ram, ryzen-9 pls tell me which pc is best for smooth work in blender,currently its lacking
great, but when I didn't get it to look 3d when i went to Render Settings, displacement: Displacement and Bump" Still just has 2d texture on flat plane. Ideas?
It only shows as 3d in Rendered view
Is there procedural node or any method to make a open world for unity in blender
It's not very straightforward, I suggest you search a tutorial
I'm probably doing something wrong but when I select GPU render the displacement freaks out. CPU works in viewport but hangs when I click render
Update, it only does this when mapping is set to default values (moving or scaling fixes it). I'll leave this here in case someone has the same issue
damn
Hello, it was a very useful video for me, thank you very much. But even though I did the same things in order and chose 'displacement and bump', it didn't switch to 3d like yours, it always remained 2d. What can I do? I would be very grateful if you could reply...
what version of blender are you using? Are you in the rendered view?
I'm using version 3.2.. I just checked 'viewport shading', I need to enter render mode, it's fixed, thanks a lot! There is one more thing I would like to ask, if you have time, I want to model procedural based on a specific canyon that actually exists. Do you know if it is possible for me to add data such as height map or normal map and edit them in Blender as in this video? I'm not very good at Blender, but I need to use it for one of my master class...
@@edaylmaz8955 @edaylmaz8955 yes it's possible, just use a image texture node instead of the 3 noise nodes. But I believe it's better for you to search for something like "height map displacement" online :)
@@MarkFaasen Oo okay, this was very helpful thank you so much..
How exactly do Mungrave and Voronoi textures work? Im trying to implement this in godot
Musgrave evaluates perlin noise and voronoi uses worley noise. Check the blender docs for more details.
@@MarkFaasen Why exaclty does the Voronoi texture use different colors?
@@NikZapp i think its just random: docs.blender.org/manual/en/latest/render/shader_nodes/textures/voronoi.html
@@MarkFaasen Oh, thanks! I have figured it out!
hey, im having trouble with the displacement part of the video, i turned on displacement and bump and connected everything correct, so i'm not sure what's going on but i think it's the version im using
i downloaded the pre-made version and i figured out it was just my version being different
@@lakepants glad you figured it out! Which version did you have trouble with?
@@MarkFaasen im still using blender 3.0.0 because i was to lazy to update it haha
Hey man, It stoped working, can you fix it
Well my 1050 Ti can't render this xD. System is out of GPU. I need more GPU pls
could you give to me the code of this canyon?
there is no code involved to make this canyon
procedural make my pc blow up :(
Clickbait! This has more than 3 nodes. Just kidding, thanks a lot!
grate vid, keep it up :) (rn i feel like im flexing my subscriber count by commenting)
I will pay you back