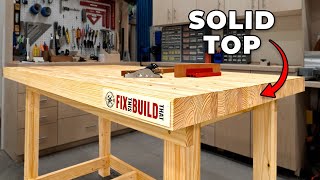
Easy 2x4 Workbench - A Simple Woodworking Shop Project

Вставка
- Опубліковано 16 чер 2018
- This Easy 2x4 Workbench is great for a small woodworking shop and can be built in a weekend from 2x4s and plywood.
GET THE PLANS: www.etsy.com/listing/62167595...
DGC Tool/Vac Switch: amzn.to/2llIuHr
Countersink Drill Bits: amzn.to/2taThIW
--------------------------------------------------
Visit my website and join my newsletter - www.thecarmichaelworkshop.com/...
--------------------------------------------------
Recommended Tools (affiliate links):
www.inventables.com/technolog... - X-Carve CNC Machine
amzn.to/2dy8cXn - SawStop Table Saw
amzn.to/2dy82iN - Craftsman Sliding Miter Saw
amzn.to/2dnLL3V - Dewalt Planer
amzn.to/2czmO8S - Craftsman Router
amzn.to/2dnMmmq - Dewalt Trim Router
amzn.to/2d5eGMi - Dewalt Jigsaw
amzn.to/2qMEEJf - Ridgid Spindle Sander
amzn.to/2Bq0vLy - Ridgid Cordless Sander
amzn.to/2cYSxOS - Dewalt Palm Sander
amzn.to/2d29D1Z - Jet 14" Bandsaw
amzn.to/2dnIUYG - 14 Gallon Shop Vac
amzn.to/2cYRKxt - Ridgid Drill and Driver Combo
amzn.to/2dnLiPb - Dewalt Scroll Saw
amzn.to/2cYRMWf - 1" Belt Sander
amzn.to/2dnzGQP - 8" Drill Press
amzn.to/2dy8Hkx - Lathe
amzn.to/2dnLyxK - Lathe Tools
amzn.to/2dvi41g - Kreg K4 Pocket Hole Jig
amzn.to/2dvgvAF - Glubot Glue Bottle
amzn.to/2dnKZ7b - Babe-Bot Glue Bottle
amzn.to/2czmszj - Momentary Footswitch
amzn.to/2dnAXHr - Freud 50 Tooth Thin Kerf Sawblade
amzn.to/2czmXcG - Microjig Gripper
amzn.to/2d5cQvh - Microjig Grip Blocks
amzn.to/2d5cPXW - MJ Splitter Thin Kerf
amzn.to/2dvgrAF - RZ Mask
amzn.to/2dfpl4f - Bench Cookies
amzn.to/2kPBHZn - Logan Point Driver for Picture Frames
----------------------------------------------------------
Recommended Supplies (affiliate links):
amzn.to/2di8UVz - Harbor Freight Flashlight
amzn.to/2cVkn1Q - Clock Insert
amzn.to/2d2ab7G - 3M General Purpose 45 Spray Adhesive
amzn.to/2dvfZ5x - Stick Fast Medium CA Glue
amzn.to/2d29MlU - Stick Fast Activator for CA Glue
amzn.to/2dfnBbd - Titebond II
amzn.to/2dnLvSn - Loctite Epoxy
amzn.to/2dfrpZE - Transtint Dye
amzn.to/2cYTwyG - Deft Spray Lacquer
amzn.to/2dnD9Pv - Johnson Paste Wax
amzn.to/2dfkbVT - 10-14 Gallon Shop Vac Bag 3pk
--------------------------------------------------
Follow me on:
Etsy - www.etsy.com/shop/carmichaelwo...
Facebook - / thecarmichaelworkshop
Google+ - plus.google.com/u/0/111000674...
Instagram - / carmichaelwkshp
LumberJocks - lumberjocks.com/scarmike67
Pinterest - / pins
Tumblr - / thecarmichaelworkshop
Twitter - / carmichaelwkshp
Website - www.thecarmichaelworkshop.com
WoodTube - woodtube.ning.com/profile/Stev...
--------------------------------------------------
Music selected from the UA-cam Audio Library:
"While You Work It" by Dan Lebowitz - Навчання та стиль


I love you added in the center the shelves for your tool organizers!!! It not only looks clean and organized but I don’t know it satisfies my ridiculous ocd
Very clean build Steve. Im sure its a great upgrade for yours wifes side of the shop.
Hi Steve hope all is well with you. Another nice video project. Your always so upbeat too, that's great. I just wanted to say that I made another of your "Twisted Christmas Trees' this time for a charity auction for my nephews little 8 month old baby girl with Leukemia. It sold for $150.00 and was a big hit. Thanks again Steve for all your inspiration.
Hi Tommy, yep all is well here. Same to you. Good to hear about the tree, that's awesome and I'm glad you could use the idea. Thanks for sharing that with me.
Bought the plans for this for my new garage. Can't wait to get it built after the electrical is in. Thanks!
That smile is contagious!!!
Well thanks! :)
This whole video was worth just learning my new favorite word. WOMPERJOG!!!
Ha, yep, I learned that one from my aunt about 40 years ago. Whomperjawed!
Great job, stud!
Great! A new weekend project for me! Lol looks great!!
Nice upgrade.
I really like the central storage for the tool trays. That is a great idea.
Peter Brown I think I was commenting on your video when you were commenting here.
Thanks Peter! It needs a cool ice blue table top though.
Simple design, clean lines. Looks great!
Hey Troy, thanks!
I think I was just your first subscriber! Now you have to post a video. ;)
What a neat little project, Steve. I really like the center compartments for the containers. I see that someone has stamped your nickname all over the lumber at my local big box store. Isn't that vandalism? 😜 Keep up the awesome work!
Thanks Tim! Those pesky stamps and stickers cause me more work. lol
Nice work, Steve. I have to admit that for a split second there around 2:50 I was thinking, "Oh no, you're gonna wanna add a toe kick area'". This is why it pays to watch the whole video before commenting! Scott
Ha, yep, the casters make it mobile AND you get an instant toe kick. I always drop stuff and it rolls right underneath it though. lol
Wow! Looks great. I love the container rack.
Wonderful Job!! loved the project!!
Nice video as always Steve, thanks for posting.
Word of the day.... Womperdog!!!
Yeah, whomperjawed. Learned that one from my aunt about 40 years ago.
Great workbench. I like how you customize it.
Sweet project
Thanks for making it look so easy. Well explained.
I’m a big fan of your work Steve. Keep bringing in good content!
Why do I always leave your videos smiling?
Steve's demeanor is awesome. I watch these again to cheer me up :) :)
Nice bench steve thanks for sharing your work
Man... I hate it when my projects get all “ whomperjawed “ too. Hahaha. Nice workbench Steve! Enjoyed it brother!!
Ha ha, I learned that word from my aunt when I was a kid. 'Crooked' just doesn't describe the situation as well. lol
A Glimpse Inside surely he meant 'cattywampus'...
Brilliant, yet a simple desing for any DIY to make it.
Nice project Steve! Thanks for sharing it with us.😎👍JP
Nice workbench/storage Steve, Great build
This is a great video Steve! Getting great storage doesnt have to be expensive. This bench is awesome and very functional!
Great videos and projects as always. Thanks for all your great tutorials
Nice - I like the idea to use the hardware organizers as drawers.
Nice build!
Another great build Steve. Simple and strong work table!
Thanks Mac! Happy Father's Day!
Nice build Steve! I've been wanting to build a small out feed table with similar construction for my table saw. Thanks for sharing!
Love this idea. I am going to make one with my shop-vac in one end and my air compressor in the other
Simple, clean design. Very straight forward. Looks like a great project for anyone in need of such a bench, even for the beginning woodworker. Economical too! You did it again, Steve!
Very sturdy & well made Steve, I always love the look of spare parts holders in an organised manner, fantastic channel & fantastic host 👍👍👍
Really nice! I might attempt to make this.
great job
That was a nice upgrade. I'll have to get some of those storage containers, from Harbor Freight.
Very convenient!
well turned out. everything fell into place.
Nice simple bench there Steve. Just a point to remember, if anyone wants to make this for their garage workshop, just remember that a garage floor has a gradient towards the up-and-over door so you may need to adjust the length of the two legs nearest or towards the door. I found out the hard way before a builder told me about the slope of a garage floor. Have fun people.
always smiling :) , nice tutor sir
Great video keep it up
Nice project, and organization all in one. Solid work, Steve
Thanks Paul!
Great job. Love your vids bro
Great video, I really like storage been rack. Looks good and would keep me from shoving them all over my shop. Thanks for the great work.
Great video Steve, thank you for posting it! The workbench looks fantastic. I will probably build one once my shop is complete. Keep up the good work!
Thanks! It makes me look more organized than the old one did. lol
That looks great Steve, I am planning to put a skirt on my workbench to stop things rolling underneath the bottom
Dude, your enthusiasm is infectious...kinda reminds me of the good version of Biff on Back to the Future (FYI, that's a compliment, not an insult). Great Job!
Just caught this video, Gotta love youtube notifications :/ , I like the storage in the middle. May have to go build a few of these for the garage. Thanks for the ideas bubba.
Pretty cool bench
Thanks John!
Congratulations mister The best 🗽🇧🇷
Love your videos
Thanks!
Good video nice project.
Steve you stud muffin.....lol
I like the storage bin idea....have a great week
Loving the Bench Steve, Nice job my friend, I think I am gonna have to nick that idea as well as your idea for the sticker board, Geeez, I will be paying you royalties at this rate. (lol) Keep up the great work Steve, Cant wait for the next fun instalment. Regards to the family, All the best from North London UK.
I love a good organization video. So satisfying. Awesome job!
Do you have a link for the switch you showed at the end? I couldn't find it in the description.
Hey thanks, yes, I got this one - amzn.to/2llIuHr
It is pretty cool and works great.
Ridgid needs to send you a new table saw!
Nicely done Steve. I just noticed the fold down wing on your table saw. That's a great idea!
Hey, thanks! Yeah, that wing sticking out was an awful hip gouger. They are regular door hinges. I keep a bolt and nut hanging on it, so if I ever need to fold it up, I just use the bolt and nut through one hole to hold it up. But it's been years since I needed to fold it up.
Fancy you and I having the same nickname! I guess you used to build interior wall frames too. Enjoyed that Steve and loved the choice of music. Thanks for sharing.
Thanks Stephen
I just wanted to say thank you for making your videos. I really enjoy watching them, your personality and energy for woodworking always makes my day better. Keep it up!
Thank you for watching and commenting Nate! That's really good to hear and comments like yours keep me going. I just got back from a late night lumber run for my next project.
Great video Steve. Looks like you had a ton of fun build that sharp looking new work bench. Here is wishing you a great Father's Day and a wonderful summer my friend.
Thank you very much Michael! Same to you!
Hey Steve that was a really good video strait to the point and very well explained. I'm just getting started in wood working , and I love your videos please keep posting them because they really help me out.
Thanks, that's good to hear. Let me know if you have any questions or would like to see me build something in particular.
Great job, I can use something like that for my chop saw and vacuum.
Thanks Alan! I'm about to make a similar one for my planer with a vac and dust collector underneath. Could use one for my miter saw too.
Muito bom, simples e eficiente!
I’d add shelves for tool storage in the center and I’d swap out the 2nd shop vac for my air compressor. Great and simple build!
Hi Johathan - Good suggestions! A small air compressor would fit perfectly. I need to downsize to a smaller one actually because the old one I have takes up too much space for just inflating tires occasionally.
Awesome bench. I would remove one vac and add shelves for storing veneer. Also add a small tool rack to top for my most reached for small tools. So many possibilities! Thanks for sharing.
Thanks! Good ideas! I like the tool rack. I want to put a bigger pegboard on the wall now and will need a spot for the cordless tools.
Very nice build, and obviously catered to your specific needs! I might suggest/consider:
- Lockable wheels.
- One shopvac connected to both machines (this has already been mentioned).
- If you push the compartment boxes all the way in (it appeares to be space behind them) you could add a door in front of them, with hooks or shallow shelves on the inside of that door.
- Depending on the wear and tear it will be subject to a sacrificial surface of thin (3 mm, 1/8") hard board might be considered.
You are one kd stud!😉
Ha ha, thanks man! lol Those stamps and stickers irritate me, except for the free barcode sticker I left on my sticker spinner.
Nice looking workbench you got there!
I also had to say... I haven't met many people who have the nickname of Pine.
Really nice bench tho, seriously.
I used the same amount of materials to make me a miter saw station for my garage so the materials can be customizable. However, I didn't get all the storage solutions that you have, so I will be modifying mine soon.
Great video as always! Hope you're not getting cooked just yet there in the ATL area.
Hi Nick, thanks! It is around 90 degrees these days. We got new insulated garage doors, but the afternoon sun really heats it up. Working at night and weekend mornings helps though. I have to tackle my planer and miter saw stands next.
Besides the great job with project, that smile made me sub this channel.👍🏻
Great, thank you very much! More videos coming soon.
Nice job mister...this deserves a subscribe 😁😁😁
Thank you Alex!
Great project Steve, I have to build me one.
Thanks Jose! You should. It's easy.
Like the VAN HALEN tool box.
One customization I always like to make, in an application where I want a bench or floor cabinet sitting firmly without 'scooting', yet able to roll when I want it to, is to mount the four casters on 'rocker boards' front and back, which pivot on hinged points at the very back and the very front, and angle up in the middle causing the casters to retract up under the bench or cabinet, as they angle up and in toward each other, so it's sitting on the skirt or legs instead of the casters. Then using a lever on the side of the bench that is attached along the top outer edge of the rear rocker board, and also slips or rubs along the top outer edge of the front rocker board, you would push down on the lever with your foot so as to push down the two rocker boards and bring them flat into the same plane, causing the casters to extend down past the leg or solid bottom, and able to roll. The down position would be held in place by the lever arm latching slightly sidways like a ratchet up under the edge of a block on the side of the bench. For a wider footprint like this bench, where it's not practical to have two long rocker boards running left to right along the length of the bench, one in the back and one in the front (as you would for a less wide cabinet), it would be a lever and two wheels on shorter rocker boards, one such assembly on the left and one on the right of the bench. You'd also need to move those side pieces supporting the lower shelf, from under it to on top of it, to not interfere with the lever engaging the top outer edges of the rocker boards. You might also think about extending a 3/4" skirt front and back a few more inches, to give a deeper recess for the casters to retract into. The deeper up into the skirt they can retract, that will improve the angles of the rocker boards, and the closer to the back and front of the bench the casters can be mounted, instead of toward the middle too much.
Good suggestion! I think I saw Norm do something like that a long time ago. This bench will kind of just sit in one spot and I don't expect to be applying much force against it since it's just sanders and a drill press. The wheels do have brakes though. I got a Rockler caster set that works similar to what you describe, but each wheel mounts separately and has a built-in lever that raises the bench. Pretty cool.
Nice
Thank you Ronna!
Steve, enjoyed it buddy.
Thank you very much!
Whoa...a sub? I'm tickled pink, thanks! With my other username I've followed you for years, that made my day!
thanks steve
Thank ya John!
Hi Steve 👍🏾👋👋👏👏👏👏👏
Your nickname is KD? I've never heard that one before. LOL! Nice workbench Steve.
nice one great basic to buid and make custom. I would put 2 2X4 to make corners to make it stronger
I thought about doing that, but I'm surprised at how it doesn't budge like it is. I think the dividers in the middle help prevent any side to side wiggle.
I like your show your so up beat.
Thanks Gary! :)
Harbor Fright just changed the width of those parts bins to 17". Just kidding! Love cheap projects! Hope you're well Steve. Cheers, Chris.
Ha ha, it's funny you say that because I went to HF to make sure they still sell them and they are the same size. Subject to change though. lol All is well here, hope all is well with you Chris!
Excellent work Steve how are you and your family getting on?. It turned out fabulous. Just perfect timing as well as i am going to be building A work bench for my new shed.
Thanks 😊 keep up the excellent work... All the best from (Thomas) Scotland,
Thanks Thomas! We are doing well, had a good father's day dinner today. Hope you and yours are doing fine as well.
I like it and a great update with the old one... Get orgenized :-)
Looks great. But personaly i should paint it.
Wow looks great. I am working on a workbench right now. It is hard for me , I live in my work shop 11' x 25'
Thanks Bryon! My shop is about that size, 12'x22". I pretty much have a workbench in the middle with tools around the perimeter. I've found that narrow/compact tool stands and benches save a lot of space.
Once again another great video for me to borrow from. (Thanks) I need a center workbench for my shop & that gave me some insight. (Do you have a video where you show a complete 360 of your shop, & if not have you considered taking us on a tour of it?
Hi Jason, cool, I hope you get some ideas from this one. It has been a while since I did a shop tour. I need to do another one after I finish the reorganizing I'm working on.
I have a 16 x 24 work shop & man did that thing fill up quick. I'm hoping with yet another straightening up & reorganization I can start making it work for me. Thank you for your videos & best of luck on all of your future projects.
Great job Stud. I don’t know how you manage to keep your shop so organized all the time. That bench turned out perfect for that space. You must have recorded this a while ago because it’s so dang hot right now I can’t imagine you filmed it in the past week. Let’s get together sometime soon.
Hey Chad, I made it about 10 days ago but at night after work and early mornings on the weekend. It has been hotter in my garage than outside though. We should do something.
Steve Carmichael sounds good!
I put a portable ac unit in my garage (in hindsight would do a mini split next time) with the hoses going through permanent dryer vent like holes I made. Insulated garage door and blew in insulation in attic. MUCH more comfortable (75 degree attainable even during hottest part of the day) during my FL summers!
It's 2-3X more for the mini split. Is it worth it? I can get a portable A/C heater for about $275
ManCraftingTM, I have a 1 car garage and have made efforts to seal it up better and insulate, but I still would prefer for a more powerful unit. I bought the most powerful and best reviewed one off Amazon a couple years ago (whynter is the brand) for $500ish. I don't think it's powerful enough with how long it takes to cool things down.
That is with keeping outer door closed and 1-2 fans going to help circulate the air. The machine practically has to be on all of the time to maintain. Though it does cycle the compressor on and off when it senses it has met a temp goal
So a mini split would get me the floor space back AND be more powerful. Not that I have any windows, but my HOA doesn't allow window units anyway
Nice job, that bench looks great. I am just wondering, have you ever considered a single large dust collection setup instead of separate vacuums?
Hey, I have thought about it. I just don't have the room for one. I do have the Rockler wall mounted one under my CNC and could use that, but I don't think I would like the look of pipes running everywhere. Plus the pipes, fittings, gates seems like it would get expensive.
Nice project and I like the simple construction, more than "handsome" enough for a workshop! But... 60 dollars? I have calculated what the material would cost over here in my country:
7 - "2x4's" (planed, and of course as close as possible in metric) 70 Euro
1 - Sheet of plywood at (16mm thick around 65 Euro) 22 mm thick 85 Euro
So with the 16mm plywood, the materials would add up to 135 Euro (at current rate 157 Dollars) The wheels would be around 36 Euro... so, all in all, you could say to make the same bench it would be around 200 over here. (and that's in local pine, which grows fast so is a way worse quality) It still is a nice way to make a workbench! Too bad you didn't need to buy 8 - 2x4's - I hope we'll compete in that challenge again someday! Greetings from Portugal!
Hey, wow, that's a lot. No wonder you use reclaimed lumber...I would too! Brian is doing his birdhouse contest now, so maybe we can do that one.
Nice bench, Steve! You got any plans to reuse the old one somewhere in your shop? I'm about to build a new bench that will hold my bench top jointer and my lunchbox planer. I plan on using 4 x 4's for the legs to support the tools and the material I run through them.
Hey Dave! I took the old bench apart already. I'm going to use some of that wood to make a planer cart with a vac and dust separator underneath. 4x4 is a good choice since they are so heavy and need more stability from the pushing and pulling.
Nice build Steve. Do you find the shop vacs do a good enough job so that all your bins don't get covered in dust?
Hey Dale - There is constantly a fine layer of dust on everything because I don't have dust collection on some tools. I use a mini-cyclone for the bandsaw and that works great. I want to get an overhead Wen dust filter thing to help with the airborne stuff from the table saw, etc.
I really enjoyed learning how to make this bench! Maybe even I could do it. :) May I ask what the spinning thing is in the upper left of the screen in the back? Thanks for sharing this!
Hi Ellen! Glade you liked the video. I'm sure you could do it. The woodworking youtubers swap stickers and display them in each others shops as a way to spread the word about other DIYers. I made a sticker spinner using a disco ball motor, so I can display a lot of stickers in a small space. I may need to make another one soon.
Someone is an Eddie Van Halen fan
How stable is it, Steve (with the casters)?
Good video Steve. What do you keep in your parts bins under the workbench?
Thanks David! The main one on top has different screws. There is one with bolts, nuts, washers. Another with hooks, latches, hangers. One with drill bits, screw bits, etc. Various screws, nails, wire nuts, etc in the others. Still some empty space in them.
Why do you use rigid? What brand do you recommend for someone who is 18 and likes to do projects like these? (I have a 2 Milwaukee m18 and m12 battery’s. And Milwaukee drill, impact, and sawzall)
A few reasons... The sander has been great. I often get Home Depot gift cards I can use and they have good combo sales too. They have a lifetime service agreement and will repair/replace tools and batteries. Milwaukee is good - I like the red. I think any of the brands would be fine these days for projects. For cordless tools, I'd look for a brand that has all the tools you might want so they can share batteries.
Cool project, your nickname is KD HT?