When you're in the UV Editor, you can mark the vertex on the 2d screen, and while hovering with your mouse over the 3d viewport, you cam press ",", it will take you straight to where it needs a seam
Thank you for your wonderful comment! We're delighted to hear that you found the tutorial simply perfect. It means a lot to us that you appreciate the time and effort we put into creating these videos. Your support and encouragement mean the world to us. Stay tuned for more tutorials and happy creating! 👍😊🙏😍
Hope you will continue doing these great tutorials! Imo I think that your videos are not getting as much love and views as they desserve and wish this will change very soon👍
Thank you so much for your kind words. Your belief in our videos means a lot to us and with your support, we're confident that positive change will come
incredible content man! I did not even have Painter but I will still watch all of this! Did you get my links with references for that historical helmet? UA-cam hide it or removed it because of the links.
Thank you for your kind words! Even if you don't have Substance Painter, we believe you can still benefit from the tutorial. We didn't receive the links as UA-cam may have hidden or removed them due to their policy on external links. Please email us at pixlways@gmail.com
If you have an issue importing a model into Substance Painter and the objects become transparent , go back to blender select that object mesh -> normals -> Flip ; export as same file name then reimport mesh
I think you dont explain enough the "why" behind your actions. why marking the seams, why those ones for example. I mean maybe this tuto wasnt meant for begginers, but for the part 1 i had 0 problem to follow along, and i learnt a bunch. For this video i just feel like copying what you're doing d without even understand it.
Thank you for your question! The normal map used in the tutorial can be found in the description below the video. We have provided links to the resources and assets used in the tutorial. Simply check the video description for the relevant information and links. If you have any further questions or need assistance, feel free to reach out. Happy creating!
@@pixlways thanks for the tutorial - just a heads up: those links don't currently seem to be working for me (getting a timeout on cloudflare or something)
My UV for the first part of the tutorial is all coloured in the UV Editing, but I’ve done everything as shown in the video twice, and I can,t figure out why. I’ve also noticed that every time I press L in the UV editing window, the colours of the stretch change, and sometimes some parts of the mesh unwrapped become blue, but all the other have like a gradient on it. Any suggestion? 😢😢
Here's a video of what is happening ua-cam.com/video/Ggx6W3jVQHQ/v-deo.html I've also downloaded your model and, even if your texture shows correctly, in the UV Editor i've the same "problem". Is it a real problem or am i just missing something? Thanks
It appears that your islands are not properly unwrapped, or the seams may be on incorrect edges. Please select your islands, press 'U,' and choose the unwrap option to see if that resolves the issue. If the problem persists, kindly send us your file via email so that we can further investigate and provide assistance.
@@pixlwaysehi! Thanks for the answer 🙏🏻🥲 I’ve tried also to unwrap a simple cube from a new file, and I’ve the same problem. I’ve read on the internet that could be a bug related to the M1/M2 Apple processor Btw I will try to unwrap everything another time, but I’m pretty sure that I have done everything correct 🥲 (Where can I find the mail?)
If you have the same problem with the simple cube, then it's not necessary to unwrap everything again. Try a different computer. Here's the email address: pixlways@gmail.com
@@pixlways Hi! I think I've resolved the issue. I've read on some forums and I've figured it out that is a bug related to Metal GPU Backend. In fact i have a Mac studio with M2 ULTRA and with blender 4 there's not possibility to change the GPU backend on a Mac with silicon CPU. So i've downloaded blender 3.6, switched from Metal GPU Backend to OPEN CL and all my UV are blue. Unfortunately is a bug that is present since blender 3.5 :( Btw thanks for your support and congratulations for the awesome tutorials you're doing. Thanks
Mark Seam - Allows you to manually define seams by selecting edges. Gives you precise control over how UVs are laid out. Smart UV Project - Automatically calculates seams and unwraps the mesh based on geometry. Fast and easy, but less control. In general: Mark Seam = manual seam placement. More control. Smart UV Project = automatic unwrapping in one step. Quick but less customizable. So Mark Seam is preferred for complex models needing fine control. Smart UV Project works well for simpler assets.
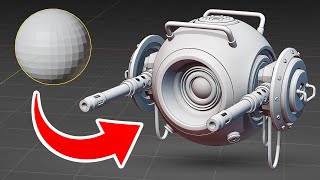
Is it impossible to use such a model in game engines to create games? Isn't it considered high-poly? It will slow down a lot. why was there no baking on the low-poly model?
This is a high-poly model and is not intended for use in game engines. However, if you wish, you can create a low-poly version and transfer the high-poly details onto it through baking.


Shift+R - made my day!
You are a real magician and an amazing master! Thank you so much for your hard work and your videos! I wish you good health and your loved ones!
Thank you so much for your kind words!
hi if u have that texture image can u send me please because the site is not working for me
Excellent. Don't be too tired. You choose beautiful models. And it is very informative and attractive. 👌👏👍
hi if u have that texture image can u send me please because the site is not working for me
When you're in the UV Editor, you can mark the vertex on the 2d screen, and while hovering with your mouse over the 3d viewport, you cam press ",", it will take you straight to where it needs a seam
Simply perfect! 👍👍Thank you for putting so much time and effort in making these tutorial videos.🙏😍
Thank you for your wonderful comment! We're delighted to hear that you found the tutorial simply perfect. It means a lot to us that you appreciate the time and effort we put into creating these videos. Your support and encouragement mean the world to us. Stay tuned for more tutorials and happy creating! 👍😊🙏😍
hi if u have that texture image can u send me please because the site is not working for me
This was an awesome tutorial! I never had this much fun following a tutorial. The result is amazing! Do you plan to make other hard surface tutorial?
Great tutorial thanks for showing and explaining each step of the process 😃
You're very welcome! I'm glad you found the tutorial helpful, and I appreciate your positive feedback
hi if u have that texture image can u send me please because the site is not working for me
Best one yet! Thank you!
YOU are the best Loshke, thank you for your comment and support!
@@pixlways always!
hi if u have that texture image can u send me please because the site is not working for me
Hope you will continue doing these great tutorials! Imo I think that your videos are not getting as much love and views as they desserve and wish this will change very soon👍
Thank you so much for your kind words. Your belief in our videos means a lot to us and with your support, we're confident that positive change will come
hi if u have that texture image can u send me please because the site is not working for me
For the next video, please make a keyframe animation tutorial video with this model
Thx for you perfect content 😍❤
Thank you Naser for your kind words! Your support and appreciation mean a lot to us 😍❤
hi if u have that texture image can u send me please because the site is not working for me
Such a helpfull tutorial 🤩♥️♥️
31:25 tip for finding n-gons
Thank you so much!
hi if u have that texture image can u send me please because the site is not working for me
Thanks for the tutorial! Please tell me, why do you use a common UV, but different materials?
Amazing 👍🏻
Thank you Arman!
incredible content man! I did not even have Painter but I will still watch all of this! Did you get my links with references for that historical helmet? UA-cam hide it or removed it because of the links.
Thank you for your kind words! Even if you don't have Substance Painter, we believe you can still benefit from the tutorial. We didn't receive the links as UA-cam may have hidden or removed them due to their policy on external links. Please email us at pixlways@gmail.com
@@pixlways done
If you have an issue importing a model into Substance Painter and the objects become transparent , go back to blender select that object mesh -> normals -> Flip ; export as same file name then reimport mesh
Thanks brother
Great tip! Sometimes those little tricks can save a lot of frustration. Thanks for sharing! 👍😊
CAN U MAKE A VIDEO FOR RIGGING TO THIS MODEL
36:03 where did the old material go? where did you put it
the texture site is not working for me is anyone please provide me that rougness and normal maps please
Iam facing errors acceptable texture file name can you please help me
I think you dont explain enough the "why" behind your actions. why marking the seams, why those ones for example. I mean maybe this tuto wasnt meant for begginers, but for the part 1 i had 0 problem to follow along, and i learnt a bunch. For this video i just feel like copying what you're doing d without even understand it.
Yea...you right!!!! it's just for copy/paste.
Yappatron 5000 💀💀💀
where can we get those normal maps from 1:13:20 onwards?
Thank you for your question! The normal map used in the tutorial can be found in the description below the video. We have provided links to the resources and assets used in the tutorial. Simply check the video description for the relevant information and links. If you have any further questions or need assistance, feel free to reach out. Happy creating!
@@pixlways thanks for the tutorial - just a heads up: those links don't currently seem to be working for me (getting a timeout on cloudflare or something)
hi if u have that texture image can u send me please because the site is not working for me
Oh no!
I can't continue... I can't afford substance painter. :.(
💚💚💚💚
My UV for the first part of the tutorial is all coloured in the UV Editing, but I’ve done everything as shown in the video twice, and I can,t figure out why. I’ve also noticed that every time I press L in the UV editing window, the colours of the stretch change, and sometimes some parts of the mesh unwrapped become blue, but all the other have like a gradient on it. Any suggestion? 😢😢
Here's a video of what is happening ua-cam.com/video/Ggx6W3jVQHQ/v-deo.html
I've also downloaded your model and, even if your texture shows correctly, in the UV Editor i've the same "problem". Is it a real problem or am i just missing something?
Thanks
It appears that your islands are not properly unwrapped, or the seams may be on incorrect edges. Please select your islands, press 'U,' and choose the unwrap option to see if that resolves the issue. If the problem persists, kindly send us your file via email so that we can further investigate and provide assistance.
@@pixlwaysehi! Thanks for the answer 🙏🏻🥲
I’ve tried also to unwrap a simple cube from a new file, and I’ve the same problem. I’ve read on the internet that could be a bug related to the M1/M2 Apple processor
Btw I will try to unwrap everything another time, but I’m pretty sure that I have done everything correct 🥲
(Where can I find the mail?)
If you have the same problem with the simple cube, then it's not necessary to unwrap everything again. Try a different computer. Here's the email address: pixlways@gmail.com
@@pixlways Hi! I think I've resolved the issue. I've read on some forums and I've figured it out that is a bug related to Metal GPU Backend. In fact i have a Mac studio with M2 ULTRA and with blender 4 there's not possibility to change the GPU backend on a Mac with silicon CPU. So i've downloaded blender 3.6, switched from Metal GPU Backend to OPEN CL and all my UV are blue. Unfortunately is a bug that is present since blender 3.5 :(
Btw thanks for your support and congratulations for the awesome tutorials you're doing. Thanks
What is the difference using Mark seam and smart uv project?
Mark Seam - Allows you to manually define seams by selecting edges. Gives you precise control over how UVs are laid out.
Smart UV Project - Automatically calculates seams and unwraps the mesh based on geometry. Fast and easy, but less control.
In general:
Mark Seam = manual seam placement. More control.
Smart UV Project = automatic unwrapping in one step. Quick but less customizable.
So Mark Seam is preferred for complex models needing fine control. Smart UV Project works well for simpler assets.
hi if u have that texture image can u send me please because the site is not working for me
podrias pasar el archivo de blender con los uvs?
Archivo de proyecto agregado. Puedes descargarlo desde aquí:
pixlways.gumroad.com/l/robot
Is it impossible to use such a model in game engines to create games? Isn't it considered high-poly? It will slow down a lot. why was there no baking on the low-poly model?
This is a high-poly model and is not intended for use in game engines. However, if you wish, you can create a low-poly version and transfer the high-poly details onto it through baking.
hi if u have that texture image can u send me please because the site is not working for me
Strong argument for texturing in Blender.