Це відео не доступне.
Перепрошуємо.
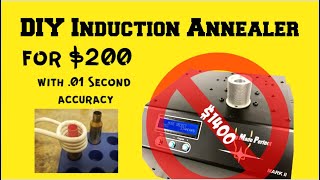
DIY Induction Brass Annealer for Under $225 - AWESOME!

Вставка
- Опубліковано 24 жов 2022
- Check out how well the DIY Induction Brass Annealer works. Up your reloading game and build with all parts for under $225.00.
Shout-out to North Texas Tactical for the original build list and demo
• DIY Induction Annealin...
Links to items used - (affiliate links)
Link to the heater I used
Taishii 1000 Watt Induction Heater w Case
amzn.to/3Db0qwf
For about $160 - $180 more, get a MADE IN THE USA Product !
INDUCTION INNOVATIONS - Mini-Ductor II Handheld Induction Heater
amzn.to/3jPYGSW
Solary Brand - Chinese Made - No Case
amzn.to/3N6ANRH
JWGUTS Brand w case and the most included coils- Amazon Choice
amzn.to/3fcp6w7
F1TP DC 12V 2A Power Supply Adapter with On Off Switch
amzn.to/3FnoEpB
DROK Delay Relay Module, DROK DC 6-30V Timer Relay
amzn.to/3gL8wDX
Lyman Aluminum Reloading Block - .485-Inch (Fits 6.5/30 Caliber Cartridge Bases)
amzn.to/3W8HnuX
Amazon Basics 3 Speed Small Room Fan, 7-Inch, Black
amzn.to/3TYxoql


AWESOME! be sure and share with the team
u can get small 5-12v induction heater modules from china, might make it a little more portable to use with a 3d printed enclosure
I went through the painful experience of buying that AMP but there was zero remorse after the first batch I annealed. Awesome piece of equipment.
I would think that your DIY induction annealer is doing the job just fine. As long as the brass in the batch you're annealing is as consistent as possible (you already have the best brass in Lapua) then you're good to go. I did tests with my AMP with range pickup 223 to see how it analyzed the differences. The biggest jump in program settings was when comparing headstamps, which would be obvious. But even among the same headstamps, a slightly thicker neck called for a different program setting to achieve an annealed state. So if you really wanted an increase in consistency then I'd start looking into neck turning if ya haven't already. That's on my list of tools to buy next. Very cool gadget you built and it's faster than my AMP!
Yeah, the AMP looks like an AWESOME piece of technology, I just can't justify it's cost, at least for now. I probably will look into neck turning not too far down the road. For now, I'm checking neck thickness and keeping the batches as even as possible and relatively small. Small adjustments to the "on" timing are made between batches
@@CrustyOldMarine I'd have gone the route you did if I had the know how of building electronics. So congrats to you! It looks like you did an outstanding job building something extremely effective. If your shoulder bump is consistent in the sizing process...you can bet that your build is achieving full annealing.
Holy crap. Love your workbench. I bet it doesn’t move around. My timer did not come with directions on set up and how to wire it. A fellow in the star rating of Amazon had a picture of the diagram to actually wire it up. Of course, I didn’t buy the one with the DC powered version. I bought the AC powered one so, they’re not the same. I just about gave up on programming the settings and then I got it figured out. It’ll cycle through a couple times with the numbers lit up, and then it will go blank. The top number was the cycle on and the bottom number was the time off, and it had three settings P0, P1, and P2. P0, you can’t get anything and has an off setting, Might be to turn it on for extended period of time and then it stops cycling. I don’t know., P1 is tenths of seconds and is the one I used. P2 might be minutes. You have to hold the settings button down to get it to change. The start/ stop will start it after you’ve entered your settings. It doesn’t turn off as long as it’s plugged in, the start stop starts the cycle and stops the cycle only. It was frustrating at first but yeah, after I got it figured out, pretty happy with my purchase. I don’t know which induction heater I bought, it was like 180 bucks. Mine has the fan running every time it’s got power, but you do have to press the red button down to make it heat, so you will hear the fan, but it’s not heating until the observation light comes on in the front.
Thanks! Nope, it doesn't budge, just hope I don't ever have to move it!...lol
Yeah, if the timer you have didn't have the wiring diagram, thay sure would make it tough! Glad you got it figured out. Same with my Induction heater, fan runs whenever timer has it on but, no heating unless button is held down. I actually like it better that way and I think it helps it not to overheat.
You really take this to a high level! I consider long range anything beyond maximum zero where I have to make some basic trajectory calculations. I shoot heavy bullets having the trajectory of a watermelon. I intend to post on what I do keeping it simple and recommending your channel for those who wish to take it further. What is that yellow and black tool? I wonder if I could achieve the same effect with just a cheap soldering iron using wire to replace the soldering tip?
I try too...lol I'm just a middle of the road guy on this LR (800-1200 yd) shooting at this point. But, closing in on the limits of my current rifle.
That Yellow and Black tool is the Induction Heater. It's 1000 watt and designed to heat seized bolts/nuts. They aren't that expensive, the whole setup was $225 or less. I doubt you'd get the same results with a soldering iron. Probably wouldn't hold up to the duty cycle but, sure would make a good video giving it a go and showing the results!
Hey buddy, somehow I accidentally hid your comment on my "Best Load Development" vid ua-cam.com/video/nYL-xMdYdVM/v-deo.html and can't find a way to get it back. If you don't mind posting it again that would be awesome! Stay warm up there!
@@CrustyOldMarine Done. NP
How far below the neck/shoulder junction does the lowest coil sit? Thanks
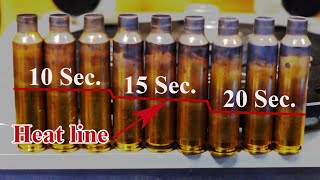
You can adjust it for any length/location. The heat will rise, i.e. the lowest point will be the coolest and up the neck gets a little hotter. This is due to the heat rising and the variation in diameter. I don't know or have an exact figure as to how far down to place it but, the important aspect is to get it slightly below (maybe 10-12 mm) the shoulder/case body junction as that portion gets reworked in the sizing and the annealing prolongs its life.
Question: Does your unit actually state Made In Japan? The Taishi brand on Amazon appears to be a Chinese company like all the other knockoff mini induction units sold on Amazon for half the price of the US-made Mini-ductor II from Induction Innovations. Like what you said, I would rather buy a Japanese version if available.
IT does not give any country of origin. My assumption from research was that it (Taishi) is a Japanese company. Though the lack of any "country of origin" or "made in" stamp on the inductor or in the manual, certainly makes one go hmmm.... Thanks for watching and asking as well as pointing out Induction Innovations. If I had known there was a "Made In The USA" option, I would've spent the extra $$ and got it. Going to find link for their model to add.
Sweet! What is the hardness (Vickers scale) of the necks after you anneal? Lapua & Peterson produce necks around 95-100 on the Vickers scale. Thanks!
I have no idea, though I'd love to know that too. If I had the money for a testing gage/setup, there's other reloading items I'd spend it on first. Unless you know of a good one in the $100-$200 range and not $1500-$3000. And if you do, PLEASE SHARE!
Check ebay for a used Webster Hardness Tester Meter for Brass W-B75. Test on a new lapua neck = 100. See where yours ends up
ua-cam.com/video/SF0YmmeEJK4/v-deo.html
@@foreheadlikeflint7516 That was a GREAT video share on Bruce and the Webster Tester. THAT is actually affordable and I curse you for putting me on a new hunt and yet ANOTHER tool to buy...LOL JK, I appreciate the info and share!
Have you done any testing with the annealed cases from that yet? I’m thinking of putting g one of these together to try to get a little more consistency with my annealing. Flame annealing is just too dam inconsistent regardless of how it’s done.
Testing as in how consistent shot groups are from it, I'm assuming? In the process of that right now. The only other "testing" I can think of would be bullet seating pressures. Northeast Texas Tactical where I got the idea and plans from did that (I don't have a gage yet) and his results were great in terms of consistent pressure
@@CrustyOldMarine yeah I was wondering how the velocity numbers looked compared to other methods. I just got mine together and it definitely works like a charm! I got a cheap 5v turbine fan fan and mounted it on the back to hopefully keep it cool as it gets hot pretty quick. I’m really loving this thing compared to flame annealing, much more consistent. Hopefully I’ll get to do some testing on the range in the next few weeks.
@@randallgibson3212 I haven't had a chance to test yet. You may well get some numbers before I do, if so, please share your results.