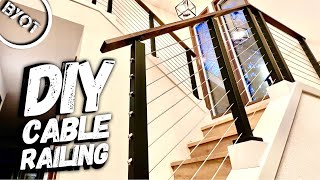
DIY Wire Railing Installation // DIY Cable Railing for Deck

Вставка
- Опубліковано 8 лют 2025
- This DIY Wire Railing Installation video will show you everything you need to know to install a DIY cable railing for your deck. Specifically, you’ll learn:
1. How to set and install deck railing posts
2. How to make a template for your railing post holes.
3. How to drill into the railing posts for your DIY cable railing
4. How to run the cable / wire through the deck railing posts
5. Tips on having a continuous cable run through stairs
6. The Best Cable railing hardware to use
7. How to tighten the cable and adjust the wire railing tension
8. How to cut the excess bolt length.
Step 1: How to set and install deck railing posts
We installed our Deck Railing posts with an “inside mount” approach and then “picture framed” the edge board around the posts. To do this, we installed the railing posts such that the top cap of the railing would be at 38” (check local codes requirement as you may need to make yours 42” high depending on where you live). To fasten the posts to the deck, we Used Thrulock Screws which do not require any predrilling. Links to tools and materials used are below!
Step 2: How to make a template for your drill holes.
In order to ensure that all of our drill holes were exactly the same from post to post, we created a template with a scrap 2”x4” board. First, because we used 1/8” cable, we drilled 1/4” holes spaced every 3 inches (approximately) and located them directly in the center of the template board. Please check your local code requirements for cable railings.Once your template is ready, use clamps to attach the template to your deck railing posts and mark the holes on the post. Be sure to mark both sides of the post with your template.
Step 3: How to drill into the railing posts for your DIY cable railing
At this point, use a drill bit that is slightly larger than the diameter of your cable and drill half way though the post in the exact place of where you marked it with your template. Be sure to hold the drill level and make sure you are in the exact center of the post. Next, move to the other side of the post and drill in halfway, meeting the previously drilled hole in the center.
Step 4: How to run the cable / wire through the deck railing posts
Simply run the wire railing though the holes in the post and cut to length.
Step 5: Tips on having a continuous cable run through stairs
Having a continuous run through the stairs was a bit tricky. I would recommend that you have a dedicated set of hardware through the stair railing - It will make your life simpler. But if you want to save the money, you can follow what we did in the video. It is a little confusing in the video, but I hope that what you see will get the creative juices flowing so that you can come up with your own solution!
Step 6: Best Cable railing hardware to use
For our Project, we used the 1/8” Type 316 (Rust Proof) Stainless Steel (included a cable cutter with purchase), Muzata Cable Railing Kit Hardware, and a Hydraulic Crimping Tool. All tools were purchased on AMAZON and links are provided below.
Step 7: How to tighten the cable and adjust the cable railing tension
Once the cable is run through the railing, simply insert the Muzata hardware in both posts at the beginning and end of the cable run. Insert the cable into the hardware and then crimp the cable in place. Then, thread the washer and nut on the opposite side of the post and tighten the nut with a wrench as necessary to get your desired cable tension.
Step 8: How to cut the excess bolt length.
Once the cable tension is to your liking, cut off the excess bolt length with an angle grinder or a reciprocating saw. You will obviously need a metal blade for this. Once the excess length has been removed, thread on the decorative hardware end cap, and your DIY Wire Railing Installation is complete.
TOOLS Used in this project and Total Cost:
All in all, the wire railing materials cost me $155 for the Stainless Steel Cable, Muzata Hardware, and hydraulic crimping tool.
Affiliate links to the exact products I used are linked below:
Hydraulic Cable Crimping Tool:
amzn.to/2SXMz9p
316 Stainless Steel Cable (includes cutter)
amzn.to/3j1lJYD
Muzata Cable Railing Kit Hardware:
amzn.to/3wTEa5y
Thrulock Screws:
amzn.to/2TXi1EF
Thank you guys so much for watching! If this video helped you out, please consider dropping a “like” below to help this video get recommended. Also, please subscribe if you like content like this - it helps me out a ton.
This is Episode 6 in my BACKYARD TRANSFORMATION SERIES.
Check out the other episodes below:
Episode 1: DIY Fence on a Budget
• DIY Fence On a Budget!
Episode 2: How to Build a Fence Gate (DIY Fence Gate Ideas) • DIY Fence Gate Ideas (...
Episode 3: How to Extend a Concrete Slab
• How to Extend Concrete...
Episode 4: DIY Concrete Paver Patio
• DIY Concrete Paver Pat...
Episode 5: DIY Trash Can Screen // Horizontal Privacy Screen • DIY Trash Can Screen /...


Super helpful. I was quoted $5200 for the cable and connectors at a lumber company in Portland Oregon. I took your advise and it cost me around $340. Everything was from Amazon. Only thing different is I did not run the cable all the way through the 4x4. I screwed the connecters to both sides of the 4x4. Turned out beautiful!
Glad it helped, Dan! And glad you were able to save nearly 5k by going DIY. Thanks so much for watching!
I got the same style you just predrill and screw it in then crimp it and turn to tighten.
Lolol. Portland Oregon lol.
I would like the Link for the Cable railing system @@AndrewThronImprovements
Hi
How many feet long ?
For the prices.
Finished product was awesome…dude you had the perfect jig all along. The jig you used to set the holes would worded perfectly to drill your holes level and straight!!! Drill halfway, clamp on other side drill the rest of the way…boom half the time.
Am just about to understake a similar project and found your video very useful, thank you very much indeed! Good work!!
Thank you! Your techniques were well thought out and explained . Now I’m chilling with my own new railing! Bravo!
This really looks like something I can do. I like the sharp, clean, modern look. Nice job guys!
Great job! The more I watch home Reno videos, the more I realize that I could easily learn out to do these projects myself. Keep it up 👍
I appreciate it! And you totally got this! Getting started is the hardest part. Thanks for watching!
Very cool. Especially the tuned wires.
Beautiful work! Definitely use a grinder for cutting those excess bolt cuts!
Appreciate it! And yea….that probably would have been a way better idea lol
Your friend in this video, looks like your brother! All in the family! Cheers! Thomas!
Very detailed and informative. First time for me doing one of these systems. Thanks
Hshahaha got hooked at 5 secs plus… This is EXACTLY was I was looking for: how to attach it all PERFECTLY🎉🎉🎉
Love this! The backyard looks amazing!
Thanks Pin!
Do I see catman?!
@@melanielong6232 That is NOT catman
Great idea drilling both sides!
Andrew, keep up the great content! The deck looks fantastic. I’ve really enjoyed all of your videos.
I appreciate it, Kyle! Thanks so much for the support!
@@AndrewThronImprovements The first 😮😮😮😮😮😮
This looks so good. I love music stairs railing. Wow, wow, wow.
Haha I appreciate it Yuliya! Thanks for watching! Hoping to have another video out tomorrow or Monday.
@@AndrewThronImprovements keep rocking it.
Andrew!! I love your introduction it was pretty genius!! 🤣❤️. I am loving your wire railing and backyard it turned out really nice. 👏🏾👏🏾👏🏾❤️❤️❤️!
Haha I appreciate it and thanks so much for watching! A few more improvements to go still!
Besides your brothers pajama bottoms (or pants) being distracting, this was waaay helpful! Thanks!
He swears I only ask him for help when he is in his Sunday worst lol Thanks for watching!
Nice work. Very helpful.
I have watched a bunch of these cable rail videos and this is the only one that makes me want to take on the project. Thank you !
Thanks!
Thanks a lot Luke!!
keep jammin on them wires bud soundin gnarly
Next video is going to be a full song cover lol thanks for watching!
Long old day but looks awesome man!
Appreciate it man! And I hear you on the length - I just wanted to include as much info as possible since I had lot of questions when I was researching how to do the project. Thanks for watching! Should have another video dropping either tomorrow or Monday!
Nice video. Very creative in drilling your holes.
Wooow who are you 😄 this is awesome, you are genius 👏👍support and greetings from Serbia 🇷🇸 ❤
Haha I appreciate the kind words! Thanks for the international support of the channel and thanks for watching!
The double-sided drilling is smart. Will keep it in mind. All of the cable railing kits are stupidly expensive, to end up with the same thing. Gonna go your route.
This is by far the best video I have found on cable wire railings. This is now my next project- Thx for the details in the vid
Glad it helped! Thanks for watching 🤙
beautiful job guys!
You're a beast in the DIY game.
Getting ready to do this same project and searching videos. Great job and explanation!!
Glad it was helpful! Good luck with your project!
thank you for taking the time to show the detail and in a short enough time too brilliant.
Great video guys
Would love to hear an update on how this held up. Running the cable the entire length definitely saves tons of money due to the cost of terminations but most cable manufactures don't recommend making turns or running past a certain length. How tight were you able to get the cables? Do you ever do any seasonal tightening over time? Are they tight enough to avoid enough deflection to fit the 4" ball through?
Great vid. Super tips
Tgat came out great!
Btw, I thought you had a mullet in your profile pics, I just realized it was a jacket hoodie.
That is so awesome!
Appreciate it, Alexander! Thanks for the continued support!
work perfect by a perfect man
Appreciate it, Cyril!
@@AndrewThronImprovements 🥰
Great job, thank you for explain very clearly.
I am glad it helped, JL! Thanks for watching!
Great work! Thanks for the guidance!
Glad it helped! Thanks for watching!
Thank you -- the thing I learn was to get an electric crimper 🤣
PS, just looked up Ecrimpers, expensive! Will go with the long handle ones that are a single push I guess, better than pumping IMHO and brother has one.
Cheers
LOVE LedgerLoks!!!
Great video!! We will be starting ours this week. We were wondering at what distance your posts are apart? Thanks for the well laid out resources and fantastic explanation during the video.
What a well tuned railing and attractive too. I like how your brother helps you; and you both seem to enjoy the project too. What soccer club do you play for?
Enjoyed the video very much and so far, I love all of them I've seen. Thanks for your good work.
Quick question to the four people who gave this video a thumb down: do you also hate puppies, kittens, and generally good things in life? lol
Great job, Andrew and brother!
Haha I appreciate it, my man! Thanks for the support 👌
Thank you for your video. It very helpful as I’m researching for
an upcoming project. It’s been a couple years since you did this video. How is the cable holding up?
Make yourself a little template take a board put screws through it put it next to your post and hammer that way you get the holes perfectly lined up!
Very nice
Epic!
Thanks brother!! Looking forward to your next drop!
Very well done vidio!
How much rail did you use on this project and what is the size of your patio
Hey bud. I have seen Perkins brothers do a similar install. I believe they have angled adapters for the stair transition so your bolt finish ends up sitting perpendicular instead of at an angle. Either way, wonderful work
Hey Ben! Appreciate the feedback! I was actually pretty overwhelmed by how many different types of hardware that is out there. They literally have a piece of hardware for virtually EVERY application. I went with these Muzata ones since they were on the cheaper side, but I totally agree that there is a more appropriate type of hardware for the angled stairs. Next time! Thanks for watching!
Turned out great - nice work! What are the chances of getting a video for how to make the wire spool setup??
Thanks AH! Not the best railing style for a taquito though... Spool video coming soon on Ryan's "Pookie's Projects" channel.
Good job. It's been a year now. What would you have done different?
I forgot what it’s called but there’s this single clamp thing when you can put the wire through and it clamps it down and can’t come out. That way you can just use hardware in one end and that on the other the. Really tighten it down with the hard where on one end making it pretty tight
You could pre drill your poles on a drill press very fast if you have one! I know for the staira you would need your angle prior though.
Hello, my husband and are about to this on our new deck. I do have one question, how did you secure the trex board as the top rail? Thanks :)
I want to do this, but my end post is attached to the wall, can i put i hook on the cable to hook it up to the post attached to the wall?
Really useful video, thanks.
I was wondering what no. Crimp die you used with the tool?
I'm finding it way harder to crimp than I expected. It's taking me literally 5 minutes of pumping which is hard work!
Great finding you 😁. We are just about to do our cable railing and your video is gold at this point. Thanks 😊. Do you mind sharing the final cost for the railing ( just the cable and materials 🙏🏽). Once again, thank you and yes, I subscribed 👏
Hey Marcia! Thanks for watching and subscribing! Hmm, I don't quite remember the cost but I would estimate around $500 for the wire, crimper, and hardware. Good luck with your project!
Hello! How do I know which crimping size to use? 2/7/25
I keep having the issue where i go to tighten one cable and the bottom/top ones come loose. Did you have that issue too if so how did you overcome it?
This system is actually super fun to do!!
Agreed! Thanks for watching!
Not a fan of the hardware but nice job on it!
did you prime and then paint your posts?
How can horizontal wire railing be to code?
You can't run wood horizontal on rails.
awesome video man ! cant find the patio diy on your channel its possible ?
Thanks. And it's on there I promise!
What type of Trex did you use and how did you secure it to the 2x4s?
So guys its been 2 years sinc you posted this,is it still holding well?
So far so good!
How much cable did you use?
I feel like the fact that you have that incredible length of cable only being anchored at the very ends weakens the system as a whole. There might be some kind of code requiring cable be anchored every so often
That's a fair point, Austin. During my code review, I only saw cable spacing requirements - but more anchor point will definitely add to the strength. Thanks for watching!
Awesome job! What kind of stain did you use for the posts? And did that dark color hold up?
Great video and excellent tips. I was wondering how to add the posts to an already built deck. After moving next month I’ll be doing this for certain.
Appreciate it! Good luck!
Everything I've watched and read says that your run of cable should not exceed two turns before you start a new run of cable. (That's a lot of additional hardware). It looks like you ran one cable the entire length with several turns. Did you have any issues getting it tight enough?
Bumping this comment because I want to know too
What paint did u use?
Hey Andrew, what exact paint color did you use for your posts?
I believe it was called black magic by ppg
I laughed so damn hard!!!
Hi! Do you remember what paint you guys used for the posts? Thank you!
Hey, Wendy! It was called PPG Black Magic. Thanks for watching!
Where do I see the materials list. Cable, hardware and crimper? Thank you.
Hey Scott - All of that should be in the video description (underneath the video). Thanks for watching!
When crimping, what size dies did you use? Number 8?
Hi Ray! Unfortunately, I don't recall. But the crimp tool I bought (linked in the video) had a bunch of different dies and I just found the one that crimped just right through trial and error. Sorry I can't be more help, but good luck on your project!
@@AndrewThronImprovements Its fine, I used the one with smallest number, number 4,
What size bit did you use to drill the holes for the wires?
how come there's no video of making the deck?
Hi Colin! I didn't document the deck since I didn't feel like I had enough "experience" to actually teach others. I will document my next one though for sure.
@@AndrewThronImprovements thoughtful of you..but I bet we dont really care about that cause your video is great to watch,..and the deck looks great btw..
Wear a tool belt: Be more efficient=get done quicker. ✅
On my "things to buy" list haha. Thanks for watching!
Why wouldn't you just get a longer drill bit...?
You can use a drill bit that goes all the way through. However, you may experience two issues:
1. Wood breakout on the other end of where you are drilling.
2. If you drill at any angle, you might find that you miss the mark on the side.
Thanks for watching!
You need more than a single tension point. Cables are too loose
audela cable railing in Amazon
Washers.......
Protector sleeves.......
And so much more..........
I recommend watching another video on how to install these properly. Seem like nice enough guys though,, but they lack the knowledge and skills.
It was my fault ❤
good thing they are wearing masks outside. Wouldn't want to breath in too much fresh air. 😕
What the hell is the deal with the face diaper?
No to the hardware you are using.. Very ugly! Why not use the protector sleeves for the post? Using swag screws would have given a much better finish look.. for the end post..
A mask? 😂
Just curious. Why the masks?
Outside with a mask, you got my down vote! I only wasted a minute and a half watching you not the full 13!
Hey Kyle - that’s a pretty hasty decision with no context. God bless
How do you know he doesn’t have allergies, jerk? So tired of you self-righteous people…
Why is he wearing pajama pants makes you look unprofessional
I noticed that, but I thought it was cute and looked comfortable!
@@ljbrodnax only gays and girls on their period were pajama pants
That was hilarious!! 😂😂😂