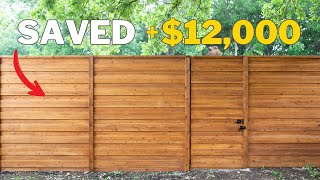
How To Build A 6' Wooden Privacy Fence

Вставка
- Опубліковано 19 чер 2019
- We have been wanting a privacy fence here at our homestead since we moved in so it is time to get to work! We are building a 6' wooden privacy fence from Home Depot supplies but you can get these same pickets and lumber from Lowes or any home supply or lumber yard. I have build a couple of these in the past and this is the method that I have found to be easiest and look the nicest in the end.
DeWalt Impact Driver/Drill combo kit - amzn.to/1toCosg
Dewalt 20v Battery Powered Circular Saw - amzn.to/2Y2o1t5
4' Metal Level - B071DP54G8
Ultimate LED Worklight - amzn.to/2HsEJMu
Countersink Drill Bit Set - B07SCXGHJG
FAQ
- You do not need to space the pickets apart for expansion and contraction. They come pretty wet from the treatment and will shrink over the first year so there will be a gap of about 1/4" anyway.
- I would recommend staining it within the first 3 months as it starts to turn grey after that. You can also just let it turn grey and it will be fine like that as well.
- Pickets are treated and do not need to be off the ground for any reason.
- I would recommend 3" star bit deck screws to attach the 2X4 stringers.
- I would recommend 1 1/2" or 1 5/8" star bit deck screws to attach the pickets.
Get SSL Family Merchandise here - teespring.com/stores/ssl-fami...
.$.99 organic seeds - migardener.com/?affiliates=11... - use this link for $.10 off!
Please check us out at www.sslfamilyfarm.com
Find recommended products on Amazon - www.amazon.com/shop/sslfamilydad
and follow us on....
/ sslfamilyfarm
/ sslfamilyfarm
/ sslfamilyfarm
/ sslfamilyfarm
Daily Beetle by Kevin MacLeod is licensed under a Creative Commons Attribution license (creativecommons.org/licenses/...)
Source: incompetech.com/music/royalty-...
Artist: incompetech.com/
Country Cue 1 by Audionautix is licensed under a Creative Commons Attribution license (creativecommons.org/licenses/...)
Artist: audionautix.com/
Any links here may be Affiliate links
Jukin Media Verified
Interested in licensing this footage?
Learn more @ www.jukinmedia.com/licensing/... - Навчання та стиль


Great job on the fence, but I think I’m more impressed that you got the kids to help all day..😳
Lmao....my 14 year old faked a heart attack 😭😭😭😭🤣🤣🤣
@@newbeginning8134 What????🤣🤣🤣🤣🤣
My two adult kids and my 15 year old helped us replace two rotten fence posts, yesterday. The only one that about died was me🥵that’s hard work!!
I didn't have a fancy auger, so I decided to dig my fence posts by hand with a post hole digger. Let's just say I am very sore and hate roots, but I got it done.
Fuck that, I plan on renting a gas one from home depot
@@gunterhitchcock2261 any idea what they cost to rent or how difficult they are to use?
I know the feeling, I grew up on a farm that had ALOT of acres with tree lines that we couldn't get a tractor through and dug out each post hole by hand. Now I'm about to work on putting up a fence just like the one in this video next weekend, and I'm going back to hand digging each hole. Fun times.
@@semiprolific774 My area has them for $125 for 4 hours... I am going to start by hand and depending how that goes I may decide to rent one.
Guys buy one that digs 22 inches deep for like $150 and keep it for future use
Dude its nice to see the fam working with u ... 👍
even the dog haha
@@JRCoronado24 Dog is supervisor lol
Love it! That is one great-looking fence! I can't believe you guys did that in one day! It looks fantastic!
Watching your family help to build the fence is very loving.
Nice job as usual. My wife and I started watching your wife's channel originally then yours. We really enjoy the ones with your family in them. Thanks for posting we really appreciate the effort you do.
Really impressive, for a city break from New York oh, it's really great to see how you built that sounds and looks great!
Great job, so nice to see family all working together.
I had a 6 foot chain link in the back of my house when I bought it. I found some brackets at Home Depot that slide over the posts that have holes in them to bolt the stringers on to. That fence is about 80 feet and not having to put new posts in saved me a ton of time and money.
Thank you for your very well explanations on how to DIY a privacy fence. A lot of work. Your family is so lucky to have you and all your knowledge. God Bless you and your family.
It's so nice to sit back after it's all said and done and enjoy the fruits of your labor. Thank you for this video so glad you got that done now I know what I should do. Till next time God bless
This is how I'm planning to do repair to my fence, nice to see I have the right idea. Thanks
As always I enjoy all your videos both during the week and on Sunday, You have given me a lot of good idea's as far as the building of the Greenhouse and now with the fence. Glad to see that the injury hasn't restricted you, You are the Shepard that watches over his family, his crops and animals with God's care and knowledge.
Great job with the family glad you bounced back
Loved seeing the kiddos helping out ❤
This was the exact fence I had in mind to build. Only difference we used cedar pickets. But my wife and I followed every step in this video and the fence came out great. All 59’ feet of it. Great suggestion on going with the contour of the ground. Could not have done without your guidance. Thank you so much for sharing this video. We did it!
You're a hard working, industrious family!
I purchased the posts today and will be starting this project next week. Mine will be 175 feet of fence. This was very helpful. Thank you.
Looks great. I’m in the process of building 90’ of fence, so your video will come in handy. Thanks and great job!!!
Good teamwork, I like how the kids helped with staging material so the adults could keep up a quick pace on the pickets. An option to help the posts last longer would be to use penetrating epoxy on them, at least the lower three feet, though that is a bit pricey.
Love seeing the girls helping. I have a sister and this video brings back some good memories of our helping Dad with his construction projects. He always bragged upon completion, "Who needs boys? I've got girls...and they're as handy as a pocket on a shirt!"
Excellent Job ! Inspiring , Touches My Heart to See You Involve The Whole Family, Thank You & God Bless
SSL Family: You NAILED it!! I built a fence like this several years ago and came to the same conclusions/process you did. Screws are the way to go. When a picket goes bad/rotten it's easy to replace. We spaced our pickets with double thickness of corrugated card to allow some wind relief. Rented gas powered post hole digger from tool rental place. Stained it using 2 gal insecticide sprayer and deck spray from HD. After 5 years, pressure washed and stained again. Still looks great. Used 4" pickets. Wish I had used 6". 👍👍 Neighbor built his fence with panels and they were falling down after about 2 years!
I just pressure washed my 13-year-old fence and stained it again. Looks new! Sanded down my deck, stained it, and it looks new. Now I have one more 50ft run of fencing to build to enclose the back yard. The posts are crucial in longevity and stability. Thanks for the reminder on the wind relief! I get straightline winds, and am surprised, in retrospect, that my fence is still standing after so long. I used Thompson's Water Seal Signature Series 1gal on the fence and deck, and just bought more cans for the new fence going up. There are transparent, semitransparent, and solid; I went with solid, and in natural cedar instead of honey brown, or maple, or any of the other colors. I didn't realize they were "seasonal" in replenishment; I got lucky with finding the last few cans I need before the spring replenishment (per Thompson's online response). I can't believe how many fences I see that do not get stained-- treatment does not mean impermeability!
You made that look so easy! Looks great! Love jobs that incorporate the whole gang!
It is when you have a tractor to dig the holes😀
You gave me insight on "building" a fence compared to installing 8' fence panels. I have slight hilly land, thank you very much...
Nice video, very easy to follow and nice that the family is working together. Way to set the example 👍 💪
commend you on the great fence and raising a beautiful fam!
Looks Very Nice !! And see that you had used that New Handy Dandy Led Light .. Thanks SSL Family !!
great job. I really like to see all the family working together. also, thanks for the info.
Nice job I’m researching diys before I go in on my fence ur the best I’ve seen as far as detail and informational
Great job! I would have left the inch or two on the 4x4. That saw is heavy cutting up that high! But at 72 some things get a little more difficult.
Had the whole family with helping hands,💯
I have minimal experience with fences, this helps clear things up for a couple repairs I will try.
Good video! Nice that the family helped out to get the project done
Excellent work, and nice to see the whole family working together on the project, I would raise the boards about an inch off the ground .
How come?
All the best to you and your family!
Solid job! Looks nice and built well. Definitely better than the pre built sections
Great video. Have two fences, here in Florida, and they just do not last. Between the humidity and severe weather, they just break, fall over, and get destroyed. I do appreciate the noise reduction and privacy. I, however, decided to go with trees/shrubs that not only do the same thing as a fence, but look better and last longer. I planted Podocarpus trees and man does it look great. I am not hating on fencing at all and am glad that it is an option. I have built many, "I hate my neighbor" fences in Atlanta. Sometimes, wood fencing is the best choice, but for me and my location, trees ended up being the better choice. I still love watching your videos after all of these years.
I would not recommend putting any space between pickets. They are going to shrink over the first month and leave a 1/4" gap already. No amount of wind should blow your fence over if it is installed properly
Thank you to you and your family for making this video! I'm so looking forward to my new fence!!!
Important to note that if you set your posts exactly 8ft on center, you'll have to cut the 2x4x8 stringers to exactly 8 ft long. Yes they are sold as 8ft boards but my experience is that they are always slightly longer, sometimes even as much as an inch and a half.
If you want to have a nice smooth end on the 2x4 instead of an unfinished crooked rough cut, square each and cut each end to make the board 8 ft long. Then it’s a nice smooth perfect 8 ft. Gets covered up, but it’s done the right way.
Me and wife starting ours next week! Thanks for the tips on starting!!
You gained a follower!!
Awesome job SSL Family! It looks amazing. Thanks so much for the detailed explanation of how to build that fence. Blessings from NE Missouri!
Hi Paula.
We could be twins!!
haha
Have a great day.
Now that's pretty awesome twinage right there, Patrick. I love it! Blessings from NE Missouri!!
@@pjd3028 haha Thank you.
Great video. 👍 and beautiful family. God bless you all!
Such a nice family project.
Screws are definitely the way to go!!!
Awesome fam btw!
i just subscribed to your channel because you helped mr with putting a waterpump on my chevy traverse.. thank you for your help
I believe the most efficient tool that you have and did not talk about is the PTO driven auger. That machine is a back saver AM time saver. Really nice job on the fence it is beautiful.
Great job with the family. Thanks.
This is one of the best fence video's I've seen, great job! Sounds like a perfect design. I would have two or three post in my back that could occasionally get lightly flooded, should I do anything different there ? Thank you, John
i did posts the same way 24 years ago and about 10 years ago some of the posts rotted away right at the concrete so i replaced some of the posts but for the ones that were salvagable i dug out to the concrete and put the yellow concrete cardboard tubes and added concrete to top of it and a few inches above ground...also good idea to clear silicone around the base of the wood or water could get in there and still rot the post
Awesome job! Like the Army T-shirt as well. Thank you for your service.
your doing it right...only different thing i did was buy the 16' 2x4s as they (supposedly) are cut from older trees and should have tighter pores which will hold up to moisture better. And then stagger them to help make the fence more rigid.
Very well explained, and looks really nice. Thank you!
Thank You for sharing. It looks great!!
Thank you so much , I’m ready to build mine. Wonderful video.
Great to see all hands on deck.
I built a fence on flat land and it seemed easy. I'm now building one on a 150' slope and it sucks, to say the least. What a pain putting the post in, anyone who put a privacy fence on a hill knows what I mean. You guys did a really nice job.
We have a 1 acre property…we are going to fence in the entire rear 1/2 acre and have been researching DIY vids for this project since a contractor quoted us $15,000 to install…thank you for the vid much appreciated!!!
beautiful job & saved lots of money by doing it yourself... lucky to have so helpful helpers.... enjoy for the years to come....thumb up...
Very nice fence and it will last a long time because you done it right
A 90 degree post level helped me out alot. It rubber bands to the post and gives you a level on 2 sides for I man operation.
They are great. Also good to measure post from top to set depth, mark, and I nail a temporary cross piece to hold the post at desired height. Then gravel on the bottom so post isn't sitting in "cup" of concrete and water between post and concrete can run out. Greatly increases life of post. Once set, just knock temp board off.
Great Video, helped with the stringers and rails.
I just did one that is 220 feet long x 6' high. Love it and so does the neighbor.
Same materials? How long did it take you?
Great work going to tackle my own privacy fence here soon this video helped alot
I LOVE HER SHIRT!!!!! ❤️
Beautiful work, I'm about to put mine up now.
Great job, looks fantastic.
Guy's awesome job on the fence. Forget about all the negative comments. All you " I would've" " you could've" people give us tags to your fence video.
Righton great video good job you n the Family. Keeping things Simple in life.
Always recommend going with a 2x6 treated wood along the bottom keeps pickets from ground contact weathering and the 2x6 is more resistant to the weed eater damage.
Exactly 💯.
11:48 dog making sure everything is going according to plan
playgrrrr the Dog has found his spot
.?
That came out great.
....should've done it when lumber prices were low
Nice job and nice tractor! Only suggestion is you have dirt surrounding the pole at the ground interface. Big issue which will reduce your fence life many years. Should have concrete coming out of ground an inch or two. That dirt will rot that interface much sooner. Use small cardboard tube form (2-3 inches at top) to get a nice concrete top that you can slope water away from post. I am replacing my fence after 23 years and the reason it lasted so long was that. Great job and great family!
Do you have a video or image showing what you mean?
@@TheBrokenGuru pretty simple. Surround your 4x4 with a square like 6.5 inch form. Make it an inch or so above ground level. Fill it with concrete as you fill the hole with concrete. Then the 4x4 won’t be in contact with the dirt
not true at all. rain is going to wick straight down the top of those fence posts anyway. any good treated lumber should last 30 yrs, yrs lasting only 23 shows you did it wrong,
@@cryengine_x - you’re dreaming if you think treated 4 x 4 with direct soil contact is gonna last 30 years in Texas. But you’re entitled to your opinion.
@@condor5635 and youre dreaming if you think a little pile of concrete is gonna protect your fence post from water outdoors. but whatever floats your boat. also such a setup is not gonna be perfectly sealed to the base, so it will actually arguably hold water that seeps between the concrete and the post close to the post
tldr if it makes u feel good go ahead
How much did you have in labor cost lol absolutely love the way the whole family helped out my wife and I do the same thing with our children they're all grown up now but what a blast truck loads of memories family that works together plays together prays together stays together unity great video the fence is really nice too LOL thanks for sharing
Built same fence 2005 but my mistake was I put a 1/4 space between boards , 15 years later I have gaps up to 1 inch wide, So I simply removed all boards held on by 2 1/2 #8 robinson deck screws. I then reinstalled them tight together. I also put my posts exactly 8 feet apart and mounted the 2x4x8 on metal brackets; it meant I had to rip one board to fit and I used 1x6 x 5 ft boards. So in 15 years I had to replace 4 posts that rotted pff. I left them in place and put in new a post a couple of feet away. It has served its purpose, Good video!
Very nice video. And congrats, you have a beautiful family. Nice team work
Fantastic build!
Just what I was looking for! Thx very much.
It's an early comment but just for a FYI, UFPO or any marking agency usually they tell you a 3' radius . from the mark should be hand dug with safety . You probably knew that but wanted to add it. The fence looks awesome and I love the fact that the whole family was involved. You are teaching your kids a wonderful life lesson. This truly is a wonderful channel for any and everybody to watch!
Thanks! Well, in this case both of those lines were just put in and I asked him to mark where he put them so it was the actual guy that ran the line. They were pretty accurate but I was cutting it close anyway. I like to live on the edge:)
Solid work bro and very inspiring making it a family project. We'll be building ours next week.
Good luck!
Fantastic....thanks for the motivation.....I have 100+ft to do this spring
Very nice job .its nice your wife and kids work with you .
Thanks for this video sir. I want to do the same thing except I’m doing it in the backyard between both my neighbors fences and it’s on a slope. Plus I have to follow the stupid HOAs specs for a fence. Hope one day to have a house with some acreage!
Hey! Good video thanks. Just a note. I’m a UG locator for electric. All utilities are allowed a
1-1/2 foot error allowance on both sides of their marks. So actually that locator did a pretty darn good job being only a few inches off on they’re paint lines.? Everybody! Always assume there are lines where you dig and dig cautiously. Especially around gas and electric!
Nice fence I need to put one like that iIn my yard but in my experience you should put cement under your posts to keep them front sinking and only put dirt around them because if the post rots 1/4" you get 1/2" of play but if it is filled with dirt it will pack down and you won't have any play
Nice job mate looks really cool
Yes! Cordless drills are great, string line is key, and rent a post hole digger. Manual digging is fine, but after a couple of holes it’s time upgrade. A thing or two to keep in mind: for those that trim/weed eat, you could create a rock bed (or something similar) under the fence to prevent chipping the fence when trimming; and be sure to plan, plan, plan! Write down what materials you need, mark your holes, mark utility lines, etc and double check before you start. Nice video!
2:21 I thought I'd clicked over to a "that chapter" video by mistake! They use the same song for their theme. My mother's fence is in bad shape and I'm trying to replace it for her. Thank you for inspiring me.
Very nice job. Looks great.
Great family project !!!!
Nice job a great family project
Great job on the fence.
Looks beautiful!
Excellent video. Best I've found. Thanks!
Nice easy augering, here in rock country your hole never winds up where you started it :)
Man I hear Ya! That's what I was thinking, two of us just hand dug and installed 87- 6"x6" posts in the worst ground ever. Some rocks had to be drilled and split in the hole to get out. Hardest work I think I've ever done (at least it seemed like it), 10' posts, 4' in the ground/rock/roots yikes! lol.
I hope our fence comes out this good today!
Did you do it? I have a tip.. Run a string across the top.. Temp screw in a picket.. And another further down the line or where the ground changes. Put a screw into the top of each.. Run a string flush with the top of each.. Then install each picket in line with the string
@@fencefirst2722 gonna use that for the side fence, which is next. Thanks for the tip!
Next DIY build, if I were you I’d pay more attention to the smiles and rainbows when doing the framing. Tells you where it’ll warp and how. Good to keep in mind for when it’s aging.
Best fence installation video so far. I am about to install my very first privacy fence with the family. Thanks again
Very nice simple design. I'm thinking of building one, but I'll definitely need a rot board around here. The ground stays too wet 3/4 of the year! I'd much rather replace segments of a 2x10 or something than replace a whole bunch of pickets!
Wow good job 👍😁 I think this is something me and my dad can do in my back yard. Thanks for the video.👍👍