Easy to Install DIY Epoxy Flake Coating OUTSIDE

Вставка
- Опубліковано 8 сер 2024
- Epoxy Flooring for your Concrete and Wood Floors:
www.stonecoatcountertops.com/...
Epoxy Flake Floor Step by Step Written Instructions:
www.stonecoatcountertops.com/...
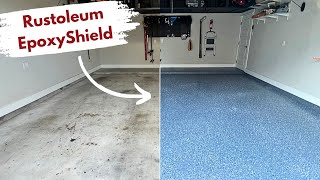
Easy to Install DIY Epoxy Flake Coating OUTSIDE:
Our easy-to-apply epoxy flake coating is perfect for homeowners who want to spruce up their indoor and outdoor spaces at an affordable cost. What's more, it offers excellent UV resistance, is extremely durable, and has no harsh smells - making it ideal for any home. In this video, we'll show you how to use Stone Coat Epoxy to revitalize your floors and create a stunning finish that will last for years.
Products used ⬇️
Epoxy Flake Flooring System
Floor Patch Epoxy Gel:
www.stonecoatcountertops.com/...
Our Floor Patch Epoxy Gel is perfect for filling any gaps or cracks in the concrete for a seamless designer floor. The gel dries quickly and can be sanded and smoothed before painting.
Moisture Seal Epoxy Primer:
www.stonecoatcountertops.com/...
Our epoxy flooring system starts with a moisture seal epoxy primer, which bonds like tree roots and will not fail. This primer is applied over concrete to ensure that your epoxy is secure and will last for years to come.
Decorative Floor Flakes:
www.stonecoatcountertops.com/...
With five epoxy flake color options from Stone Coat Countertop Epoxy, you can easily turn your forgotten garage into a functional finished space to enjoy. Our epoxy flake options come in a variety of colors and sizes, so you can create the perfect look for your space
Polyaspartic Flooring Topcoat:
www.stonecoatcountertops.com/...
This topcoat is strong and won't be affected by the sun. It can be used with our epoxy flake floor system or our epoxy metallic marble system. We also give you an additive to make your floor less slippery. With Stone Coat Countertop Epoxy, you can turn your garage into a nice place without hiring expensive people or needing special tools.
Non-Skid Additive:
www.stonecoatcountertops.com/...
This unique floor coating system combines either an epoxy metallic marble or a multi-colored garage floor epoxy flake system with a non-skid additive that creates a durable, anti-slip surface with our Polyaspartic flooring topcoat
Flooring Tools
www.stonecoatcountertops.com/...
Spiked Shoes for Epoxy: amzn.to/3zRyn3G
Flooring squeegee: amzn.to/408WVzW
Epoxy Glide Roller 18’’: amzn.to/411kXxY
Roller Pan 18’’: amzn.to/43ongg4
Roller Extension Pole: amzn.to/43tNhe6
Roller Frame 18’’: amzn.to/3MAa0yQ
Floor Scraper: amzn.to/3mmJkam
Floor Surface Protector: amzn.to/400kFG8
Calcium Chloride Moisture Test: amzn.to/3KRqcdH
7in Angle Grinder: amzn.to/41fh0oQ
7in Diamond Grinder Wheel: amzn.to/3ZVgg7u
7in Dust Shroud for Grinder: amzn.to/41iVH5R
Shop Vac: amzn.to/3zOEVjg
Corded Leaf Blower: amzn.to/3ZZRF1k
Chapter Breakdown👇
0:00 - Easy to Install DIY Epoxy Flake Coating intro
0:34 - How to prep concrete for epoxy
1:05 - How to mix and apply moisture seal epoxy primer to concrete
2:27 - How many lbs. of flakes do I need for my floor project?
2:46 - How to evenly spread the moisture seal with a squeegee and a roller
3:54 - How to apply epoxy flakes to your garage floor or outside concrete areas
4:25 - Where to find the different color flake options
4:47 - How to scrape off and bag up excess flakes from your epoxy floor project
5:48 - How to mix and apply the Polyaspartic top coat with our non-skid grit additive
7:33 - Polyaspartic top coat best practices and final result of this outdoor epoxy flake install
Insiders Group:
Join the Facebook Stone Coat Countertop Insiders Group for the latest tips and tricks, your fellow Epoxy friends all join in on the Q&A, project pictures, recipes, and more.
/ sccinsiders
About us:
Stone Coat Countertops is an epoxy based UA-cam channel that will show you unique ways to DIY your way to an amazing kitchen, bath, resin art, construction, or design project on a budget. We believe in teaching skills in, woodworking, art, epoxy floors, epoxy countertops, and showing how to get realistic results to make your old laminate, tile countertop, formica, concrete countertop, garage floor, and walls look like renewed works of resin art! Simply put we are always looking for our next project to help all the DIY folks, contractors, designers, artists, and hobbyist, tackle their next makeover. Watch our free how to videos on the skills to make your dreams come to life with epoxy resin! Contact us anytime for free project support, (541) 450-1976 You Got This!
#StoneCoatCountertops #epoxy #YouGotThis - Навчання та стиль


El señor Mitch always delivers a great colors and designs and this exterior floor looks great and it will look great with more patio furniture to really enjoy the nice finish 😊Saludos!!! 👋😃👋I will see you guys in the next project 👋😊👋
Great video. Answered a lot of questions. Thank you!!!
Another awesome job, Mitch! I love the color combo of the flakes! That pop of teal is gorgeous, but I wouldn't expect anything else at RK3 . Keep up the good work and the awesome videos!
Looks incredible!! 👏👏 Love the teal!! 💙
Hey Mitch, this turned out so awesome!! I love it! The colors really pop. Will do this to our patio once our kitchen is fully functional 😅 great job on the video, Luc!! 👍🏼
You guys nailed it again!!! 😊
Great Job Gentlemen! Love it!
Nice, like the picnic table finish also...👍
You guys are the best.
Great video!! Very good directions
Thank you. This is so clear.
Nice work y’all!!!
Mitch is amazing🎉
Awsome job!
Nice job!
Mitch, just an FYI, never alcohol mop a freshly ground concrete floor, you're pushing the dust particles back into the pores of concrete. Either shot blast or vacuum numerous times with a good vac
Thanks for the PRO TIP!!!!
I'd love to see a white galaxy pour!
Again, amazing job, Mitch! Wondering if I could put a thin metal emblem on concrete with epoxy on top? Hmm.
Regarding your comment about using the gel powder if you're replacing the toilet: you can also use it even if you'll be reinstalling the toilet. The next time you flush the toilet, it'll break up the gel and send it down the drain.
I've done that several times and never had an issue.
Can you apply this system over a cementous self levelling compound that I used to level my floor? Would you need to grind it first?
I love all your videos. I even bought a Stone coat epoxy kit from your website MONTHS ago, but I’m so scared I’ll mess it up. Even after watching all the videos 😩😭😂
Give it a try, even if it's just on a small project like a side table top or just a piece of MDF. I did a few small pieces of MDF then made them into clocks for gifts. They look great! I kept going and eventually built an island top out of MDF to place over our existing solid surface island. It looks like REAL marble and was fun to make. If you follow the instructions it's easy to do and quite difficult to mess up.
My first epoxy job was my best. I kinda messed up my attempt at marble though and used too much accent colors and it's very dark.. living with it but want to redo and go barely past all white. Good luck! It's fun.
I've done a built in counter top vanity, a kid's desk, a plant table, an end table, and a really gorgeous dresser that I got for free. Once you get started, you'll be hooked.
What grit diamond did you guys use for your dry grind? I’ve done regular polished floors but not epoxy
When doing a concrete basement floor do I have to sand first? Is that the "update"?
My patio has a rough broomed finish
Do I need to grind the surface and make it smooth?
So your chart is off? Or did it call for less and you put on more.
So how much did all this cost and what was the square footage?
Can I have Mitch’s number? I have a patio I need done!
That might be overkill to use a walk behind grinder on concrete that you said has been recently poured. I think that having to find and rent that equipment might discourage a lot of people from tackling the job.
Uztutuudet u😅6😅
It😅u 0:01
😊I
It is not Overkill. The concrete has to be prepped profiled before coating can be put down. It has to be opened up so the speak so it can accept the coating. Freshly poured concrete is the same as the cream coat is too tight and not porous enough