DIY Shou-sugi-ban Wood Burning Torching Technique on Pine

Вставка
- Опубліковано 5 бер 2018
- Love Of The Grain Workshop
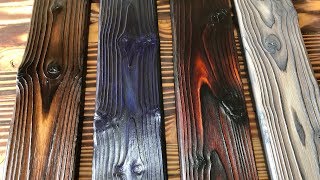
Here is a simple DIY video of the few steps it takes to create a stunning one of a kind piece of charred wood. Using the Shou-sugi-ban technique. A Japanese technique of charring or burning wood for a water & fire resistant wood surface. Which by the way is absolutely stunning to look at.
Step 1- lightly charred version.
I lightly charred the surface which makes the pine look like zebra skin. A black and white colored striped look. If this is the desired look, move onto the sealing step below.
Step 1-heavily charred version.
If you want the heavily charred deep embossed look. You need to heavily charr the wood. Evenly until the wood crackles or wrinkles up on the surface. The more you charr it, the more embossed the finished product will look.
Step 2-wire brush.
Using a wire bristle brush scrub the charred surface in the direction of the wood grain only! Removing all the crinkled burnt wood and any other loose charr. No need to dig deep with the brush. If you still want it to have a more embossed look. You can then again charr it and then repeat this step of scrubbing it.
Step 3- sanding
Using either an orbital sander or by hand you need to now sand the surface smooth. Use 220 grit sand paper for this. Making sure to get down into the lighter colored crevices that have been created. Try to remove as much of the wire scratches as possible. This should create an ultra smooth finish.
Step 4-sealing
Now you want to make sure it’s thoroughly wipe cleaned and dusted off. Use a tack cloth if you have one to remove everything. The more you clean the dust off. The smoother it will be in the end. In this video I sealed it with a water based Polyurethane. You can use an oil based or even something like danish oil or lacquer.
I hope you enjoyed this video. Thanks for stopping by, liking, commenting and subscribing. Feel free to contact me for a quote on a custom piece of your own. Also check out my
facebook
/ loveofthegrainworkshop
Instagram
Www. Love_of_the_grain_workshop
And I typically have some stock items available on my Etsy page as well. etsy.me/2n87ZwG


Thank you for a video with clear and direct instructions. You are my favorite type of instructional video tutor, straight to the point and we don't have to hear some random story before you got to the point. Thank you.
rodrigo oliva thanks very much
Big props to the orbital sander for drowning out the ubiquitous youtube music.
TheOneEyedWoodsman lol yeah one of my first vids. Was still learning editing.
Very nice! The embossed effect is really amazing. Thanks for the lesson.
Thanks
Best video I found using this technique. This is quite different from others, much better & to the point . I'm so excited to use your technique w/out feeling overwhelmed!
Susan H. Cooper wow! Thank you so much! Thanks for the comment. If you have any questions along the way feel free to ask. Find me on Instagram or Facebook and message me there. I don’t see these comments very often.
Susan H. Cooper how did your project come out?
الله ينور عليك مجهود رائع حبيت اضيف تعتيق وحفظ جميع الاخشاب فورى وبدون مجهود على الروابط التالية
ua-cam.com/video/6FYrirenuoI/v-deo.html
والرابط التالى
ua-cam.com/video/GL9ZFBAMwes/v-deo.html
I love how it turned out! Thank you for doing the video, I’ve wanted to try this and now I will.
Thank you
Ever since I learned this technique I use it on almost everything I've made. Fireplace mantle tv stand, my flatbed truck, a kitchen island I've build it's such a fun and good technique and it helps the wood withstand moisture specially the more you char it
Thanks very much it really is versatile.
I've been sand blasting log cabins and wood flooring with fine sand then burning the wood lightly . Faster and a lot less work . I learned this after blasting a log cabin that caught on fire in Oregon about 25 years ago . I didn't know it was a Japanese thing but the cabin sure did turn out real cool and same with floors in my house
@@magapickle01 hi. Does doing it your way still give that deep 3d effect that you get by wire brushing?
@@Phloored probably even better if you use a very fine crushed glass
@@magapickle01 interesting. Thanks for sharing.
Recycling an old work bench, this will be great on the top, thank you an brilliant job 👏
Absolutely! Tag me on Instagram so I can see it when finished!
@@loveofthegrainworkshop2891 will do
Good explanations, and no hard rock music, that's perfect ! Thank you
Thanks
It's a lovely effect and really brings the grain out.
Many thanks
James
Thanks
Great job, looks awesome. Can’t wait to do this. Thanks for the lesson.
Grey Wolf67 thanks. Your very welcome. Feel free to ask any questions
BEST VIDEO IV FOUND IN 2 WEEKS that simplifies it all,,Thankyou sir!!!
Wow! Thanks so much. Guess that’s why it has a lot of views! I’m not a cinematographer though for sure.
wow! The end product is one of the best I have seen wih this technique
wiseman fromlife thanks very much
I love the burnt 🔥 wood look it really makes the grain pop out. I've used it on my wood spirit carvings before and it saves a lot of sanding with it burning 🔥 off the splinters of wood, good tutorial that's why I've subscribed to your channel.
Cheers
Tim from wood 4 nothing
Thank you very much
Wow that pine grain pops so well!
Design Craft Workshop yes indeed
Very nice demo., especially for someone like myself trying to learn....Thank you.
Judith Copeland glad it could be of assistance. Feel free to ask any questions along the way.
Thanks for showing me this!!! Going to try it!!
Lise Christofferson find me on Facebook or Instagram and feel free to send me pics!
Oh this looks gorgeous!
Jo thanks very much. Be sure to check out my latest Shousugiban video!
Thank you... That was a helpful and clear video.
Jay C your welcome. Be sure to check out my latest Shousugiban video
great job, congratulations for all your videos!
Thanjs
Awesome , i stained a bunch of windows for a customer and did cedar trim that i burned and sealed .....looked very awesome. Good work brother
Jason Johnson would love to see them! Shoot me a dm on Instagram or Facebook to Love of the grain workshop
Awesome job!!
Gerard's Horticulture Culture thanks very much
I realy love your video! Thanks!
Marius Leica thank you!
Suggestion for the metal brush ... I bought some cheap small grill brushes (clipped off the metal scraper on the front), you can get a good grip on the head of the brush, and it's a lot wider than that long handled brush. I'm doing long wall planks and it really sped up my work.
Great idea! Also an electric brush called the restorer made by porter cable and craftsman is another alternative.
thank you so much for the video im going make a concrete top night stand for my house and been looking for just this burnt look for the wood part of it
Awesome!
Thank you..that was very helpful.
Thanks
That looks awesome 👍
Tommy Trexler thanks very much. Check out my other shou sugi ban vids. One heavily charred and just posted one with epoxy resin colored over it.
I love this effect. Going to try to do my porch ceilings like this.
Awesome! Thanks for the comment. Any questions along the way feel free to ask.
Not a good idea to try and burn your house! Flames will shoot up between the boards and light any dust that is up there and the next thing you know is you have an attic fire! Try explaining that to the insurance adjuster as he is denying your claim!
Hotrod Hog absolutely not! Which is why i did this outside on my metal table saw.
And I was assuming he was doing it with the ceiling before he installed them.
Well I took it a bit like he or she was getting on a ladder and gonna torch the ceiling! These days we can never assume some folks have common sense Lol. Scary times we live in nowadays :o
Beautiful!
Thanks
In the 70's every bunk bed had this finish along with love seats and sofas with the water mill upholstery pattern...
that's pine
🤣🤣🤣🤣🤣🤣🤣🤣🤣🤣🤣
Haha true
Interesting technique...Many thanks for sharing.
owoh george thanks for watching and commenting!
Wow this was so helpful thank you
Thanks
That's beautiful never knew of this technique.
King Hicks thanks. It’s been around for a long time with various surges in popularity throughout time.
@@loveofthegrainworkshop2891 Thank you for introducing those of us who we're opaque! it is definitely something i want to try.
Damn! I just learned something in the first 5 seconds of this video. I do mine a tad different but see now where I can try a different method and get a gorgeous result too! Thanks!
Chris J Peavy wow! Thanks! Glad it could help! Any questions feel free to ask.
Love Of The Grain Workshop sorry about the notices. Fat fingers slipped. Anyway, I have a 6x6x12 raw timber in my shop that I’m about to test drive for an elaborate deck for a client. He wants the deep true shou sugi ban treatment for all of it’s real intentions and benefits obviously. I mean, 70+ years with no sealer other than light oil, who wouldn’t. She wants the “lightly toasted like a marshmallow” just for aesthetics. I took my mapgas and a 2x4 over to get their joint decision. And god help us all. I let myself out you know. But now, since we are doing a covered and uncovered with a rain garden, seeing you do that light side to side to really darken the hard grain and kiss the soft fibers, might pitch a compromise and play on contrasts if they’re still married tomorrow! LOL! Good stuff all the way around man. Love the channel. (Sad thing is, I’m an artist that can build a great deck so all the artsy fartsy stuff has to come out in that most often)
Great video sir!
Thanks
Thank you for posting
Absolutely
Beautifull!!!
Thanjs
This is awesome, ty
Subscribed
tina mckeage thanks very much. New vids coming soon
Beautiful job
miguel Becerra thanks
I'm going to use some aged pallet wood, burn the grain a bit and use it as the mounting base for a deer skull. Then wrap it in some barbed wire for a rough look. Just needed to watch someone do this before I attempt. Thanks.
Ben Leaper be careful with pallet wood. It’s treated with nasty toxic chemicals.
@@loveofthegrainworkshop2891 Look for the HT designation stamp on pallet for heat treated. they are okay. google the codes,
Ty so much..I love ur work
Thank you!
Thank you. I learned a lot from your video.
Thanks
Cool! Nice Video!
Thank you
very helpful. thanks!
Thanks
You’ve inspired me to build a patio bench for my girlfriend to sit on thank you for posting this
Warren W lucky girl!
Awesome! Send me some pics! My Instagram is Love_of_the_grain_workshop
How’d it turn out?
Still in the planning stages
@@tuco86x Nothing in the planning stages at all. Consider your comments before making them...my 23yo son committed suicide this past October and it was something that he helped me with.
I love this process of burning the wood, wire brushing and finish. Would look great as floor boards. Wonder how sand blasting the grain section would look then applying a epoxy finish.
Love the look with color!
That would look great!
Eye of the beholder. Try it !
Was thinking about doing and now I'm really thinking.
Do it! Dont hold back. Let me know how it works
Looks great
KHEM Studios thank you
Damn this looks good you my friend are the MAN
Joel Blanco haha thanks
Like it lighter than dark the 1st application was perfect
426 SUPER BEE it’s usually a 50/50 split which one people like better.
That's awesome. Thanks
Michael Jackson thank you!!! Be sure to check out my latest Shousugiban video
Beautiful
Thanks
Just beautiful
Freedom thanks very much
Great great tutorial
Thanks very much!
Love it 👌 Cant wait to give it ago👍🏻
Thanks. Let me know how it turns out!
I made a bed frame out of Oregon once. I lightly sand blasted the timber with very fine sand then brushed all the residue off. Then I lightly burnt the raised grain with a blow torch before finishing it with a wax. The feel of the grain was amazing.
The bed was a four poster which were lathed. It was queen sized, everything put together with wooden pins and wedges. It took me months to make.
I lost it in a fire. Heartbreaking.
Man that’s awesome and horrible at once.
Very nice 👍🔥
HB VIDEO thanks
Thanks for sharing you do nice work on wood etc.
MyREDTAIL thanks
Great, will use process for desktop I just completed.
Awesome
Best end result I've seen on here
Wow thank you so bery much!
Good work
kim so hyun fans thank you
Been watching a lot of wood burning videos for a project I’m about to make, this helped a lot. Great result! But you tortured your table saw!
Haha. No it was fine I promise. Still in amazing working condition. Check out my latest Shousugiban vid. Lots of new tips.
Muchas gracias por estos videos.hermosos
Thanks
Thanks sir, this solution I am happy
Thank you
Dude. You killed it! Awesome stuff
Peter Dods thanks very much
Great!!
Thanks
Try rubbing the wood down thoroughly with beeswax before doing the light burn. Makes the wood water repellent, and adds a beautiful golden colour. I do it for the frames of my food drying racks.
Hmmm! Never thought of that. Great idea.
Nice 🙌
Thanks
I'm making a spice rack kind like this, not quite so colorful, I just stained it with some early american minwax. Gave it a reddish look I really like.
Great!
I accidentally tapped this video while my phone was in my pocket and I wondered what the loud noise was 😂 I checked my phone and saw this looks cool so I waited till it finished
Flam3 well thanks so much for sticking around and watching it!
Perfect
Is that pine?
Thanks and yes pine
YES! Exactly what I'm going to do to my stair treads. Thanks!
Carrie Cessna awesome. Don’t do it in the house! Take the treads outside. Please.
Hello your video was amazing I am doing a project and I am in the step of the good sealer I will want to know what tipe of good sealer you use in the video.Thank you for your help.
In this one Minwax Polycrylic
After you burn and stain the wood Do you have to seal it with something? I'm building a outside bar. Do you have a video of that? Thanks you the man.
No stain needed. But yes seal it with a tongue oil is traditional. But you could use an outdoor varnish as well.
Absolutely Gorgeous. Does it matter with the torch with the grain or against? also was that an orbital sander?
Mitch Muerle No, direction doesn’t matter. Yes an orbital sander is what I used
Thanks, will try your suggestions. Will have to use a jointer, not a thicknesses , as roller of latter would damage burnt face.
Bob Frood yep
Nice
Thanks
Hello 🌹👍👏🏼❤️
Good afternoon
my friend how are you today Beautiful your Working the wood very good I’m happy for your working thanks so much goodbye
my Lovely ❤️👏🏼👍🌹
did a similar method for my fence but considering using a wire drum stripper for the interior house wood
You can absolutely do that. That is what I use now! Check out my latest vids on it.
I like it better the first time all very awesome
time for slime merritt thanks!
Wow I love this!
Thanks
dope!
Thanks
Hello! Thanks for the video! This is exactly what I have been looking for! I am installing what is considered "carbonized" barn doors in my home and need to use this method for the header board (the first method, less char). In doing so, should I seal the wood before attaching to studs? What is the method if the header will be installed against painted sheet rock after? Should I expect any chipping or would sealing the wood prevent that? To get the same effect as the first minute of the video, should I char then seal? Sand before sealing or not at all? Please advise. Thank you!
Amber Hatfield hi Amber. Thanks for the comment. Glad you enjoyed the video. I will try to answer as best I can. Yes I would seal the wood prior to installing. There should not be any chipping etc once it’s sealed. Be sure to use 3 layers or more of sealer. If you want the very light zebra like striped look. I would very lightly sand by hand with 220 grit paper. Then seal. Any other questions feel free to ask.
I've got a build that requires wood against aluminum siding and there's likely to see mold since the metal side will be outside in the weather. My question is, does should sugi ban protect against molds? Also, if the wood is painted, does it still guard against mold?
Ron Miller yes it does help against mold as well as fire water and insect damage. If it’s painted not sure. I’ve seen mold grow on paint
This looks awesome! I’m working in a project and I can’t seem to get the orange/Amber look you achieved. What is the wood sealer you used that made it pop?
Hi there! Thanks for commenting! If you scrub the wood with the brush enough to remove the loose bits. But not to deep into fresh wood. It will leave it a little more colorful. I used a water based poly on this one. Though an oil based would probably bring out even more color. Try Danish oil. Hope this helps
Get some Amber shellac... Good stuff. 👍
If you want the orange/amber color more, burn the wood like shown, brush and sand it then add a vinegar/steel wool homemade stain to it and then seal it with an oil based finish. For the stain, just put some vinegar into a jar and some 0000 steel wool and let it sit 3-4 days. Make sure the lid is slightly ajar since this creates a little gas.
Muito bom!
Thank you very much!
I'm new to wood working and my first large project is a basic computer desk. I really like this technique. What finish did you use at the end?
Lawrence Carlson this one I used polycrylic. Which is a liquid plastic like top coat. I would recommend using a danish oil hand rubbing it very gently.
Amazing!👏 what kind of seal do you use? It looks beautiful🤩
Alina Fayuk on this one minwax Polycrylic.
Looks amazing! I have a diy project coming up, I would like to make a frame for our bed, and this is exactly the look I would like 😍 but I'm concerned about if it smells burned? I have a very sensitive nose 😉 and does it rub off when it is touched stain fx clothes? Thank you in advance for your answer 😀
It does has a slight smell prior to sealing. Make sure you sand and dust it well. That should help tremendously with and dust rubbing off. Blow it off with a compressor, dust with a rag, then use tack cloth (which you can get from any hardware store) to remove and stragglers. That will take care of the dust rub off issue. After that seal with Polyurethane or Polycrylic (I recommend Polycrylic as it’s water based for easy clean up and dries faster, about 3-4 coats). Or you can use Danish oil which is rubbed on and really nice as well. Danish oil gets rubbed on with a rag, set 5-10 minutes buff off excess, wait for the recommended dry time before reapplying about 3-4 coats as well. Have fun. Send me some pics!
Very nice! How would I keep that deep black color though?
Tony McQueen sorry for the delay. I have seen since you found my other video showing a deep burn
Good video! I have heard if you spray the board before and during the burning process with water from a spray bottle it helps keep the wood from cupping as much. Have you used this?
It can but not always. It really depends on the severity of the burn and wood grain as well. It’s kinda trial and error.
Thank you for the videos. I’m going to try it soon. Do you ever use wood conditioner on the pine or 2x4’s before staining?
No staining at all. Clear coat after burning yes. And no I do not use precondition.
When sanding do you still leave the ridge/texture or sand to smooth...I really like the texture as part of the finish.
live4metal4life i like the texture ridges. I sand between them to keep it that way.
@@loveofthegrainworkshop2891 Is it possible for it to be sanded smooth and flat?
Adam Almaleky possibly, don’t tilt the sander up. Try keeping it completely flat.
That's absolutely stunning ! Great job ! I just have a question, if I want to apply this technique on a knife handle let's say, I should firstly shape the handle then do this technique, that's right ?
Le Cobra yes absolutely! I was thinking of applications to use this on. And thought knife handles would be amazing. Go for it. Be careful heating them. Do small sections at a time and lightly then cool, then burn again. The heat could warp such a small piece of wood. So go slow and intermittently so it doesn’t heat to fast.
Thank you, I will make sure to follow up your wise counsels !
Does the notion of charred wood acts as a barrier to rot have any prevalence. I am thinking about burning the inside of a homemade planter made from decking boards to better protect them from being permanently in contact with wet soil. The wood is pressure treated but i think and extra layer of protection will help.
DMESSER though it would protect the wood longer. Do not burn treated wood. It is illegal and toxic. Either don’t burn. Or use untreated and burn.
Great video .....awesome looking piece. When you say use your favorite sealer....is it Poly or something else ? Thank you
mundl kalli sorry I thought I said what it was. It’s minwax Polycrylic water based sealer.
No worries I might have missed it ....nevertheless,thank you for your reply...cant wait to do it myself !!!!!!
ty
Awesome video with an amazing end product. I have a question, and forgive me if you have already answered - after sanding, how did you prevent the dust and chard wood from tinting the clear sealer? I wiped it down with a dry cloth as best I could but there was still quite a bit of fine brown dust on the wood. Perhaps I should have put a heavier first coat of sealer to limit brush strokes, or washed the wood with water and let dry before sealing... my impatience got the best of me! The result was great except I did not achieve such a stark contrast between the raised chard grain and the lighter deeper grain.
Kevin Barfield ok so as far as the dust. I blow mine off with a compressor. Dust with a rag and then blow off again. If there are still little bits use a damp rag or tack rag (recommended) to grab any leftovers. Odds are not every single particle will come off. But that should help. As far as the dark vs light colored wood grains. Make sure you charr, brush sand. And again charr lightly if need be multiple times to get the desired effect. The more you charr the darker the harder grains get and then when sanding the lighter softer grains sand off revealing light colored wood. If you use an oil base finish it will darken everything a touch. If you use a water base finish it will not darken the light wood. But will help enhance the darker grains. Pine, spruce and cedar are best for this application.
Thanks for the detailed response! I will try these suggestions for sure!
That's a stunning colour, so 2 questions if I may? Can you post the exact poly product you used, and can you advise whether that product would be good for outdoors us? I'd be very grateful.
Craig Elder on this one I used minwax polycrylic. No for outdoor use. They now make a minwax water base spar varnish which is meant for exterior use.
Hi great video, is there much difference between using oil or water based stains?
Andy Comerford not really. Water builds on the surface. Where oil soaks into the wood.
So would this be effective for outdoor furniture like Adirondack chairs? I was under the impression that the SSB process was supposed to naturally preserve/seal the wood. Do you mainly do it just to reveal the character of the wood grain?
You would not want to charr treated wood as it can five off toxic fumes. If anything build from scratch with untreated then charr.