How to Make a Mini Radiant Diffuser for Macrophotography- A Universal Technique

Вставка
- Опубліковано 25 вер 2023
- Step by step making of a DIY radiant diffuser, described in details. It is a very simple, easy to make and very cheap.
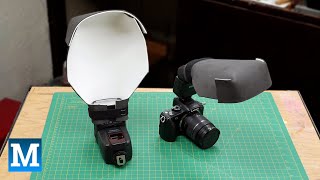
Making a mini radiant diffuser for macro photography involves a few simple steps. First, gather a small piece of translucent to white plastic sheet as diffuser panel. Cut it into a size that can cover the front of your macro lens. Next, find a circular object, like a plastic lid or plastic tube, that matches the diameter of your lens. Attach the diffuser to the circular object using adhesive or tape, ensuring it covers the entire opening. Finally, place the mini radiant diffuser over your macro lens, and enjoy soft and evenly distributed light for stunning close-up shots.
====================================
MY OTHER VIDEOS ON RADIANT DIFFUSER MAKING
Simple & Easy DIY Mini Radiant Diffuser for macro photography: • Simple & Easy DIY Mini...
How to make a mini Radiant Diffuser for Laowa 90 mm macro lens. • How to make a mini Rad...
========================================
AVAILABLE RADIANT DIFFUSERS:
AK DIFFUSER: akdiffuser.com
CYGNUSTECH DIFFUSER: Website: / cygnustech (send an inquiry via direct message) or Email to brendanjphotography[at]gmail.com
POPESHIELD: Website: popeshield.com
RADIANT DIFFUSER OF INDIA. GIRISH GOWDA
Instagram link. … / radiantdiffuser
Face book link: / radiantdiffuser
==========================================
Try Adobe Lightroom for FREE: geni.us/try-lightroom
Best Sony macro lenses for Sony E-mount: lesdeuxpiedsdehors.com/en/bes...
Socials DR JALIL PHOTOGRPAHY:
FACEBOOK PAGE: profile.php?...
INSTAGRAM LINK: / rjalil15559
#macro #photography #DR JALIL PHOTOGRAPHY - Фільми й анімація


Brilliant, easy to make, light weight and portable, all what you need
Thanks.
Hi from Russia ! I respect you for doing everything with your own hands and teaching others. Support this way. I make diffusers myself with my own hands. Everything and always. But mine also have a segment with foil attached under the lens to highlight the subject from below. This is especially useful when shooting insects. I recommend making it and attaching it with Velcro. To put it on and take it off if necessary. Velcro should be placed on the sides, just below the center of the lens, where the light no longer gets from the flash and the Velcro does not block light from the flash.
Thank you Mr. Светозар. Happy to know that you also make your own diffusers for macro. I tried to explain very simple methods for beginners. I also have diffusers with bottom reflectors too. In my upcoming video, I will also show, the making of diffusers with additional bottom reflectors. Thank you for your suggestions. By the way, where do you publish your macro photographs? I will be happy if you send me links to view your photographs.
Wow ❤❤❤❤❤
thanks.
Brilliant. Will definitely be buying some plastic and building one of these. Really clear instructions.
Glad it was helpful!
What a nice presentation. I'll follow your steps to make a diffuser for me. thank you so much
Hi, Vinicius , glad you liked it. Please see the dimensions of various diffuser systems I made.
drive.google.com/drive/folders/1uNqcQvAqnvS5xC1as1v_JL4e33XUh-Gw?usp=drive_link
drive.google.com/drive/folders/1J8va4jHUB7kqqVodYQ3mN9IStYVijaTg?usp=drive_link
@@dr.jalil.photographyThank you so much!
A lot of interesting information.
Thank you from Poland
Glad you liked it!
Thanks for another great addition to this series on how to make diffusers
Really helpfull
Looking forward to the next one on how you add your light.
Glad you enjoyed it!
Thank you Sir
Welcome!
TY great video
Very welcome
Thank you so much for the easiest tutorial 👌
You’re welcome 😊
Thank you for for this video. It was a great help. Looking forward to your next instalment,
Glad it was helpful!
Well done Sir. I will be trying this out. Many thanks
Please do!
Amazing! You are a very clever man 😊👍🏾
Thank you! 😃
thx mate
You are welcome.
Sir thank you so much. Good bless you longer. Last couple of weeks I been looking and googling it but you are wonderful and very helpful. Thanks again for making this so easy for us.
You are most welcome
Thank you for your very generous instructions. Could you clarify a couple of points for me please? I can't see the pencil lines clearly on your white sheet - where exactly in the inner circle do you trace the squashed circle for the lens hole? And along what line do you then cut the bottom half, to get the right width around the hole? I also wasn't clear whether you said you needed a card template for the diffuser, or whether I should just cut it directly in plastic?
drive.google.com/drive/folders/1uNqcQvAqnvS5xC1as1v_JL4e33XUh-Gw?usp=sharing
Mr Muldal, please download all pictures of radiant diffusers from my Google Drive. Link above. The inner circle should be at the bottom touching the outer circle line. Please contact me if you have any trouble again.
About, the paper board template, I did make it because I did not want to waste my plastic sheet. I wanted to make sure the size is perfect.
Great explanation...what type of stand are you using. The white stand your camera is sitting on in the video?
Hi Mr Chris Sobczak, glad you noticed it. I made it myself from an old microscope.
Thanks again for a great demonstration. In many ways your design is better than commercially available products. I like the idea of leaving the bottom open for easy focusing. Just curious, are you located in India? I spent a month travelling in Ragasthan and loved every minute. Such a beautiful country and a photographers paradise. Anyways, thanks again. Your videos have proven to be enormously useful. Cheers from Canada 🇨🇦
Hi, Gregory. Thanks, you appreciated my design. I live in Bangladesh, which is located in the Eastern Part of India. India is a photographer paradise for street and old building photography, but Canada is for landscaping. I visited several times in Vancouver and surrounding townships several times, including Yukon, Alaska, and Toronto. I wish I could visit again.
Hi Doc, thank you for the videos and knowledge. Which video is the diffuser with reflector under the lens? Thank you and best wishes from Jakarta.
Thank you Mr. Hans for your complement. I made this radiant diffuser for Laowa 90 mm lens.
@@dr.jalil.photography you're most welcome, Sir. I have just subscribed. Would you kindly please make a video of a diffuser with added reflector on the bottom of the lens please. I have the Sony 90mm and would love to make my own. Thank you again.
Thank you Mr Hans. I will make another video very soon with the bottom reflector. Please keep in touch.
Very lucid instructions, but sadly here in Kolkata milky whit plastic file is not available
Hi, Abhishek, thanks for your compliment. If you do not find the white plastic files, you may try some craft stores in Kolkata. They usually keep some plastic sheets of different colors. Or you may try some online sellers in India.
I you are serious about making it yourself, you may use "Diffusion Film Filter Sheet, Lighting Gel Diffuser Roll Photography Video, Light Diffuser, White Diffusion Paper Sheet Roll for Photo Studio Product Portrait Photography" available in Amazon India.
www.amazon.in/Diffusion-Lighting-Diffuser-Photography-Portrait/dp/B09XGZP71S/ref=sr_1_1?crid=1DREJANIRQC55&keywords=white+plastic+sheet+for+light+diffusers&qid=1702325844&sprefix=white+plastic+sheet+for+light+diffusers%2Caps%2C237&sr=8-1
Very nice information!!! Very detailed and easy to follow along!!! I might give it a try!!!👍👍👍
Please do!