Easiest step by step Highlights Tutorial you will see!

Вставка
- Опубліковано 24 вер 2024
- Here are my tips and tricks for doing a full head of foils!
I hope this was helpful 💕
The best way to section your hair for a full head of highlights will depend on the length and thickness of your hair, as well as the look you want to achieve. Here are some general guidelines for sectioning your hair:
Start by separating the top section of your hair from the bottom. This can be done by creating a horizontal part at the crown of your head and securing the top section with a clip.
For the bottom section, create vertical parts starting at the nape of your neck and working your way up to the crown. This will divide the bottom section into smaller, more manageable sections.
For the top section, you can create vertical parts as well, or you can simply divide the section into quadrants using horizontal parts.
When applying the coloring product, be sure to work from the back of the head towards the front. This will ensure that the highlights in the front of your hair blend seamlessly with the rest of your hair.
It is a good idea to start with the highlights in the back of the head, as these are the most difficult to reach and will require the most time to process.
Remember to take your time and be patient when sectioning your hair for highlights. It is better to take extra time to create even, consistent sections than to rush through the process and end up with uneven highlights.
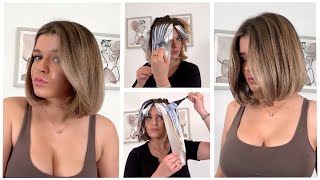
To put in a weave highlight using foil:
First, decide on the look you want to achieve and choose the appropriate hair coloring product. If you are using a hair bleach or lightening product, you will need to mix it according to the instructions on the packaging.
Section your hair into small, equal-sized sections, using clips to keep the sections separate.
Take one of the hair sections and use a fine-tooth comb to separate a thin strand of hair from the rest of the section. This strand will be the highlight.
Place the strand of hair on top of foil and apply the colouring product to it, following the instructions on the product packaging. Be sure to wear gloves and take all necessary safety precautions when handling hair coloring products.
Once you have applied the coloring product to the strand of hair, fold the foil over the strand, enclosing it completely. Repeat this process for each highlight you are creating.
Let the coloring product sit on the hair for the recommended amount of time. This will allow the color to fully penetrate and lighten the hair.
Rinse the coloring product out of your hair thoroughly and apply a deep conditioning treatment to help nourish and protect your hair.
Style your hair as desired and enjoy your new highlights!
It is always a good idea to consult with a professional hairstylist before attempting to colour your own hair, especially if you are unfamiliar with the process or are looking for a more complex colouring technique.
Socials:
Facebook: / rachelmckx
Instagram: / rachelmckx
TikTok: / rachelmckx
Twitter: / rachelmckxx
4- Finish off the look with a nice bouncy blue
Jewellery:
Necklace: -www.ferdorie.c...
Rings: -www.ferdorie.c...
www.ferdorie.c...


Do you do your own highlights? If so, could you show that and the in depth layer tutorial? Thank you so much for posting this type of videos!
I second this it would be fantastic if she has ideas of how to do the back of your own head.
Heyy, I do my own hair yes! I’ll defiantly film something next time I do my highlights 😊
@@Rachelmckeown Thanks will press notifications!
That was VERY well done.
Thank you ❤
It looks very gorgeous and natural! Oh Godness, what a many work and effort to achieve the result .but definitely worth it! Thank you for sharing!🎁
Wonderfully executed beautiful
Thank you so much for this video, have found it really helpful x
Great video. Thanks for sharing. Can you do one with your Haircut start to finish.
Beautiful! Should've gone to someone like you that understands the diagonal aspect. I'm continuously left with visible crooked lines that are brassy right at the top. No amount of toner will fix under developed bleach. When I want larger highlights that are COOL platinum with big money pieces & end up with baby, baby fine weaves of strawberry/copper....UGH! & maybe 3 or 4 actual platinums... (this has happened with several stylists that I've explained to, in detail what I want & specifically what I DON'T want, with photo examples & it's still so hit & miss) it is really depressing! I am so tempted every time to just start doing my own balayage again... except for the fact that my level 5-6 hair is to my waist & my shoulders can't possible keep up with trying to manage moving all the hair about...lol
You would need a higher volume developer. In some cases, if a toner doesn’t compliment your desired color then you will need to re-highlight. This is more for textured hair. Always do a stand test before! Purple shampoo works well after a highlight then moving onto toner.
👍👍👍👍👍💯💯💯💯💯💯👍👍👍👍👍from Egypt 🇪🇬 sending you ❤️ sweety 😘
How do you dye your hair plz share, and how do we care for it after dye. Cheers love your gorgeous