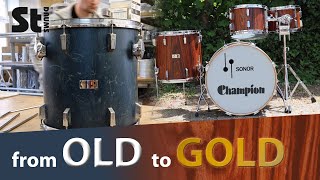
Restoring An Old Drum Set - Part 1: DIY How To Stain A Drum

Вставка
- Опубліковано 12 лис 2018
- SUBSCRIBE: bit.ly/2IpeubN Part 1 or 4 videos that will take you through how to restore a drum and refinishing a drum set. In this part 1, I will take you through my process for staining a drum with no skill and on a shoestring budget. Honestly, I used a lot of drum hacks and drum mods to complete this project and I'm not sure I did everything perfectly, but I am happy with the results. These Pearl Drums are pretty unique. I am not sure if you'd consider them vintage drums, but this particular model was only created between 1981-1983. So if you are thinking about refinishing your drum set, make sure to subscribe and check out all 4 parts of this series: #pearldrums #drumrestoration #drumfinishing #drumhardware #evansdrumheads #drumbuilding #drumbuilder #VicFirth
Dig this video? Why Not SUBSCRIBE: bit.ly/2IpeubN
Next Videos in This Drum Restoration Series:
Part 1: (Current Video)
Part 2: Updating The Hardware - • Restoring An Old Drum ...
Bonus: DIY Drum Building Tool - • DIY Drum Finishing Rol...
Part 3: Applying The Clear Coat - • Restoring An Old Drum ...
Part 4: Rubbing Out The Finish - • Restoring An Old Drum ...
Entire Playlist: • How To Make Your Old D...
Take the drum challenge that 98% of drummers fail... Completely free! thedrummersalmanac.com/dfc-op...
Follow me on:
Website: thedrummersalmanac.com
UA-cam: / thedrummersalmanac
Facebook: / thedrummersalmanac
Twitter: / drummersalmanac
Instagram: / thedrummersalmanac
TikTok: / jayfenichel
LinkedIn: / thedrummersalmanac - Навчання та стиль


I did a bunch of videos in this series outlining the entire drum set restoration... Check out the playlist: ua-cam.com/play/PL4Yyz0u_dF6M0vpVGxLofwuiUo658SFVn.html
Thank you 😊
I found an old Royce brand 4 piece in the trash and I am going to refinish it ,I like what you did ,good Idea . I was thinking to have the middle of the drum shell stained dark and the outer part lighter. Thanks again .
@@markdemell3717 awesome... I’d love to see some pics when you are done ✅
@@Thedrummersalmanac Greetings fro Gatineau ,Quebec ,Canada. I was just researching whenever your post went up just now ,I agree with you .One thing I am very skilled at is sanding ,I was a drywall sander for 10 years . I figure that staining is about proper flow ,I have seen others try to stain and they stopped the brush when painting it on and they were left with big dark spots all over. thanks .
@@markdemell3717 yup... you definitely wanna keep moving... I ended up building a whole roller assembly so I could do just that.
Man oh man did I laugh when your wife put the pillow there. From that tiny clip, I can see that you and your wife have a similar dynamic to ours. She’s annoyed, but used to it. Hahaha
Yup... that’s about right 😂😂
awesome work man! I'm getting into building drums so this is a great addition to my research. thanks.
Awesome! Good Luck...
Dude, these look immaculate! that's the exact stain and finish I want to do on my tama rockstar. great job with these videos- very helpful and everything was explained thoroughly. and of course, your shells are beautiful.👍🏼👍🏼💯
jbrussell8 make it happen! Let me know how they come out...
I think you did great!
Thank you very much for making these videos. I’ve been planning to do a custom kit, with fresh new shells, since the beginning of the year. This video is a great help.
Yeah man, do it! I love my kit... Send me some pics when it's done...
Thanks for the comment on mine. Smoothing it out did help a ton, but I wish I would have done the fade/contrast like you. looks great.
Thanks for checking it out. Hopefully we’ll both get better for the next build!
Really appreciate the work 🔥👍
Hi there great video and great job on the drums. Thanks.
Aiming that Masterworks look I see! Looks amazing!
Yeah... love the way they came out... and a hell of a lot cheaper than a Masterworks. Although, who wouldn't love a brand new Masterworks, right?
Drums look great! So much fun to restore/revive old drums!
It was fun... makes me wanna do another one. I bet I can get them even better the next time around. Sounds like you might have done it yourself... If so, how'd it work out for you?
You should do another one for sure! I haven't really refinished any drums but I have bought several kits that have damaged wraps, missing parts etc and re-wrapped/restored them. The before and after is pretty gratifying :) Just subscribed to your channel! Great content
@@ARDrummer Thank you again. Glad to have you here. I haven't tried a wrap, although I had to remove the wrap on those drums from the vid. The wrap was in bad shape and already peeling pretty bad... so it wasn't that hard. I only wish I had resanded the shells before I started working on them. All the pits in the shells made it tough to work with.
Yeah, some wraps come off easy and others, not so much! I had some old Ludwigs that were glued around the whole shell and it was horrible trying to remove it...I used a heat gun etc. and it still was a pain, lol
@@ARDrummer ...ugh... that sound like a pain
Nice job sir!
Kitt2112 thank you 🙏
In order to get the dark fade, I had to do 2 coats of dark walnut everywhere, then one coat of the fade and then 2 coats of a darker espresso stain and it got me that darker fade. Thanks for the great video!
Thanks for the great video I literally just bought a beat up pearl set for 40€
Gonna try it tomorrow ;)
Nice... I'd love to see it when it's done
What stain did you use?
Any recommendation for making an old, warped shell circle again? Is there a quick n' dirty method? Thanks!
Looks beautiful! any issues with the stain and/or poly dripping through the holes of the shells when applying? I Just got an undrilled unfinished walnut shell and I’m trying to figure out if I should apply oil/stain before drilling or after
Ok, the video is a bit dated but you hit upon a technique without realizing it. Way back in the old days of woodworking, there was no sandpaper to smooth out wood. So, when it came time to get the wood smooth, a cabinet scrapper was used. It was simply a thicker piece of metal with a beveled edge. Maybe the size of an index card. The wood was dampened to raise the grain and when it dried. The cabinet scrapper was drawn at an angle against the grain of the wood shaving off the raised grain. This was repeated until the surface was glass smooth.
Great video! How did you build the lazy susan?
I just bought something like this and attached it to a piece of drywall: 6" Lazy Susan Turntable 500 LBS pounds steel ball bearing rotating tray strong sturdy table cabinet low profile www.amazon.com/dp/B0006LBVDS/ref=cm_sw_r_cp_api_i_T8fvFbKJ8ZM70
Question. How is the paint holding up on the metal after 4 years?
I picked up a 2015 Ludwig accent set for 100.00 and stripped the plastic wrap off and painted them in jelly bean colors. The sound pretty good.
Enjoyed the video! What was the original stain you used before the dark walnut?
Actually... That was also the dark walnut... Minwax. It was just one light coat about 15 years ago. So the drum has changed a lot over time.
Gotcha thanks for the reply!
I might stain my old mapex kit because i hate the wrap thats on it but I dont really know much about taking wraps off especially where the adhesive is
I found with the Pearl kit, there was only adhesive at the seams. You can get a heat gun and try to gently heat up the glue... then carefully pry at the seems. Be careful not to touch the shells. Once the wrap is off, you should be able to sand away the adhesive.
@@Thedrummersalmanac thank you
Some kid on the internet ...no worries
Enjoyed the vid! Am planning to do this to my old set. Can i know what colour stains u used? Also, how did u manage to stain the bass drum on that small turntable lol?
The color I used was Minwax Dark Walnut 2716... my bass drum is only 18” and it just fit as I made sure the diagonals on the piece of drywall were 19”. ...I did end up building a jig to apply the poly horizontally. Check out that video. In hindsight, I would have done it that way from the start. Much easier!
Jig video: ua-cam.com/video/4iTxea9pBhY/v-deo.html
How did you make the spinning table?
It's a lazy susan mechanism I got from Amazon screwed into a square piece of drywall. Here's a link: www.amazon.com/Square-Inch-Susan-Turntable-Bearing/dp/B00ZSQSWTM/ref=sr_1_3?crid=3N3A4UAWKSAAY&dchild=1&keywords=lazy+susan+ball+bearing+base&qid=1587598068&sprefix=lazy+susan+ball+bear%2Caps%2C152&sr=8-3
@@Thedrummersalmanac Sweet, thanks!
What's written on the inside?
I think it's the name and address of a previous owner. I bought the set used. From the writing, it may have been a house kit from a studio in Brooklyn. I should reach out to them. lol
Could I do this with a cheap drum set that has a wrap.?
Absolutely... However, the type of wood that the drums are made of plays a big part in how it will look. These drums were cheap being that they were used, but I knew that the outer plies were maple under the wrap. Maple shells tend to have a very pretty grain. If the shells are just pine or poplar... there might not be much wood grain to bring out with the stain. If the outer plies are a wood like maple, birch, or mahogany, then it will definitely look nice with the stain. So it very much depends on what the shells look like when you remove the wrap. I hope that helps. Do you know what kind of wood you are dealing with under the wrap? What make and model is the kit?
@@Thedrummersalmanac I am not doing it to my drum set. It was just out of curiosity.
@@Dom-gk9ku lol... Well, I hope that answered it... and if you ever decide to do this, try to find a solid kit with a wrap that's not in the best shape. The wrap on this kit was already cracked and peeling, which really helped me negotiate the price down. You could end up with a really high-end kit for next to nothing.
@@Thedrummersalmanac i currently have a poplar set that is wrapped black. will it look better if i take the wrap off and stain it dark walnut?
Don Cheadle ...you can certainly stain poplar, although I have never done it... I found this video where he seems to have some success, but it’s a little extra work: ua-cam.com/video/6KwpT4KueM0/v-deo.html
My floor tom hoop damaged I want repair it. How I repair it. It is black colour. Please help me.
Is it a metal or wood hoop? and how is it damaged exactly?
@@Thedrummersalmanac it is metal and flake
@@shanikatharangi3107 if it's metal and flaking... check out my video on how to update your hardware. you can do the same thing with the hoop: ua-cam.com/video/ScyRDK9_hto/v-deo.html
The finished tom looks horrible to me. The finish doesn't look like it was sanded between coats. Going over it with 0000 steel wool would get rid of that uneven glossines and make it look like a nice furniture finish.
Yeah, I used the 0000 steel wool. The issue was not leveling the drum before I started. The drums still came out great. I am very happy with them.
Lose the background music, please. PLEASE.
lol... sorry you don't like my background music choices.
@@Thedrummersalmanac I'll only semi-agree with OP. For me, the music was fine while the video was displaying time-lapsed stuff, or text, or whatever else. It's just that is was a bit distracting to have the background music playing while you were talking.