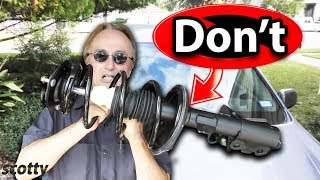
2014 Acura MDX Front Struts, Lower Control Arms, Stabilizer Links, Tie Rod End Replacement How-To

Вставка
- Опубліковано 2 жов 2022
- This video will show you how to replace the front struts, lower control arms, stabilizer links, and tie rod ends on the third generation Acura MDX 2014-2020. Most parts were purchased from Amazon and I will provide links down below.
Right Passenger Side Strut: amzn.to/3Rv3vfE
Left Driver side Strut: amzn.to/3M43ePQ
Strut Mount: amzn.to/3rpXw1e
Right Passenger Side Lower Control Arm: amzn.to/3fBExhs
Left Driver Side Lower Control Arm: amzn.to/3fFotuQ
Right Passenger Side Stabilizer Bar Link: amzn.to/3SIA7DS
Left Driver Side Stabilizer Bar Link: amzn.to/3SSO1Dp
Right Passenger Side Tie Rod End: amzn.to/3SBy8Bp
Left Driver Side Tie Rod End: amzn.to/3RAymat
Strut Spring Compressor Tool: amzn.to/3UUfA0J
CV Axle From Hub Removal Tool: amzn.to/3rIbtrv - Навчання та стиль


Partial Timeline to the best video on struts for this MDX. Thank you BlueCollarGarage
2:20 Axle nut remove
2:50 Outer Tie Rod remove (lift and hit with hammer) 17mm
4:20 Brake line bracket remove (connected to strut)
4:53 Remove Brake Caliper bracket - - rest caliper on bucket
5:32 - ABS Line out of strut, 5:40 squeeze bracket off the other side
6:09 Remove Sway Bar End links bottom, Spins - 17mm wrench+ allen socket to hold
7:24 - Lower Ball Joint Removal (LBJ), 9:30 pry bar to verify separation
9:35 Lower Control Arm - Center Bolt Remove (22mm)
10:00 Lower control arm Rear 3 bolts , 19mm socket, -and another in hole for sway bar bushing bracket
10:50 Sway Bar Bushing pry off
10:59 - separate Lower control arm and Lower ball joint - Move knuckle out of way and slide out LCA
11:23 Remove ABS sensor Bolt
11:55 remove CV axle from Hub, was seized for Bluecollargarage - used tool from autozone (57037)
14:40 - Remove pinch bolt for strut - - knuckle and rotor are heavy, - **DONT PULL out axle** careful, maybe pad the CV Boot with towel or something 16:55 tail end of this part
17:15 - Remove top 3 strut bolts near windshield
STRUT part
20:20 - strut spring compression -
23:05 - remove rubber from strut?
23:55 - pull mount off
24:10 - whole assembly off -
24:44 new strut in vice
25:35 new bearing and put rubber boot in
26:10 orienting spring correctly to bottom (2 landmarks to use) had to further compress spring to start thread
29:30 correct alignment to indentation)
30:35 - put cap back on strut
32:00 - get strut back in - top 3 screws, hold from bottom
Strut compression part - ended
32:35 - clean cv axle with wire brush and grease
33:10 clean knuckle hole and wire brush -
34:00 slight pry on knuckle where strut mounts are
34:55 - notch on strut fits right into knuckle
35:45 - Pinch bolt ready, has jack ready to help support weight of knuckle
36:10 -knuckle and strut joining - looks heavy
37:00 wiggle and align CV axle into hub - slide up onto strut
38:35 - uses jack to help slide up knuckle onto strut
LCA
42:00
42:31 - 1st middle nut then back end, WATCH the LBJ can easily tear it here - steering knuckle, Turns knuckle to side
45:00 3 bolts in
45:55 LBJ into steering Knuckle - large pry bar down, cotter pin
*will add notes later *
Thanks a lot
I don't plan to try this myself, but your video is the best I've seen so far. You describe what you're doing and your camera angles don't block any of your work. Thanks!
Been watching UA-cam for years, but this is actually the third time I am leaving comment, thank you so much for making this video, it helps a lot of our MDX DIYers here. I got the exact same car like you, but I don’t really like the suspension in this car, it’s like I can feel every little bumps I ran over, but last time i was only replacing the strut only, if I due for the replacement again, I will def replace the top Mount also the rubber bushing, again, love your video, clean and no BGM, hope to see your MDX videos again. 👍👍👍👍👍👍👍👍
I've been watching this video back and forth several times, great video, I'm about to start my project on this. I think I will take off the rotor to make the knuckle a little bit lighter to handle.
What an awesome video. After watching thousands of yt videos, this might be the only time if felt compelled to comment.
Thanks to you, I tackled this myself with almost no mechanical experience. I just finished the job tonight and I got stuck on a few things.
I couldn't get the lower control arm ball joint to separate on the passenger side, after whacking the knuckle with mini sledge and jumping on a pickle fork. I removed the knuckle and the control arm together which allows the use of a ball joint puller tool as the axle is no longer in the way.
Additionally, my abs speed sensors were beyond seized... I think if anyone else were to tackle this with stuck sensors, I'd try to unplug the sensor and leave it bolted into the hub.
Thanks for the outstanding video... Definitely subscribed...
I accidently clicked the thumbs down button but then quickly changed it to thumbs up. However, it made me think "Why would anyone give this video a thumbs down?" I rarely rarely rarely write comments on videos but from watching hundreds if not thousands of them I know they can help with "The YT algorithm". So, I am doing my little part for this outstanding video. Nothing to complain about because it was all great down to the torque specs. Fantastic. I will offer one suggestion. Before I do I will add that I do not make YT content so I may be wrong here but.... I would suggest breaking this long video up into shorter videos on each part. It does not seem like it would take much more editing to break the video up. That would let people get the exact content that they are looking for. You would get more views/likes across more videos. Even better do both. Keep the full version up. Then also upload the individual videos and have messages/links letting the viewer know that there is a full version as well as other individual videos. I have also seen other creators who have mentioned that "The YT algorithm" like shorter videos. I could be off base on this. However, I think the effort would be worth it. I type all of this because I think your video was great and you should have way more subs and views. Thank you.
Thank you I appreciate the positive feedback and glad the video was able to help you out. I have thought about breaking it up into multiple videos just never got around to doing it. I’ll keep that in mind on future videos thanks again.
Great video. I really appreciate the editing for time, thank you.
WOW 👌 EXCELENTE!!!
I know I'm not going to do all that job, because I have no power tools and no ability to do all that.
But for some reason I watched everything.
You are a professional 👏 and you should be a teacher.
Thank you so much for your help and you have a new subscriber!!!
100% agreed, such a beautiful job with the precision processes and the video angles were perfection to show all the critical areas.. thank you for sharing this wonderful video ...
Great camera angles and very detailed information. I will be doing this work next week only because of your video. This is a lot of work (compiling video) so really appreciate you doing this video.
awesome vid with all torque spec and part numbers! you da man!
Very detailed great camera and microphone…I’m gonna take this on
Very detailed video. I’m doing the same thing tomorrow.
Great video I did my passenger side today. Thank you for being through and official
Damn, it looks like I have to set at least a day or two to do this in the future for my 2020 MDX.
Awesome video.. so well done! I purchased my front struts and paid $250 to a shop to install them as those are just a bit past what I'm willing to do but now I'm confident to replace the lower control arms myself because of your video. I've already done inner and outer tie rods but will do the sway bar end links as well after watching this. Much appreciated!
Great job. Gotta do mine soon just waiting on the parts back orders
Most excellent video on struts and steps and videos each part of the way
I thought I could do this but I’m about to get worried lol
Might be over my head
I just bought complete pair of strut from Detroit axle. My previous OEM replacement wasn’t good. Seems dealers were selling old stock of strut that wasn’t good. Your video will help. However, hate this type of strut to remove axle.
Bought a 2014 Acura MDX for my son with high mileage. Needed the struts and control arm replaced. Luckily found your video. Absolutely outstanding down to the torque specs. Made the job so much easier. Thanks for doing such a great job on the video!
Great video
I need to find you to fix mines lol
Hey man. When I remove the steering rods. The nut was super crazy to remove. But also I could not get it to move that easily like yours.
Bro - I found the SIMPLEST way if you are really DIY person. 1) remove wheel. 2) remove brake line and brake sensor also. 3) Remove bolt of top end sway bar link. 4) Remove strut bolt at knuckl. 5) no need to remove anything else 5) spray wd40 around knuckle strut joint. 6). Place manual wheel jack between knuckle and top bottom end of strut. Facing sideway. Start screw in to expand jack which will compress and push strut upward and knuckle towards floor. 7) when you see strut almost out at knuckle, slightly careful to push away using pry bar. Knuckle will bounce up slightly and quickly due to control arm pressure upward. 8)removal 3 bolts under the hood and remove strut. 1) slide new strut in place at top end and loosely secure 3 bolts to have some free movement 10) next use long wood 6x2 piece to push/compress strut. This time Place jack on floor and wood between knuckle and tie rod. Place Wood upper end to securely at bottom end where spring end. Wood bottom end on the jack. Start compressing strut expanding jack. After enough compress smoothly slide/position strut into knuckle. Let the jack go. That is it. Finish rest. This is simplest so far without removing any joints that I found, but tricky to compress and need good hand skills. GOOD LUCK. You may Alternatively use strut compression tool instead of wood and jack for removal. Buy Complete strut on eBay.
What is a manual wheel jack?
27:00 does it matter how the strut mount is oriented? Because mine is backwards when I put mine back into the car and I’m really screwed for Time right now.
Do you have a video on replacing swaybar links for a 2017 RDX?
Sorry I don’t not at the moment.
Hey how are the control arms and sway bar links holding up since they’re after market I’m really concerned if I should go with Acura genuine or the link that you provided in the description
So far so good no issues yet that I know of. This was my brothers buddy’s Acura and he hasn’t said anything bad about them.
How do you know how many pounds is required per each bolt
Hey I just wanted to one one of the problems of my replacing
MDX I'm on a conference I'm
Hi great tutorial. I did replace the strut but i hear a noise when turning the steering wheel as if the spring was not spining freely on the upper mount. Did i overtighten the upper nut that holds the spring?
Did you replace the upper strut mount or did you reuse the old one?
@@BLUECOLLARGARAGE thanks for quick reply. I found the problem. I did replace upper mount, i bought parts from Acura. They don't supply bearing together with the new mount, it needs to be purchased separate. I rushed and quickly installed the mount without inspecting it since it is OEM part. My mistake. Had to take it apart and reassemble again with old bearing until i get new one.
Just checking with the upper strut mount, I was told the arrow points towards the knuckle did you hear any noise when turning like a spring? The brand of upper mounts you bought does it come with bearings?
Any idea how to get the LCA off without doinking up the ball joint? My Ball joints are in great shape.
There’s a couple ways if you can hit hard enough on the steering knuckle with a sledge hammer while prying down on the lca to vibrate it loose of if you wanted to remove the cv axle from the knuckle that way you got room to hit downward on the ball joint stud to separate it.
Welp, turns out while trying to beat it off, that back bushing tore, so looks like i will have to replace the LCA's after all.. :(@@BLUECOLLARGARAGE
nice video but why didnt you change the inner tie rod
Customer didn’t want to.
Hello sir how are you can you teach me how i take off my control arm stuck i cant take off thank you
Do you know where it’s getting stuck at?
I think you put the left with the right side.
There is an "L" punched on the part.
And the grease nipple it's on the other side
Awesome Video - just everything I needed to DIY this - wondering what is the mileage on this vehicle? , and would you estimate when these should be changed? thank you!. I have almost 120K miles.
Thanks! This one had right at 150k I believe.
I hear a noise while the vehicle moves through a bump and descends through the bumps. Lower arm has been changed, front sway bar bushings, linkages, front strut , complete tierod . What’s the diameter of the front and rear stabilizer bushings
Not sure on the diameter this was not my vehicle. Sounds like the stabilizer links are bad but you mentioned you already changed them right?
@@BLUECOLLARGARAGE yes it’s been changed with a new one. Sound comes up especially when you ascend a bump and descend
@@mayowaodus6310 yeah I’m not really sure what it would be then. Are the struts oem Acura?
After a year how are all the suspension parts holding up ,
Not really sure this was on my brothers coworkers car and he hasn’t had any complaints so far.
What causes actions to stick into the hub
What causes acid estate and hub race
The oem control arms are better
I found most simplest way of replacing without removing any of the lower ball joint or tie rod or control arm. Just use compression method. See my next comment
I watched this video a few times, but I didn't get why you need to hull out the hub. I don't think it's needed to replace the struts, lower control arm and stabilizer links, even the tie rod. Please educate me coz I'm a noob.
Question for whoever can help. I’m trying to find a part (TZ5R) which, at min 18:13, is the only part that’s visible still attached to the car. Any help would be greatly appreciated.
Are you talking about the steering knuckle?
This piece www.acurapartswarehouse.com/oem/acura~knuckle~l~fr~51216-tz5-a00.html
Thanks for the reply. I don’t believe that’s it. At min 18 there’s only one part still attached to the car. I think it’s called the outer tie rod? It’s currently split in half in my MDX, and I believe I might need the outer and inner tie rod. Confirmation or pointing me in the right direction would be awesome.
Was this a base model or SH-AWD model MDX?
SH-AWD
@@BLUECOLLARGARAGE Thanks, great video
static.nhtsa.gov/odi/tsbs/2016/SB-10084739-2280.pdf Service bulliten for struts with torque specs
How much you charge to change the struts?
On this vehicle for the fronts about $200
200 each size or for both sizes cuz I’m in Philly and some of them mechanics trying to charge me 1800
I mean i DONT know much about it but I think is to much Thank for you response.😁
@@aldoperez4759 is the $1800 for both struts and labor?
@@BLUECOLLARGARAGE yes for both
It’s that a fear price or a little high ?