Back in the handsaw days, if a carpenter or woodworker needed a joint to fit together perfectly, he would recut the joint with the two parts put together. That made it so that the cut would be mirrored on both pieces, so they would line up accurately after the cut was made. This simple sled does that on the table saw, holding two parts firmly in place for the cut. I also made 45 degree fences that are removable to cut perfect 90 degree miters. I designed this on the fly and made improvements / additions as I went. Another fence option would be one for 22.5 degree cuts for a 45 degree miter. Also this sled can work as a tapering jig, as I show with my first cut. And of course as a regular table saw sled for making 90 degree cuts on the ends of stock. The base of mine is 16" wide and 22" long, so fairly compact. It can be made wider and longer, if needed, but I think this is a good general use size.
John I watch your videos all the time on all your channels, and I can tell you I appreciate that you show your mistakes because it shows no one is perfect and here's how you learn. Kudos to you John you are indeed a excellent woodworker.
I have recently heard of a woodworker on UA-cam having someone upload their content on Facebook. I've seen your content on Facebook, not sure if it is you.
Unbelievable! I have a CNC about 4 foot by 4 foot and have it on a big awkward fold down table, I never thought about wall mounting it! What a gem of an idea, thanks
John, I seriously appreciate your efforts in keeping our craft alive and exciting. I just noticed how much you make me think of Pask, you have the same cadence.
@@billsicander7371 pretty much what I do as well, but for some dang reason, solutions continue to pop into my head. . . . you guessed it, in the shower.
Such a great idea! I really enjoy seeing you work things out like this, and iterate on an idea. Thanks for being willing to show an entire process of a idea and not just the typical UA-camr showing a 'perfect' final product.
so simple, so great! these ideas that you show are the what got me to first find you, but for a long time now I enjoy all your content. You have a fantastic delivery at a very good pace. Keep them coming John!
That is a brilliant and fairly simple multi function sled that will come in extremely handy for most woodworkers. I can certainly see myself making one of those as it is not too complex to make but can save a lot of time and frustrations when trying to make those perfect joints/mitres.
That is an excellent jig. You always come up with jigs that are only as complicated as they need to be. I don't have a CNC , but I can replicate this jig with my tools. Thanks for posting this video.
Genius. I’ve used a similar process to joint boards with a track saw, where the blade kerf cuts both boards at the same time. Your process is next levels.
Compared to traditional methods (length stops + angular references) the eyeballing "cut both at the same time"-method will give way more problems than it solves. It's only plus is if the saw has severe blade wobble problems and imo it's better to solve the real problem in that case instead of creating new ones. Different angled parts as you cut at 5 minutes, "pushed out slightly" to cut a bit of both, affects the width and length of the parts differently. How much is depending on the individual angles and how much is cut off each part. This gives two variables not possible to control, you introduce a risk to have a width step between the parts and different lengths compared to the next joint pair since there is no length reference. Btw those cuts are with advantage cut with the straight sides against the fence on a normal sled as it gives tear out support on the exit side and no "add on fence" is needed. For identical angle and width parts, example a mitered frame, width is no issue but there is nothing (again except excessive blade wobble) to gain by cutting both at the same time, length and angle references is what matters. And no, it can't with any success be used as a ordinary sled as it says in the description. No tear out support and very un-ergonimic to use a front fenced sled. A sled without rear fence is useful for some angled cuts, but it needs length stops and I also recommend microjig dovetail clamps instead of those overly complicated fiddly hold downs. Dovetail clamps would simplify things considerably, both build-, hardware- and usage wise.
Hi John, I watched the videos in the wrong order so saw the scrap bin one first in which you talked about the hard coded subtitles and wanted some feedback on them. I have to say I didn't really notice them at all so no distractions for me. Great project to solve the perfect joint issue, I love it. Thanks for sharing yet again.
Great idea and project. I liked the parts where you made some mistakes and lived up to them. Also, great idea to put your CNC on the wall! Now you got the little wheels in my head spinning.
It just really would not scream your channel if your CNC wasn’t mounted vertically. I’ve never seen that or even considered it, but what a space saver. Shear genius as always!
Nice job 👍 I got 2 new mitre saws one fixed battery and one a sliding plug in one, also got a new table saw, so this is going to come in great this year! Cheers 🏴🇬🇧
I've wanted to make a sled that does that perfect fit 90 degree miter in that manor for box walls. I made one that proved concept but never refined it because of time. Great video John.
not sure why you added hard coded/burned in subtitles, but would you consider using youtube's subtitles system instead? this way 3rd party tools can "read" the subtitles. additionally youtube's subtitles can be switched off and are not as distracting as hard coded ones.
I noticed i had that same trouble lots of times & usually did a renky deek to cut both at same time thanks this will be another great jig i know will work
Yet another great idea I’m adding to my list of “I really need to make that for my shop!” Do you think adding sandpaper to the sled and hold downs could improve it? I feel like the workpiece could slip…
Subscribing to your channel was one o the best ideas. Your videos are amazing - your craftsmanship likewise. A CNC wall mounted? Why does noone else think of that? I really enjoy your videos. Great source of inspiration - maybe one day I'll make my woodworking a profession. Your vids give me quite a boost! All the best for 2024 - Greetings from Germany.
Jon, I think you’ve reached the point where you need to sit down and ask yourself a very serious question: am I coming up with projects just so I can make jigs?
I think he’s explained how this ‘jig’ grew to solve multiple needs plus the odd special one. Looks like a couple of other jigs or cutting sleds can be recycled.
-Miter saws typically have adjustment screws to true the saw up with. Both for angle (face) and miter cuts. -You can cut very long sharp angles on your miter saw by putting a wedge shaped piece against the fence in conjunction with your saw’s regular adjustment. That works easier on angle face cuts than miters but can still be done. -i.e. set your saw on 45° and put a 30° wedge against your fence to cut a 75° angle.
Years ago I was thinking about how one would go about making a 3-D barn star. You'd have 10 complexly mitered pieces to glue into one star. The challenge was compounding error. I made a few, but the miters never met precisely. I can see this as a solution to that problem. You'd only be limited by the size of the sawblade as to how big the star could be.
My first thought was how could this work with a closed-loop piece such as a picture frame. The pieces are getting jointed perfectly, but you lose precise control of the length of the workpiece.
First of all, great jig! I really appreciate your channel, you really design and build really cool stuff. About the jig: Couldn’t this jig be 2 separate jig, left and right side of blade? The thing is, when you are cutting the joint, what seems to guarantee the joint marrying is the angle of the blade. On the other hand, the technique implies the workpieces to have some extra material before the final cut. When you are placing the two pieces at the same time, it requires that extra material to be really small, in the magnitude of half the thickness of the blade. By cutting each piece, one at a time, on “half a jig” you would be allowed to have more material and have a lighter jig to move around. Just an idea! Keep up the great work
Terrific jig John! To make the jig a little bit easier to use, I was wondering if you use small toggle clamps in lieu of those nuts that you have to constantly twist off & on? Just a thought. 👍👍
The flight was very good I thought however I was interested in the CNC on the wall. Could you explain why you put it on the wall and if it works okay please


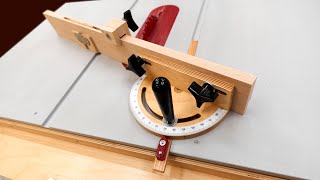


Back in the handsaw days, if a carpenter or woodworker needed a joint to fit together perfectly, he would recut the joint with the two parts put together. That made it so that the cut would be mirrored on both pieces, so they would line up accurately after the cut was made.
This simple sled does that on the table saw, holding two parts firmly in place for the cut. I also made 45 degree fences that are removable to cut perfect 90 degree miters.
I designed this on the fly and made improvements / additions as I went. Another fence option would be one for 22.5 degree cuts for a 45 degree miter.
Also this sled can work as a tapering jig, as I show with my first cut. And of course as a regular table saw sled for making 90 degree cuts on the ends of stock.
The base of mine is 16" wide and 22" long, so fairly compact. It can be made wider and longer, if needed, but I think this is a good general use size.
John I watch your videos all the time on all your channels, and I can tell you I appreciate that you show your mistakes because it shows no one is perfect and here's how you learn. Kudos to you John you are indeed a excellent woodworker.
John, I guess that you need to adjust the length of the pieces a couple of mm "long" to allow for that final cut... No carpenter, I...
😂5 😅2p😅😅😅poii0
I have recently heard of a woodworker on UA-cam having someone upload their content on Facebook. I've seen your content on Facebook, not sure if it is you.
good content
I can't click like twice, but I came back after the chair video to see this one again. I think I want one.
Unbelievable! I have a CNC about 4 foot by 4 foot and have it on a big awkward fold down table, I never thought about wall mounting it! What a gem of an idea, thanks
John, I seriously appreciate your efforts in keeping our craft alive and exciting. I just noticed how much you make me think of Pask, you have the same cadence.
Brilliant, as usual. I love your process. I always figure my improvements/fix's in the shower. Well done.
It’s a choice ! I’d rather wash my body in the shower, …😂
@@billsicander7371 pretty much what I do as well, but for some dang reason, solutions continue to pop into my head. . . . you guessed it, in the shower.
Fixes*
Plurals don’t have apostrophes brother. Guess they don’t teach you that in the shower
Such a great idea! I really enjoy seeing you work things out like this, and iterate on an idea. Thanks for being willing to show an entire process of a idea and not just the typical UA-camr showing a 'perfect' final product.
I love the vertical concept, so clean. All the sawdust falls to the ground easy to clean
I'm not going to have a miter / chop saw in my shop, so these kinds of things are immensely helpful. 👍
Your level of inventive genius is astounding. Heaps of praise from Houston, TX!
Great project John. Simple but very accurate and useful.
Thanks for sharing.
I've been thinking about a sled like this for a while - good to see I was on the right track.
so simple, so great! these ideas that you show are the what got me to first find you, but for a long time now I enjoy all your content. You have a fantastic delivery at a very good pace. Keep them coming John!
Now that's a neat jig. I've always enjoyed your type of problem solving. Thanks John.
Right away a home run in the beginning of the new year! That is some really useful jig and first project I’m going to build this year. 👍😀
I can see this jig being very useful. I am thinking about making a chair later this year. Will give this a shot
This is epic John, not only a perfect joint jig but also, as you did in the beginning, a taper jig, brilliant!
Great sled idea John!
That is a brilliant and fairly simple multi function sled that will come in extremely handy for most woodworkers. I can certainly see myself making one of those as it is not too complex to make but can save a lot of time and frustrations when trying to make those perfect joints/mitres.
It doesn't get any better than this.
Damn, I was hoping it would.
That is an excellent jig. You always come up with jigs that are only as complicated as they need to be. I don't have a CNC , but I can replicate this jig with my tools. Thanks for posting this video.
Well, thank you for adding to my "to do list". Absolutely brilliant!
What a slick idea! ! ! ! Another sled project on the list. I've only got two blank plates left but this will be well worth using one of them.
Marvellous! I don't need this sled but I would like to have it just so I could show people how it works.
Best Wishes, Brendan.
A recut jig. What a stellar idea!
Genius. I’ve used a similar process to joint boards with a track saw, where the blade kerf cuts both boards at the same time. Your process is next levels.
Compared to traditional methods (length stops + angular references) the eyeballing "cut both at the same time"-method will give way more problems than it solves. It's only plus is if the saw has severe blade wobble problems and imo it's better to solve the real problem in that case instead of creating new ones.
Different angled parts as you cut at 5 minutes, "pushed out slightly" to cut a bit of both, affects the width and length of the parts differently. How much is depending on the individual angles and how much is cut off each part. This gives two variables not possible to control, you introduce a risk to have a width step between the parts and different lengths compared to the next joint pair since there is no length reference. Btw those cuts are with advantage cut with the straight sides against the fence on a normal sled as it gives tear out support on the exit side and no "add on fence" is needed.
For identical angle and width parts, example a mitered frame, width is no issue but there is nothing (again except excessive blade wobble) to gain by cutting both at the same time, length and angle references is what matters.
And no, it can't with any success be used as a ordinary sled as it says in the description. No tear out support and very un-ergonimic to use a front fenced sled.
A sled without rear fence is useful for some angled cuts, but it needs length stops and I also recommend microjig dovetail clamps instead of those overly complicated fiddly hold downs. Dovetail clamps would simplify things considerably, both build-, hardware- and usage wise.
Yea slowing down some…..but the brilliance has not waned. Well done John!!
Keep up the good work I’m always looking for you videos, I’m following you for many years now, thanks for your efforts to create such great content
Hi John, I watched the videos in the wrong order so saw the scrap bin one first in which you talked about the hard coded subtitles and wanted some feedback on them. I have to say I didn't really notice them at all so no distractions for me. Great project to solve the perfect joint issue, I love it. Thanks for sharing yet again.
Always fun to see your thought process and solutions. Love a great jig!
Outstanding work John, keep it up and be safe
This is a great idea. Love the subtitles.
Great idea and project. I liked the parts where you made some mistakes and lived up to them. Also, great idea to put your CNC on the wall! Now you got the little wheels in my head spinning.
Thanks for wonderful videos and many clever ideeas. Whish you all the best.
A proper elegent solution, love it!
It's so important to never have a "sloppy cleat".
Nice jig
It just really would not scream your channel if your CNC wasn’t mounted vertically. I’ve never seen that or even considered it, but what a space saver. Shear genius as always!
Nice job 👍
I got 2 new mitre saws one fixed battery and one a sliding plug in one, also got a new table saw, so this is going to come in great this year!
Cheers 🏴🇬🇧
I learned something today. Thank you for sharing this.
Hello, you are the best, we learn a lot from you, thank you.
Nice combination of CNC and "traditional" woodworking to come up with a solution to a problem that we all have to deal with.
Brilliant, John! Fantastic work!!! 😃
Stay safe there with your family! 🖖😊
I've wanted to make a sled that does that perfect fit 90 degree miter in that manor for box walls. I made one that proved concept but never refined it because of time. Great video John.
not sure why you added hard coded/burned in subtitles, but would you consider using youtube's subtitles system instead? this way 3rd party tools can "read" the subtitles. additionally youtube's subtitles can be switched off and are not as distracting as hard coded ones.
Really like your jig you made
Perfection. Great video thumbs up.
Kind of a shooting board for the table saw. Nice.
I'm going to build this. Thank you John.
I noticed i had that same trouble lots of times & usually did a renky deek to cut both at same time thanks this will be another great jig i know will work
Excellent as usual
Thats a pretty god idea. I would have never thought of it.
Perfect gênio fantastic very good.
Yet another great idea I’m adding to my list of “I really need to make that for my shop!” Do you think adding sandpaper to the sled and hold downs could improve it? I feel like the workpiece could slip…
Really cool jig
I like this solution better than what FourEyes and Boyd use for their aesthetic but crazy angles. The bonus.... It can be used in production runs!
that's a pretty cool jig.
Very nice jig John. Your videos and woodworking have come a long way since I subscribed years ago. 👍
That's pretty slick. Thanks for sharing!
Subscribing to your channel was one o the best ideas. Your videos are amazing - your craftsmanship likewise. A CNC wall mounted? Why does noone else think of that? I really enjoy your videos. Great source of inspiration - maybe one day I'll make my woodworking a profession. Your vids give me quite a boost!
All the best for 2024 - Greetings from Germany.
Excellent idea!
Excellent! thank you for sharing
I like what you did with the music.
Jon, I think you’ve reached the point where you need to sit down and ask yourself a very serious question: am I coming up with projects just so I can make jigs?
I think he’s explained how this ‘jig’ grew to solve multiple needs plus the odd special one. Looks like a couple of other jigs or cutting sleds can be recycled.
Brilliant!
Very good idea and video! Thanks.
THANKS FOR THE VIDEO
Phenomenal. I will make and use immediately
You are genius! Happy New Year. 🎉🎉🎉🎉
One jig to rule them all 😉
Brilliant idea
I’ll be interested to see if you come up with a quick clamp hardware to replace the wing nuts. Great project!
Great job fab. Gotta try it.
great think through sir!
-Miter saws typically have adjustment screws to true the saw up with. Both for angle (face) and miter cuts.
-You can cut very long sharp angles on your miter saw by putting a wedge shaped piece against the fence in conjunction with your saw’s regular adjustment. That works easier on angle face cuts than miters but can still be done.
-i.e. set your saw on 45° and put a 30° wedge against your fence to cut a 75° angle.
John;
Gutes neues Jahr, eh!
🇨🇦 🐻 in 🇩🇪
Years ago I was thinking about how one would go about making a 3-D barn star. You'd have 10 complexly mitered pieces to glue into one star. The challenge was compounding error. I made a few, but the miters never met precisely. I can see this as a solution to that problem. You'd only be limited by the size of the sawblade as to how big the star could be.
My first thought was how could this work with a closed-loop piece such as a picture frame. The pieces are getting jointed perfectly, but you lose precise control of the length of the workpiece.
Très belle idée ❤
Awesome. I must build one.
Maybe I just got lucky. I got a miter saw a few years ago and it is super accurate.
Pretty smart!
No driving knife? You're nuts 😂😂
Very cool.
Magnífico su trabajo lo felicito
That’s neat!
Super 👍👍👍
I really want to know more about that wall mounted CNC....
those quick release clamps for tracksaws that fit in the guide rail, could probably work instead of the bars and wing nuts
First of all, great jig! I really appreciate your channel, you really design and build really cool stuff.
About the jig:
Couldn’t this jig be 2 separate jig, left and right side of blade? The thing is, when you are cutting the joint, what seems to guarantee the joint marrying is the angle of the blade. On the other hand, the technique implies the workpieces to have some extra material before the final cut. When you are placing the two pieces at the same time, it requires that extra material to be really small, in the magnitude of half the thickness of the blade. By cutting each piece, one at a time, on “half a jig” you would be allowed to have more material and have a lighter jig to move around. Just an idea! Keep up the great work
Excellenr work as always ☺☺
Terrific jig John! To make the jig a little bit easier to use, I was wondering if you use small toggle clamps in lieu of those nuts that you have to constantly twist off & on? Just a thought. 👍👍
John i never thought you would get a CNC machine.
Looks like a solution in search of a problem. You're just cutting a straight line. What was the difficulty doing this without the jig?
The flight was very good I thought however I was interested in the CNC on the wall. Could you explain why you put it on the wall and if it works okay please
Wonderful
Really,interesting and pertinent, thanx
Brilliant
Why don't you recalibrate your miter saw?
Loved it. Not so keen on the subtitles tho.
Groovy!