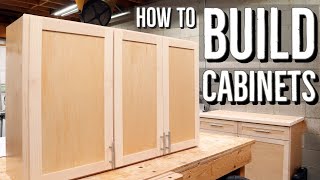
How to Build Easy Wall Cabinets for Storage - Cabinetmaking

Вставка
- Опубліковано 3 жов 2024
- See the easiest way to build your own wall cabinets, also known as upper cabinets. Wall cabinets are typically used in kitchens, laundry rooms, and workshops to make the most use of storage space.
RELATED VIDEOS:
Playlist for Workshop Organization and Tool Storage - • Workshop Organization ...
How to Cut Large Boards - • Saw Guides for Cutting...
How to Build a Cabinet for Organizer Box Storage - • How to Build a Cabinet...
Organize Workshop with Small Parts Organizers and Storage Cabinets - • Workshop Organization ...
Beginner Wood Finish Recommendations - • Wood Finish Recommenda...
A wall cabinet has 2 sides, a top, a bottom, a back, and 2 nailers. There are a number of different ways cabinetmakers build cabinets but I want to show you the easiest way to build a wall cabinet without a lot of tools. The first cabinet is simple, the second one I build is a little more complex with and adjustable shelf and hidden nailers.
The first step is determine the size of the cabinets you want to build. Then buy your material and cut it down to size. I use 3/4 inch plywood for all the parts except the back, which is 1/4 inch plywood. If you have limited tools, you can have the lumber yard cut down the plywood for you. If you want to learn how to cut down large boards, check out our video to learn how to do that • Saw Guides for Cutting...
Once the parts are cut to size, it's time to add edge banding to cover the edges of the plywood that will be visible. This iron-on veneer is easy to apply with a hot iron. Once it's cooled, I trim it off with an edge band trimmer on the long sections and a utility knife on the ends.
For the first and easiest wall cabinet, all the parts are now ready to be assembled. Its easier to do this with 2 people, but if you're working along, I suggest buying some clamping squares to hold the parts together while you pre-drill the holes and drive in the screws. I drive in 3 screws for each section to connect the side to the bottom and the side to the top. I also glue this joint for a little more grip. Once the sides are secured to the top and bottom, check for square by measuring diagonally from corner to corner to make sure they're equal in both directions.
The back is glued and nailed on to help keep the cabinet square and prevent it from racking. The last step is to install the nailers on the top and bottom. These are important as they are used to attach the cabinet to the wall. I drive in 2 screws from each end and two on the top/bottom. You're done on the easiest wall cabinet you could ever build. The nailers are visible, so if you want to hide them, the second cabinet I build shows how to do that.
The second wall cabinet also has an adjustable shelf. This is easy to add to a cabinet using a shelf pin jig and some shelf pins as shown in the video.
My goal is to give you enough information to be successful in building a wall cabinet. Here are some other educational videos you will find helpful.
TOOLS:
Countersink Drill Bit with Depth Stop - amzn.to/3kpvHTS
Canadian Link -amzn.to/3EE8Eg0
90 Degree Clamping Squares - amzn.to/3hUPjxv
🇨🇦 amzn.to/3tUG31e
Shelf Pin Drilling Jig - amzn.to/2VWf3BM
🇨🇦 amzn.to/3nYAzlf
Trimmer for Edge Banding - amzn.to/2XJaf38
🇨🇦 amzn.to/3nZEiin
Wood Edge Banding - amzn.to/3zzTvsv
🇨🇦 amzn.to/3lT7XXJ
Our Newsletter - Sign up at WoodenItBeNice.ca
Our Woodworking Plans - woodenitbenice...
Our 1-on-1 Woodworking Advice Sessions - woodenitbenice...
See the tools we use in our workshop and the tools we recommend: www.amazon.com...
🇨🇦 Canadian link - www.amazon.ca/...
For more woodworking knowledge or to contact us directly, visit our website WoodenItBeNice.ca Hosted by Scott Bennett, owner of Wooden It Be Nice in Brooklin, Ontario, Canada
#cabinets #cabinetmaking #storage


One of the best channels on UA-cam, love your videos brother 👍👍
Thank you. Please share it with others so more people can learn from our videos. Thanks. Scott 🇨🇦
A couple years ago I tried getting into wood working and spent a lot of time and money on various projects that all failed. I couldn’t get anything straight or square.
After watching this video I made 2 identical and perfectly square cabinets and couldn’t be more proud. Thanks for the simple and effective instructions 👍🏼
That's awesome! I'm so happy for you! Thanks for sharing that!
@@HomeImprovementWoodworking thanks for sharing your knowledge!
One of the best channels i have seen.
Thank you! More videos coming in a few weeks.
I love watching Scott's videos. He's so chill, reminds me of my shop teacher in high-school
Thanks Dave!
Finally an actual simple video that doesn’t involve fancy tools.
I'm glad you appreciate that. Scott
Did you miss the mitre saw?
@@TwobirdsbreakingfreeI buy my stuff already cut
@@purplegirl8036 okay, I was just pointing out that there was a fancy tool in the video - a mitre saw.
@@Twobirdsbreakingfreenot sure what era you live in? But mitre saws are common in all woodworking shops they are very affordable. The table saw is more expensive than the mitre saw by the way.
You sir are a legend. i saw almost 10 videos on how to build wall hanging cabinets. and after watching this video i dont need to watch any more. almost all the other videos use pocket holes, dado and what not. this is the simplest, and IMHO most DIY friendly video on how to build wall hanging cabinets. you have got another subscriber. please keep on making videos and sharing your knowledge till you can. 😀😀😀
Thanks, perfect video
Scott: I love this video. All I could think of was building all different size box shelves that would sit on each other in a geometric design, free standing, on the floor. Stained natural with black trim. I guess there is a design project that is brewing in my head. Carol from California
Glad you enjoyed it Carol. Thanks for sharing that!
When you built the first cabinet I thought “damn I wanted to know how to hide the nailers!”, and then you went and showed how 😅
Thank you for this video! Very helpful!
I will be installing French cleats instead of nailers to hang my cabinets :) hiding so they sit flush with the wall
2 years late but thank you for creating this, so well explained i subscribed, hopefully you are still creating content.
Thank you. Very nice video. I appreciate helping beginners and hobbyists.
Our pleasure!
Thank you! I can do this!!
Wonderful! Thanks for sharing that!
Fantastic video I'm a beginner and this most defiantly helped me to start my first cabinet build. I've watched other videos and it was too complicated to understand. Great video Thank you
Glad I could help!
Bob Ross of cabinetry 😀👍🏼
Very detail oriented, easy to understand, and excellent explanation from step 1 to the finish. Thank you so much for your very informative video
Glad it was helpful! Thank you for sharing that. Scott
I appreciate the way you teach.
Thank you for the feedback! Scott
Appreciated that you spun off the parts into smaller videos. It was great to dig into watch for the details.
Glad you liked the details. Scott
@@HomeImprovementWoodworking ohh my typo. Fixed. Appreciated ha
Fantastic video! I will now build my first wall cabinets instead of buying them built. Thank you
Glad it was helpful! Good luck with your project! Scott
Excellent…Excellent….Excellent!
Thank you!
Heck yeah Scott. Keeping it stupid simple, I can dig it!! Very efficient way to add storage to the shop. Hoping all is well Bud, Dirty Jersey out!!
Thanks 👍
Great job. You kept it simple. I love the hand nailing of back on first cabinet! Many viewers prob don’t know how to do that!
A Refreshing Woo-Hoo!!
I’ve been enjoying videos maestro!
That's great Don. Glad to hear it! Scott
awesome work Scott
Thank you kindly
Dzięki za film.
Zdrowia życzę.
Nie ma za co. Dziękuję za obejrzenie
Started with your channel with your window trim video. Love your explanations and skill man. Good job!
Thank you very much Randy. Glad you discovered our channel. Scott
Great organizer tips scott.I have a small workshop and space is limited and your tips will come in handy to maximize my space. Love how your new space turned out.
Thanks Dana! Scott
Very good teacher,thank you
You're welcome!
Love it! Very good teacher !
Thank you!
Great video Scott. The 90 degree positioning squares look like a very useful tool. ill be sure to add them to my list
Glad you found that tip helpful. Thanks for sharing that. Scott
Great demonstration! This is always a class I want to attend. Can't wait to watch the rest of the series 👍
Awesome, thank you!
Hi Scott, just came across your channel and the video about building a simp.e cabinet, and really emjoyec it, so you have yourself another subscrber, my only issue is I don have a workshop, so all my work is done outside,very best regards from Australia
Awesome, thank you!
Very informative..
Thank U
Glad you liked it! Scott
Love it. Thank you
You're welcome Dan!
You can add a followup video with how to add doors for these cabinets... will look forward to it...
So much for simple tools
Got some squares. Excited to make some nice 90 degree angles for my closet!!!
Sounds great!
I love all your videos learn a lot👍👍👍
Thank you Oliver!
Thank you. This is nice and simple.
I think a french cleat style would be good for the nailing flange-- just miter the bottom edge of the nailing flange and have the mirrored board with mitered top mounted to the wall. That way it is easier to get the cabinets mounted with one person. I like the dado style build for the cabinets. Not a fan of the shelf pins though. I'd rather have more solid support and have set heights for shelves. Probably because I've had those pins break on me and it sucks.
The plywood veneer stuff isn't available in any stores near me so I'd have to find a different option to hide the screws.
Yes, a French cleat is a great way to hang a single cabinet. I was hanging 3 different cabinets in a row, so it's easier to install by screwing through the cabinet after it's clamped in place. For accuracy, this is the best approach. Cheers. Scott
Great job! Thanks.
Thanks for watching and I hope you subscribe! Scott
New subscriber - thanks for the comprehensive tutorial!
Glad you liked it. Thank you for subscribing! Scott
Thank you, Soo helpful!!
hope you could show how to hang it on the wall...for us newbies..thanks
This is a good video thanks mate
Glad you enjoyed it
Thank you for this fantastic tutorial!
No worries if you can't field my questions below, but if possible - I'd be super grateful.
I have mid-level carpentry skills and am starting to build a built-in, wall-length desk for my kid which will have a cabinet on one end and a "floating" drawer on the other.
For the cabinet, I'll have a roughly 28"W X 42"H box in which I'll have one or two shelves, and I'd like to have doors on it.
I'm working with 3/4" birch ply, and will use edge banding.
Drawers and doors are the most intimidating for me, so my questions are:
1.
What is the simplest 2 door construction for a box this size? I don't have a plunge router or the bits to install hinges that must be counter-sunk, so I'm hoping there's a flush mount hinge option that might work?
What are some tricks for making sure my gapping is consistent?
2. The box for the floating drawer will be perhaps 14W x 10"H x 16"D
- What's the best way to cleat this to the wall? (I'm fastening to old, quite beefy wood paneling, so even though it's hard to find a stud, the paneling by itself is taking a screw very nicely)
- I'd like the drawer front to look a bit mid-century - closing flush with the box front - what's the best way to manage the gap around the drawer face?
3. I'm confident I can build your more sophisticated cabinet here - but I'm wondering if that design is as rigid as the first one?
I'm not sure exactly what's keeping the 2nd option from racking when you don't have nails affixing it to the back. Are you applying glue to the channels and depending on that glue for rigidity?
Thanks in advance!
Hi Clayton. There’s no quick response to your questions. I teach woodworking via private Zoom sessions. If you’d like to purchase one we can meet to answer all your questions and share the techniques that are most appropriate for your experience level. Here’s a link woodenitbenice.ca/products/1-hour-woodworking-advice-session
This is how I built my 1st lot of cabinets in the floor my bro.. They're ok but I wish I had waited until I had a better grasp of my table saw so I could cut the rebates around the back edge and Dados for my shelves. I just screwed my shelving into them..
I'm ok with building the cabinets but I'm struggling at which is the best fixings for hanging them onto a Concrete block wall. Any tips would be gratefully received my bro..
ENJOYED THE VIDEO AND i SUB'D AND LIKED TOO.
I only found ur channel a few minutes ago..
To hang cabinets to a concrete block wall, I'd use concrete screws into the block, the same way you would screw them into the stud. The least stressful way to hang cabinets is to us a French Cleat... screw one side to the wall, then the cabinet hangs on it. I hope that helps.
Good timing for me, this series. Ive promised myself after I finish my current project that I am pulling the place apart to make better use of the space I have. I always end up with no room to move during a project and it's getting tiresome
That's great! Yes, I've done that a few too many times as well. It's worth the investment to organize to make your shop time more productive and enjoyable. Second video just published - ua-cam.com/video/3qxmcpocyyA/v-deo.html
Per chance do you have the video on how to put a door on this cabinet? Thank you!
No, sorry
Thanksnnnn!
Great video. Am I correct that if I just used another piece of 3/4" plywood for the back, that I wouldn't need the nailer strips? I know it would be costly for a larger cabinet, but maybe appropriate for a smaller one?
Yes, that would work
Loved it thanks
You’re welcome 😊
This was great. Any advantages or disadvantages to using pocket hole screws?
I don't suggest using pocket hole screws for cabinets. It's not what they were originally designed for and there are better building techniques.
Love it.,.. want to make a small tall cabinet for snacks...😂
You can do it!
I like the art bursh for the glue tip. How do you clean them when you're finished with the project?
PVA glue is water soluble, so rinsing it good with water would probably work fine. Waiting till it dries might be OK too, but I imagine you'd damage the brush bristles to pull it off.
I wash the brush out with warm water and a dab of soap. I hope that helps. Scott
Dried PVA glue does wash out of a brush, it just takes more time to soften the glue with warm water so it breaks down. I find the easiest glue to clean up is Lee Valley Tools Carpenter's glue.
@@HomeImprovementWoodworking super helpful. Thank you.
great
Thanks Frank! Scott
This is how Mr Rogers would have done workshop videos...
Lol. Cheers! Scott
Nice
Thank you. Cheers. Scott
Hello!! I am curious if you have any recommendations for creating shelf pinholes on cabinets that are already assembled and installed?
My husband and I are new homeowners and our tallest cabinet doesn’t have any pinholes to make shelves! We have thought about installing adjustable wire shelving (for around 100 bucks). However, this seems ridiculously wasteful considering the already existing box structure. I want to add my own adjustable shelf pinholes, but I’m very nervous about making sure the holes lineup across from one another.
Thanks for any thoughts!
What you need is a shelf pin jig. Here's the one I linked in the video description and the same one I show in the video amzn.to/2VWf3BM
Hey Scott, I have a question. Why did you go with expensive veneered plywood for these cabinets rather than just white melamine and then apply veneer to the exterior? Wouldn't that have cost less? Also, if you go with a french cleat system on your top nailer, it makes hanging the cabinets much easier.
Hi Kren. You could certainly use melamine if that's the look you're going for, and yes, it's less expensive. That's not the quality I wanted for this cabinet. You'll see this all come together in the next video.
I've use French cleats in some cases. For this series of videos, I'm hanging 3 cabinets side by side. I find it easer to screw through the nailer when installing cabinets like this... again, you'll see that in the next video.
I hope that answers your questions. Scott
Is it harder or easier then using pocket holes ? What is easier for a beginner ?
This is easier and less expensive than using pocket holes... you don't need a jig. Cheers. Scott
We need a video for people that don't have a table saw.
Lumber yards and big box stores often provide a service to cut boards for customers
So...just a question: Why go with nailers instead of a french cleat system?
I use French cleats for a tool wall but I find it faster to hang a line of cabinets with nailers. Just line up where I want them and drive screws into the studs. That's my preference. Scott
Can I create a built in. wall unit with multiple boxes?
Yes, you can. That's how wall units are built. Multiple boxes with face frames on the front to conceal the edges of the boxes.
I would have put the nailers on before the backing board
Can you make easy cabinet doors for these?
Would the joints be stronger with pocket holes?
No, pocket holes are not as strong as a screw through the cabinet side. I hope that helps. Scott
@@HomeImprovementWoodworking I see. So I should only use pocket holes on end grain of solid wood?
@@HomeImprovementWoodworking I see. So pocket holes should only be used on end grain of solid lumber?
I thought a cabinet has drawers or doors while this is a bookcase since it has no drawers or doors. Why not use pocket screws for a more solid build with the plywood?
Hi Missy. "Cabinetmaking" is a profession of building boxes that are used in different ways. Sideboards, bookshelves, kitchen cabinets, are all examples of cabinets. I never use pocket screws as they're not as reliable as a screw through the side of a cabinet. I hope that helps. Scott
How did u get that makita tool 2 years ago that’s a way fast than 40v
Sorry, I don't understand your question
Hi Scott, what type and size of plywood do you use for this projects?
3/4 inch maple plywood.
We’re did you the counter bit from
See the video description for a link to the counter sink bit. Cheers.
Cheers for the video Scott, what would your procedure be if the cabinet was out of square before you put the back panel on.
Good question. If the cabinet is out of square, it needs to be squeezed from corner to corner on the longer measurement so both measurements are equal. I would use a clamp. Then glue and nail on the back to lock it into place. I hope that helps.
👏🏽👏🏽👍🏾
Why do you put a 1/4 dado 3/4" from the back @17:06 (for the back) of the casework? I see people doing this today and I'm scratching my head! That is a house/hiding place for BUGs and mice and makes the inside of the cabinet smaller. We never did that we just rabbited the back 1/4x3/8. an put the "nailer" inside the case. The cheaper shops just stapled it on without the rabbit. Do you use that method for the backs of lower/base cabinets, oven and pantry cabinets?
That technique provides a quality finished look to a cabinet. Putting the nailer on the inside of the cabinet works, but it doesn't look as nice, especially if there's a glass door on the cabinet.
@@HomeImprovementWoodworking I never had a client complain. I built & installed $200,000 Kitchen cabinets 20 years ago in some of the finest houses in Georgia. Hundreds of Glass doors. The only complaint I ever received was can you make them deeper and we did make 14" deep uppers for a few clients.
It,s so so good 🤣💜
Thank you. I appreciate that. Scott