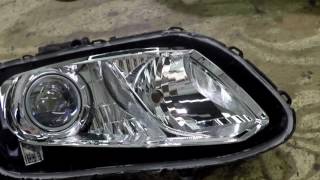
How to PROPERLY Seal Headlights from Moisture & Condensation

Вставка
- Опубліковано 9 лют 2025
- The great thing about this process that I am showing you today, is that you will be able to reopen the headlights later should you want to. I’ve seen people run run silicone that hardens to seal the headlights, and that may work, however if it hasn’t, you can’t open the headlights to perform this solution. In order to perform this procedure, you need to remove the headlight lens from the headlight assembly. If you want to see the full procedure, click the following video link • How to Blackout Your H... .
If you are interested in any of the items found in this video have a look at the affiliate links below. By purchasing items below, it helps my channel operate and brings more awesome content your ways, at NO ADDITIONAL COST TO YOU. Thank you all for your generous support!! 🖤
///// PRODUCTS FOUND IN VIDEO \\\\\
Rubber Butyl Sealant Tape ▶︎ amzn.to/2LFljWR
Porter Cable Variable Heat Gun ▶︎ amzn.to/2LuZqJs
Heat Resistant Gloves ▶︎ amzn.to/3083qaV
D1S HID Bulb ▶︎ amzn.to/3ZKEDok
Don't forget to give it a like 👍 and follow 👣
milanmastracci UA-cam Channel / milanmastracci
milmast Instagram ▶︎ / milmast
If you have any additional questions, feel free to send me an email at milanmastracci@gmail.com. Be sure to tag me on instagram @milmast with your projects. Thank you so much for watching!! - Авто та транспорт


🇮🇹🇵🇹 in Canada we can fix anything we put our minds too. This day and age is a perfect time for this generation to have such an extremely useful tool such as UA-cam at their grasp to learn everything from repairs to cooking. Thank you for the videos. When my father came to Canada as a young teen from the Açores he had to teach himself by reading countless books on plumbing, electrical, automotive repairs amongst other things. We were always told as kids until today that being knowledgeable enough to fix even the basics around the house and car is a priceless gift and can/will save you a good amount of money in the long run.
Probably one of the most ideal videos for headlights 👍. It's so unsightly see headlights with condensation in them due to improper sealing
I used gas-powered oven with 3 pieces of 2x4s to lay the headlamp on. At 200-220F for 10-min. This melts the OEM butyl sealant, makes it soft enough to take apart the lens & housing without damaging anything. Clean the mating surfaces by re-heating the housing and tracing the valley with a flat blade screwdriver & utility knife (I use OLFA or NT CUTTER brand).
A perfectly sealed housing actually builds up heavy condensation. The temp difference between the inside & outside of the headlamp causes condensation, especially on HID or LED bulbs that do not get as hot as halogens. There should be breathing ports on the backside of the housing to equalize the temp difference and release excess pressure if halogen bulb is installed.
I have 2004 Acura TL, and the passenger side is notorious for building up heavy condensation. I take it apart, clean the inside, apply wax on all possible surfaces (wipe clean of course), and after rebuild is done, I install some desiccant packets. This usually resolves condensation but cannot completely eliminate minor fogging, as it is just a nature of modern headlight housings. I expect more R&D at parts suppliers do that we do not have to take headlamp housings apart.
P.S: For 3G Acura TL, the HID ballast has some gaps at the connector that can allow moisture to enter & short circuit the ballast. Fill every gap with silicone sealant to keep water out (a heavy condensation eventually finds its way down into the expensive ballast.....roughly $50 at Amazon but a dealer wants $300-$500 for one).
Butyl is also good for sticking on your tools to pick up bolts in hard to reach places. You can stick it on the end of Torx sockets or in normal hex sockets and it will pick up whatever you need it to.
^PIN THIS COMMENT!^
I love your videos. Your enthusiasm and positive attitude are contagious - GREAT JOB! Take care my friend. ;)
instaBlaster.
Many folks use the oven.
140 degrees for around 5-15minutes, depending on the oven, fan assisted needs less time, less heat.
It works btw, i've tried it, oven gloves required etc.
Great video! still waiting for manufacturers to design their headlights with some kind of fastener capable of preventing leaks instead of dealing exclusively with messy, sticky substances
Clear Flex Seal worked just fine for me. That way you don't have to worry about needing a heat gun to soften the sealant.
Or silicone
The canadian is strong with this one!
Love this video! I would have liked to see you disassemble the headlights though.
Well made video man. Thank you. Im doing the same w my mecedes xenon headlight it leaks. I used my oven, 200 degrees for 16 mins. Thank you this really helped
Awesome video, I have this issue on my vehicles as well have seen on many other vehicles.
From one of your last videos, when you were installing the taillights and you thought you liked the chrome surround to match the crome on the headlights, door handles, etc. it sounded like you didn't want to go with black trim. But, the headlights look so much better in black and I feel that you might be able to find black door handles and change out the taillight trim to the black as well.
Your accord is also sealed up like this right ? Dude has done a great job ...v can still c that even today his accord headlights are free of moisture
They sure are :)
Love the box oven, didn't think of that. Just struggled like f with an audi headlight as didn't fit in my home oven, did with heat gun and chewed up all the bottom edge. Now trying to think how to remove old butle and straighten the edges. The stuff on audi headlight isn't like the butle I bought to fit back it real hard to melt, heard may be permaseal??? As no clips or screws in holder just 4 tiny staples
NICE ONE! and a good demo! Thanks 👍✌✊ UK
What name of sealant sir and is it can able to buy on online thank you for video sir.
Pretty solid alternative versus using a oven.
Its a cheap, easy, mom-not-gonna-beat-your-ass solution
How did you remove the lense from the headlight?
You should remove the original glue on the headlight
how?
@@rishdiaryheat gun and a tool to scrape it off.
@@KarmaticEvolutionI used plastic pry tools to limit the risk of scratching anything.
Ah.... the famous Joey mod.
Also usually it’s easier to stick it in the oven at a certain temp for a proper seal.
Also when I’ve done my lights I’ve removed all old butyl from the headlight ridges. Add new butyl and stick it back in oven. That’s how I did my custom headlights from my Rsx when I retrofitted TL projectors.
Can you please do a video step by step how can put in fuction the headlights washer? I saw many videos but no one knows for sure or did not explained
Is it doable for R56 [with xenons] without removing headlights from the car? I'm going to replace lenses using heat gun and butyl glue.
I wonder if E6000 would be a good alternative. Scraping and cleaning off the adhesive, squirting a bead of E6000 in that groove.
Great in depth, easy to follow how to, thanks Milan, great job 👍👍👍
Shout out from South Africa bro !!!!!!!!!!!!
Can someone tell me where to find the description box . I have never seen one anywhere on UA-cam. Thanks
Where did you get the led turn signal portion of the headlights?
Absolutely thee best tutorial video I've ever came across. Good job, hope to see more from you.
Explained very well.
nice video bro , keep it up
Great walkthroughs thank you! Any idea how to remove the lens from the cover on a 04 mcs?
Pop the headlight in the oven at 250° for 5-8 minutes, then gently pry apart with a flathead
Revisiting this video after watching it a year ago when you uploaded it. I did a similar mod. A year later the black plastic closest to the top bulb burnt/melted a bit and looks horrible: time for a redo. How did yours hold up?
Awesome thanks 😊
Nice work bravo
Nice vid bud you're killing it with the uploads
What is the little chrome door on the light for?
Do I have to remove the old butyl?
I though i saw how to steal headlights lmao i clicked fast 🤔🤭🤣🤣🤣
Funny but you're right, it does look like steal!!
great instructions, going to make my son follow this an re-do his correctly this weekend. The painted cover looks really good too
Hi where can you get the Gilmore snow gun in the uk from please
Would it be safe for me to use flex seal?
Any easier way is to hear hun the seal first, when it’s soft then you put on the lens and squeeze together boom 🤯
A easier way is to heat gun the seal first, then when it’s soft you put the lens on and squeeze together boom 💥
Good stuff !
I want to go to Canada just to visit you lol
I'll be heading to Maryland next weekend for H20 :)
@@milanmastracci dam that's all the way across the US lol I'm in California
Hoping you can help me... I bought a 7” led headlight for my motorcycle (from Amazon) I also bought one for my father. Mine gets condensation inside but my father’s doesn’t .... I was wondering if it might overheat if I try sealing mine better with silicone... I don’t know the science behind whether or not this type of light should be airtight.... any advice?
It should be fine for heating up for sealing purposes. You could also dry out the water and seal it up with black rtv that doesn't use heat
How do I seal my tail lights up so I don't continually get condensation in them. Ive tried using silicone on the edges but still getting condensation in them. Have any tips for me?
So what u meant by max heat, what degree of heat are u talking about? Like what max degree should i set my heat gun to? And the speed of the fan
As high as possible for both. Ideally you want to get the internals of the box to have a temperature of about 400*F. The box itself isn't thermally insulated so it will lose a lot of head. I set my gun to max heat (not pointing at the headlight itself), and leave it in there for about 7 minutes. If it glue still isn't soft enough to allow the lens to separate, I will put it back in for a couple more minutes.
Can i use a normal hair blower if i don’t have a heat gun?
Probably. Seal the box up really well and wait about 3 times longer.
So no clamps? Just force by hand?
Any change in visibility at night
Can i use silicone sealant instead???
You can, but you won't be able to reopen them later should you want to do any different work to the headlights. Not a good idea in my opinion.
@@milanmastracci thanks for the info! Appreciate it.
No problem brother!
does common silicon sealer work?
It does, however you won't be able to open it again afterwards.
@@milanmastracci fair enough, thanks!
ty
Jesus - be carefull with cardbox + heatgun. Paper burns at +100 degrees celsius...
Dude, its not normal to leave a heat gun inside a box and run away for 8 minutes...
You're right, but it works every time! 🙌
You're assuming he's not monitoring
i thought the title said steal 💀💀💀
just use silicone sealant... as simple as that... cous it fit it more and seal small gaps and holes...
Guessing you've never messed with headlights, silicone never seals properly, doesn't last, looks ugly, and a pain if you ever need to take your light apart ever again.
There's a reason why the factory use butyl, because it's better than any silicone, otherwise they would use silicone.
That butyl rubber crap will last until you leave the car in the sun !
👍
😎❤
Ewwt? 🤣🤣🤣
Half a video, show the hard part.
Just some feedback - I feel you add so many details that really don't need to be added, as if you're talking to a toddler. There are a lot of simple people out there, but even they'd know what to do. I'm guessing you do this to extend the video so it's not just 3 minutes long or something, but I find it to be really annoying
The further south you get, the more you will understand. Lol
@@davidunger9334 theirs idiots everywhere... especially in the north.
"Your video is too informative... its bugs me.." if u already know what to do, the fuck u watching a tutorial for?