1960 Rare Desk Lamp Restoration

Вставка
- Опубліковано 10 лют 2025
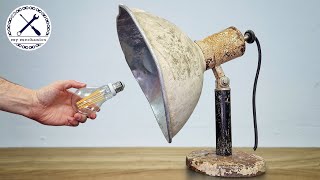
- This is another "barn find". I actually found this desk lamp hanging in my grandfather's garage. Doing some research, I found out that it was made somewhere in the 60s, in Romania or another European country that were under the communist foot. The original lampshade was missing and I couldn't find any reference photos. I did find a few actually, photos of the same model, but all were missing the lampshade.
This is a complete restoration: all brass parts restored, the switch taken apart and cleaned piece by piece, removed rust and nickel plated iron parts, rewired and crafted a brand new lampshade, feet and grommet. I am happy I could save and reuse the original power cable as well.
I hope that you like my work and enjoy the video! Please LIKE, SHARE & SUBSCRIBE to support the channel! :) Thanks!
Feel free to write comments and ask me questions. I read them all and try to reply as soon as I can.
Thank you!!
As promised, here is the list of chemicals and tools used:
Kober Dekapant (paint stripper)
Pure Acetone (industrial acetone, not the one for nails)
Green polishing compound
3M Extra Fine PLUS polishing compound (automotive)
Tamiya polishing compounds: Fine (blue) and Finish (silver) - for modelling
3D printer - a heavily modified cheap Tevo Tarantula (that prints well only when she wants)
ordinary soldering iron
Stannol leaded solder
Lotfett flux
Camera:
Sony ZV-E10
Lenses:
Helios 44M 58mm F2 (manual focus)
Canon FD 50mm S.S.C. F1.4 (manual focus)
Microphone:
ZV-E10 internal microphone
Software:
DaVinci Resolve (freeware) - for editing and color grading
Photopea (freeware) - for the thumbnail


Wonderful restoration, I love to see these old light fixtures restored. Couple of tips for electrical cords, switches or anything handling electrical current. Normally I prefer to replace old cords, it’s not a matter of the metal wire degrading so much as the insulating jacket on the wire. Obviously check for wire damage as you did, but if the insulating jacket seems hard and not very flexible, then I would replace it. Regarding old switches and other electrical parts that are usually made of Bakelite or something similar, check them closely for hairline cracks.
Thanks for pointing that out! I totally agree. Surprisingly, the cable is in a very good condition, nice and flexible, and the copper shiny. Honestly, I wasn't expecting that.
Restaurada lâmpada de mesa 💡😉
Beautiful restoration 🎉🎉
Thanks so much!! :)
I like the white one, and given the size of the light bulb you used, you might want to make the lampshade a _little_ > < bit bigger ..... like 10~15 mm.
Thanks for the restoration, and the video; nicely done! 👍
Thanks so much! :) I will give it a try!
Wow! I would have never thought you could put the cord in an ultrasound cleaner! That’s a cute little lamp. I also like the information you put in the description. Thank you for sharing
Hey there! Thanks so much for your kind words! Well, you can clean almost anything in the ultrasonic cleaner. The device basically agitates the water with soap (or what you put in the tank) very fast. Usually, you don't want to put a power cord in there, but this time worked because the conductor and prongs were perfectly sealed in rubber. They poured the rubber over the conductors and prongs. Otherwise, you want to keep the ends of the cable out of the cleaner. I liked the lamp too, when I saw it laying in the garage.. now it looks awesome on my desk :) I am happy that you found the description useful.. I thought nobody would bother to read it. If there's any other info you need, write me here, I'm happy to respond!
Very nice and cute light fixture !
Thank you so much! :)
@@ovi-diyBut I will be you, I will avoid using an incendence lamp, it gets hot and it can melt, use a compact fluorescent or LED lamp instead! Afterwards it's you who see
@@Planete-lampes1998 :) Yea.. I installed an 8w LED bulb, but I did a test. I actually got it on camera.. I wanted to see how fast the PLA lampshade will melt with the 48w incandescent light. I turned it on, and I waited 10 min, 20 min, 30 min, 40 min, nothing... I eventually turned it off. So I don't know when it will melt, but I ended up using a LED instead anyways. Yes, I like incandescent light better than LED light, but my budget is very tight... the electrical bills are a problem for me..
WOW! What a grand job!
Thank you so much! :)
beautiful result ! .. I love the orange lightshade .. it makes a nice + warm light !
Thank you so much! :) The lamp shade is red actually, but because of the light bulb it renders a nice orange light.
I saw your work and it is incredible. I thought about the lamp shade and saw that it looked beautiful in white plastic, but it could be made in white opaline, which would give greater resistance and beauty (as it is slightly translucent and shiny). The problem is finding someone who can manufacture these separate parts.
Hey! Thanks so much! :) That is a mindblowing idea! White opaline glass (or white-bluish) would indeed look amazing! Also, the 3D printed light shade can be used only with LED bulbs.. I had an incandescent bulb in the video, but didn't leave the lamp on for too long. I WILL hold on to your idea and maybe I can find someone who can make an opaline lamp shade for me :) And I'll come back with a video or a short!
This lamp loosk beautiful after renovation 👏👏
Thank you! 😊 I love your work too! :)
Perfect 👌
Thanks 😄
My Mechanics would be proud.
Thanks, man! That means a lot to me! :) My mechanics is my favorite channel!
Although red is one of my favourite colours, I vote for the white shade. The 'red' one you printed was actually orange. I didn't like it at all
Thanls :) Yea.. I think I like white better too. It's much more elegant.
That turned out great, didn't it! :)
I think so too! Thanks so much! :)
Never solder the end of wires when using screw terminals or pressure plate connections. The solder will deform over time, which can cause a poor connection.
Hey! Thanks for sharing this with us! From what I know, the best practice is with using ferrules, but I never had any issue with solder deforming over time with these type of connections.. You got me curious :) I will do some tests. Also, it may be a good idea to come back after a while and re-tighten the screws. I've seen a lot of people leaving stranded wire just twisted with screw terminals. That is surely terrible :) (as not all wires catch the screw / pressure plate) Good and safe connections are most important! THANKS again! :)
How old was the lightbulb?
I think it's from the same period as the lamp 60s - 70s.. It has brass thread and the glass is "wavy". It was coated in red, but it flaked off. I don't think it's the original bulb though, the one that came with the lamp, but it's old indeed.
I’m curious how well the printed lamp shade will hold up over time next to an incandescent bulb.
Hey! Thanks for the comment! Well, ABS will melt at about 200 degrees. Most probably I will use an LED bulb, but it would be cool to do a test with the incandescent one. The bulb in the video is a 42W halogen bulb. I will make a short video. Great idea! Thanks :)
The bulb's tip seems to have gone places it had no business to be
probably.. :) who knows
Hello glad i Found the channel like your work.
Thanks so much, man! :) This means a lot to me!
I’d have grounded/earthed the lamp as well.
Yes, that is a good idea, but I went with the original design. I made sure, though, that none of the wires can ever touch the metal chasis, and everything is rated minimum 250V/2A, so 500W. I will use only LED light bulbs because of the 3D printed lamp shade, so it should be fine. I also have a differential breaker in my main electrical panel, so, in case of anything, it should quickly disconnect. For everything else, I use only grounded appliances :) I also like to keep track where my live wire is, so I always put it to the right in my mains outlets.
Red
Thanks bro! :)
I don't understand why you used a halogen light bulb and not an LED bulb. A halogen bulb heats up so much that it can melt the plastic from the lamp shade unless it's high temp plastic.
Hi! This was just for the video, it was a 42w bulb that I had around. I did indeed fit it with an LED bulb because the ABS lampshade will melt eventually :). Although.. I am a fan of halogen light, it seems more pleasant to the eye, but not for this project.
@@ovi-diy what about a filament led bulb? You get the aesthetic of a halogen bulb, but without the heat or power consumption, and it has the retro look that would look great with this lamp
That is an awesome idea! Thanks buddy! :)
Putting mains cable into water to clean it is not a good idea as the water can wick up between the strands and under the insulation. I see there has already been a comment regarding earthing. Nice restoration though.
Hi! Thanks for sharing! Well, this cable was completely watertight, that is why the copper strands didn't oxidize in over 60 years. And that is reason why I chose this cleaning method. Otherwise, I would have gone for the traditional brushing method. Yes, I am 100% pro-earthing :) I've got everything earthed in my house, even the ceiling lights :) But as for this lamp, I wanted to keep it as original as I could, of course, making sure that all the wires are safely isolated from the chassis. Also, the cable is rated 500w, so any lightbulb (even incandescent) should not heat it up. As a last resort, I hope my differential breaker will do its job :)
Its the corrosion that is bad not just water
Yes, you are right, but the copper wire, being completely sealed in rubber (rubber was poured around the copper strands), had no contact with water or corrosion agents. The only part of the cable in contact with water and dish soap was the wire ends (which I stripped before to check the wire). The little corrosion that might have formed on those ends during cleaning was then quickly removed by applying flux and solder wire, sealing everything perfectly. :). How do I know the copper wire was perfectly sealed in rubber? The cable is over 60 years old, and if any air got in side between the copper and the wire, the copper wire wouldn't have been perfectly clean when I stripped the ends for checking. That's how I knew I could clean it this way without any problems.
It is stranded copper wire, so on the open end there is no seal between each strand, meaning that water can wick up the wire between the strands.
I see what you mean. But water would only be between the "open" strands (from the end of the wire, that has the rubber stripped away). The water can get between these strands only at the stripped end, but will not get further up the wire (this specific wire), because the rubber seals it. If it was not perfectly sealed, the wire would definitely present signs of corrosion, after 60+ years of being stored in a humid environment. But when I cut the wire and stripped 1m of rubber away at the end, the strands were "like new". So I assume the seal should be perfect. But yes, if I had no way to test this, I would not soak the wire in water. But this wire, I don't know where and how it was made, but it seems it's very high quality. I was almost sure I would find corrosion and discard it. :) Also, between the strands themselves, a couple of mm into the un-stripped wire, water can get there, but when I apply flux, together with solder to the end, that gets inside too and replaces the possible little corrosion that can form there, dries everything and seals, soldering all the wire ends into one. If I was to use a ferrule instead of soldering, yes, this wouldn't have been a good idea.
hahahah, 12 hours later (no french accent) :))))))
:D
Why would the bulb not more safe ? A bulb is a bulb it's not rocketsciene
The filament was continous electrically, but mechanically it looked very stretched and was hanging loose. I don't know how it would behave when burning out. Some older bulbs used go "bang" :), and the glass would also crack. So, a new bulb is safer.. I guess. Also, for my 3d printed lamp shade, I need to put an LED bulb, because the bulb from the video would melt it..
Who knows how long the old bulb would have lasted. And yes they can pop and break. Better to be safe
😂😂😂 pessimo lavoro , la parte elettrica doveva essere sostituita con ricambi nuovi . Pericoloso oltremodo il cavo di alimentazione con la spina con gli spinotti non isolati a norma , con conseguente scossa , originalità sì , rischio di morire no ,😮
Thanks for the comment and for your opinion. I am sorry that you don't agree with the way I did the electrical job. When you do a restoration, it is most important to keep as much of the object original. Yes, safety is paramount. That is why I thoroughly checked every part (cable, switch, light bulb socket) to be 100% sure that they are safe. Also, that is why I put additional heatshrinks on almost all the wire ends. By "not isolated" (that is what the translation told me), I think you meant not grounded (earthed). You want to ground an electrical appliance so, if you touch the chassis and has 230V / 110V on it, you don't get electrocuted. But, the way I wired this lamp, there is absolutely 0% chance of electric shock. Everything is perfectly insulated and the wires are rated 500w (and the switch 2000w). For the video I used a 42w light-bulb, but I will use 3W LED with this lamp. So there is 0% chance for a wire to melt, or the switch. The switch was fine, but I cleaned every piece anyway. Perfect condition. So, there is no reason to ground this lamp. Also, if you go down to IKEA, most of their lamps are not grounded. Secondly, a well built electrical wiring in any house features a differential breaker. A differential breaker detects wether the same current drawn by the live wire is returned through the neutral wire. If there is more than 30mA difference, it quickly disconnects. When the live wire is in contact with your skin, some of the current wants to go through you to the ground (and electrocute you). This means that way less than 30mA of the current from the live wire will return through the neutral wire. So you get disconnected before you get electrocuted. Basically, if you house wiring is done OK, you can stick a finger into the live wire hole in the wall outlet and not feel anything. Also, the legal system depends from country to country. In Romania, you were not required to have grounding (earthing) in your houses until recently. 90% of the people still don't have.. unfortunately. Cheers! :)