I have always taken bikes to shops for repairs and service, but after watching your rear wheel removal and drum inspection video I'm thinking I can do this. And with the money I save I'll purchase some air tools. Thanks for the confidence booster
Alternative to removing the mufflers--- ---Instead of Taking out the mufflers you can loosen the lower shock bolts which allows the swingarm to drop and you can access the axel bolts no problem. I needed that tip (found by my buddy) when I discovered very tight and rusty bolts on the exhaust mufflers, and I couldn't get them to budge with my little toolkit. Thanks for the video, definitely saved me money and troubles! Lots of good stuff in here 👍🏽👍🏽
The comments section of any good video have scattered remarks like yours that will help others who are in a bind. My bolts have always come out easily, but I can imagine bikes stored outside in the rust belt will be much more problematic. Thanks for taking the time to help others.
excellent video . I just purchased a beat up vulcan vn800A . literally everything is bad on it. sprockets and chain are toast, front and rear brakes worn completely out , both fork seals completely trashed , both tires and tubes gone. basically it's a frame engine and transmission. I have all the parts ordered and can't wait to get to work restoring this bike
Many thanks to you for your detailed explanations. I am located in Belgium and I have a vn classic from 98 and when I have a problem I watch your videos. So thank you again. Pascal.
Merci pour votre vidéo. J’ai besoin de montrer la roue de ma vn800, c’est vraiment les explications que j’ai besoin. Merci beaucoup ✌️✌️je suis en France 🇫🇷, le Canada 🇨🇦 ça me fait rêver 😄
I'm new to your channel but I can already see that I like your editing. You stick to the points and move along nicely. This video provided some great steps for anyone attempting this job. Oh yeah, that's why we do the work ourselves, so we can save money to buy more tools!
Thanks for great video. Just bought old Honda VT700C, and yours is by far the most helpful video on disassembling the rear wheel before servicing brakes 👍 Mika, Denmark 🇩🇰
Really easy to follow your task description with the video, like the previous guy stated, “ well edited” coupled with the little pointers regarding location points when putting the outer break housing back in place and the Speedo cable end into the wheel housing, thank you for sharing your knowledge, with everyone.
Awesome video with great insight . Just bought a vulcan 800 yesterday and was curious why the brakes weren't grabbing. Simply needed to adjust them. This video made that job simple. Thanks for the help
You're gonna like it, a great bike. I did a handful of videos on the 95 Vulcan, you might find them useful. One thing to be sure of is to follow to the recommended maintenance schedule of checking valve clearance, which I haven't recorded yet. There are now several videos here on UA-cam showing how to do that. Cheers!
Thanks you. I have a 2007 Vulcan 500. Going to have to get a new tire and maybe chain and sprocket? Experienced friend says they are looking tired. Again thanks. Good job!
Oh WOW!! Just watched your video and feel great cause I have just bought the same lift you have from Amazon for about $90.00. Your video is the BEST I have seen and you make it so easy to do. Thank you so much!
Great! I put a set of Vulcan videos into a playlist, search for the playlist "motorcycle repair" on my channel. The 95 and the 98 should be very similar. Thanks for the feedback!
Excellent video very informative I was nervous about taking my back wheel off to get the tire changed (dry rotted) now I'm pretty confident I'll have it done in no time. Thank you
Hi Spelunkerd, Thank you for posting the video. I'm considering buying a 95 Honda Magna 750 as my first bike. The guy reduced the price to cover some repairs I think I can do on my own. One of them is the rear brakes. The starter relay appears to be malfunctioning and a bit of hesitation in the throttle. For 2000.00 I guess its worth the gamble.
Your work is amazingly helpful! I've got a Vulcan much like yours and I watch your work on oil changes every time I need to do the same on mine. I need to look at my drum brake, and sure enough, your stellar recording was in place! Thanks, man! I feel a lot safer about picking the bike up off the ground using a similar setup to what you've set up.
You sure make it seem easy. I have a 2007 Vulcan 900 and a 1975 Z1 900 Chopper. They are worlds different in working on. Glad you made this video. Wichita, KS
Thank u for the cleared detail. I’ve have been looking this videos. I feel good putting the wheels back on since a guy removed the wheels himself without me seeing it. Your a life savers!
My rear tire is flat from a long nail and cannot be plugged because they installed a tube in the tubeless tire so, I am going to remove the wheel like your video shows and bring the wheel in to be repaired with a new tube. Thank you for this great video. Right on! ~ Cheers~ B.Champagne
Thank you very much ! I just got a 1981 Kawasaki 440 ltd and I love it ! I ride it to feed the Horse I'm on, and it really helps with the cost of gas. I picked up a nail in the rear tire.
This video has been a humongous help for me. You're very knowledgeable which makes it easy to follow along. I'm undertaking the same project this summer on my Vulcan classic!
Thanks, Mike. I know another guy with the same name, not you, ha ha. Nice to meet you. Dave By the way, one thing I forgot to mention is the directional arrow on the tire. If the tire you buy is directional, make sure they mounted it correctly on the wheel so that the arrow points with the same rotation as forward rotation of the wheel. If you see the stamped arrow printed on the tire at the top of the tire, it points forward, if the arrow happens to be at the bottom, it should point backwards. It would be uncommon for a pro to make that mistake but it's always good to double check their work.
I don't even know that I'll need to do anything with my rear brake shoes, but this video was so well done I had to watch through the whole thing. I'll at least feel confident about investigating the rear wheel of my '07 Vulcan 500 when I get to it. Thank you!
Thanks for a very detailed, informative and well thought out how-to. I've been changing disc pads for a while but was always a bit hesitant about drums. Not any more.
Thank you for your generous video! I Appreciate the details used on important things. Thanks for leaving out the drag out babble that lots of people use. Good tools, tips, and Clear steps provided.
Great guide. Thanks. I wish you would show a front fork oil change. I need to do that on my 2000 Vulcan in the spring and could use some tips since I never did that before
Excellent video as are all of yours. Well scripted , to the point and deal with the technical issues. It's nice to see maintenance issues covered for the shade tree mechanic thus saving $100 plus per hour for the Kawasaki shops. I'd like to see a Cam Chain Adjustment video maybe coupled with a Valve Lash Adjustment video since these are regular maintenance issues. Many thanks for the well produced technical videos for us shade tree mechanics.
I don't know how many times i've watched this video. It was a help back then when i needed it. Now i have two problems which i cannot seem to fix. When i reassemble my drum brake and everything, my speedo doesn't work anymore. The cable is fine, because the speedo works if i put the cable in a drill and go for it. Something within that drum is not lining up. Plus my rear brake line freezes on me. Whenever i use the pedal, the cable stays in the forward position. Hopefully i can get this fixed some day
I'm sorry to hear that. As you know there is some kind of gear inside the drum that meshes with the forked end of the cable. If the forked end of your cable looks good, then there must be something wrong inside. When attaching the cable you need to rotate the cable a little to get it to mesh up inside. I've never had any problem with that so have never taken it apart. Regarding the brake, it sounds like a spring has come off, or maybe it needs lubrication. Good luck!
I've been thinking about your problem, and today I wondered if it may have something to do with properly lining up those two knotches shown after 9:16. If you do take apart the mechanism, think about sharing your experience with all of us to show us how that speedo device works inside the wheel. UA-cam is all about paying that kind of experience forward.
My '48 Indian Chief has a center stand that is used on a level surface for changing tires or servicing rear bearings or brakes, on the road, or in garage. First, remove wheel studs with hex wrench. Next, bike must be tipped over onto it's side stand, and held there while you rotate center stand forward, then you tip bike back to a vertical position onto the center stand. When on center stand, rear tire is high enough off ground to allow you to remove axle, tilt wheel sideways and remove wheel. It looks scary but it has worked for generations of Indian riders. Also works when removing front wheel with a block under the front part of frame. To lower bike back down, push forward while astride it.
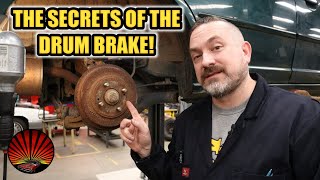
Yeah, very uncomplicated, with no need for the automatic adjustment hardware seen with drum brakes on cars. Like many simple designs, this one has been around for decades, though rarely used in new bikes today.
Thanks a ton for uploading this video. Very helpful compared to reading the repair manual. Will watch over and over until I feel comfortable doing it myself.
Very good video. My only two opinions for people watching are. 1 If there are shims be sure to put them back on the side they're on and even the same orientation. The other one is to clean everything while you got the parts taken off. Like why not?
This video was made 5 years ago but I think this is important: I would not recommend using an impact gun on the flat jack to raise or lower. The impact can break the roll pin and threads of the lift rod and cause the jack to fail rather dramatically. Also, removing the exhaust at the first would have allowed room for all the other tasks (hind sight). Chain slack adjustment is more than making sure the marks are aligned on either side of the swingarm. I would rate this video 7/10. above average. well presented with good use of frame time. The technical aspects were the faults in the video but the job would be completed safely if done per this video.
Those are good points. I've used the impact regularly for that lift, I didn't even consider it could fail dramatically, ha ha. And you make an excellent point about those alignment scales. Indeed, in a later video where I replaced the chain, I used a specialty tool to align the chain and wheel with the drive sprocket. As you say, I discovered those scales are inaccurate for my bike, although they are a reasonable starting point. Chain alignment tools are fairly inexpensive and worth having. Thank you for adding constructive remarks to the comment thread. They make UA-cam what it is.
I don't have a Vulcan, but I was eager to see how to remove a rear wheel with drum brake, before I do it myself for the first time. It's always better to see for yourself, rather than struggle to make out tiny diagrams in the service manual ;)
Thank you and all those involved in the content, efforts and production of this channel. Merry Christmas, Happy Holidays and Happy New Year to all. May the new year bring you, your families and friends much health, wealth, happiness, safety, security, appreciation, respect and peace.
Great video! I may attempt it this weekend on my Vulcan 800. Not necessarily to save money but more because I feel like it's something I should be able to do and get more familiar with my bike. My tool collection is a little lacking so well see. Would love more Vulcan videos. Cheers.
Interesting note on the air tools. Took me a while to find the manufacturer when I searched a few months ago. The butterfly impact caught my attention in a previous video...I can see tons of close-quarter engagements with stubborn nuts, and such a tool is on my wishlist. I can think of several instances where the decision to switch to air tools turned dismally stalled projects into immediate victories. (rust-welded, failed Ram O2 sensors for example)
Thanks, man! I still own the bike, recently registered as a classic with much lower insurance premiums. Overall it's been a work horse. Not much has gone wrong, so I haven't had opportunity to do a lot of repair videos.
@@spelunkerd have a 2001 vulcan 800 i bought last year so was just going to give it a full service as it was starting to splutter a bit lately prob plugs so will give it the full hog .anyhow enjoy your videos hear in ireland.
Go out there brother this is 2024 almost July I have a 2006 800 Drifter with just 5500 miles and I think it's very similar to yours as far as working on it
For some reason they call them shoes for these old style drum brakes and pads for disc brakes, though I don't get why some people make a big deal out of semantics. Good luck!
Ha ha ha, only a Canadian hockey player would recognize that! Outstanding tape, no residue, easy to remove, and surprisingly inexpensive in bulk at Costco.
I have 2 stroke 1986 suzuki Almost all part is rusted Bolts and nuts are death exhust is covers with rust And fueltank has hole And im going to fix it now This video helps me a lot
Thanks for the video. Is doing all this the only way to know how much meat you got on your drum's brake pads?? I just got a Vulcan 500 and I'm not sure how much pad is left on the tear tire
Yeah, with drum brakes the thickness of the shoes cannot be directly measured without removing the drums. However you'll notice there is a pointer attached to the swing arm, which will move to the end of its swing path as the shoes wear. That pointer is a good index, but it's not perfect and there is variance between bikes.
Hey great video. Just did my rear brakes and changed the tire from this video. I have a 2004 Vulcan 800. But I was wonder if I could ask you something. I have a part left over. Its a small collar, and I can't figure out where it goes.
Not sure, I wonder if it may be a spacer for the wheel bearing. Those spacers are pretty important to get the right axial tension on the wheel bearing. If the video doesn't help, I would search for your specific dealer repair manual, you may even be able to find one online as a free pdf document. Many wheel bearing spacers are pretty long, if it is much smaller I wonder if it could be a bearing seal or maybe a washer for one of the other parts. In any case if it belongs on your bike the dealer repair manual should show you where it goes.
Your video is very helpful, ihavea 800 Classic . This will really help. I have a question for you , I notice you had a cable lock on back . I was thinking of using a cable with a padlock for short stops , movies, restaurant and the like. For some extra security. Is that what you do ?
Yes, exactly. I thread it under the seat, through the rear wheel and chain. I also use the front steering lock. I don't tie it to anything, so if somebody had a few friends they could lift it onto a dolley, then into a truck and be gone. However motorcycle theft is a crime of opportunity, few would put in the extra effort to lift an old 700 lb bike like this one. I rarely leave it anywhere outside overnight. I have always been 'self insured' for theft. After 20 years the insurance savings have already paid for a new bike if I want one. Thanks for visiting my humble channel!
Thanks for the ideas. I’m going to be more careful. I was in a store for much longer than I thought and noticed some guys lurking and scoping out my 800 when I came out. It was almost dark and I think they were going to nab it. Also I realized I parked in a dumb spot where they could back up to it and not be noticed by anyone. I just got it and last time I had a bike was 30 years ago and didn’t even worry about bike theft in Oregon.
Awesome video! I'm working on the drum brakes for my 2004 Kawasaki Vulcan EN500C at the moment...attempting to take off the cam lever/shaft to regrease it; however, I can't seem to get the shaft out. The repair manual requests that I pull it out from the inside, but it's a little tricky. Is there anything you would recommend? I've contemplated using a flat-head screwdriver to pry it apart, and I've also thought about putting it on a vise, but I don't want to damage anything. Any help would be sincerely appreciated.
I've never had that one off, but I remember the fitting. There are many pullers designed to accomplish that task. Some are designed for windshield wipers, others for battery terminals, and others are generic. Try searching "windshield wiper removal tool", I'm guessing the one I have would probably work. It screws down on the center post and pulls up on the outside arms. Also Lisle sell a tool designed to expand the arms of the outside part of battery terminals. Before you take it off, remember to put two marks on the mating parts so when it does come off you can reassemble it the same way. Please stop back and tell us how you got it off, I'm sure your experience will help others.
Spelunkerd, I got my cam shaft out by using a flathead screwdriver and twisting while simultaneously pulling it from the inside. Hope that helps someone in the future with the same issue. Thanks for your help!
Thanks for the video! I have the 2002 Vulcan 800. I'm getting into doing more and more on it myself. I may be following it to replace my tire. I just got her running for the season and immediately picked up a screw in the rear tire. (Basically brand new tires) SO frustrating! Do you plug your tires that get nail holes, or do you replace them? They don't recommend riding on plugs, but some guys do. Thoughts?
I usually ask for pro help on punctured tires. Hopefully its not a sidewall puncture, they can't fix those. With cars, often the shop will do the repair at cost if you bought the tires from them, although I find motorcycle shops around here to be less obliging. You'll likely save some cash if you take the wheel off yourself. Good luck! By the way, a dealer repair manual is always worth having, I get one for all the vehicles I own. Electronic copies are available for cars online, I use alldatadiy. The nice thing about that is you get updated TSB's, but last time I checked they don't offer bike manuals. For bikes, you could do a search for your model and year and find somebody willing to sell a CD or pdf copy, and dealers sell originals, too. Good luck!
Thanks. It's not a sidewall puncture. I borrowed a plug repair kit from a buddy, but also ordered a new tire. Sooner or later, I'll need it! I have the Haynes manual on my bike, as well as the owner's manual. I'd love to find the dealer manual, although I don't have too many tools for specific jobs. I do what I can, and learn along the way. I would love to see any of the videos you've done on the Kawasaki 800. I'll see if I can search them that way. I hope you've done one on checking valve clearance, because I think that might be something I could try to tackle. Thanks very much for the reply.
Thank you very much, again, for your video. I ended up removing the wheel, taking your advice on how to keep it together, and took it in for a replacement tire and tube. I got the wheel back today and put it all back together this afternoon. I appreciate your videos on the Kawasaki 800, since that is my exact bike. Every time I learn something new about my bike, I feel more comfortable working on it. Thanks!
Excellent question. I've had this bike on its stand without backup to service the front wheel occasionally, and it seems pretty stable even without the handlebar support from above. As you can see at 5:58, there is no way this would fall even in a small earthquake, and I wanted completely confident support for days while I waited for the new tire. I hope more visitors chime in with their experience. Hydraulic tools always need backup, and cheap tools like my little stand can be unreliable. In my hands this one has been rock solid.
Hi.. as I am getting ready to ride on my 2014 Yamaha V-star 250..the rear brake pad is grabbing the drum on the wheel and making a sqeaking noise and unable to move freely.. can I adjust the cable the pulls the lever and losen the grip or should I take the wheel off and replace items as needed? Thanks Shane
They call them shoes when they act on brake drums, pads when there is a central rotor that pads squeeze against. The 95 Vulcan has pads on the front, drums on the rear, I did videos for both. If you have the more modern pads and rotor on the rear, then you need to remove the caliper from the caliper bracket and lubricate everywhere the pads make contact (except the actual brake surface contact area). Especially lubricate the clips and the slides. Don't forget to take a file to the area under the clips. Rust jacking is common in that area, causing pads to hang up and wear unevenly. The most common cause for unequal wear on the pads is sticking slides, the whole caliper needs to slide sideways as the pads wear, otherwise you get unequal wear. If the slave cylinder is sticking, you need to rebuild or replace the caliper. If you have brake drums, as shown in this video, then the advice to remove everything and lubricate the mechanism holds. For really good teaching on brakes in general, SouthmainAuto here on UA-cam is a brilliant resource, though he doesn't do bikes. Good luck!
Not always but certainly worth having a look. It could be a small stone pinched at the wrong place. Don't leave it too long, since you don't want to replace the whole wheel.
As always another great video and well put-together, there is just one thing I would like to say, the guy who owns that bike needs to give it a real bath that is absolutely horrible to own a bike that dirty I would never ride that thing anywhere. I own a 1999 Kawasaki Vulcan 800 classic and I have owned it since it was new and it is in pristine condition and always spotless. Once again thanks for another great video. I believe there is a link to the picture of my bike in my UA-cam channel.
Well just a friendly tip I use the chain wax also because I believe it is the best but always after you apply the chain wax to the inside of the chain wait 10 minutes and roll the chain through a rag lightly. Once again excellent video.
It would be nice to see you too a valve lash adjustment which needs to be done every 6000 miles on these Kawasaki Vulcans. They are done with a shim by Hot Cams
HI, I have been using a lot of your videos to help guide me through forking on my vulcan/first bike. One thing I want to ask is, did your alignment work fine using just the hash marks on the frame? every forum I've read says not to go by those... what say you?
For alignment of the rear tire, those marks were off more than I expected. That little tool seemed to work pretty well in the video, I recheck every year. I haven't done front alignment, ever.
@@happywheelz11 Oh, now I recall I demonstrated it on the video where I go into replacing a motorcycle chain. As I'm installing the new chain I show the difference between alignment with the marks on the frame vs alignment with the little tool. Quite a difference.
I don't know, but there are more similarities than differences between bikes. Search the web for a pdf of your dealers service manual, Kawasaki even sell those at a reasonable price on their website.
The end of the cable has a two pronged fork, which needs to mesh nicely with the rotating wheel inside the drum. The first thing I'd check is to verify that the fork is two pronged and correctly inserted into that part of the drum. You may have to rotate the cable and the fork a little to get it to go all the way in. Check to be sure that rotating the cable causes rotation at the other end of the cable, make sure it isn't broken. If all of that checks out, you'll need to remove the wheel and take apart the drum to verify that the inside part of the drum is working correctly. I've never taken that part of the drum apart. Good luck!
@@spelunkerdhello, forgot to reply lol. But I found out who my speedometer never worked. It wasn’t fitted right? So it was bent inwards. Now I re did the error there & now my speedometer works perfectly! Only issue now is my rear brake doesn’t work right since I bought it.
Yeah, possible. It would be interesting to see if the cable spins when the rear tire rotates. If you have a motorcycle lift, you could raise the rear tire off the ground, disconnect the speedometer so you can see the end of the cable where it attaches at the speedometer. Rotate the tire and see if the cable spins. If the cable spins, your problem is in the speedometer itself, if it doesn't spin, I'd be tracing the problem back to the rear wheel. As you know, the cable has an end with a fork, and it needs to slide properly into a mating part inside the rear wheel. I have never torn down the connection at the wheel, but if the problem is there you may have to explore it further. Perhaps the cable you are using is an aftermarket cable that isn't quite shaped correctly to be driven by the gear inside the wheel, or perhaps the part inside the wheel was damaged when the speedo stopped working. In any case, it would be a fun video to watch, you should consider posting your findings. Thanks for the sub, Tim! Dave
I ordered the same cable from your video. I’ll check out what you suggested and I’ll pull out the GoPro see what I come up with thanks again all keep you posted
spelunkerd nope 👎 not it now I have to try the rear tire see what I come up with. I did make a video when I post it I’ll be sure to let you know. Thanks again for your help
When i saw the shoe material thickness i knew you were ok for another few years :-). I have a crappy kawasaki kh125 125cc motorbike, not on the road at the moment, but the back brake is very similar to yours, just a little smaller because it's a small bike. And my lever goes down not up, but it still has the brake rod and anker bar, much like yours. - Was the cushdrive behind the sprocket in nice condition?, or don't big bikes have those?. I didn't see you take that apart. I had to put my adjustment rings+thread in a vice to bend them correctly, a past owner must have hit them.
Excellent point. There is a cush drive deep to that sproket, although the dealers manual doesn't use that terminology. They describe it as requiring no maintenance or cleaning, so I haven't ever pulled it apart. A replaceable coupling bearing supports it and can be replaced if necessary. Happy Holidays, to my friend across the pond!
Well if there is no rotational play between the sprocket and wheel it's fine :-D i and frends call it "cush drive" because its a cushing of rubber around the aluminium driving blades/paddles, if it becomes sloppy then there is a possibility of blade/paddle fracture. Have a happy christmas :-D


I have always taken bikes to shops for repairs and service, but after watching your rear wheel removal and drum inspection video I'm thinking I can do this. And with the money I save I'll purchase some air tools. Thanks for the confidence booster
Do not use air tools on motorcycles .😂😂😂
Alternative to removing the mufflers---
---Instead of Taking out the mufflers you can loosen the lower shock bolts which allows the swingarm to drop and you can access the axel bolts no problem. I needed that tip (found by my buddy) when I discovered very tight and rusty bolts on the exhaust mufflers, and I couldn't get them to budge with my little toolkit. Thanks for the video, definitely saved me money and troubles! Lots of good stuff in here 👍🏽👍🏽
The comments section of any good video have scattered remarks like yours that will help others who are in a bind. My bolts have always come out easily, but I can imagine bikes stored outside in the rust belt will be much more problematic. Thanks for taking the time to help others.
excellent video . I just purchased a beat up vulcan vn800A . literally everything is bad on it. sprockets and chain are toast, front and rear brakes worn completely out , both fork seals completely trashed , both tires and tubes gone. basically it's a frame engine and transmission.
I have all the parts ordered and can't wait to get to work restoring this bike
Many thanks to you for your detailed explanations. I am located in Belgium and I have a vn classic from 98 and when I have a problem I watch your videos. So thank you again.
Pascal.
Merci pour votre vidéo. J’ai besoin de montrer la roue de ma vn800, c’est vraiment les explications que j’ai besoin. Merci beaucoup ✌️✌️je suis en France 🇫🇷, le Canada 🇨🇦 ça me fait rêver 😄
I'm new to your channel but I can already see that I like your editing. You stick to the points and move along nicely. This video provided some great steps for anyone attempting this job. Oh yeah, that's why we do the work ourselves, so we can save money to buy more tools!
One of the best detail-driven, but efficient channels I've found!
can't wait to get mine out this spring!
Dony, thanks for stopping by! It's so nice to hear from you, I always come away learning something more from your small engine videos.
i realize it is quite randomly asking but do anybody know of a good site to watch new series online?
@Bradley Charles i watch on FlixZone. Just google for it =)
Thanks for great video. Just bought old Honda VT700C, and yours is by far the most helpful video on disassembling the rear wheel before servicing brakes 👍
Mika, Denmark 🇩🇰
Really easy to follow your task description with the video, like the previous guy stated, “ well edited” coupled with the little pointers regarding location points when putting the outer break housing back in place and the Speedo cable end into the wheel housing, thank you for sharing your knowledge, with everyone.
Great video I recently inherited a 99 Vulcan nomad 1500g
Awesome video with great insight . Just bought a vulcan 800 yesterday and was curious why the brakes weren't grabbing. Simply needed to adjust them. This video made that job simple. Thanks for the help
You're gonna like it, a great bike. I did a handful of videos on the 95 Vulcan, you might find them useful. One thing to be sure of is to follow to the recommended maintenance schedule of checking valve clearance, which I haven't recorded yet. There are now several videos here on UA-cam showing how to do that. Cheers!
Thanks you. I have a 2007 Vulcan 500. Going to have to get a new tire and maybe chain and sprocket? Experienced friend says they are looking tired. Again thanks. Good job!
Oh WOW!! Just watched your video and feel great cause I have just bought the same lift you have from Amazon for about $90.00. Your video is the BEST I have seen and you make it so easy to do. Thank you so much!
I got a 1998 Vulcan 800. My rear breaks stick now, so with the help of your video I am ready to fix it. I hope to see all your videos on the Vulcan
Great! I put a set of Vulcan videos into a playlist, search for the playlist "motorcycle repair" on my channel. The 95 and the 98 should be very similar. Thanks for the feedback!
Excellent video very informative I was nervous about taking my back wheel off to get the tire changed (dry rotted) now I'm pretty confident I'll have it done in no time. Thank you
Thank you for taking the time to share. I'm in Atlanta GA, USA. Just bought a Vulcan. I appreciate your info.
Hi Spelunkerd,
Thank you for posting the video. I'm considering buying a 95 Honda Magna 750 as my first bike. The guy reduced the price to cover some repairs I think I can do on my own. One of them is the rear brakes. The starter relay appears to be malfunctioning and a bit of hesitation in the throttle. For 2000.00 I guess its worth the gamble.
Very good step by step illustration. Thank you for sharing your knowledge.
Your work is amazingly helpful! I've got a Vulcan much like yours and I watch your work on oil changes every time I need to do the same on mine. I need to look at my drum brake, and sure enough, your stellar recording was in place! Thanks, man! I feel a lot safer about picking the bike up off the ground using a similar setup to what you've set up.
You're welcome, and thank you for the kind response. You made my day.
Dave
I’ve got that same set of air tools. Had them for almost 20 years and they still work great.
This is excellent, and very helpful. Changed my first rear tire (on my Vulcan) because of this. Thanks for taking the time to share.
You sure make it seem easy. I have a 2007 Vulcan 900 and a 1975 Z1 900 Chopper. They are worlds different in working on. Glad you made this video. Wichita, KS
Thank u for the cleared detail. I’ve have been looking this videos. I feel good putting the wheels back on since a guy removed the wheels himself without me seeing it. Your a life savers!
My rear tire is flat from a long nail and cannot be plugged because they installed a tube in the tubeless tire so, I am going to remove the wheel like your video shows and bring the wheel in to be repaired with a new tube. Thank you for this great video. Right on! ~ Cheers~ B.Champagne
Well done video. Very informative.
Your videos have seriously saved my skin while working on my vn 800
Thank you very much ! I just got a 1981 Kawasaki 440 ltd and I love it ! I ride it to feed the Horse I'm on, and it really helps with the cost of gas. I picked up a nail in the rear tire.
That's an interesting setup Dave and thanks for bringing us along.
Thank you for this informative video. I own a 2001 vulcan 800 classic with a rear brake issue. This will be my guide to investigate.
This video has been a humongous help for me. You're very knowledgeable which makes it easy to follow along. I'm undertaking the same project this summer on my Vulcan classic!
Thanks, Mike. I know another guy with the same name, not you, ha ha. Nice to meet you.
Dave
By the way, one thing I forgot to mention is the directional arrow on the tire. If the tire you buy is directional, make sure they mounted it correctly on the wheel so that the arrow points with the same rotation as forward rotation of the wheel. If you see the stamped arrow printed on the tire at the top of the tire, it points forward, if the arrow happens to be at the bottom, it should point backwards. It would be uncommon for a pro to make that mistake but it's always good to double check their work.
I don't even know that I'll need to do anything with my rear brake shoes, but this video was so well done I had to watch through the whole thing. I'll at least feel confident about investigating the rear wheel of my '07 Vulcan 500 when I get to it. Thank you!
Thanks for a very detailed, informative and well thought out how-to. I've been changing disc pads for a while but was always a bit hesitant about drums. Not any more.
Thanks, it is always nice to learn that I've reached the kind of viewer I was hoping to find.
Thank you for your generous video! I Appreciate the details used on important things. Thanks for leaving out the drag out babble that lots of people use. Good tools, tips, and Clear steps provided.
Awesome video! Clear, consice, and well edited. Thanks for sharing.
Great guide. Thanks. I wish you would show a front fork oil change. I need to do that on my 2000 Vulcan in the spring and could use some tips since I never did that before
Excellent video as are all of yours. Well scripted , to the point and deal with the technical issues. It's nice to see maintenance issues covered for the shade tree mechanic thus saving $100 plus per hour for the Kawasaki shops. I'd like to see a Cam Chain Adjustment video maybe coupled with a Valve Lash Adjustment video since these are regular maintenance issues. Many thanks for the well produced technical videos for us shade tree mechanics.
I don't know how many times i've watched this video. It was a help back then when i needed it.
Now i have two problems which i cannot seem to fix. When i reassemble my drum brake and everything, my speedo doesn't work anymore. The cable is fine, because the speedo works if i put the cable in a drill and go for it. Something within that drum is not lining up. Plus my rear brake line freezes on me. Whenever i use the pedal, the cable stays in the forward position. Hopefully i can get this fixed some day
I'm sorry to hear that. As you know there is some kind of gear inside the drum that meshes with the forked end of the cable. If the forked end of your cable looks good, then there must be something wrong inside. When attaching the cable you need to rotate the cable a little to get it to mesh up inside. I've never had any problem with that so have never taken it apart. Regarding the brake, it sounds like a spring has come off, or maybe it needs lubrication. Good luck!
I've been thinking about your problem, and today I wondered if it may have something to do with properly lining up those two knotches shown after 9:16. If you do take apart the mechanism, think about sharing your experience with all of us to show us how that speedo device works inside the wheel. UA-cam is all about paying that kind of experience forward.
My '48 Indian Chief has a center stand that is used on a level surface for changing tires or servicing rear bearings or brakes, on the road, or in garage. First, remove wheel studs with hex wrench. Next, bike must be tipped over onto it's side stand, and held there while you rotate center stand forward, then you tip bike back to a vertical position onto the center stand. When on center stand, rear tire is high enough off ground to allow you to remove axle, tilt wheel sideways and remove wheel. It looks scary but it has worked for generations of Indian riders. Also works when removing front wheel with a block under the front part of frame. To lower bike back down, push forward while astride it.
Thanks super helpful, happy riding
I have never seen motorcycle brakes before. Very interesting design. Thank you for sharing sir. Cheers
Yeah, very uncomplicated, with no need for the automatic adjustment hardware seen with drum brakes on cars. Like many simple designs, this one has been around for decades, though rarely used in new bikes today.
Love your videos. Very helpful for a new motorcycle owner
Thanks a ton for uploading this video. Very helpful compared to reading the repair manual. Will watch over and over until I feel comfortable doing it myself.
I'm glad it helped, thanks for watching.
Very good video. My only two opinions for people watching are. 1 If there are shims be sure to put them back on the side they're on and even the same orientation. The other one is to clean everything while you got the parts taken off. Like why not?
great video! will try it myself with my younger brother tomorrow ;) Helps a lot to see such a clear and good commented video beforehand.
Thanks. You might also watch the motortcycle chain video I posted last week, where I remove the wheel without taking the exhaust off. Faster.
This video was made 5 years ago but I think this is important: I would not recommend using an impact gun on the flat jack to raise or lower. The impact can break the roll pin and threads of the lift rod and cause the jack to fail rather dramatically.
Also, removing the exhaust at the first would have allowed room for all the other tasks (hind sight).
Chain slack adjustment is more than making sure the marks are aligned on either side of the swingarm.
I would rate this video 7/10. above average. well presented with good use of frame time. The technical aspects were the faults in the video but the job would be completed safely if done per this video.
Those are good points. I've used the impact regularly for that lift, I didn't even consider it could fail dramatically, ha ha. And you make an excellent point about those alignment scales. Indeed, in a later video where I replaced the chain, I used a specialty tool to align the chain and wheel with the drive sprocket. As you say, I discovered those scales are inaccurate for my bike, although they are a reasonable starting point. Chain alignment tools are fairly inexpensive and worth having. Thank you for adding constructive remarks to the comment thread. They make UA-cam what it is.
I don't have a Vulcan, but I was eager to see how to remove a rear wheel with drum brake, before I do it myself for the first time. It's always better to see for yourself, rather than struggle to make out tiny diagrams in the service manual ;)
Great video, really thorow, helped this new rider out alot 👏
Great video
Just what I needed to see thank you, professional at work.
Did you modify that lift to accept the pins on the bottom of the Vulcan frame? My lift looks like yours but is worthless on either of my Vulcans.
Not much needed for mine.
Thank you and all those involved in the content, efforts and production of this channel.
Merry Christmas, Happy Holidays and Happy New Year to all.
May the new year bring you, your families and friends much health, wealth, happiness, safety, security, appreciation, respect and peace.
That tire was very smooth, good video.
Great video I have to change out my rear tire on a VN 800 going to give a go myself after your video
Great video! I may attempt it this weekend on my Vulcan 800. Not necessarily to save money but more because I feel like it's something I should be able to do and get more familiar with my bike. My tool collection is a little lacking so well see. Would love more Vulcan videos. Cheers.
Good luck, you'll probably find it well within the DIY range. Just find a safe way to balance the bike, ha ha.
Excellent video. Thanks.
Well done, well explained and recorded video. Thank You.
Interesting note on the air tools. Took me a while to find the manufacturer when I searched a few months ago. The butterfly impact caught my attention in a previous video...I can see tons of close-quarter engagements with stubborn nuts, and such a tool is on my wishlist. I can think of several instances where the decision to switch to air tools turned dismally stalled projects into immediate victories. (rust-welded, failed Ram O2 sensors for example)
Yeah, I think the vibration is so much better than the pure torque of a longer wrench. Merry Christmas to you!
Good info. Well-presented. Thanks.
I think you are now my favorite Canadian great video
Thanks, great job of showing how its done properly.
Thank you!
Very clear instructions good video have watched a few now on the vulcan and find them really helpful.
Thanks, man! I still own the bike, recently registered as a classic with much lower insurance premiums. Overall it's been a work horse. Not much has gone wrong, so I haven't had opportunity to do a lot of repair videos.
@@spelunkerd have a 2001 vulcan 800 i bought last year so was just going to give it a full service as it was starting to splutter a bit lately prob plugs so will give it the full hog .anyhow enjoy your videos hear in ireland.
Go out there brother this is 2024 almost July I have a 2006 800 Drifter with just 5500 miles and I think it's very similar to yours as far as working on it
Very nice and helpful video sir, thank you! I will follow your advices when i will replace rear brake pads on my vulcan 800 tomorrow
For some reason they call them shoes for these old style drum brakes and pads for disc brakes, though I don't get why some people make a big deal out of semantics. Good luck!
Typical Canadian using hockey tape like a true pro. love it
Ha ha ha, only a Canadian hockey player would recognize that! Outstanding tape, no residue, easy to remove, and surprisingly inexpensive in bulk at Costco.
I have 2 stroke 1986 suzuki
Almost all part is rusted
Bolts and nuts are death exhust is covers with rust
And fueltank has hole
And im going to fix it now
This video helps me a lot
Great video!
Informative two thumbs up. 👍👍
love your bike videos as i have the same bike i have used your videos to do maintenance on my bike keep them coming great job
Thanks, that's my target audience, I appreciate the reply. This bike is so reliable that very little has happened to it over the years.
Dave
great video you make it step by step great job thank you
Thanks for this good video presented it was a great help to me !
thanks again ! Greetings from Vulcan Riders Hungary!
Sok Vulcan van otthon?
Amazing and very helpful video. Thankyou.
Great share man , I own many motor cycles and have yet to cover this in a vid .. You did PERFECT ! thumbs up..
Thanks, Shawn!
Thanks for the video. Is doing all this the only way to know how much meat you got on your drum's brake pads?? I just got a Vulcan 500 and I'm not sure how much pad is left on the tear tire
Yeah, with drum brakes the thickness of the shoes cannot be directly measured without removing the drums. However you'll notice there is a pointer attached to the swing arm, which will move to the end of its swing path as the shoes wear. That pointer is a good index, but it's not perfect and there is variance between bikes.
Brilliant video. Inspired me to do the work myself
Great video I have a 95 VN8. This will help me today lol.
Thank you.
Hey great video. Just did my rear brakes and changed the tire from this video. I have a 2004 Vulcan 800. But I was wonder if I could ask you something. I have a part left over. Its a small collar, and I can't figure out where it goes.
Not sure, I wonder if it may be a spacer for the wheel bearing. Those spacers are pretty important to get the right axial tension on the wheel bearing. If the video doesn't help, I would search for your specific dealer repair manual, you may even be able to find one online as a free pdf document. Many wheel bearing spacers are pretty long, if it is much smaller I wonder if it could be a bearing seal or maybe a washer for one of the other parts. In any case if it belongs on your bike the dealer repair manual should show you where it goes.
this is giving me confidence to remove the rear tire on my vulcan 800. I don't know how I will support it so it doesn't tip over though....
Your video is very helpful, ihavea 800 Classic . This will really help.
I have a question for you , I notice you had a cable lock on back . I was thinking of using a cable with a padlock for short stops , movies, restaurant and the like. For some extra security. Is that what you do ?
Yes, exactly. I thread it under the seat, through the rear wheel and chain. I also use the front steering lock. I don't tie it to anything, so if somebody had a few friends they could lift it onto a dolley, then into a truck and be gone. However motorcycle theft is a crime of opportunity, few would put in the extra effort to lift an old 700 lb bike like this one. I rarely leave it anywhere outside overnight. I have always been 'self insured' for theft. After 20 years the insurance savings have already paid for a new bike if I want one. Thanks for visiting my humble channel!
Thanks for the ideas. I’m going to be more careful. I was in a store for much longer than I thought and noticed some guys lurking and scoping out my 800 when I came out. It was almost dark and I think they were going to nab it. Also I realized I parked in a dumb spot where they could back up to it and not be noticed by anyone. I just got it and last time I had a bike was 30 years ago and didn’t even worry about bike theft in Oregon.
Thanks for the clear and details info
Another fantastic & well explained video. Thank you .
Thank you!
Nice work
thank you that makes the job done ......really good video
Thanks
Awesome video! I'm working on the drum brakes for my 2004 Kawasaki Vulcan EN500C at the moment...attempting to take off the cam lever/shaft to regrease it; however, I can't seem to get the shaft out. The repair manual requests that I pull it out from the inside, but it's a little tricky. Is there anything you would recommend? I've contemplated using a flat-head screwdriver to pry it apart, and I've also thought about putting it on a vise, but I don't want to damage anything. Any help would be sincerely appreciated.
I've never had that one off, but I remember the fitting. There are many pullers designed to accomplish that task. Some are designed for windshield wipers, others for battery terminals, and others are generic. Try searching "windshield wiper removal tool", I'm guessing the one I have would probably work. It screws down on the center post and pulls up on the outside arms. Also Lisle sell a tool designed to expand the arms of the outside part of battery terminals. Before you take it off, remember to put two marks on the mating parts so when it does come off you can reassemble it the same way. Please stop back and tell us how you got it off, I'm sure your experience will help others.
Spelunkerd, I got my cam shaft out by using a flathead screwdriver and twisting while simultaneously pulling it from the inside. Hope that helps someone in the future with the same issue. Thanks for your help!
Excellent, thanks for the followup, I'm sure it will help others who stop by.
Thanks for the video! I have the 2002 Vulcan 800. I'm getting into doing more and more on it myself. I may be following it to replace my tire. I just got her running for the season and immediately picked up a screw in the rear tire. (Basically brand new tires) SO frustrating! Do you plug your tires that get nail holes, or do you replace them? They don't recommend riding on plugs, but some guys do. Thoughts?
I usually ask for pro help on punctured tires. Hopefully its not a sidewall puncture, they can't fix those. With cars, often the shop will do the repair at cost if you bought the tires from them, although I find motorcycle shops around here to be less obliging. You'll likely save some cash if you take the wheel off yourself. Good luck! By the way, a dealer repair manual is always worth having, I get one for all the vehicles I own. Electronic copies are available for cars online, I use alldatadiy. The nice thing about that is you get updated TSB's, but last time I checked they don't offer bike manuals. For bikes, you could do a search for your model and year and find somebody willing to sell a CD or pdf copy, and dealers sell originals, too. Good luck!
Thanks. It's not a sidewall puncture. I borrowed a plug repair kit from a buddy, but also ordered a new tire. Sooner or later, I'll need it!
I have the Haynes manual on my bike, as well as the owner's manual. I'd love to find the dealer manual, although I don't have too many tools for specific jobs. I do what I can, and learn along the way. I would love to see any of the videos you've done on the Kawasaki 800. I'll see if I can search them that way. I hope you've done one on checking valve clearance, because I think that might be something I could try to tackle.
Thanks very much for the reply.
Thank you very much, again, for your video. I ended up removing the wheel, taking your advice on how to keep it together, and took it in for a replacement tire and tube. I got the wheel back today and put it all back together this afternoon. I appreciate your videos on the Kawasaki 800, since that is my exact bike.
Every time I learn something new about my bike, I feel more comfortable working on it. Thanks!
Great video, do you do all of this with the bike just on that stand, or do you reinforce its stability otherwise?
Excellent question. I've had this bike on its stand without backup to service the front wheel occasionally, and it seems pretty stable even without the handlebar support from above. As you can see at 5:58, there is no way this would fall even in a small earthquake, and I wanted completely confident support for days while I waited for the new tire. I hope more visitors chime in with their experience. Hydraulic tools always need backup, and cheap tools like my little stand can be unreliable. In my hands this one has been rock solid.
Hi.. as I am getting ready to ride on my 2014 Yamaha V-star 250..the rear brake pad is grabbing the drum on the wheel and making a sqeaking noise and unable to move freely.. can I adjust the cable the pulls the lever and losen the grip or should I take the wheel off and replace items as needed?
Thanks
Shane
They call them shoes when they act on brake drums, pads when there is a central rotor that pads squeeze against. The 95 Vulcan has pads on the front, drums on the rear, I did videos for both. If you have the more modern pads and rotor on the rear, then you need to remove the caliper from the caliper bracket and lubricate everywhere the pads make contact (except the actual brake surface contact area). Especially lubricate the clips and the slides. Don't forget to take a file to the area under the clips. Rust jacking is common in that area, causing pads to hang up and wear unevenly. The most common cause for unequal wear on the pads is sticking slides, the whole caliper needs to slide sideways as the pads wear, otherwise you get unequal wear. If the slave cylinder is sticking, you need to rebuild or replace the caliper. If you have brake drums, as shown in this video, then the advice to remove everything and lubricate the mechanism holds. For really good teaching on brakes in general, SouthmainAuto here on UA-cam is a brilliant resource, though he doesn't do bikes. Good luck!
Thanks for the video, does a brake squeal in drum brakes on a Suzuki usually signal replacement shoes are needed
Not always but certainly worth having a look. It could be a small stone pinched at the wrong place. Don't leave it too long, since you don't want to replace the whole wheel.
Having trouble with my back break jamming on virago 125 any ideas why that’s happening be much appreciated
I’d take the mechanism apart and look for problems, lubricate the moving parts but not shoes or drum.
I'm more of a car guy but still a good learning experience.
As always another great video and well put-together, there is just one thing I would like to say, the guy who owns that bike needs to give it a real bath that is absolutely horrible to own a bike that dirty I would never ride that thing anywhere. I own a 1999 Kawasaki Vulcan 800 classic and I have owned it since it was new and it is in pristine condition and always spotless. Once again thanks for another great video. I believe there is a link to the picture of my bike in my UA-cam channel.
¥eah, pretty dirty, I'm guilty, ha ha. I use chain wax rather than oil, and although it seems less messy it is not easy to remove.
Well just a friendly tip I use the chain wax also because I believe it is the best but always after you apply the chain wax to the inside of the chain wait 10 minutes and roll the chain through a rag lightly. Once again excellent video.
It would be nice to see you too a valve lash adjustment which needs to be done every 6000 miles on these Kawasaki Vulcans. They are done with a shim by Hot Cams
HI, I have been using a lot of your videos to help guide me through forking on my vulcan/first bike. One thing I want to ask is, did your alignment work fine using just the hash marks on the frame? every forum I've read says not to go by those... what say you?
For alignment of the rear tire, those marks were off more than I expected. That little tool seemed to work pretty well in the video, I recheck every year. I haven't done front alignment, ever.
@@spelunkerd Which little tool do you mean? I very likely have missed that part, but I tried finding it and haven't been able to yet
@@happywheelz11 Oh, now I recall I demonstrated it on the video where I go into replacing a motorcycle chain. As I'm installing the new chain I show the difference between alignment with the marks on the frame vs alignment with the little tool. Quite a difference.
really thanks for this ... great video
I think this is the first bike I've ever seen to have the speedo cable connected to the rear wheel.
I have a en500 vulcan. Will this be the same process for sprocket replacement?
I don't know, but there are more similarities than differences between bikes. Search the web for a pdf of your dealers service manual, Kawasaki even sell those at a reasonable price on their website.
Have question? My speedometer don’t work? I did replace my speedo cable but I think it might be something wrong with my rear wheel?
The end of the cable has a two pronged fork, which needs to mesh nicely with the rotating wheel inside the drum. The first thing I'd check is to verify that the fork is two pronged and correctly inserted into that part of the drum. You may have to rotate the cable and the fork a little to get it to go all the way in. Check to be sure that rotating the cable causes rotation at the other end of the cable, make sure it isn't broken. If all of that checks out, you'll need to remove the wheel and take apart the drum to verify that the inside part of the drum is working correctly. I've never taken that part of the drum apart. Good luck!
@@spelunkerdhello, forgot to reply lol. But I found out who my speedometer never worked. It wasn’t fitted right? So it was bent inwards. Now I re did the error there & now my speedometer works perfectly! Only issue now is my rear brake doesn’t work right since I bought it.
great video. thank you
My speedometer quit working. I watched your other video and replaced my cable but got nothing I was wounding if it could be at the rear tire ?
Yeah, possible. It would be interesting to see if the cable spins when the rear tire rotates. If you have a motorcycle lift, you could raise the rear tire off the ground, disconnect the speedometer so you can see the end of the cable where it attaches at the speedometer. Rotate the tire and see if the cable spins. If the cable spins, your problem is in the speedometer itself, if it doesn't spin, I'd be tracing the problem back to the rear wheel. As you know, the cable has an end with a fork, and it needs to slide properly into a mating part inside the rear wheel. I have never torn down the connection at the wheel, but if the problem is there you may have to explore it further. Perhaps the cable you are using is an aftermarket cable that isn't quite shaped correctly to be driven by the gear inside the wheel, or perhaps the part inside the wheel was damaged when the speedo stopped working. In any case, it would be a fun video to watch, you should consider posting your findings. Thanks for the sub, Tim!
Dave
I ordered the same cable from your video. I’ll check out what you suggested and I’ll pull out the GoPro see what I come up with thanks again all keep you posted
spelunkerd nope 👎 not it now I have to try the rear tire see what I come up with. I did make a video when I post it I’ll be sure to let you know. Thanks again for your help
Very informative. I thank you sir.
When i saw the shoe material thickness i knew you were ok for another few years :-).
I have a crappy kawasaki kh125 125cc motorbike, not on the road at the moment, but the back brake is very similar to yours, just a little smaller because it's a small bike.
And my lever goes down not up, but it still has the brake rod and anker bar, much like yours.
-
Was the cushdrive behind the sprocket in nice condition?, or don't big bikes have those?.
I didn't see you take that apart.
I had to put my adjustment rings+thread in a vice to bend them correctly, a past owner must have hit them.
Excellent point. There is a cush drive deep to that sproket, although the dealers manual doesn't use that terminology. They describe it as requiring no maintenance or cleaning, so I haven't ever pulled it apart. A replaceable coupling bearing supports it and can be replaced if necessary. Happy Holidays, to my friend across the pond!
Well if there is no rotational play between the sprocket and wheel it's fine :-D
i and frends call it "cush drive" because its a cushing of rubber around the aluminium driving blades/paddles, if it becomes sloppy then there is a possibility of blade/paddle fracture.
Have a happy christmas :-D