Colorado XT - Front Motor Mount - Version 2

Вставка
- Опубліковано 25 сер 2024
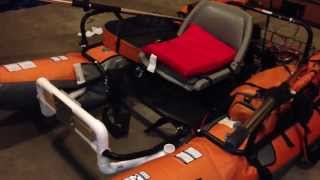
- Colorado XT - Front Motor mount version 2. This is an updated design on the front motor mount I designed last year. This version is constructed of 100% PVC and should provide a more rigid frame. I didn't glue much of the version 1 motor mount, but I would recommend gluing this one a bit more. I also have a complete parts list with quantities and measurements at the end of the video.
The total cost of this frame was $26. You may want to spend an extra few dollars for the glue and spray paint (I still need to paint this one). Also, the addition of two bungie cords added to the stability.
Quick Parts List: - All parts 1.25 inch PVC
6 x "T" shaped connectors
4 x "L" shaped connectors
2 x "+" shaped connectors (which will be cut)
63 inches of PVC - Assuming 100% efficiency.
- 4 x 6.75 inch PVC cuts (for the center to side braces)
- 8 x 2.25 inch PVC cuts (for connectors)
- 2 x 9 inch PVC cuts (for bottom extensions or "legs")
I STRONGLY suggest buying more than just the 63 inches of PVC so you have some room for trial and error.
Please comment and let me know if you have any suggestions or modifications.
Thanks for watching!


This is much better than the factory mount in the rear. FYI though, Your boat isn’t sagging in the rear due to weight, your pontoons are not inflated enough.
Moved my motor mount from back to the front and pinned into existing holes for foot rest. Left foot rest behind. Steering is made easier since motor handle and speed controls are in front. Secured back rack for battery to frame using anchor rope ( a more permenant solution is possible to pin rack).. Put feet on pontoons or in the water when travelling. Considering a future clamp-on rudder attachment to motor shaft for additional steering ability.
That sounds great! You should post a video!
What size of a shaft do you need for your trolling motor with this mount?
I know this is old but I am going to give it a shot. I am pushing 360lbs lol. So I am over the limit. Will see if I sink. Thanks for posting this.
You got this man. Let me know if I can assist!
@@nated2951 I used your shopping list. It worked great. Next week is the first voyage. I told my wife the captain is going down with the ship.
@@donnikrans2625 wear a life jacket. Come back with awesome stories!
I've been thinking a lot about getting this particular toon and I saw one of your other videos showing how you did a custom job to mount the motor in front of you and thought to myself, man I wish this guy had a how to video on that mount, and looky here, very detailed step by step instructions. You rock man, thanks for posting!
Shirtrippa,
Thank you for your kind comments. I hope this setup suits you well. Of course I am always interested in feedback for how the design works out, so if you build one, let me know how it goes.
Thanks again!
- Nate
Where do you put your feet?
Bro, awesome video. Thanks so much. Just took mine out for it's maiden voyage last week and had the trolling and battery in the back, and realized I needed a front mount. Excellent job Sir.
Thanks so much for sharing. Just got my boat and am modding it up before I take it out, thanks to backyard engineers like you.
I picked up a pontoon last spring and just got a motor for it. This video is awesome and I will be building this very soon. Thanks for the cool video.
Thank Nate, this helps me. I've got an electric motor with a foot petal, i'll try something like this and screw the foot petal to it and leave the motor in the back.
Jus be careful with the weight distribution. I would strongly advise against having the motor and battery on the same side of the boat. It will make that side very heavy and your boat will not be balanced at all in the water. At least that's been my experience. Best of luck!
I put a standing deck with that
It would be nice
Thank you Nate for great videos and detailed instructions.
Steve Gate - Thanks for watching. I'm glad today found this to be useful. Let me know if you have any further questions.
- Nate
Nate D. Thanks for the great video and tips. I got my XT a month ago. Had it out 3 times now. My Minn Kota C2 30 has been ordered and is on the way. Off to Home Depot today to purchase the PVC. Good tip on purchasing the 10 foot pipe. Before I retired I worked at Home Depot in the plumbing department. If you came to me with your plane I would have cut all the pieces for you and would hope any other Home Depot would do that for you. So if you don't have a pvc cutter, ask the folks at Home Depot to cut the pieces for you.
This is one of the best creations known to man...thank you sir for all your creative thinking for us toonsters:)
Great video! I fell in love with this boat the first time I saw it! Can't wait to get onto the water this year.
Nate D you are the man! thank you for the video step by step instructions.
great vid man mine worked great only thing i did diff was glue all of it
gentrytnboyz glue is definitely the way to go. I ended up gluing mine once I was satisfied the design was functional. Have a great time out there!
The 2 nine inches pieces for the bottom don’t work on mine. I need to cut them smaller or do you not blow it up all the way?
ronyewest That’s really strange. I always inflated my pontoons fully and never had a problem. Are you using the Colorado XT?
I have my foot rests in pretty far. Only one hole is sticking out past
great had to make a few mods as my foot rests dont sweep upwards like urs but try it out this weekend
Yes I am. I went off all of your measurements and that piece needs to be around half that size
my friend for life
Hi Nate, what would happen if you only cut the outside, of the pieces the foot rest goes into, so that the foot rest goes in but the top and bottom of the PVC piece remains holding the foot post from turning up or down, practically deleting the additional pieces you attached with the bungie cords on to keep the brace from rocking frontwards and backwards. In other words only remove as much of the outer wing to allow the foot rest to enter the piece in the new slot you just created and not cut off the entire outer section off. I hope that makes sense.
Fishing has to be fun now that you have all that stuff in the way
Keith Dauss Well, its more fun than rowing. It's more fun than having the back of the boat submerged due to uneven weight distribution, and it's more fun than standing on shore wishing I could be out on the water fishing. I can troll, and I have caught bass while floating in 2 feet of water.
Honestly, the trolling motor can sit pretty low in the water, and I usually cast to the side of the boat anyway, so I haven't had an issue with stuff b info in the way. All things considered, it's works out pretty well for me and at least a few other people who have similar setups.
- Nate
Damn skippy
Thank you so much! I had a similar experience on my first outing (s) I thought I had made a big mistake! - This will really help. I don't fish, ( wildlife & nature photographer) so I don't have concerns about casting or landing my fish, front mount being in the way of rod holders etc. but I wanted to keep the electric motor for stealth & serenity. My motor has a 30" shaft, is that deep enough to help steering? Just musing...maybe a shallow keel mounted under the seat would help... I hope others will comment with their experiences too.
the spacers were 2 1/4 or 2 1/2
Any chance you can show a clip/video on how you have your fish finder/transducer mounted?
Jeremy,
Take a look at my "Colorado XT Nate's Rig" video. Right around the 3 minutes and 43 seconds mark (I Think), it shows the transducer mounted to the bottom of the trolling motor. It actually works out pretty well. Let me know if you have any other questions. I would be happy to help.
I have just finished a front motor install. My pontoon is only a 8 footer but it dog tracks like crazy. If I hold the throttle straight I just go in circles. Anyone else have this issue?
David D try adjusting the height of your motor. The thrust could be being partially blocked by your pontoons unevenly. Lowering it a bit may help. Good luck!
@@nated2951 Thanks for the reply! I tried many adjustments. I do only have a 30" shaft. I might try turning the head of the motor back the way it was and drive backwards. Thank you!!
I have the same problem. Tried everything I could think of . Weight distribution, motor depth, couldn’t get it to track at all unless I had my feet in the water. I’m stumped..
Trevor Rotter just catch bigger fish and have them tow you around the lake. 😁
Hey Nate, nice vid's on your modifications. I'm about to do my xts but before I do I have a question when you have a fish on. Currently I bring all my fish through the front-end of pontoon's, so with the trolling motor now in that space are you using a net to bring fish in over the sides? Thanks again!
thats what I do, a rotating seat helps!
Nate,
I really like the new design. I had one quick question... Is there a reason you didn't get rid of the foot rests and have the PVC insert into the foot rest holes? Thanks so much for the inspiration!!
Candpdad,
I inserted the foot rests into the PVC because, after a fair amount of experimenting, it seemed to be the best option. The foot rests fit really snugly into this size of PVC pipe. Also, I made a very specific effort to have the design for this to be as simple as possible. I figured the simpler the design, the easier it would be for other people (and myself) to build their own. I'm glad you like it. Let me know how it works for you!
Great thanks!
Any one try taking the motor mount assembly and putting the whole thing in the holes for the foot rests? A welder could weld brackets for the battery rack to the foot rest tubes so you put the rack in front too so you could stand. Maybe weld up a new battery holder to fit in the tubes where the rack used to go in back.
I purchased a lost creek pontoon brand thinking it's the same frame a s the Colorado XT. Sadly it's different. The foot pegs are flat and don't have the bend upward to hook the support legs for the front mount motor frame you have done this video for 😕
Robert Shaw n
Have you thought about trying to make a standing platform under you? I enjoy standing while fishing and i like this boat but idk if it would be possible to build on it.
GDSaint I have considered building a platform for standing, but I think it would be rather cumbersome to steer the boat with the trolling motor that way. The boat is certainly stable, so I would guess it would work, but I haven’t put any effort into such a concept.
If you make an attempt, please let us know how it works out!
- Nate
Nate! Your videos are awesome man. I can not thank you enough for taking the time to make videos for us. I may have missed it, but how long are the shortest pieces of pvc for the frame? I've got 4x 6 3/4" and 2x 9"... what about the rest dude? I'm trying to get this built for a trip tomorrow! Thanks for the help!
Michael,
I'm happy to be able to help. When I bought my Colorado XT and took it out for the first couple of times (with the battery and motor mounted on back - and sinking in the water), I was so frustrated, I considered just selling it all for like $100 just to get rid of it. The motor stand was a last-ditch effort to keep it.
Anyway, I think I have all the measurements mentioned in the text for the video description. If I missed something, let me know. I'll do everything I can to help you get this done in time sir!
Awesome video, I want to add this to my new Colorado XT ( I named it "looney toon") I think this would help a lot with ease of control and weight distribution but my questions: How do you enter/exit the boat with the mount in place? Now I just step in through the foot rests. Also I read some comments that front mount "messes up" steering, but with no other explanation. Can you comment on that? I assume you had a rear mount prior to this. how do you compare the to?
Carol Lawlor Thank you for the great questions. I will do my best to answer them here. Entering and exiting the boat is the same. You just step over the metal foot rest in front of the boat. It has never been an issue. I personally don't find the steering to be too cumbersome and it seems to be roughly comparable to what it was before. That being said, it can be tricky to go in a straight line with this boat. You often have to make corrections while piloting the boat. Some people have had better luck by changing how deep their trolling motor is in the water. As far as a rear mount, I did have one. It was so amazingly disappointing that I was about to sell the whole rig. After my second outing I was almost in tears due to how frustrated I was. Just before I listed the boat on Craigslist, I decided to give it one last shot and see if I could fix the boat instead of getting rid of it. That's when I came up with the design for the front motor mount. It immediately went from being a frustrating/infuriating experience on the water to being lots of fun. Having the trolling motor in front also makes it easier to grab the handle to steer. I'm sure it won't be the same for everybody, but that has been my personal experience. "Looney Toon" is a fantastic name by the way!
A while back I posted about ordering the Colorado XT in one of your other videos. I figured it was time report back what I have learned so far and a few ideas I’ve had. I’m still very much in the experimenting/learning phase with the Nate Rig Version 2. After building and using it I still think it’s a brilliant idea so super kudos to Nade D. So far I’ve taken it out three times. This weekend I’m going to experiment in my garage with a couple of design ideas, but it will probably be a week before I can hit the water again.
Notes:
1. The first time in the water I rigged everything as directed in the manual (motor & battery in back), I had no intention of leaving it this way, but wanted try it just to use as comparison. While it worked, I’ll agree with Nate it put too much weight in the back(my 250lb fat butt didn’t help much ether).
2. The second and third time I used Nate’s Rig version 2 rig built exactly to spec, but I wanted to test in the water before I glued everything down.
3. The first time using the rig I didn’t use bungie cords(because I left them at home) and decided to try using your foot method described in version 1 video.
4. I added the bungie cords for the second trip and I will say it worked better. I also discovered gluing the rig together is a must because the rig nearly came complexly apart on me while I put it through its paces.
Design ideas
1. Two thing about the legs that hormonally stabilize the rig
a. Rather than using bungee cords and sandwiching the elbow joint between the pontoon and the frame, I thinking about replacing the elbow joint at the end with a T joint. In the upside down T configuration I plan to cut a gap just right size and angle for the boat frame to rest. Then securing the leg to the frame using a wing nut and a ubolt going around a smaller piece of pvc or a wood rod inserted at the end of the leg. Using wing nuts would ensure assembly/disassembly could be done by hand without any tools.
b. I’m also considering leaving legs unglued where they connect to the main rig. If option ubolt option works like I expect I don’t see this as being a problem. The goal is to make them removable. This will allow me flip the rig horizontal when storing the frame in my SUV without needed to remove the foot rests. This is also partly because I’ve have a hard time getting the holes to lineup because the foot rest tend to bind when trying to insert both with the rig fully assembled. Alternatively I also thought about cutting 4 small slits in the T joint on the rig the legs connect to and use a hose clamp to it down. Drilling a couple of holes in the T joint and using thumb screws is another possibility.
2. I plan to zip tie the trolling motor power cable to the rig and frame, but have 45amp Anderson powerpole connectors at each boat session that comes apart so the boat can still be fully disassembled.
3. While not specific to the boat. I just ordered the Tenergy High Precision Watt Meter & Power Analyzer and the K-Pump Kwik Check Pressure Gauge from Amazon. The inline power meter(that I plan to mount next to motor on Nate’s rig) not only displays current draw and voltage, but it also tells you(in either Amp hours or Watt hours) the amount of power you have used. I ordered the Pressure Gauge because it is compatible with the Halkey-Roberts valve on the Colorado XT and being fearful of over inflating without a Gauge, I’m sure my pontoons were underinflated the times I’ve taken it out.
Comments quesions?
wo5m
I know this video is several years old. But how did it work out?
Eric,
That’s a legitimate question. This has worked out quite well. I did use PVC glue to to hold it firm. I also ended up using zip ties instead of bungee cords to hold it in place. Overall, it’s still going strong. Other people have modified the design a bit to fit their needs as well, but the core remains consistent and solid.
@@nated2951 Thanks! Did you even end up putting a solid piece on the backside of the motor mount?
Eric,
I initially thought I would need some sort of back plate for the motor, but as it turns out, as long as I have it clamped tightly, I don’t need one.
@@nated2951 Thanks
Hey Nate, first off thank you for this awesome tutorial, I'm about to go outside and assemble this trolling motor mount right now. I have a question about this toon, do you happen to know what the differences are between the Colorado XT and the XTS are? if it's just the swivel seat then I was able to upgrade mine to an XTS for $7.00 lol. Anyhow thank you for this and I'll post a video of my maiden voyage.
Hey Ramon, I had the same question before I bought mine. After doing my research I discovered only two differences the swivel seat and that the boat is blue. I ordered the Green Colorado XT from Walmart online for $499 and added the swivel seat as you suggested. At the time the Colorado XTS was $667.93(now its on sale for $600). While I like the blue color I don't think any color is with $161 or 32% the price Colorado XT. Even at the current price of $600 I still don't think it worth it. Now all that said, the Classic Accessories Oswego Boat is one I would have jumped on if it still was available, but it was discontinued last year. It was the next step up from the Colorado XT. From what I understand it had the same frame and parts as the Colorado XT, but came with red 10' pontoons vs the 9' with Colorado XT. I wanted it just for the extra weight capacity.
Yes I got mine for $479 from Cabela's, with the front trolling motor mods, battery, trolling motor and modifying the single wheel to a dual wheel, I'm at about what it would've cost me to get the XTS at Bass Pro Shop. I absolutely love this thing, I added some rod holders but they ended up being on the way, the only problem I had was with that single transport wheel making it difficult to maneuver to the bank so I purchased a steel rod and two new wheels and now with the two wheels set 2' apart it is so much easier to move.
how is this set up workin vs the version 1?
do you think the Roanoke could hand this ?
handle %
Just wanted to confirm that this works like a charm in the lake. For me and it could be just the PVC parts I bought, I do suggest gluing all parts. The bottom brace did fall out the final trip in. But, I did just for extra support put 100 mile hour tape on it for an extra support. So didn't lose any parts. However, the front mount driving with Nate D's design worked awesome! Saves on the back twisting around all day. Lastly you will need to drive your motor in reverse unless there's a way to turn the hand around to face the same direction as the blades. Over all A+ design. Well done Nate.
GreedeeVids thank you for the feedback. I’m delighted to know this is working for you. As far as driving in reverse, on my Minnkota, there is a little bolt just below the head of the trolling motor, at the top of the neck. I just pulled that out, twisted the neck 180 degrees, and put the bolt back in (you may need to move the cables a tiny bit). No need to run in reverse anymore! I ran it this way for years without issue. I may be able to do a quick video on this if you need further clarification on it.
@@nated2951 Thank you sir, I'll give it a shot tonight. I even pointed a fisherman towards your video and gave you credit on the lake when a guy commented on how cool of an idea this was. I said Nate D and front motor mount on youtube for it. He even gave exact measurements and amount of parts to make. Great guide sir.
Thanks a lot dude! Now I just got ate by a shark because you told me to build it like this.
Yeah, but DUDE! You know chicks dig scars. Just imagine how much they dig somebody who got entirely EATEN by a FREAKIN SHARK! (With laserbeams on it’s head) As recompense, I will refund the cost of your watching my video (in 331 annual installments in the form of UA-cam ad skip credits). Let me know if you end up surviving. I’m sure you will have a hell of a story. Thanks for checking in! 👍
Nate,
Thanks for replying! After paying closer attention to the video and using some commonsense, I figured it out. The entire thing has been painted and installed!
Bad news is I can't go to the lake tomorrow because I forgot about my daughter's parent teacher conference.
So I will update later when I get it on the water. Thanks again!
I love this video. I have the Roanoke so I had to make a couple of modifications. I wanted to add photo's to this post for other Roanoke owners but can't for some reason. I have a couple suggestions/recommendations. First, in the video you say the front isn't ideal for rod holders. The holes work great for me. I can actually hold three rods and a net (or 4 rods). Second, you said you didn't want to drill holes so you purchased the four way connector. I decided to drill and really like it better I think. I used a one inch hole saw and it's a fairly tight fit. Finally, I did glue the four joints you recommended. I think for the piece of mind that I'm going to figure out a way to use tie straps, rope or some other method to secure everything horizontally and vertically just for extra measure. I also spent the couple extra bucks and spray painted it black. Great job with the video and thanks.
Rick McLatchie Thank you for the kind words, and much thanks for providing the additional insight. I'm very happy to know that this helped you a bit with your setup. I imagine your tips will help others with their rigs as well. I would love to see a photo or video of your setup sometime. Also take a look at some of the other mods out there. This design is pretty basic. Other people have taken it and done much more impressive modifications.
Happy fishing!
- Nate
Even with my laptop all the way up, could hardly hear you.
Dennis Roberts that's okay. I rarely say anything worth listening to. My apologies for the poor sound quality. Home Depot was noisy, and it was windy outside that day.
Its now great, I used headphones instead of my funky laptop. Got all the stuff now headed for my garage and build it! Thanks so much for your clear instructions.....Dennis from VT.
uhhh ummm uhhhh ummmm