Frigidaire Dryer Disassembly - Dryer Repair Help

Вставка
- Опубліковано 25 сер 2024
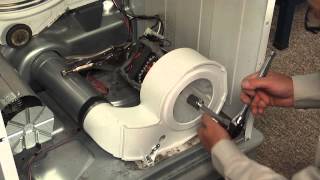
- Repairing a Frigidaire dryer? This video demonstrates the proper and safe way to disassemble a dryer and how to access parts that may need to be tested and/or replaced.
Here is a list of the most common dryer problems:
Dryer won't start
Dryer stops turning during cycle
Dryer won't turn at all
Dryer takes too long
Dryer is too hot
Dryer won't stop
Dryer doesn't heat
Dryer trips breaker
Dryer makes noise
Click here to purchase replacement dryer parts:
www.repairclini...
Additional dryer repair, troubleshooting tips, help with finding your model number and part replacement videos can be found on our website:
www.repairclini...
Tools needed: screwdriver
Connect With Us!
plus.google.co...
/ repairclinic
/ repairclinic
/ repairclinic
Join our free VIP email list for discounts and money-saving tips: tinyurl.com/pnn...
Check out our blog: www.DIY.RepairC...
Don't forget to like and comment on this video, and subscribe to our channel!


I wish I had looked a little further because I didn’t find a video that had my dryer so I felt uncomfortable opening the dryer from the videos I did watch. After watching the repair man open my dryer, I realized I could do the repair myself. Thankfully, he didn’t have the belt that fit so I went to my local appliance repair shop and bought the manufacturer’s belt and had it on in 2 minutes. The repair man didn’t disconnect the control panel. He just opened up the front panel and swung it to the side like a door. I did the same thing when he left and now this SAHM can do laundry again. Never have been so happy for the privilege to do laundry in my own home. Hallelujah!
You helped me save my mother's dryer for mother's Day 😁! Thank you so much for your videos
You're welcome!
We are always happy to help. If you would like to give us a review on Google, we would much appreciate it: g.page/r/CcVUrahZNozMEBM/review
We hope that you have a great day!
I have a 20+ year old dryer which started making the worst screeching sound. Turns out it needed the bearing to be replaced. I ordered a bearing replacement kit from AppliancePartsPro but could not get the front-off. I found this video which showed me what to do and it worked perfectly. The repair took longer than expected - nearly 3 hours, but what do you expect for a 20+ year older dryer. Some of us still like to fix things for a fraction of the cost vs. just throwing everything out and getting an overpriced replacement. Thanks for the video!
You're welcome!
We are always happy to help. If you would like to give us a review on Google, we would much appreciate it: g.page/r/CcVUrahZNozMEBM/review
We hope that you have a great day!
Usually the new ones don't last nearly as long either!!
I'd like to thank you for this video, it has thus far been one of the most useful UA-cam videos (for me at least). Thanks to you I was able to save myself hundreds of dollars in repair fees; and not to mention that I completely impressed my husband doing it myself!! I cannot express my thanks enough!!! Now i'm going to use the money I saved to buy me a new purse!!
In case you missed it: ua-cam.com/video/Qg1W9RrxXLY/v-deo.html&lc=UgwODkfSCMViGr2Yi7F4AaABAg
Thank you repair clinic. I need to replace the start switch on my full size Kenmore dryer, which is stacked on top of my full size Kenmore washer. The first 45 seconds of the video showed me how to release the dryer lid with a putty knife, so that I could gain access to the backside of the front-mounted controls.
***** We're glad the video was helpful to you!
Wonderful video[s], it helped a lot to replace the bearing (loud annoying squeaking sound) and belt on my 16 year old Frigidaire dryer.
I don't recall if you mentioned it, but caution needs to be taken on that metal as it cut my hand a couple times. The control panel on mine is a bit different, but same result. I took photos along the way, just in case. Other than that, it all worked out great and sounds like a new machine.
Thanks again!
Right on the money. We had a loud dryer due to lint clogging the output. Pulled the front and cleaned out the shoot and blower fan from the front. Works and sounds as smooth as new. Thank you!
Still handy today - Thanks !
You're welcome!
We are always happy to help. If you would like to give us a review on Google, we would much appreciate it: g.page/r/CcVUrahZNozMEBM/review
We hope that you have a great day!
Thank you so much! I seriously Thu k you just saved our house from a fire. This video have me the confidence to unhook and clean out the dryer!!
This is a very good instructional video. Our Kenmore front load dryer (with front controls) was vibrating badly, driving us insane. We pulled the front off and cleaned everything as best we could. Lots of lint everywhere. The vanes of the blower were coated in a film from the use of dryer softener sheets. The chemical melts from the sheets and onto the clothes, making them soft. Some of it goes into the blower housing, to build up on the vanes. This causes them to fall out of balance. I used a long thin screwdriver to break loose the goo and lint trapped in the corners. Vacuumed that out. An old toothbrush worked perfect to remove the buildup from the sides of each vane. (mark one with a Sharpie before you start) Re-vacuumed and also used a nozzle on an air-compressor to really blow it out.
Back together again, it runs as quiet as new.
I also removed the idler pulley from the drive motor, accessed through the rear panel. Added a thin brass washer with some axle grease on the post. Replaced the idler wheel. That reduced the wobble from the worn bushing and helped with the noise.
+Patrick Tylee Thank you for sharing.
This was such a helpful comment. I took mine apart and went to empty the blower and found a fucking sock cap stuck in it.
the sart button wii not turn on tryet
Super helpful!! Was able to follow exact steps to get the drum bearing shaft/mount cleaned up (was stuck and not spinning freely due to accumulated gunk :( ). Thank you!
Thank you Repair Clinic for posting this video. My dryer was letting out a strong burning smell and a bit of smoke. This video helped me disassemble my dryer and clean out all the lint that was in it and causing the problem. Thank goodness I caught the problem in time. Thanks again for this helpful video!!!!
Gerry De La Rosa We are glad we were able to help.
You guys have truly develop with precise material brand model and etc! Job well done 👍🏽
I finally have "all" the parts that I needed to order to fix my "ancient" relic of a gas Frigidaire dryer! I had to watch this video again, because the "door switch" wire cables that hold the front panel on won't let me totally take the front panel off. The wires are somewhat hard to take off just by trying with your fingers. [They make it look so EASY in the video!!] I was already to tackle this beast and then when I lifted the top panel, I discovered the dryer belt was starting to fray. I know that's not good either. Now that the belt has finally arrived, I might "attempt" to tackle this problem child later again during the week, if not the weekend. Trying to fix this dryer is turning out to be a major pain in my life right now! Now I know why repair techs charge the outrageous prices to fix things!! I'm beginning to wonder if I "bit off more than I could chew!" Tell me, repairclinic - am I going to have to remove the dryer drum to get to all these small parts that I have to replace? I'm replacing the ignitor bar, flame sensor switch, belt & the gas solenoid valves. Would really appreciate a reply from you by this weekend. Thanks! Jennie Duncan
Jennie Duncan Once you have the front off most of the parts you mentioned can be replaced with the drum in place. However, if you are replacing the belt you might as well take the drum out so you have room to work since you have to hook up the tension pulley.
Thanks for your reply! Yes, the belt also needs to be replaced, so it looks like the drum will also have to come off! I'm going to have to use some pliers to get the door switch cable wires off. Those won't come off just by using my hands. Like I mentioned earlier, this gas dryer is an ancient relic! I'll touch base with you again & let you know the outcome. Thanks again!
Exactly what I needed! Thanks! This video helped me to fix my problem in less than an hour.
FirstTimeUser.net Awesome! Congrats on the successful repair!
This is exactly what I was looking for. Thank you very much!
Correct machine - looking for instructions related to heat/drum fuse. Interior door light is functioning. Never had a rubber or burning odor.
Great and useful video! follow all the instructions and repair my dryer, replace the belt.Thank you repairclinic!! 🙂👍🏻
Cool thanks!
Thank you repairclinic! Great video. This helped me tremendously!
Rondale Mcneal You are welcome.
Thanks great guide, had a hard time finding something for this model. Turns out I had a lint fire at the bottom of mine. The lint non-trapping feature is definitely a problem in this design. Could have burned my house down.
excellent instructional to take apart and reassemble. i saw what i thought was the problem. heavy lint build up on bearing hitch and cup. cleaned it all out. gave everything a good vaccuum while it was apart. put it back together and still sounds loud and squeaky. any suggestions? everything looked good on the inside. should i grease the bearing hitch?
The access panel on back allows access to what-- are all fuses, high limits, reachable there?
Still super useful ! Thank you very much! !
Your video helped me !!!
That's great! Enjoy the purse!
Thanks for the help!
This video is very helpful. I have done most of this. however I lifted up my dryer and found a black plastic piece that looks very similar to the black plastic feet on the dryer, only it is not one of those. It has a slot on the back of it
I have no clue where it may of come from!
Thank you this helped!
This video is similar to the one that I just watched showing how to replace the igniter unit and the flame sensor unit on my Frigidaire gas dryer. Am I going to have to remove the dryer drum as well, in order to replace these 2 parts I mentioned? I wrote down the part numbers that were shown on your website. For the cost of the parts shown, I think I can attempt to do this repair job myself. I'm pretty handy, so I'm not terribly worried about it. I've already replaced a timer switch on my washing machine last year, so I'm figuring this kind of repair can't be that much more difficult. I'll have to devote a few hours to it. Watching the videos helped, but is there anything like installation directions that come with the parts? I'm a "visual" person, so I need something to reference as I do the replacement job. I'm looking to do this repair soon, as I'm tired of wasting money at the laundromat just to dry my clothes. Looking forward to your reply!! Thanks a lot!
Nice video!
Thank you!
***** You're welcome.
Again, very helpful! We found what parts we needed to order from this, too.
Do you have a disassembly video for the FFRE4120S ?
Any special cautions/instructions for a GAS rather than electric dryer? My control panel also is electronic rather than mechanical as shown here, if that makes any difference. Please advise. Thank you in advance.
Always turn the gas off to the dryer and unplug your dryer before working on it.
Hey I know this video is a bit old, but any suggestion would help. My model is similar to this, except the connector to the door switch is different, and I'm even having trouble with needle nose pliers when trying to press the tabs in to remove the wires. I want to avoid damaging the door switch and save a few bucks if I can.
What's the model # on the dryer with the front panel, pls. I think it is the same as mine but I cannot read the numbers.
Helped more than you know! you named the parts i need also
worked fine thank you! could not get wires to disconnect from door swtch though.
Thanks! Im doing a full maintenance kit on a FDE336RES2 dryer i just bought used. This helped. I do have a question though, I found a broken wire on my timer. timer does not stop. The wire looks like a jumper wire going from R terminal to the terminal below TM. what do the markings mean? Did that wire have a resistor? I saw another wire that does...
Caramel.Pegasus TM probably stands for timer motor. We are not sure about R. Use the wiring diagram within the appliance to be sure you install the wire on the proper terminals.
My drum isn't coming out, like you are showing. It's not sliding forward.
Did you figure it out my dryer is doing the same thing
@@shawnvogt643 yea , just gotta pull up, then out. I just didn't put enough butt into it, LOL
@@wvgrizzly9323 I actually just got it thanks for replying back!!
Thanks for the video!!!
Mine took a lot of upward force to free.
Heating element where is it located
Behind the drum
Moter doesn't engage
Hey, Repair Clinic! May you please give me a favor? May you please make new repair videos about the Frigidaire Affinity dryer, model FARE4044MW?
Bruce Alexander We have a lengthy to-shoot video list already this year but this has been noted.
And wear gloves. As I sit here with my knuckle sliced off (stitches and even got the artery) from rotating the drum.
Didnt help