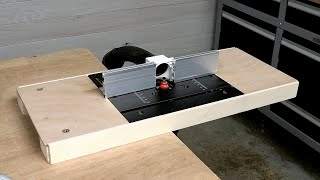
Portable Workshop Improvements / DIY Table Saw Rip Fence

Вставка
- Опубліковано 30 вер 2024
- After a few years using the Portable Workshop I’ve spotted a few problems, as well as accessories that could use some improvement.
I’m going to try and show how to fix them in a series of four videos. In this first article I’ll show you how to improve the fence.
DIY Table Saw Fence Plans: bit.ly/3CjPugr
DIY Portable Workshop Plans: bit.ly/36iYmTp
Blog Article: bit.ly/3RVVbX6
Portable Workshop Playlist: bit.ly/3qfnSlQ
Where to obtain materials and tools that I use:
Multi-Function Workbench Plans: bit.ly/39eKtrr
Band Saw Plans: bit.ly/2JisRjf
Workbench Accessories: bit.ly/2OSNcKu
Follow:
/ paosonwoodwork
/ paoson_woodworking
/ paoson_woodworking
#woodworking #tablesaw #fence #diy


You do have to spend some time setting the saw up... blade, fence, etc. But once done, the saw is great. Fairly compact which is Nice ua-cam.com/users/postUgkxXh-4_3-ZT1fFWP91ZV7iVqzElr0lEb-a I did get an Incra Miter Gauge which takes some setup as well. The stock miter gauge can be adjusted in the miter slot with a little painter's tape... this tightens up the side to side play a lot.
DIY Portable Workshop Plans: bit.ly/36iYmTp
DIY Table Saw Fence Plans: bit.ly/3CjPugr
It may be better to mark the tooth from 1st measurement and turn it to other side for 2nd measurement while calibrating saw. Then any wobble or slight bend in blade wont influence the result.
Greetings from the One Handed Maker.
I just found your channel and have subscribed.
Great idea and great video.
Nice job Suso! Thanks for always sharing with us!💖👍😎JP
As cool as this is, that "table saw" scares the shit out of me.
Of all the things, replacing that with a SawStop would be all I can think of.
This is awesome. I wish I hadn't bought a table saw. This would be fun to build.
Awesome improvements! I simply wish the fence was a T-square, can't wait for the other improvements!
Me encanta verte trabajar y tus proyectos !!.. Los planos de la mesa ya los tenga.. asi que ya tengo para mejorarla, Mil gracias por enseñarnos tus trabajos
Great as usual, thanks for sharing your ideas!
Excelente tutorial, la perfección y los ajustes elevados al máximo nivel, gracias por compartir sus conocimientos y experiencias, un saludo cordial y por supuesto un gran like desde Narón (Galicia) 🔝💦
gracias compañeiro!
Tolle Entwicklung und Idee, bin 100% Fan Deiner Produkte. Saubere und präzise Arbeiten für jeden Nachvollziehbar. Danke, ich bleib dabei.
Vielen Dank!
Just gets better and better.
Literally.
Fabuloso !! como todos los videos de tu canal. Te considero un autentico referente en el mundo de la carpinteria. Mis mas sinceras felicitaciones por tu trabajo. Me preguntaba si cabe la posibilidad de incuir el español en los subtitulos, en mi caso no domino mucho el ingles y, sinceramente, me pierdo ! ......no conozco mucho el mundo de UA-cam y desconozco si hay que pagar por ello, o algo similar.......y repito : felicidades !!
gracias por tus amables palabras Pep! Creo que esto te va a gustar. Los vídeos van con algo de retraso pero espero poder subirlos todos para ayudar a gente que está en tu misma situación: ua-cam.com/channels/QUXvKDSkQSCKkv4Phyhebg.html
@@Paoson_Woodworking ......muchas gracias a ti por tu respuesta !!
Carriage bolt, not mushroom bolt
What is the name of the program you use to do 3D modeling?
AutoCad and SketchUp: www.paoson.com/blog/en/sketchup-tutorial-beginners-n36/
Скажите пожалуйста , какой материал и из чего вы клеили на фанеру , которую фиксировали струбцинами ? За ранее спасибо !!!
Hi I'm currently building your mobile tablesaw and router table bench, would you use this fence for that table too, or stick with the existing one?
hi! I would use the one that comes standard with the bench saw
@@Paoson_Woodworking ok thanks! one other question...do you know for the sliding carriage on the tablesaw workbench, is there a way to get a cast iron or aluminium surface instead of the plywood or melamine?
@@oitoitoi1 cast iron seems too heavy for this design, better go for aluminum. I'm not sure where you could find it, in some industrial factory I suppose!
@@Paoson_Woodworking thanks, I'll take a look!
❤❤❤🎉🎉🎉
Amazing skill
Awesome genuine genius
Спасибо! Много полезных идей в одном видео. Великолепный результат.
The best makers in the world!!! 😎
thanks mate!
Incredible
Nice job!
Good job!
Cuanto es el valor de esta máquina, gracias.
Very nice. Thanks for the update.
Planlara nasıl ulaşabiliriz acaba gerçekten emeğinize sağlık
link in video description
Excelente trabajo 👏🏻👏🏻👏🏻👏🏻
The main problem is it seem to be really hard and exspensive to find birch or any plywood good enough for constructions like this. I am also concerned about the strenght/safety when putting screws in the sides of the plywood
If you’re not sure about the strength of the screw hole, get either a pipette or a syringe water down the wood glue 50:50 with warm water, drill small guide hole and use the glue to inject it into. The glue will permeate any vulnerable places and reinforce the fibres, particularly effective with MDF and particle board. Good luck.
Outstanding as always, Suso! Unquestionably the best DIY rip fence design available. The one minor improvement I’d make is to put the cursor window (and of course the measuring tape) facing upward so you don’t have to kneel or bend way over to line it up. (I realize you had the scale on the front rather than the top of the original design, of course.) Looking forward to the next video!
you are right Donny! I had thought about it but without a dedicated profile for the fence it is complicated. I don't like the measuring tape on the top of the table with this design. The other problem is not being able to remove the fence without going through one of the sides, but it is a simple design!
@@Paoson_Woodworking Good point. I can see where it might complicate things. You could maybe hang the cursor off the back side of the fence (the measuring tape offset accordingly) to keep things simple… or even put it on the inside of the fence. Might be a little tricky to read it there due to shadows but you could add a little LED to light it up. Then you’d have the world’s first battery powered rip fence! 😁
@@Paoson_Woodworking Routing a groove on the top surface and moving the curson on top? :)
@@Paoson_Woodworking What if the front of the fence was a little thicker (tiny box) so you can put a mirror inside at 45º? Then the ruler can be on the front, but you can read it from the top.
👍👍👍👍👍
👍👍👍💯
How dangerous? Very poor example of Health & Safety!
Well, safety comes after you Made Money. I'm not rich, so a sawstop isnt afordable
so well done!
👍👍👍